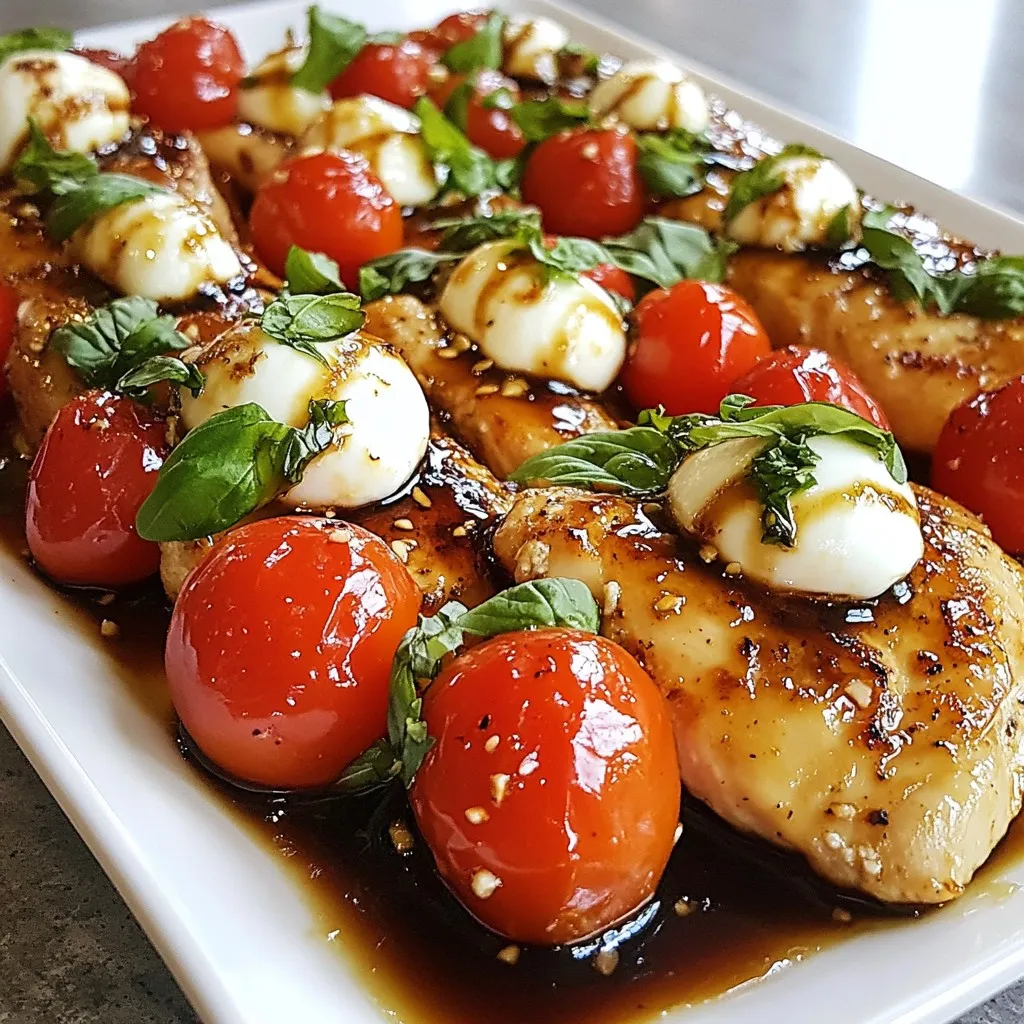
Looking for a delicious dinner that’s easy to make? Try my Balsamic Glazed Caprese Chicken! This dish bursts with flavor from juicy chicken, fresh basil, and creamy mozzarella, all drizzled with a tangy balsamic glaze. Whether you’re cooking for a family or impressing friends, this recipe will be a hit. Let’s dive into the easy steps and tips to make this delightful dish shine on your dinner table!
Why I Love This Recipe
- Flavorful Combination: The rich balsamic glaze paired with fresh mozzarella and juicy tomatoes creates an explosion of flavors that is both satisfying and refreshing.
- Quick and Easy: With a total cooking time of just 30 minutes, this recipe is perfect for busy weeknights while still feeling gourmet.
- Healthy Ingredients: Using lean chicken breasts and fresh vegetables makes this dish a nutritious option without sacrificing taste.
- Beautiful Presentation: The vibrant colors of the ingredients make for an eye-catching dish that is sure to impress guests at any gathering.
Ingredients
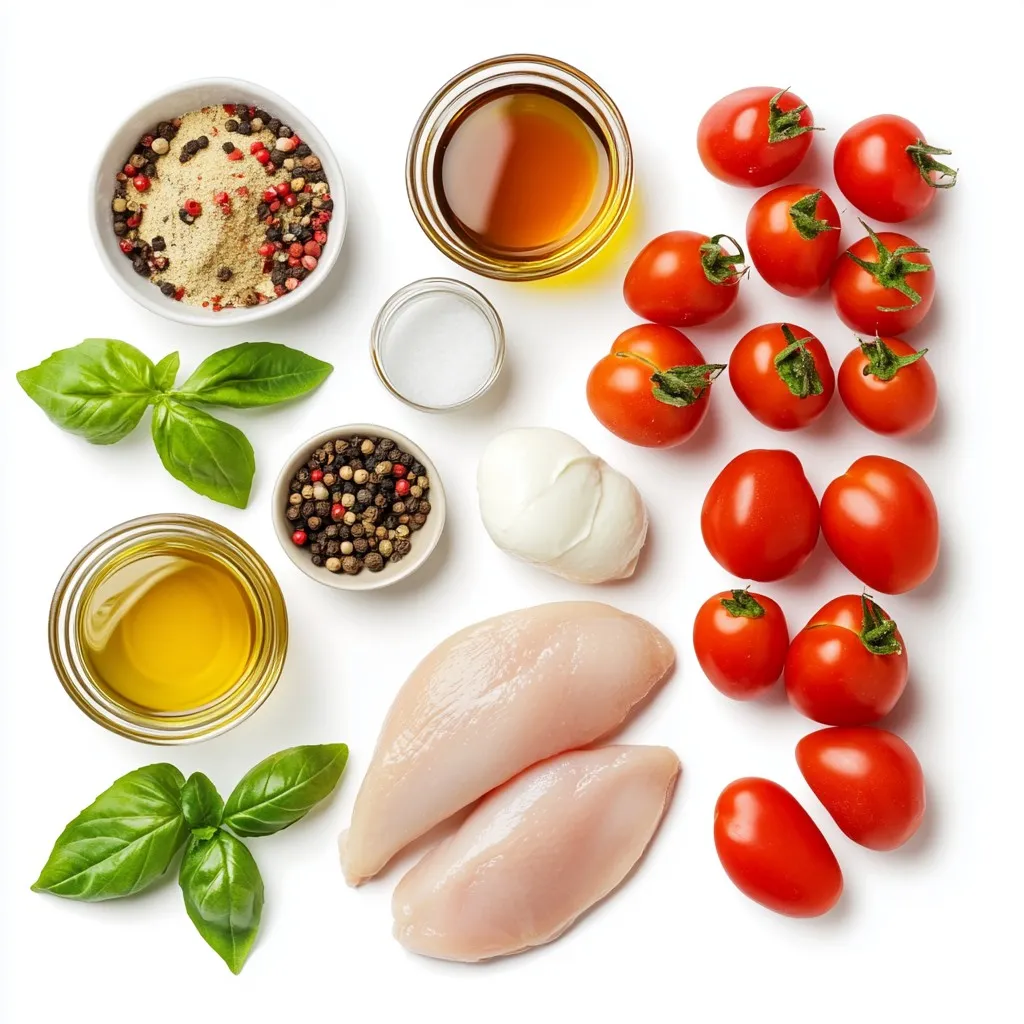
List of Ingredients
– 4 boneless, skinless chicken breasts
– 1 cup cherry tomatoes, halved
– 1 cup fresh mozzarella balls (bocconcini)
– 1/4 cup fresh basil leaves, finely sliced
– 1/2 cup balsamic vinegar
– 2 tablespoons honey
– 2 tablespoons extra virgin olive oil
– Salt and freshly ground black pepper to taste
– 1 teaspoon garlic powder
– 1 teaspoon onion powder
Optional Add-ins
You can add more veggies to boost flavor and nutrition. Consider these options:
– Spinach or arugula for a fresh touch
– Bell peppers for sweetness
– Avocado for creaminess
Substitutions for Ingredients
If you can’t find certain items, don’t worry! Here are some easy swaps:
– Chicken thighs instead of breasts for juiciness
– Grape tomatoes instead of cherry tomatoes
– Goat cheese or feta instead of mozzarella
– Maple syrup instead of honey for sweetness
Step-by-Step Instructions
Preparing the Chicken
Start by seasoning each chicken breast. Use salt, freshly ground black pepper, garlic powder, and onion powder. This adds great flavor. Make sure to coat both sides well. Set the seasoned chicken aside while you heat your pan.
Searing the Chicken
Heat a large skillet over medium-high heat. Pour in the extra virgin olive oil. Wait until the oil shimmers, then add the chicken breasts. Sear them for about 6-7 minutes on each side. You want a golden-brown crust. Check that the chicken reaches 165°F (75°C) inside. Once done, take the chicken out and keep it warm on a plate.
Making the Balsamic Glaze
In the same skillet, pour in the balsamic vinegar and honey. Stir gently to mix. Bring this mixture to a gentle simmer over medium heat. Cook it for about 5-7 minutes. Stir occasionally. The glaze will thicken and become syrupy.
Combining Ingredients and Glazing Chicken
Reduce the heat to low. Add the halved cherry tomatoes and fresh mozzarella balls to the skillet. Toss these gently in the glaze. Cook for an extra 2-3 minutes. You want the tomatoes to soften and the mozzarella to melt a bit. This creates a lovely blend of textures.
Finishing Touches
Return the cooked chicken to the skillet. Spoon the balsamic glaze over each piece. Let it warm together for about one minute. Remove from heat and sprinkle the fresh basil on top. This adds a bright, fresh scent and flavor.
For a beautiful presentation, serve the chicken on a large platter. Spoon the tomato and mozzarella mix over the chicken. Garnish with more basil and drizzle any remaining glaze on top. Enjoy this delightful dinner!
Tips & Tricks
Cooking Tips for Perfect Chicken
To make the best chicken, start with good seasoning. Use salt, pepper, garlic powder, and onion powder. This mix gives the chicken a tasty kick. Always let your skillet heat well before adding the chicken. I recommend about 6-7 minutes on each side. This timing helps create a nice golden crust. Check the internal temperature to ensure it reaches 165°F (75°C). This step keeps your chicken juicy and safe to eat.
How to Achieve the Best Balsamic Glaze
To create the perfect balsamic glaze, use high-quality balsamic vinegar. Mix it with honey in the same skillet you used for the chicken. This adds flavor from the chicken drippings. Bring the mixture to a gentle simmer. Stir occasionally and let it cook for 5-7 minutes. You want it to thicken and become syrupy. This glaze adds a sweet and tangy finish to the dish.
Presentation Tips
For a stunning presentation, use a large serving platter. Place the glazed chicken in the center. Spoon the roasted tomatoes and mozzarella over the top. This adds color and texture. Garnish with fresh basil leaves for a vibrant look. Drizzle any remaining balsamic glaze on top for that extra flair. A beautiful plate makes every meal more enjoyable.
Pro Tips
- Rest the Chicken: After cooking, let the chicken rest for a few minutes before slicing. This allows the juices to redistribute, keeping the meat moist and flavorful.
- Use Quality Balsamic: Select a high-quality balsamic vinegar for the glaze. It will enhance the flavor and add depth to the dish.
- Fresh Ingredients Matter: Opt for fresh mozzarella and ripe cherry tomatoes for the best taste and texture. Fresh ingredients elevate the overall dish.
- Customize the Glaze: Feel free to add herbs or spices to the balsamic glaze for a personalized touch. Thyme or oregano can complement the flavors beautifully.
Variations
Vegetarian Option
You can make this dish vegetarian. Swap out the chicken for thick slices of eggplant or zucchini. Grill or roast the veggies until tender. This gives you a great base. The balsamic glaze and toppings work well with these veggies. You’ll still enjoy the same rich flavors.
Using Different Cheeses
Fresh mozzarella is classic, but you can switch it up. Try feta cheese for a tangy kick. Goat cheese also adds a creamy texture and flavor. If you want something sharp, use aged cheddar. Each cheese brings a new taste. Experiment to find your favorite!
Flavor Enhancements
Want to add more flavor? Try adding some red pepper flakes for heat. Fresh herbs like thyme or oregano can boost the dish too. A splash of lemon juice adds brightness. You can also try a dash of balsamic reduction for a sweeter touch. These small tweaks can really elevate your meal!
Storage Info
How to Store Leftovers
Store any leftover balsamic glazed caprese chicken in an airtight container. Make sure to cool the chicken to room temperature first. This way, it stays fresh longer. Place it in the fridge. It will last for about 3 to 4 days. If you want to keep it longer, consider freezing.
Reheating Instructions
To reheat, take the leftovers out of the fridge. You can warm them in the oven or microwave. For the oven, preheat it to 350°F (175°C). Place the chicken in a baking dish, cover it with foil, and heat for about 15-20 minutes. For the microwave, heat on medium power for 1-2 minutes at a time until warmed through.
Freezing Options
You can freeze balsamic glazed caprese chicken for up to three months. Wrap each piece tightly in plastic wrap, then place them in a freezer-safe bag. Label the bag with the date. When you’re ready to eat, thaw in the fridge overnight. After thawing, reheat as described above. This keeps the flavors intact and makes for an easy meal later.
FAQs
What is Balsamic Glazed Caprese Chicken?
Balsamic Glazed Caprese Chicken is a tasty dish. It features chicken breasts topped with a sweet and tangy balsamic glaze. The glaze comes from balsamic vinegar and honey. Cherry tomatoes and fresh mozzarella add color and flavor. Basil gives it a fresh finish. This dish is simple yet elegant, perfect for any dinner.
Can I use chicken thighs instead of breasts?
Yes, you can use chicken thighs. They add a rich flavor and are juicier than breasts. Cook them the same way as breasts. Make sure they reach an internal temperature of 165°F (75°C). Adjust cooking time slightly if needed, as thighs may take longer to cook.
How can I make it spicier?
To add some heat, try these options:
– Red pepper flakes: Sprinkle them in the balsamic glaze.
– Hot sauce: Mix a few drops into the glaze.
– Spicy seasonings: Use a spicy chicken rub instead of regular seasonings.
These additions will give your dish a nice kick without overpowering the flavors.
What goes well with this dish?
Balsamic Glazed Caprese Chicken pairs well with:
– Garlic bread: A great side for soaking up the glaze.
– Salad: A fresh green salad adds crunch and balance.
– Rice or quinoa: These grains can help absorb flavors.
– Pasta: A light pasta dish can complement the meal nicely.
These sides will make your dinner even more enjoyable.
This article covers how to make a delicious Balsamic Glazed Caprese Chicken. We looked at the needed ingredients, optional add-ins, and substitutions. The step-by-step instructions showed how to prepare and sear the chicken, make the glaze, and combine it all for a tasty finish. I shared tips for perfect cooking and presentation. For fun, we explored variations like vegetarian options and flavor boosts. Finally, we discussed storage and reheating methods. Try this recipe and enjoy a fantastic meal that fits many tastes. You’ll impress your guests with your cooking skill


