Baked Pesto Chicken Thighs Juicy and Flavorful Dish
. 1. Preheating the oven: Start by setting your oven to 400°F (200°C). This heat helps the chicken cook evenly and ensures a crispy skin. 2. Drying the chicken thighs: Use paper towels to pat the chicken thighs dry. Getting rid of moisture is key for that nice, crispy texture. 1. Mixing seasoning and applying to chicken: In a bowl, mix olive oil, garlic powder, dried oregano, salt, and black pepper. Rub this mix all over the chicken thighs. Be sure to coat them well for great flavor. 2. Layering the pesto: Take your basil pesto and spoon a good amount onto each thigh. Make sure each piece is coated well for the best taste. 1. Arranging chicken in the baking dish: Place the chicken thighs skin-side up in a baking dish. Scatter halved cherry tomatoes around the chicken. Their juices will add even more flavor. 2. Baking time and checking doneness: Put the dish in the oven. Bake for about 35-40 minutes. Check that the juices run clear and the thickest part of the thigh reads 165°F (74°C) on a meat thermometer. This step-by-step guide will help you create the best Baked Pesto Chicken Thighs. For the full recipe, check out the earlier section. To get crispy skin on your baked pesto chicken thighs, start by patting the chicken dry with paper towels. This step removes extra moisture, helping the skin crisp up nicely. Next, set your oven to 400°F (200°C). This temperature is key for cooking the chicken evenly while also achieving that perfect crispy finish. Mix your basil pesto with a teaspoon of olive oil if it feels thick. This makes it easier to coat the chicken thighs evenly. A good layer of pesto adds rich flavor to each bite. For a fresh touch, use herbs like basil or parsley to garnish the dish. They add color and a bright flavor. Serve your baked pesto chicken thighs on a large platter. Drizzle any juices from the baking dish over the chicken. Scatter the halved cherry tomatoes around for a colorful look. Pair this dish with a fresh salad or fluffy rice. Both sides complement the chicken well and make for a complete meal. For the full recipe, check out the details above. {{image_4}} You can use chicken breast instead of thighs. Chicken breasts are lean and cook faster. They will still soak up the pesto flavor. For a twist, try turkey. Turkey thighs or breasts work well too. They add a different taste while keeping it juicy. Experiment with homemade pesto. You can make it from sun-dried tomatoes or spinach. Both options give a unique flavor. If you like heat, add red pepper flakes. Just a pinch can spice things up without being too hot. This recipe can fit gluten-free diets. Just check that the pesto is gluten-free. Use gluten-free pasta or a side dish to complete the meal. For those avoiding dairy, choose dairy-free cheese. Many brands offer great options that melt well. Feel free to explore these variations to make your Baked Pesto Chicken Thighs even more exciting. For the full details on the base recipe, check the Full Recipe section. To store leftovers properly, let the chicken cool first. Place the chicken thighs in an airtight container. This will keep them fresh longer. I recommend using glass or BPA-free plastic. These containers seal well and prevent spills. You can freeze baked chicken thighs for later use. To do this, wrap each thigh in plastic wrap. Then, place them in a freezer bag. Remove as much air as possible before sealing. When you’re ready to eat, thaw the chicken overnight in the fridge. Reheat it in the oven at 350°F (175°C) until hot. In the fridge, baked pesto chicken thighs last about 3-4 days. Keep an eye on them. If you see any off-smells or discoloration, discard them right away. These signs mean the chicken is spoiled. Enjoy your meal with peace of mind by storing it properly. For the full recipe, check back to make this tasty dish! Bake chicken thighs for about 35 to 40 minutes. This time gives you juicy meat and crispy skin. Check the chicken at 35 minutes to see if it's done. The juices should run clear. If you have a meat thermometer, insert it in the thickest part. It should read 165°F (74°C). This temperature ensures the chicken is safe to eat. Yes, you can prep this dish ahead of time. Season the chicken and coat it with pesto. Place it in your baking dish and cover it. Store it in the fridge for up to 24 hours. When you're ready to cook, just bake it as directed. This makes meal prep easy and quick. Chicken should reach a safe cooking temperature of 165°F (74°C). This temperature kills harmful bacteria. Use a meat thermometer for the most accurate reading. Insert it into the thickest part of the thigh. Once it hits 165°F, your chicken is safe and ready to eat. This post covered juicy chicken thighs baked with pesto and cherry tomatoes. You learned about the key ingredients, seasoning, and steps to prepare this dish. I shared tips to achieve crispy skin and suggestions for variations. Storing leftovers and meal prep were also discussed. Incorporate these ideas in your cooking. Enjoy the flavors and share with others. Your kitchen is now ready for this tasty meal!](https://goldendishy.com/wp-content/uploads/2025/06/60e55a10-6222-4f06-b0be-30d915c75343.webp)
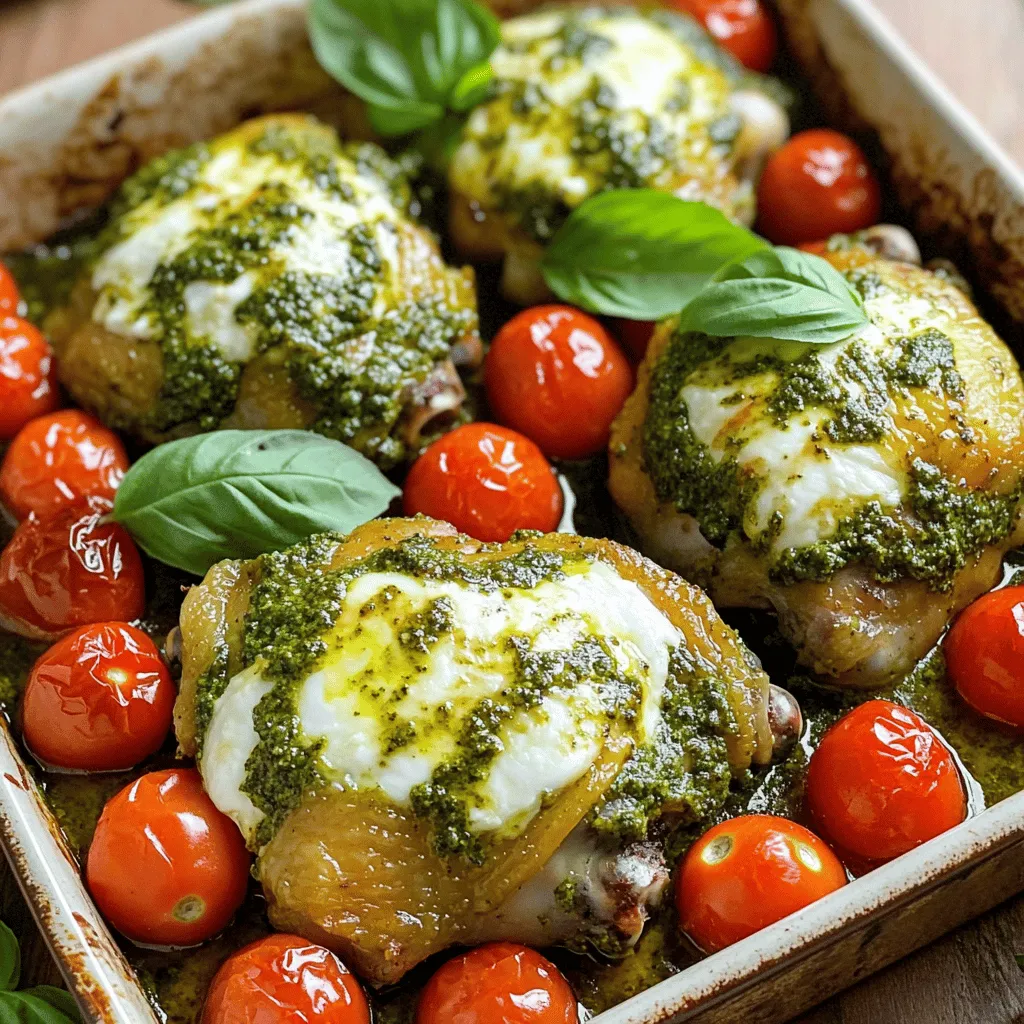
If you crave a dish that bursts with flavor and keeps juices locked in, look no further than Baked Pesto Chicken Thighs. This easy recipe combines tender chicken, rich basil pesto, and juicy cherry tomatoes for a meal that delights the senses. I’ll share my simple steps, including tips for golden, crispy skin, so you can impress your friends and family with this juicy dinner. Ready to dive in? Let’s get cooking!
Ingredients
Main Ingredients
– Chicken thighs, skin-on and bone-in
– Basil pesto (store-bought or homemade)
– Cherry tomatoes
Seasoning Ingredients
– Extra virgin olive oil
– Garlic powder
– Dried oregano
– Salt and black pepper
Garnish
– Shredded mozzarella cheese
– Fresh basil leaves
When I make baked pesto chicken thighs, I focus on fresh and simple ingredients. The chicken thighs provide juicy, tender meat. I prefer skin-on and bone-in for the best flavor and texture. The basil pesto adds a burst of herb taste, and you can use store-bought or homemade. Cherry tomatoes bring a sweet touch that pairs well with the chicken.
For seasoning, I use extra virgin olive oil to keep things moist. Garlic powder gives a nice kick, and dried oregano adds depth. Don’t forget to season with salt and black pepper to enhance all the flavors.
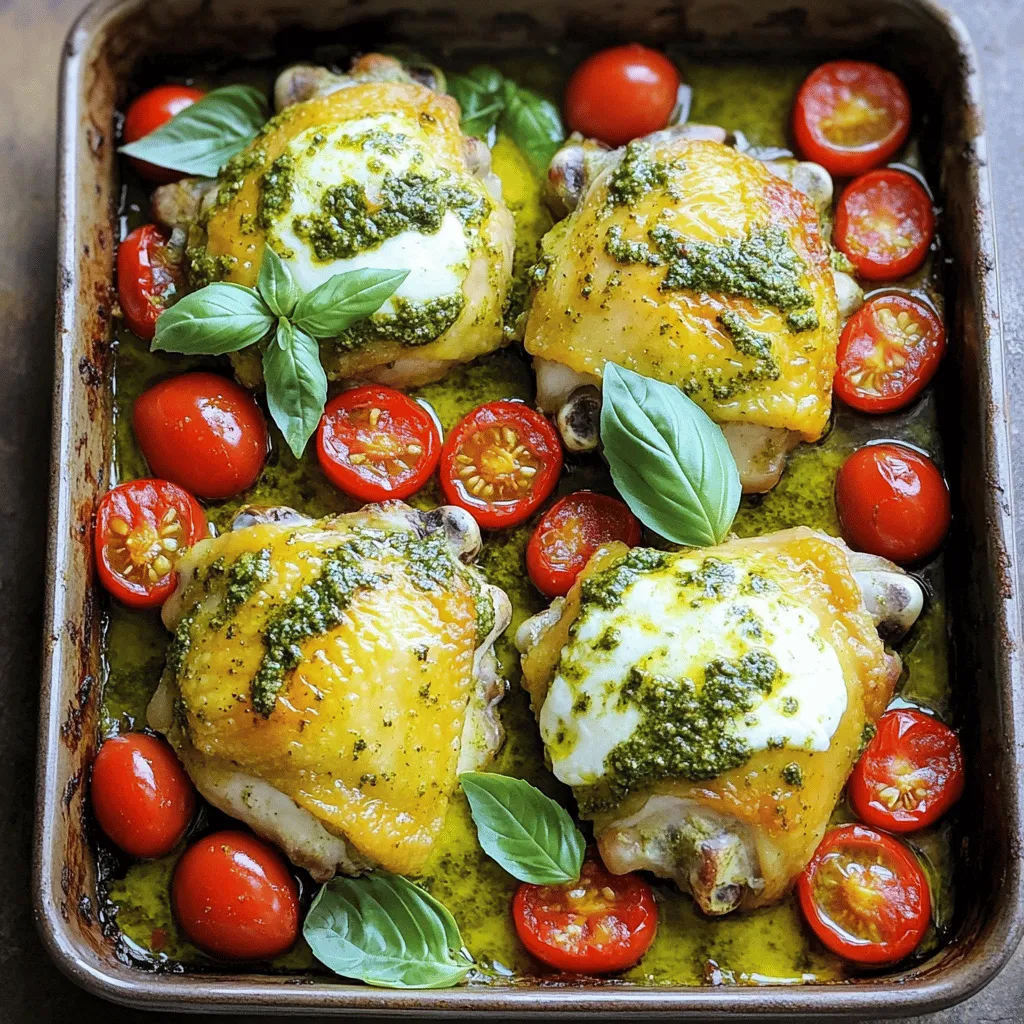
Finally, I like to top my dish with shredded mozzarella cheese. It melts beautifully and creates a rich, creamy layer. Fresh basil leaves serve as a lovely garnish and add a pop of color.
Step-by-Step Instructions
Preparation Steps
1. Preheating the oven: Start by setting your oven to 400°F (200°C). This heat helps the chicken cook evenly and ensures a crispy skin.
2. Drying the chicken thighs: Use paper towels to pat the chicken thighs dry. Getting rid of moisture is key for that nice, crispy texture.
Seasoning and Coating
1. Mixing seasoning and applying to chicken: In a bowl, mix olive oil, garlic powder, dried oregano, salt, and black pepper. Rub this mix all over the chicken thighs. Be sure to coat them well for great flavor.
2. Layering the pesto: Take your basil pesto and spoon a good amount onto each thigh. Make sure each piece is coated well for the best taste.
Baking Process
1. Arranging chicken in the baking dish: Place the chicken thighs skin-side up in a baking dish. Scatter halved cherry tomatoes around the chicken. Their juices will add even more flavor.
2. Baking time and checking doneness: Put the dish in the oven. Bake for about 35-40 minutes. Check that the juices run clear and the thickest part of the thigh reads 165°F (74°C) on a meat thermometer.
This step-by-step guide will help you create the best Baked Pesto Chicken Thighs.
Tips & Tricks
Achieving Crispy Skin
To get crispy skin on your baked pesto chicken thighs, start by patting the chicken dry with paper towels. This step removes extra moisture, helping the skin crisp up nicely. Next, set your oven to 400°F (200°C). This temperature is key for cooking the chicken evenly while also achieving that perfect crispy finish.
Flavor Enhancements
Mix your basil pesto with a teaspoon of olive oil if it feels thick. This makes it easier to coat the chicken thighs evenly. A good layer of pesto adds rich flavor to each bite. For a fresh touch, use herbs like basil or parsley to garnish the dish. They add color and a bright flavor.
Serving Suggestions
Serve your baked pesto chicken thighs on a large platter. Drizzle any juices from the baking dish over the chicken. Scatter the halved cherry tomatoes around for a colorful look. Pair this dish with a fresh salad or fluffy rice. Both sides complement the chicken well and make for a complete meal.

Variations
Protein Alternatives
You can use chicken breast instead of thighs. Chicken breasts are lean and cook faster. They will still soak up the pesto flavor. For a twist, try turkey. Turkey thighs or breasts work well too. They add a different taste while keeping it juicy.
Flavor Profile Adjustments
Experiment with homemade pesto. You can make it from sun-dried tomatoes or spinach. Both options give a unique flavor. If you like heat, add red pepper flakes. Just a pinch can spice things up without being too hot.
Dietary Modifications
This recipe can fit gluten-free diets. Just check that the pesto is gluten-free. Use gluten-free pasta or a side dish to complete the meal. For those avoiding dairy, choose dairy-free cheese. Many brands offer great options that melt well.
Feel free to explore these variations to make your Baked Pesto Chicken Thighs even more exciting.
Storage Info
Refrigeration
To store leftovers properly, let the chicken cool first. Place the chicken thighs in an airtight container. This will keep them fresh longer. I recommend using glass or BPA-free plastic. These containers seal well and prevent spills.
Freezing Guidelines
You can freeze baked chicken thighs for later use. To do this, wrap each thigh in plastic wrap. Then, place them in a freezer bag. Remove as much air as possible before sealing. When you’re ready to eat, thaw the chicken overnight in the fridge. Reheat it in the oven at 350°F (175°C) until hot.
Shelf Life
In the fridge, baked pesto chicken thighs last about 3-4 days. Keep an eye on them. If you see any off-smells or discoloration, discard them right away. These signs mean the chicken is spoiled. Enjoy your meal with peace of mind by storing it properly.
FAQs
How long should I bake chicken thighs?
Bake chicken thighs for about 35 to 40 minutes. This time gives you juicy meat and crispy skin. Check the chicken at 35 minutes to see if it’s done. The juices should run clear. If you have a meat thermometer, insert it in the thickest part. It should read 165°F (74°C). This temperature ensures the chicken is safe to eat.
Can I make this recipe ahead of time?
Yes, you can prep this dish ahead of time. Season the chicken and coat it with pesto. Place it in your baking dish and cover it. Store it in the fridge for up to 24 hours. When you’re ready to cook, just bake it as directed. This makes meal prep easy and quick.
What temperature should chicken be cooked to?
Chicken should reach a safe cooking temperature of 165°F (74°C). This temperature kills harmful bacteria. Use a meat thermometer for the most accurate reading. Insert it into the thickest part of the thigh. Once it hits 165°F, your chicken is safe and ready to eat.
This post covered juicy chicken thighs baked with pesto and cherry tomatoes. You learned about the key ingredients, seasoning, and steps to prepare this dish. I shared tips to achieve crispy skin and suggestions for variations. Storing leftovers and meal prep were also discussed.
Incorporate these ideas in your cooking. Enjoy the flavors and share with others. Your kitchen is now ready for this tasty meal!
. 1. Preheating the oven: Start by setting your oven to 400°F (200°C). This heat helps the chicken cook evenly and ensures a crispy skin. 2. Drying the chicken thighs: Use paper towels to pat the chicken thighs dry. Getting rid of moisture is key for that nice, crispy texture. 1. Mixing seasoning and applying to chicken: In a bowl, mix olive oil, garlic powder, dried oregano, salt, and black pepper. Rub this mix all over the chicken thighs. Be sure to coat them well for great flavor. 2. Layering the pesto: Take your basil pesto and spoon a good amount onto each thigh. Make sure each piece is coated well for the best taste. 1. Arranging chicken in the baking dish: Place the chicken thighs skin-side up in a baking dish. Scatter halved cherry tomatoes around the chicken. Their juices will add even more flavor. 2. Baking time and checking doneness: Put the dish in the oven. Bake for about 35-40 minutes. Check that the juices run clear and the thickest part of the thigh reads 165°F (74°C) on a meat thermometer. This step-by-step guide will help you create the best Baked Pesto Chicken Thighs. For the full recipe, check out the earlier section. To get crispy skin on your baked pesto chicken thighs, start by patting the chicken dry with paper towels. This step removes extra moisture, helping the skin crisp up nicely. Next, set your oven to 400°F (200°C). This temperature is key for cooking the chicken evenly while also achieving that perfect crispy finish. Mix your basil pesto with a teaspoon of olive oil if it feels thick. This makes it easier to coat the chicken thighs evenly. A good layer of pesto adds rich flavor to each bite. For a fresh touch, use herbs like basil or parsley to garnish the dish. They add color and a bright flavor. Serve your baked pesto chicken thighs on a large platter. Drizzle any juices from the baking dish over the chicken. Scatter the halved cherry tomatoes around for a colorful look. Pair this dish with a fresh salad or fluffy rice. Both sides complement the chicken well and make for a complete meal. For the full recipe, check out the details above. {{image_4}} You can use chicken breast instead of thighs. Chicken breasts are lean and cook faster. They will still soak up the pesto flavor. For a twist, try turkey. Turkey thighs or breasts work well too. They add a different taste while keeping it juicy. Experiment with homemade pesto. You can make it from sun-dried tomatoes or spinach. Both options give a unique flavor. If you like heat, add red pepper flakes. Just a pinch can spice things up without being too hot. This recipe can fit gluten-free diets. Just check that the pesto is gluten-free. Use gluten-free pasta or a side dish to complete the meal. For those avoiding dairy, choose dairy-free cheese. Many brands offer great options that melt well. Feel free to explore these variations to make your Baked Pesto Chicken Thighs even more exciting. For the full details on the base recipe, check the Full Recipe section. To store leftovers properly, let the chicken cool first. Place the chicken thighs in an airtight container. This will keep them fresh longer. I recommend using glass or BPA-free plastic. These containers seal well and prevent spills. You can freeze baked chicken thighs for later use. To do this, wrap each thigh in plastic wrap. Then, place them in a freezer bag. Remove as much air as possible before sealing. When you’re ready to eat, thaw the chicken overnight in the fridge. Reheat it in the oven at 350°F (175°C) until hot. In the fridge, baked pesto chicken thighs last about 3-4 days. Keep an eye on them. If you see any off-smells or discoloration, discard them right away. These signs mean the chicken is spoiled. Enjoy your meal with peace of mind by storing it properly. For the full recipe, check back to make this tasty dish! Bake chicken thighs for about 35 to 40 minutes. This time gives you juicy meat and crispy skin. Check the chicken at 35 minutes to see if it's done. The juices should run clear. If you have a meat thermometer, insert it in the thickest part. It should read 165°F (74°C). This temperature ensures the chicken is safe to eat. Yes, you can prep this dish ahead of time. Season the chicken and coat it with pesto. Place it in your baking dish and cover it. Store it in the fridge for up to 24 hours. When you're ready to cook, just bake it as directed. This makes meal prep easy and quick. Chicken should reach a safe cooking temperature of 165°F (74°C). This temperature kills harmful bacteria. Use a meat thermometer for the most accurate reading. Insert it into the thickest part of the thigh. Once it hits 165°F, your chicken is safe and ready to eat. This post covered juicy chicken thighs baked with pesto and cherry tomatoes. You learned about the key ingredients, seasoning, and steps to prepare this dish. I shared tips to achieve crispy skin and suggestions for variations. Storing leftovers and meal prep were also discussed. Incorporate these ideas in your cooking. Enjoy the flavors and share with others. Your kitchen is now ready for this tasty meal!](https://goldendishy.com/wp-content/uploads/2025/06/60e55a10-6222-4f06-b0be-30d915c75343-300x300.webp)

![- 2 cups elbow macaroni - 4 cups water - 1 teaspoon salt - 2 tablespoons unsalted butter - 1 cup sharp cheddar cheese, shredded - 1 cup Monterey Jack cheese, shredded - 1/2 cup cream cheese, softened - 1 teaspoon garlic powder - 1 teaspoon onion powder - 1/4 teaspoon black pepper - 1/4 teaspoon smoked paprika - Fresh parsley, chopped - Chives, chopped To make delicious Instant Pot mac and cheese, you need a few key ingredients. First, the elbow macaroni is your base. It holds the sauce well and cooks up perfectly. Water helps cook the pasta and creates steam. The salt adds flavor to the mix. Unsalted butter enriches the dish, making it creamy. Next, the cheese! Cheddar cheese gives that classic flavor, while Monterey Jack adds creaminess. Cream cheese helps bind everything together. For seasonings, garlic powder and onion powder bring depth. Black pepper adds a bit of heat. Smoked paprika gives a nice smoky touch. Finally, if you want to garnish, fresh parsley and chives add color and flavor. These ingredients come together to create a comforting dish that feels like a hug in a bowl. You can find the full recipe [here]. Start by adding the elbow macaroni into the Instant Pot. Next, pour in 4 cups of water. Sprinkle in 1 teaspoon of salt for flavor. Make sure all the macaroni is covered in water. Secure the lid tightly on the Instant Pot. Set the pressure release valve to the sealing position. Select the manual high-pressure setting. Adjust the timer to cook for 4 minutes. When the cooking cycle ends, do a quick pressure release. Carefully turn the valve to venting. Wait until the pressure is fully released. Open the lid slowly, being cautious of steam. Stir the noodles gently to separate any that are stuck together. Add 2 tablespoons of butter right away. Then, mix in 1 cup of sharp cheddar cheese, 1 cup of Monterey Jack cheese, and 1/2 cup of softened cream cheese. Next, add 1 teaspoon of garlic powder, 1 teaspoon of onion powder, 1/4 teaspoon of black pepper, and 1/4 teaspoon of smoked paprika. Stir well until the cheese melts into a creamy sauce. If your mac and cheese is too thick, add a splash of water or milk. Stir until it reaches your desired creamy consistency. Taste your mac and cheese and adjust the seasoning as needed. You can add a pinch more salt or pepper if you want. Serve your dish hot and enjoy the creamy comfort of this Instant Pot mac and cheese. For the full recipe, check the details above. To make your mac and cheese shine, choose a mix of cheeses. I love sharp cheddar for its bold taste and Monterey Jack for creaminess. Together, they create a rich flavor that sings. For a twist, add a bit of gouda or parmesan for depth. Preventing sticking is key. Make sure to stir the pasta before cooking. Adding a touch of oil helps too. This keeps the macaroni from clumping together in the pot. Cook in larger batches to save time. The Instant Pot can handle it! You can double the recipe easily. This way, you have leftovers for quick meals later. Just store them in the fridge. Clean-up can be quick if you act fast. Rinse the pot right after use. Soaking it for a few minutes also helps. Use a soft sponge to keep it scratch-free. For a stunning display, serve your mac and cheese in a beautiful bowl. Top it with extra cheese or crispy breadcrumbs for texture. Fresh herbs like parsley or chives add color and flavor too. Pair your dish with a simple salad or garlic bread. This makes a balanced meal that everyone will enjoy. {{image_4}} You can switch up the cheese for fun. Try using Gouda for a rich taste. It melts well and adds creaminess. Parmesan also works great. It gives a salty, nutty kick. If you're dairy-free, nut cheese is a good choice. It can make your dish creamy while keeping it plant-based. Want to make your mac and cheese more exciting? Add veggies! Broccoli or spinach mixes in nicely. They boost both flavor and nutrition. You can also throw in proteins like chicken or bacon. These ingredients add heartiness and make the dish more filling. If you like heat, spice it up! Add jalapeños for a fresh kick. Hot sauce can also bring the heat. Another fun idea is using smoky chipotle. It gives a deep, smoky flavor that pairs well with cheese. These spicy twists can take your mac and cheese to the next level. For the full recipe, check out the instructions above. Enjoy creating your perfect bowl of mac and cheese! After you make your Instant Pot mac and cheese, let it cool down first. This helps keep the creamy texture. Once cooled, place it in an airtight container. I like to use glass containers for easy reheating. Store it in the fridge for up to three days for the best taste. When it’s time to enjoy those leftovers, you can reheat them in two ways. The microwave is quick and easy. Just place a portion in a bowl and cover it. Heat for one minute, stir, and heat again if needed. The stovetop method keeps the texture nice. Add a splash of milk to a pan, stir in the mac and cheese, and heat on medium until hot. You can freeze mac and cheese for later! Let it cool completely, then spoon it into freezer-safe bags. Press out as much air as possible before sealing. It can stay fresh for about three months. To thaw, move it to the fridge overnight. After thawing, reheat it using the stovetop method for a creamy finish. To make Instant Pot Mac and Cheese, you start by adding elbow macaroni to the pot. Pour in water and add salt. Then, secure the lid and cook on high pressure for 4 minutes. After that, release the pressure quickly. Open the lid and stir the pasta. Add butter and mix in your cheeses. Finally, stir in the seasonings until smooth. You can find the full recipe for more details. Yes, you can use gluten-free macaroni. Just substitute regular pasta with gluten-free options. The cooking time may stay the same, but check the package for specific instructions. Some gluten-free pasta might need a little less time, so watch closely. This way, you can enjoy a creamy dish without gluten. If your mac and cheese is too thick, don’t worry! You can fix it easily. Add a splash of water or milk to the pot. Stir well until it reaches your desired creaminess. If it still seems thick, add a bit more liquid. This will help create that perfect velvety texture. You learned how to make Instant Pot mac and cheese with ease. We covered ingredients, cooking steps, and tips for perfect flavor. You can customize your dish with different cheeses and add-ins. Remember to store leftovers properly to enjoy later. Now it’s your turn to create a creamy, cheesy delight. Experiment with flavors and share your results! Enjoy your cooking journey.](https://goldendishy.com/wp-content/uploads/2025/07/fbbf4859-6ee8-4460-a645-018ee95cc89f-768x768.webp)


![- Bell Peppers: I like using large bell peppers. You can choose any color you like: red, yellow, or green. They all taste great! Make sure they are firm and fresh. Each pepper should hold the stuffing well. - Ground Chicken and Dairy: Ground chicken adds a light flavor. It cooks quickly and blends well with other ingredients. Pair it with shredded cheddar cheese for a creamy touch. The cheese melts beautifully, making the dish extra yummy. - Enhancing Ingredients: I always add cooked rice to the mix. It gives the dish a nice texture. Black beans are great too; they add protein and fiber. Corn brings sweetness and color. Together, these ingredients create a hearty filling. - Essential Spices: Be sure to use chili powder, ground cumin, garlic powder, and onion powder. These spices pack flavor into the filling. A sprinkle of salt and pepper brings everything together. - Optional Garnishes: Fresh cilantro adds a burst of flavor. It makes the dish look more vibrant. You can also use a dollop of sour cream for creaminess. - Recommended Sides: Serve the stuffed peppers with a simple salad. A side of rice or quinoa pairs well too. You can also add some tortilla chips for crunch. - Display Ideas: For a beautiful presentation, place each stuffed pepper on a plate. Drizzle a bit of olive oil on top for shine. Add some chopped cilantro for color. This makes the meal look as good as it tastes! For the complete recipe, check out the Full Recipe. 1. Preheat your oven to 375°F (190°C). This step is key for even cooking. 2. Grab four large bell peppers. Cut off the tops and remove the seeds. Rinse the insides to clean them well. 3. Lightly coat the outside of each pepper with olive oil. Stand them upright in a 9x13 inch baking dish. 1. Heat a skillet over medium heat. Add 1 pound of ground chicken to the pan. 2. Cook the chicken for 5-7 minutes. Stir and break it apart until it turns brown. 3. Once cooked, mix in 1 cup of cooked rice, 1 cup of rinsed black beans, and 1 cup of corn. 4. Add 3/4 cup of shredded cheddar cheese, 1 teaspoon of chili powder, 1 teaspoon of cumin, 1 teaspoon of garlic powder, and 1/2 teaspoon of onion powder. Season with salt and pepper to taste. Stir for 2-3 minutes. 1. Generously fill each bell pepper with the chicken and cheese mixture. Pack it well. 2. Sprinkle the remaining 1/4 cup of cheese on top of the stuffed peppers. 3. Cover the dish with aluminum foil to trap steam. Bake in the preheated oven for 30 minutes. 4. After 30 minutes, remove the foil. Continue baking for 10-15 minutes, until the cheese is bubbly and golden. 5. Check if the peppers are tender by piercing them with a fork. 6. Allow them to cool for a few minutes after baking. Optionally, garnish with fresh cilantro for extra flavor. For the complete recipe, check out the [Full Recipe]. What are common mistakes to avoid? One mistake is overcooking the chicken. Cook it just until it's brown. If you use too much salt, it can ruin the flavor. Taste your mixture before stuffing the peppers. How can you ensure even cooking? Make sure all your peppers are the same size. This will help them cook at the same rate. Cover them with foil for part of the baking time. This keeps the heat in and helps them cook through. What are some suggestions for adding extra flavor? Try adding diced tomatoes or jalapeños for a kick. You can also mix in some spices like paprika or cayenne pepper. Fresh herbs like parsley or basil can brighten the dish. What are some ingredient swaps for dietary preferences? For a lower-carb option, replace rice with cauliflower rice. Use ground turkey or tofu for a different protein. You can also swap cheddar cheese for a dairy-free cheese for a vegan option. What cooking methods can you use? You can air fry the stuffed peppers for a crispy texture. Just set the air fryer to 375°F and cook them for about 15-20 minutes. Grilling is another fun method. Just wrap the peppers in foil and place them on the grill. How do you maintain moisture in stuffed peppers? Add a splash of chicken broth to the bottom of the baking dish. This creates steam as they cook. Avoid overstuffing the peppers; too much filling can lead to dryness. For the full recipe, check out the recipe section above. {{image_4}} You can change the ground chicken in your stuffed peppers. Use ground turkey or beef instead. These meats add different flavors and textures. If you want a vegetarian option, try using quinoa or lentils. These ingredients pack a protein punch and keep the dish hearty. For a vegan twist, use a mix of beans and mushrooms. They add a nice texture and flavor. You can also use tofu crumbles, which absorb spices well. This makes your meal rich and filling while keeping it plant-based. You can spice up your stuffed peppers with different flavors. Why not try a Mexican twist? Add taco seasoning or jalapeños for heat. A dash of lime juice brightens the dish. If you love Italian flavors, mix in some Italian herbs like oregano or basil. You could also add marinara sauce to the filling. This creates a rich and comforting taste. Want a twist? Try adding olives, capers, or feta cheese. These ingredients bring unique textures and flavors. They turn a simple meal into something exciting. For those needing gluten-free meals, this recipe is easy to adapt. Use rice instead of breadcrumbs for filling. Always check labels on canned items like beans and corn. They should be gluten-free. If you follow a low-carb diet, you can swap rice for cauliflower rice. This keeps the dish light and low in carbs. You can also skip the beans to reduce carbs even more. These variations help everyone enjoy this tasty meal. No matter your diet, you can find a way to enjoy chicken and cheese stuffed peppers. After you make your chicken and cheese stuffed peppers, let them cool down. This helps keep them fresh. Store them in an airtight container. They will stay good in the fridge for about 3 to 4 days. If you have leftovers, try to eat them within this time. To reheat, place them in the oven or microwave until warm. If you want to keep your stuffed peppers for a longer time, freezing is a great option. First, let them cool completely. Wrap each pepper tightly with plastic wrap. Then, put them in a freezer bag or container. This helps avoid freezer burn. They can last up to 3 months in the freezer. When you're ready to eat, take them out and thaw in the fridge overnight. Reheat them in the oven at 375°F until hot. This will keep the flavors and textures intact. Meal prepping can save time on busy weeknights. You can prepare the filling ahead of time. Cook the chicken and mix in the rice, beans, and spices. Store this mixture in the fridge for 2 to 3 days. When you're ready, stuff the peppers and bake them. For batch cooking, consider making a double recipe. Freeze half for later. This way, you have a tasty meal ready whenever you need it. How do you know when stuffed peppers are done? You can tell when stuffed peppers are done by checking the peppers and cheese. The peppers should be tender and the cheese melted and bubbly. If you pierce a pepper with a fork, it should feel soft but not mushy. Can you prepare them in advance? Yes, you can prepare stuffed peppers in advance. Just stuff them and store them in the fridge. Bake them when you're ready to eat. This makes for a quick and easy family meal. Can I use frozen peppers? Yes, you can use frozen peppers. Just thaw them before stuffing. They may cook faster, so keep an eye on them while baking. What to do if I don't have certain ingredients? If you lack certain ingredients, feel free to swap them out. For example, use quinoa instead of rice or a different type of cheese. Get creative based on what you have! Can stuffed peppers be made on the stovetop? Yes, you can make stuffed peppers on the stovetop. Just steam them in a skillet with a little water. Cover with a lid and cook until tender. How to adjust heating times for different ovens? Oven temperatures can vary. If your oven runs hot, check the peppers a few minutes early. If it runs cool, you may need to add a few extra minutes. Always trust your instincts! We covered the best way to make stuffed peppers. You learned about key ingredients like bell peppers, ground chicken, and spices. You also discovered tips for cooking and storing them. There are many ways to adjust the recipe for different diets and tastes. Incorporating these ideas will make your dish delicious. Get creative with flavors and toppings. With practice, you'll master this easy meal for any occasion. Enjoy your cooking journey!](https://goldendishy.com/wp-content/uploads/2025/06/69b5c483-258e-4498-8701-d043fb5fc497-768x768.webp)