Baked Feta Pasta with Tomatoes Easy and Flavorful Dish

Are you ready to dig into a tasty Baked Feta Pasta with Tomatoes? This dish is easy, fun, and packed with flavor. You only need a few simple ingredients like feta cheese, fresh tomatoes, and pasta. Plus, it comes together in one dish! Join me as I guide you through this simple recipe that’s sure to wow your family and friends. Let’s turn these ingredients into a meal you’ll love!
Ingredients
List of Ingredients
– 200g (7 oz) block of feta cheese
– 300g (10.5 oz) pasta (fusilli or penne recommended)
– 300g (10.5 oz) cherry tomatoes, halved
– 4 cloves garlic, minced
– 1 teaspoon red pepper flakes (adjust according to your spice preference)
– 1/4 cup extra virgin olive oil
– Salt and freshly ground black pepper to taste
– Fresh basil leaves, for garnish
– Grated lemon zest, for finishing touch
Every ingredient plays a key role in creating the magic of baked feta pasta. The feta cheese is the star. It becomes creamy and rich when baked. The cherry tomatoes burst with flavor, adding sweetness. The pasta serves as a perfect base to soak up all the goodness.
Garlic gives depth and aroma to the dish. Red pepper flakes add a nice kick that you can adjust. Extra virgin olive oil brings richness and ties all the flavors together. Don’t forget salt and black pepper to enhance everything.
Fresh basil leaves brighten the dish and add a pop of color. A sprinkle of lemon zest at the end adds a fresh finish.
Step-by-Step Instructions
Preheating and Preparation
First, preheat your oven to 400°F (200°C). This helps create a warm space for the dish. Next, grab a large baking dish. Pour in 300g of halved cherry tomatoes. Add 4 cloves of minced garlic and 1 teaspoon of red pepper flakes. Pour in 1/4 cup of extra virgin olive oil. Season with salt and freshly ground black pepper. Mix everything well until the tomatoes are coated.
Baking the Feta and Tomatoes
Now, nestle a block of 200g feta cheese right in the middle of the tomatoes. Drizzle a bit more olive oil on the feta for added flavor. Place the dish in your preheated oven and bake for 30-35 minutes. You want the tomatoes to blister and the feta to soften and turn golden.
Cooking the Pasta
While the feta and tomatoes bake, fill a large pot with salted water. Bring the water to a boil. Once boiling, add 300g of pasta, either fusilli or penne. Cook it according to the package instructions until it’s al dente. This means it should be firm but not hard. Drain the pasta and set it aside for later.
Combining Ingredients
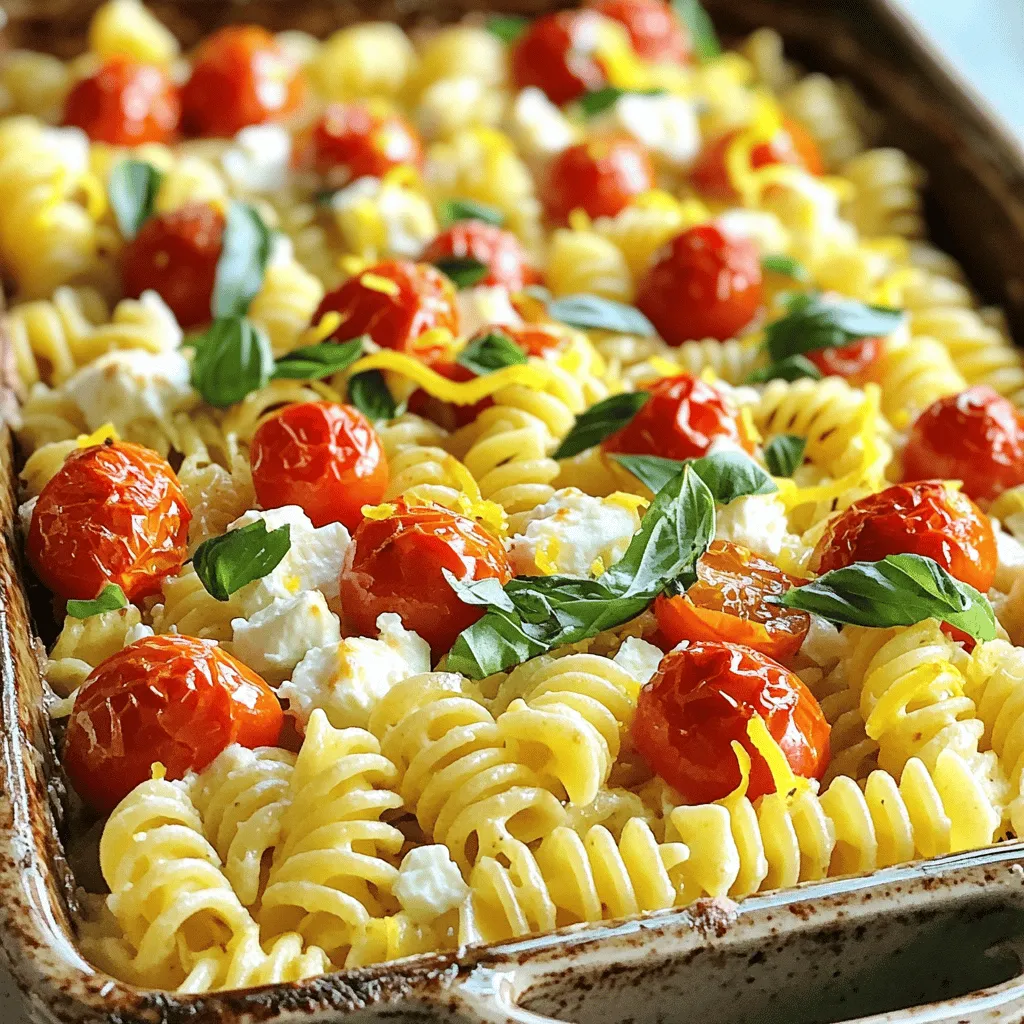
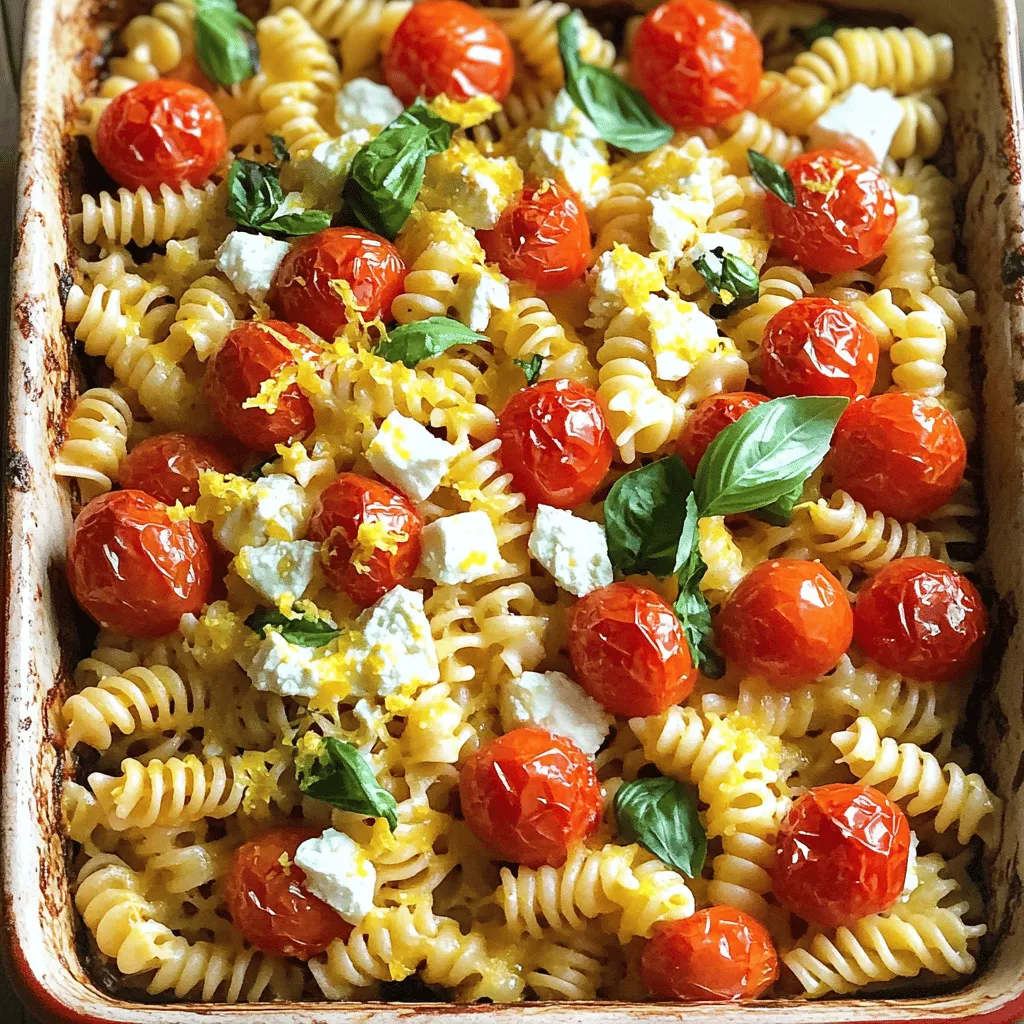
When the feta and tomatoes are done, take the dish out of the oven. Using a fork, gently mash the softened feta and blistered tomatoes. This creates a creamy mixture. Next, fold the drained pasta into the dish. Make sure every piece is coated in the feta-tomato blend. Taste it and adjust the seasoning if needed. Enjoy!
Tips & Tricks
Perfecting Texture and Flavor
To make your baked feta pasta shine, adjust the seasoning to suit your taste. Start with salt and pepper, then add more if needed. If you like a little heat, sprinkle more red pepper flakes. Each bite should sing with flavor.
To ensure a creamy consistency, blend the feta and tomatoes well. Use a fork to mash them up after baking. This step creates a smooth sauce that clings to the pasta. It should have a velvety feel, making every forkful delightful.
Visual Presentation
Serving your baked feta pasta in stylish bowls makes it look fancy. Try individual servings for a special touch. You can even layer it with fresh basil and a hint of lemon zest on top. This not only adds color but also gives a fresh flavor boost.
For garnishes, fresh basil leaves work perfectly. They add a pop of green and a lovely aroma. A sprinkle of lemon zest brightens the dish, making it eye-catching and appetizing. Enjoy your beautiful meal!

Variations
Different Pasta Shapes
You can switch the pasta shape from fusilli or penne. Try farfalle or rigatoni for fun shapes. They hold sauce well, giving each bite flavor. If you need gluten-free options, use rice or chickpea pasta. Both types work great and taste delicious.
Additional Ingredients
Feel free to add more veggies. Spinach or zucchini blends well with the tomatoes. You can also mix in proteins like chicken or shrimp. For spice lovers, adjust the red pepper flakes. Add more for heat or skip it for a milder taste. These changes make the dish your own.
Storage Info
Refrigeration Guidelines
After you enjoy your Baked Feta Pasta, store leftovers in airtight containers. This keeps the pasta fresh and tasty. Make sure to let the dish cool down before sealing it. When stored properly, your dish can last for 3 to 5 days in the fridge. If you notice any change in smell or appearance, it’s best to toss it out.
Reheating Suggestions
To reheat your Baked Feta Pasta, the oven works best. Preheat it to 350°F (175°C). Place your pasta in an oven-safe dish and cover it with foil. This keeps the moisture in and helps maintain the creamy texture. Heat for about 15 minutes or until warm. You can also use the microwave if you’re in a hurry. Just make sure to stir it halfway through to warm it evenly. If it feels dry, add a splash of olive oil or a bit of water to restore creaminess. Enjoy your dish just like it was fresh!
FAQs
Can I use a different type of cheese?
Yes, you can! If you want to switch it up, try using goat cheese or cream cheese. Both add a nice creaminess. Goat cheese gives a tangy taste, while cream cheese offers a rich, smooth feel. You can also use ricotta for a lighter option. Just remember, each cheese changes the flavor a bit. Feel free to experiment!
Is this recipe suitable for meal prep?
Absolutely! Baked Feta Pasta is perfect for meal prep. You can make it ahead and store it in the fridge. It keeps well for 3-5 days in an airtight container. Just heat it up when you’re ready to eat. This saves time on busy days and lets you enjoy a tasty meal without extra fuss.
Can I freeze Baked Feta Pasta?
Yes, you can freeze it! To freeze, let the dish cool completely. Then, place it in a freezer-safe container. It can last for about 2-3 months. When you’re ready to eat, thaw it in the fridge overnight. Reheat it in the oven or microwave until warm. Just keep an eye on the texture; it may change a little.
What can I pair with Baked Feta Pasta?
Baked Feta Pasta goes well with many sides. A simple green salad with a light vinaigrette is a great choice. You could also serve some garlic bread for a cozy touch. For drinks, a crisp white wine, like Sauvignon Blanc, complements the dish nicely. Enjoying these pairings enhances the meal experience!
This recipe for Baked Feta Pasta combines fresh flavors for a delicious dish. You learned about key ingredients, step-by-step baking, and tips to enhance texture. Try different pasta shapes or add veggies for variety. Store leftovers properly to enjoy later, and reheat without losing creaminess. This meal is great for any occasion. Enjoy making it and sharing with friends!


![To make Ranch Chicken and Rice Casserole, gather these items: - 1 lb (450g) boneless, skinless chicken breasts, cut into bite-sized pieces - 1 cup uncooked white rice (e.g., jasmine or basmati) - 2 cups low-sodium chicken broth - 1 cup creamy ranch dressing - 1 cup frozen mixed vegetables (a colorful blend of peas, carrots, and corn) - 1 cup shredded sharp cheddar cheese - 1 teaspoon onion powder - 1 teaspoon garlic powder - Salt and freshly ground black pepper to taste - Fresh parsley, chopped (for garnish, optional) Garnishes add beauty and taste to your dish. Here are a few: - Fresh parsley, chopped - Extra shredded cheddar cheese - A drizzle of ranch dressing These add color and a fresh taste to the casserole. You can mix and match based on what you like! Sometimes, you may need to swap out ingredients. Here are some ideas: - Chicken: Use turkey breast or cooked rotisserie chicken for a quicker option. - Rice: Brown rice or quinoa can work well. Just adjust the cooking time. - Vegetables: Feel free to use any frozen veggies you have, like broccoli or bell peppers. - Dressing: If you prefer, swap ranch dressing for other creamy dressings like blue cheese or Caesar. With these swaps, you can make the dish fit your taste or what you have on hand. First, preheat your oven to 375°F (190°C). This step is key for even cooking. A hot oven helps the chicken cook well and the cheese melt perfectly. In a large bowl, add the diced chicken, uncooked rice, chicken broth, and creamy ranch dressing. Then, sprinkle in the onion powder and garlic powder. Use a spatula to mix everything well. Make sure the chicken and rice are coated with the ranch dressing. Add salt and pepper to taste. Next, fold in the frozen mixed vegetables. This gives your casserole color and nutrition. Make sure the veggies are spread throughout the mixture. Pour your chicken and rice mixture into a greased 9x13-inch baking dish. Spread it out evenly for best results. Cover the dish tightly with aluminum foil. This traps moisture and helps the dish cook well. Bake in the preheated oven for 25 minutes. After 25 minutes, remove the foil carefully. Watch out for steam! Now, sprinkle the shredded cheddar cheese on top. Return the dish to the oven, uncovered, for another 15-20 minutes. You will know it’s ready when the chicken is cooked through, and the cheese is melted and bubbly. Once done, take it out and let it cool for about 5 minutes. This resting time helps the flavors settle. If you like, add freshly chopped parsley for a nice touch before serving. To make perfect rice, rinse it first. This removes extra starch. Use a 1:2 ratio of rice to broth. This keeps the rice moist. Cook it covered for even heat. If you want extra flavor, add herbs to the broth. You can mix in extras to change the taste. Try adding diced bell peppers for crunch. Use different frozen veggies like broccoli or green beans. You can also swap ranch dressing for a spicy sauce. This gives it a kick. For a cheesy twist, add cream cheese with the ranch. One mistake is not covering the dish while baking. This can dry out the rice. Another error is using too much liquid. Stick to the right amounts in the recipe. Don’t skip the resting time after baking. This helps the flavors blend well. Always taste before serving. Adjust salt and pepper as needed. For a full recipe with all these tips, check out the [Full Recipe]. {{image_4}} You can make a tasty vegetarian version of this dish. Start by swapping the chicken for a mix of beans or lentils. Use 2 cups of cooked black beans or chickpeas instead. Then, keep all the other ingredients the same. The ranch dressing adds great flavor, and the veggies provide crunch. This version is hearty and filling, perfect for a meatless meal. If you love heat, try a spicy twist on the classic recipe. Add diced jalapeños or a pinch of cayenne pepper to the mix. You can also use spicy ranch dressing in place of the regular one. This gives the dish a nice kick. Top it off with pepper jack cheese instead of cheddar for extra spice. Your taste buds will thank you! For a one-pan meal, mix everything in a large oven-safe skillet. This saves on clean-up time. Just add the rice and broth to the skillet along with the chicken and veggies. Cover and bake as you normally would. The flavors blend well, and you still get that creamy goodness from the ranch dressing. This method makes dinner even easier and quicker. You can find the full recipe linked above, allowing you to create these delicious variations! You can keep leftover Ranch Chicken and Rice Casserole in the fridge. Place it in an airtight container. It will stay fresh for up to three days. Make sure the casserole is cool before sealing it. This helps prevent moisture from building up. If you want to save some for later, freezing is easy. Use a freezer-safe container or heavy-duty freezer bag. Store the casserole in portions for easy meals. It will keep well for up to three months. To freeze, let it cool completely first. Label the container with the date to track freshness. When you’re ready to enjoy your casserole again, you can reheat it in different ways. The oven gives the best results. Preheat it to 350°F (175°C). Bake the casserole for about 20-30 minutes, covered with foil. This keeps it moist. You can also use a microwave. Heat in short bursts, stirring in between to ensure even warming. Always check that the chicken is heated all the way through. For extra flavor, add a little ranch dressing before serving. To adjust the recipe for fewer servings, simply halve the ingredients. Use ½ lb of chicken and ½ cup of rice. Also, cut the broth and dressing in half. This way, you keep the same flavors. Make sure to check the baking time. Smaller portions may cook faster, so keep an eye on them. Yes, you can use brown rice. However, brown rice takes longer to cook. It may need more liquid too. I recommend cooking it for a few minutes before adding it to the casserole. This helps it soften. Follow the same steps, but adjust the cooking time. Ranch Chicken and Rice Casserole goes well with many sides. Here are a few tasty options: - Simple green salad with a light dressing - Steamed broccoli or green beans for a crunchy bite - Garlic bread for a cozy touch - Roasted vegetables for extra flavor and color These sides add balance and make your meal complete. Enjoy the casserole with your favorite sides! For the full recipe, check out the link above. In this blog post, we covered the key steps to make a delicious Ranch Chicken and Rice Casserole. We explored the ingredients, sharing options for garnishes and substitutions. The step-by-step instructions guide you from preheating the oven to baking. I also shared tips to perfect your dish and variations for added flavor. Finally, we discussed how to store leftovers for later enjoyment. Follow these tips, and you’ll create a tasty meal that everyone will love!](https://goldendishy.com/wp-content/uploads/2025/06/349f3b9c-e648-45ce-b7ed-2f76b31339ac-768x768.webp)


