Baked Feta Pasta Delight Easy and Creamy Recipe

Looking for a quick and delicious meal? Baked Feta Pasta is the answer! This easy and creamy dish combines simple ingredients to create a delightful comfort food that’s perfect for any night. In this post, I’ll guide you step-by-step on how to make the best Baked Feta Pasta you’ve ever tasted. Get ready to impress your family and friends with this tasty recipe that packs flavor in every bite!
Why I Love This Recipe
- Easy to Prepare: This recipe requires minimal effort and uses common ingredients, making it perfect for busy weeknights.
- Flavorful and Creamy: The combination of baked feta and tomatoes creates a rich and creamy sauce that is simply irresistible.
- Customizable: You can easily add your favorite vegetables or proteins to the dish for added nutrition and flavor.
- Perfect for Sharing: This dish serves four, making it ideal for family dinners or gatherings with friends.
Ingredients
Detailed Ingredient List
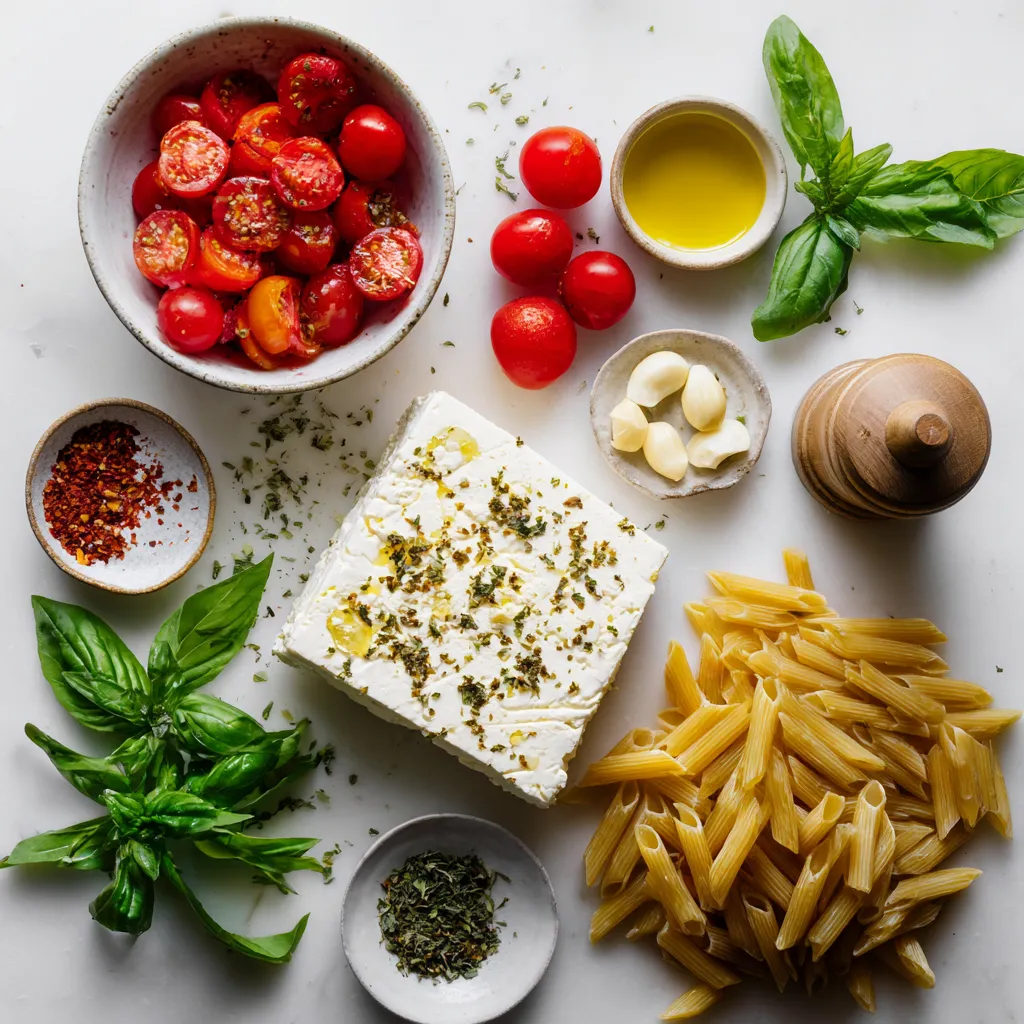
– 200g (7 oz) feta cheese, preferably block-style
– 300g (10.5 oz) penne pasta
– 2 cups cherry tomatoes, halved
– 1/4 cup extra virgin olive oil
– 4 cloves garlic, minced
– 1 teaspoon dried oregano
– 1/2 teaspoon red pepper flakes (or to taste)
– Salt and freshly ground black pepper to taste
– Fresh basil leaves for garnish
– Freshly grated Parmesan cheese for serving
You need fresh ingredients for the best taste. Start with block-style feta cheese. It melts beautifully and gives a creamy texture. Make sure to grab a good quality penne pasta. This shape holds the sauce well. Cherry tomatoes add sweetness and color. I love using halved ones for a burst of flavor.
Extra virgin olive oil helps with roasting. It also adds a rich taste to the dish. Fresh garlic gives a nice kick. Don’t skip it! Dried oregano adds an aromatic flavor. Red pepper flakes give a hint of heat. Adjust this to your taste.
Salt and black pepper are key for seasoning. Always taste as you go. For a fresh finish, have basil leaves ready. They add color and flavor when you serve. Finally, freshly grated Parmesan cheese makes everything even better. It adds a salty, nutty note that completes the dish.
With these ingredients, you are set for a creamy baked feta pasta that will impress everyone!

Step-by-Step Instructions
Preheating and Preparing the Dish
First, preheat your oven to 400°F (200°C). This step is key for a perfect bake. Next, grab a large baking dish. In it, mix together 2 cups of halved cherry tomatoes, 4 minced garlic cloves, and 1/4 cup of extra virgin olive oil. Add in 1 teaspoon of dried oregano, 1/2 teaspoon of red pepper flakes, and salt and black pepper to taste. Stir well so each tomato gets coated in that flavorful mix.
Baking the Feta and Tomatoes
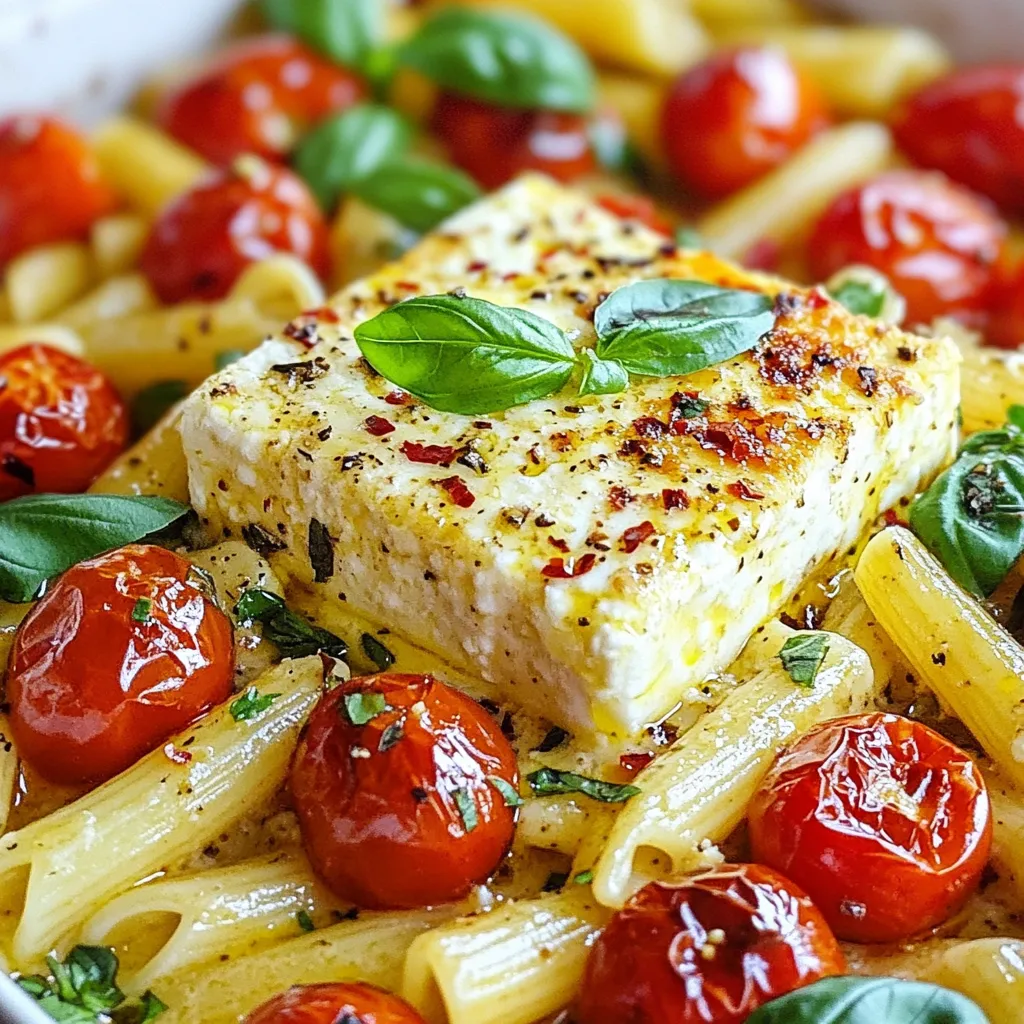
Now, make a small nest in the middle of the dish. Place the block of feta cheese right in that nest. Drizzle a bit more olive oil over the feta. This adds richness to the dish. Bake everything in the preheated oven for about 25 minutes. You want the feta to soften and the tomatoes to burst and caramelize.
Cooking the Pasta
While your feta and tomatoes bake, fill a large pot with salted water and bring it to a boil. Once it boils, add 300g (10.5 oz) of penne pasta. Cook it according to the package instructions until it is al dente. This means it should have a slight bite to it. After cooking, drain the pasta and set it aside.
Combining Ingredients
When the baking time is up, take your dish out of the oven. Use a fork to gently mash the baked feta and tomatoes together. This will form a creamy sauce. Then, add the cooked penne pasta to the baking dish. Toss everything together until the pasta is well coated with the creamy sauce. Taste it and adjust with more salt and pepper if needed.
Tips & Tricks
Perfecting the Creamy Texture
To get that smooth, creamy sauce, mash the baked feta and tomatoes well. Use a fork to blend them together. This will help make a rich sauce that coats the pasta. Taste the sauce before serving. You may want to add more salt or pepper. If it feels too thick, drizzle in a bit more olive oil for extra creaminess.
Serving Suggestions
Baked feta pasta pairs well with a fresh green salad. You can also serve it with crusty bread to soak up the sauce. For a lovely touch, add fresh basil leaves on top. A sprinkle of Parmesan cheese adds a nice finish. Arrange the dish on a bright plate to make it pop visually.
Enhancing Flavor
Fresh herbs like basil or parsley boost the dish’s taste. You can also add oregano for an extra kick. If you like heat, sprinkle in more red pepper flakes. For more texture, toss in some toasted pine nuts or olives. These add crunch and depth to every bite.
Pro Tips
- Choose High-Quality Feta: Opt for block-style feta cheese for a creamier texture and richer flavor compared to crumbled feta.
- Add Fresh Herbs: Enhance the dish by incorporating fresh herbs like thyme or oregano in addition to the dried oregano for an aromatic boost.
- Don’t Skip the Pasta Water: Reserve a cup of pasta cooking water before draining. Adding a little to the sauce can help adjust the consistency and flavor.
- Customize with Veggies: Feel free to add other vegetables like spinach or bell peppers to the baking dish for extra nutrition and flavor.

Variations
Ingredient Swaps
You can switch out the feta cheese if you want. Cream cheese works well for a rich taste. Goat cheese adds a tangy flavor. You can even try ricotta for a lighter option. For pasta, penne is great, but farfalle or rotini are nice too. Each shape holds sauce in its own way.
Protein Additions
Want to boost the protein? Add grilled chicken or sautéed shrimp to your dish. Just cook them separately and toss them in at the end. If you prefer vegetarian options, try chickpeas or lentils. They give a good texture and protein boost without meat.
Flavor Profile Changes
You can change the flavor with fun twists. For a Mediterranean vibe, add olives or artichokes. If you like spice, mix in more red pepper flakes or some jalapeños. Seasonal veggies like zucchini or spinach make the dish vibrant and fresh. Toss them in with the tomatoes for a colorful meal.
Storage Info
Storing Leftovers
To keep your baked feta pasta fresh, place it in an airtight container. This helps prevent the dish from drying out. Store it in the fridge for up to three days. When you want to eat it again, reheat it gently. Use a microwave or stovetop. If using a microwave, cover it to keep moisture in. Stir it occasionally to avoid hot spots. On the stovetop, add a splash of water or oil. This keeps the creamy texture smooth and tasty.
Freezing Tips
If you want to save some for later, you can freeze this dish. Let it cool completely before packing it. Use a freezer-safe container or a heavy-duty freezer bag. Press out any air to avoid freezer burn. You can freeze it for up to two months. When you’re ready to eat, thaw it overnight in the fridge. Reheat it slowly in a pan or microwave. Add a little olive oil or water to keep it creamy. Enjoy your delicious meal again!
FAQs
Can I use different types of pasta?
Yes, you can use many types of pasta. Penne works well, but other shapes like fusilli or rotini are great too. These shapes hold onto the sauce nicely. If you want to try something fun, go for whole wheat or gluten-free pasta. Both options keep the dish tasty and enjoyable.
How do I know when the feta is baked properly?
You want the feta to be soft and creamy. It should look slightly golden on top. The tomatoes will burst and get juicy. If you poke the feta with a fork, it should give way easily. These signs mean it is ready for mixing into your pasta.
Can I make this dish vegan?
Absolutely! To make it vegan, swap the feta for a plant-based cheese. Look for options that melt well, similar to feta. You can also skip the Parmesan cheese on top. Use a sprinkle of nutritional yeast for a cheesy flavor instead. This way, you still get a creamy and delicious meal.
This dish brings together rich flavors from simple ingredients: feta, tomatoes, and pasta. First, we heated the oven and prepared a yummy base. Then, baking the feta creates a creamy delight that blends with cooked penne. Our tips enhance flavors, while variations let you spice things up. Proper storage keeps leftovers tasty. Enjoy experimenting with ingredients and make this meal your own. Cooking should always be fun and flexibl

Creamy Baked Feta Pasta
Ingredients
- 200 g feta cheese, preferably block-style
- 300 g penne pasta
- 2 cups cherry tomatoes, halved
- 0.25 cup extra virgin olive oil
- 4 cloves garlic, minced
- 1 teaspoon dried oregano
- 0.5 teaspoon red pepper flakes
- to taste salt
- to taste freshly ground black pepper
- for garnish fresh basil leaves
- for serving freshly grated Parmesan cheese
Instructions
- Begin by preheating your oven to 400°F (200°C) so it's ready for the baking process.
- In a large baking dish, combine the halved cherry tomatoes, minced garlic, olive oil, dried oregano, red pepper flakes, salt, and black pepper. Stir well to ensure all the tomatoes are evenly coated with the flavorful mixture.
- Create a small nest in the center of the dish and place the block of feta cheese right in the middle, surrounded by the seasoned tomatoes. Drizzle a little more olive oil over the top of the feta for added richness.
- Place the dish in the preheated oven and bake for approximately 25 minutes, or until the feta cheese softens and the tomatoes are bursting and caramelizing.
- While the feta and tomatoes are baking, fill a large pot with salted water and bring it to a boil. Once boiling, add the penne pasta and cook according to the package instructions until it reaches an al dente texture. After cooking, drain the pasta and set it aside.
- When the baking time is complete, carefully remove the dish from the oven. Use a fork to gently mash the baked feta cheese and the tomatoes together, forming a creamy sauce.
- Add the cooked penne pasta to the baking dish. Toss everything together thoroughly until the pasta is well coated with the creamy feta-tomato sauce. Taste and adjust the seasoning if needed, adding more salt and pepper to your liking.
- Serve the dish warm, garnished with fresh basil leaves for a burst of flavor, and finish with a generous sprinkle of freshly grated Parmesan cheese on top.


. In this post, we covered essential ingredients for cornbread, substitutions, and tips for fresh picks. I shared step-by-step instructions to ensure your cornbread turns out great. We discussed ways to perfect texture, enhance flavor, and explore different variations. Proper storage and reheating tips help keep your cornbread fresh for later. Remember, cornbread can be sweet or savory, so choose what you love. Get creative and enjoy the process! Your next batch will be delicious and fun to make.](https://goldendishy.com/wp-content/uploads/2025/07/3215032b-f688-44a5-9882-4fc644314e18-768x768.webp)
![For perfect Greek lemon potatoes, gather these simple ingredients: - 2 pounds baby potatoes, halved - 1 cup chicken or vegetable broth - 2 tablespoons extra virgin olive oil - 3 tablespoons freshly squeezed lemon juice - 2 teaspoons fresh lemon zest - 4 cloves garlic, minced - 1 tablespoon dried oregano - Sea salt and freshly cracked pepper to taste - Fresh parsley, chopped (for garnish) You can swap baby potatoes for Yukon Gold or red potatoes. Both work well and add great taste. If you want a vegan option, use vegetable broth instead of chicken broth. Fresh lemon juice is best, but bottled works in a pinch. You can add fresh herbs like thyme or rosemary to change the flavor. For a spicy kick, consider a pinch of red pepper flakes. Using high-quality ingredients makes a big difference. Fresh potatoes give the best texture and flavor. Extra virgin olive oil adds richness. Fresh lemon juice and zest brighten the dish. Quality broth enhances the taste. When you use good ingredients, you create an authentic Greek experience. They help your dish shine and make every bite delicious. Check out the Full Recipe for more tips and tricks on how to make these zesty potatoes. To make Greek lemon potatoes, start by gathering your ingredients. You need baby potatoes, broth, olive oil, fresh lemon juice, lemon zest, garlic, oregano, salt, and pepper. 1. Preheat the oven to 425°F (220°C). This heat helps the potatoes become crispy. 2. Halve the baby potatoes. This allows them to soak up all the flavors. 3. In a large bowl, mix the broth, olive oil, lemon juice, lemon zest, garlic, oregano, salt, and pepper. Stir well to combine. 4. Add the halved potatoes to the bowl. Toss them until they are fully coated with the mixture. Once your potatoes are ready, it’s time to roast them. 1. Pour the potato mix into a roasting pan. Spread the potatoes out in a single layer. This step ensures they cook evenly. 2. Roast in the oven for about 30-35 minutes. Check for a golden brown color and fork-tender texture. 3. Stir the potatoes halfway through roasting. This helps them absorb more flavors and become crispy all around. Sometimes things don’t go as planned. Here are some tips to help. - If your potatoes are not browning, increase the oven temperature by 25°F. This can help them crisp up. - If they seem too dry, add a splash more broth. This will keep them moist and flavorful. - If they are not tender after 35 minutes, roast them a bit longer. Just keep an eye on them to prevent burning. For a full recipe, refer to the [Full Recipe]. Enjoy the deliciousness of Greek lemon potatoes! To boost the taste of Greek lemon potatoes, use fresh ingredients. Fresh garlic and herbs add a lot of flavor. When using oregano, choose dried or fresh based on what you have. For a zingy kick, try adding a pinch of red pepper flakes. This little touch makes a big difference. You can also let the potatoes marinate in the broth mixture for an hour before cooking. This extra time helps the flavors soak in deeply. To get potatoes that are both soft and crispy, cut them evenly. Halving the baby potatoes helps ensure they cook at the same rate. Use a hot oven, around 425°F (220°C). The high heat helps the outside crisp up while keeping the inside tender. Halfway through cooking, give the potatoes a good stir. This helps them brown evenly. If you want extra crispiness, broil them for the last 2-3 minutes. Just keep an eye on them to avoid burning. Prep the ingredients ahead of time to save effort later. You can wash and cut the potatoes a day before. Store them in water in the fridge to keep them fresh. You can also mix the broth and seasonings ahead. Just combine everything in a bowl and cover it. When you are ready to cook, simply combine the potatoes with the mixture. This makes dinner quick and easy. For even faster meals, consider roasting a larger batch. Leftovers taste great and can be enjoyed in many ways. For the full recipe, check out the complete cooking guide for Greek lemon potatoes. {{image_4}} You can easily make Greek lemon potatoes vegan. Just swap chicken broth for vegetable broth. This change keeps the rich flavor intact. Make sure your broth is gluten-free if needed. You can use any vegetable broth you like. This way, everyone can enjoy this dish! Feel free to mix up the flavors! Add fresh herbs like thyme or rosemary. These herbs give a nice twist. You can also try spices like paprika or cumin for heat. For a creamier taste, sprinkle some feta cheese on top before serving. You can even toss in some olives for a salty kick. Each of these options makes the dish unique! Greek lemon potatoes shine as a side dish. Pair them with grilled chicken or fish for a full meal. They also go well with a fresh salad or tzatziki sauce. If you want to make it special, serve with warm pita bread. These potatoes are great for any gathering. They will impress your guests, and they are easy to share. For the full recipe, check out the Full Recipe link above. To keep your Greek Lemon Potatoes fresh, let them cool first. Then, place them in an airtight container. You can also cover them tightly with plastic wrap. Store them in the fridge for up to three days. This method helps keep their flavor and texture. When reheating, use the oven for the best taste. Preheat your oven to 350°F (175°C). Spread the potatoes on a baking sheet. Heat them for about 15 to 20 minutes. This way, they will regain their crispiness. If you’re in a hurry, you can use the microwave. Just heat them in 30-second bursts, but they may not be as crispy. Greek Lemon Potatoes stay good in the fridge for three days. If you want to keep them longer, you can freeze them. Place the cooled potatoes in a freezer-safe bag. They can last up to three months in the freezer. When ready to eat, thaw them in the fridge overnight. Then, reheat them as mentioned above. Greek Lemon Potatoes are a delicious side dish. They are made with baby potatoes, lemon juice, and herbs. The dish is known for its bright, zesty flavor. The potatoes become tender and crisp when roasted. You can enjoy them with grilled meats or fish. They add a refreshing touch to any meal. You can prepare Greek Lemon Potatoes ahead of time. First, follow the recipe up to the roasting step. After mixing the ingredients, cover the dish and store it in the fridge. This way, the flavors will blend. When you're ready to cook, just preheat your oven and roast them. You may need to add a few extra minutes to the cooking time. Yes, you can use other potatoes like Yukon Gold or red potatoes. These types work well due to their creamy texture. Just remember to cut them into similar sizes. This helps them cook evenly. Each potato type will offer a slightly different taste and texture. Feel free to experiment with your favorites! Greek Lemon Potatoes are a delightful dish that you can easily make. You learned the key ingredients that make them special, and tips for the best flavor. Following the step-by-step guide ensures perfect roasting every time. You also discovered tasty variations for different diets and ways to store leftovers. In closing, use fresh ingredients and don't rush the cooking process. Enjoy this dish with friends and family. Each bite will showcase Greek flavors. Happy cooking!](https://goldendishy.com/wp-content/uploads/2025/07/055e8462-33de-483e-a53c-599291ba0dde-768x768.webp)


![To make this simple and tasty chicken and rice soup, gather these ingredients: - 2 boneless, skinless chicken breasts - 1 cup jasmine rice, thoroughly rinsed - 6 cups chicken broth (preferably low-sodium) - 2 carrots, peeled and diced - 2 stalks celery, chopped - 1 small onion, finely diced - 3 garlic cloves, minced - 1 teaspoon dried thyme - 1 bay leaf - 1 tablespoon extra virgin olive oil - Salt and freshly ground pepper, to taste - 1 cup frozen peas - Juice from 1 fresh lemon - Fresh parsley, roughly chopped (for garnish) Each serving of this chicken and rice soup is packed with nutrition. Here’s a quick look at what you get: - Calories: 300 - Protein: 25g - Carbohydrates: 40g - Fat: 6g - Fiber: 2g This soup is low in fat and rich in protein and carbs, making it a cozy choice for any meal. If you need to swap out some items, here are some ideas: - Chicken: Use shredded rotisserie chicken for a quick option. - Rice: Substitute with brown rice or quinoa for a different texture. - Broth: Vegetable broth works well for a lighter flavor. - Vegetables: Add bell peppers, corn, or spinach for extra nutrition. - Herbs: Fresh herbs like rosemary or dill can replace thyme for a new taste. These substitutions help you make this soup work for your pantry or dietary needs. Enjoy creating your version! Start by gathering your ingredients. You need chicken breasts, jasmine rice, broth, carrots, celery, onion, garlic, thyme, a bay leaf, olive oil, and peas. 1. Heat the olive oil: In a large pot, place the olive oil over medium heat. Wait until it shimmers. 2. Add the vegetables: Toss in the diced onion, carrots, and celery. Sauté these for about 5 minutes. You want them to soften and the onion to look clear. 3. Incorporate garlic: Stir in the minced garlic. Cook this for one minute. The smell should fill your kitchen. 1. Add chicken and broth: Place the chicken breasts into the pot. Pour in the chicken broth. Add thyme, bay leaf, salt, and pepper. 2. Bring to a boil: Turn up the heat until the mixture boils. Then, lower the heat to a gentle simmer. 3. Cook the chicken: Cover the pot and let it simmer for 15-20 minutes. Make sure the chicken cooks fully (165°F or 75°C inside). 1. Shred the chicken: Once cooked, remove the chicken and let it cool. Use two forks to shred it into smaller pieces. 2. Add rice: Stir in the rinsed jasmine rice into the pot. Cover it again and let it simmer for about 15 minutes. The rice should be tender. 3. Finish the soup: Return the shredded chicken to the pot. Add the frozen peas and lemon juice. Taste and adjust salt and pepper if needed. 4. Serve: Remember to take out the bay leaf. Serve hot in bowls. Top with fresh parsley for a nice touch. For the complete recipe, visit [Full Recipe]. To make your chicken and rice soup shine, focus on fresh ingredients. Start with quality chicken broth. Low-sodium broth gives you control over salt levels. Add fresh herbs like thyme and parsley for a bright taste. A splash of lemon juice at the end brightens the flavor too. You can also toss in some fresh garlic for depth. One big mistake is overcooking the chicken. Remove it from the pot once it reaches 165°F. Letting it simmer too long can make it dry. Another common error is not rinsing the rice. Rinsing removes excess starch, which helps keep the soup clear. Avoid adding too much water or broth. You want a nice balance of soup and rice. For a creamy texture, add a splash of heavy cream or coconut milk. Stir it in after you add the chicken back to the pot. You can also blend a portion of the soup. Use an immersion blender to create a creamy base while keeping some chunks intact. This mix gives you both texture and creaminess in every spoonful. Follow the [Full Recipe] for a step-by-step guide to making this comforting dish. {{image_4}} You can easily add veggies to your chicken and rice soup. Chopped carrots, celery, and peas work well. You can also try adding spinach, kale, or zucchini for more color and nutrition. These vegetables add flavor and make your soup more filling. Just toss them in during the last few minutes of cooking. This way, they will stay bright and fresh. If you like a kick, make a spicy version. Add diced jalapeños or red pepper flakes for heat. A splash of hot sauce or a spoonful of sriracha can also spice things up. Just keep in mind to adjust the salt. You want a balance of flavors. This spicy twist can warm you up on a cold day! Using a slow cooker makes this recipe even easier. Simply add all your ingredients into the slow cooker. Set it on low for 6-8 hours or high for 3-4 hours. This method allows all the flavors to blend beautifully. Plus, you can come home to a warm, tasty meal. Check out the Full Recipe for detailed steps and measurements. After you finish your chicken and rice soup, let it cool down. This helps keep the soup fresh. Transfer it to an airtight container. It will stay good in the fridge for 3 to 4 days. Make sure to label the container with the date. This way, you’ll know when to eat it. If you want to save some soup for later, freezing works great. First, let the soup cool completely. Then, pour it into freezer-safe bags or containers. Leave some space at the top for expansion. You can freeze it for up to 3 months. When you’re ready to eat, just thaw it overnight in the fridge. To reheat your soup, pour it into a pot. Heat it on medium-low heat. Stir it often to ensure it warms evenly. If the soup seems too thick, add a splash of broth or water. You can also microwave it in a safe bowl. Heat it in short intervals, stirring in between. This ensures every bite is warm and tasty. Enjoy your cozy meal! For the full recipe, check out the Cozy Chicken & Rice Delight section. Yes, you can use brown rice. Brown rice adds a nutty flavor and is more nutritious. However, it takes longer to cook. You should adjust the cooking time. Add brown rice early when you add the broth, and let it simmer for 40-45 minutes. This way, the rice becomes tender and blends well with the soup. To make the soup gluten-free, you need to check a few things. First, use a gluten-free chicken broth. Many brands offer gluten-free options. Also, make sure your rice is certified gluten-free. Jasmine rice is usually safe, but always check the label. By following these steps, your soup will be gluten-free and just as tasty. You can serve many tasty sides with your soup. Here are some great options: - A fresh green salad - Crusty bread or rolls - Garlic breadsticks - Steamed vegetables These sides will make your meal complete and satisfying. For more ideas, feel free to check the Full Recipe and explore different serving suggestions. We reviewed the key steps to make Chicken and Rice Soup, from choosing the right ingredients to cooking methods. You learned helpful tips to enhance flavor and avoid common mistakes. Variations and storage details ensure this dish suits your taste and convenience. Trust these insights to create a tasty soup every time. Enjoy warm bowls of nourishment that you made with care. Happy cooking!](https://goldendishy.com/wp-content/uploads/2025/06/7617fd4a-61d9-414c-8819-76abcb6635e5-768x768.webp)