Air Fryer Teriyaki Tofu Bowls Easy and Flavorful Meal

Are you craving a meal that’s both easy and packed with flavor? Let me show you how to make Air Fryer Teriyaki Tofu Bowls! In just a few steps, you can enjoy crispy, golden tofu slathered in a tasty teriyaki sauce, paired with fresh veggies. This dish is perfect for busy nights and offers tons of ways to customize it. Let’s dive in and make your dinner task a breeze!
Why I Love This Recipe
- Flavorful Marinade: The teriyaki marinade enhances the tofu, infusing it with a sweet and savory taste that’s irresistible.
- Crispy Texture: Air frying gives the tofu a delightful crunch while keeping the inside tender, making each bite satisfying.
- Quick and Easy: This recipe can be prepared in just 30 minutes, perfect for a busy weeknight dinner.
- Customizable Veggies: You can easily swap in your favorite vegetables, making this dish versatile and adaptable to your preferences.
Ingredients
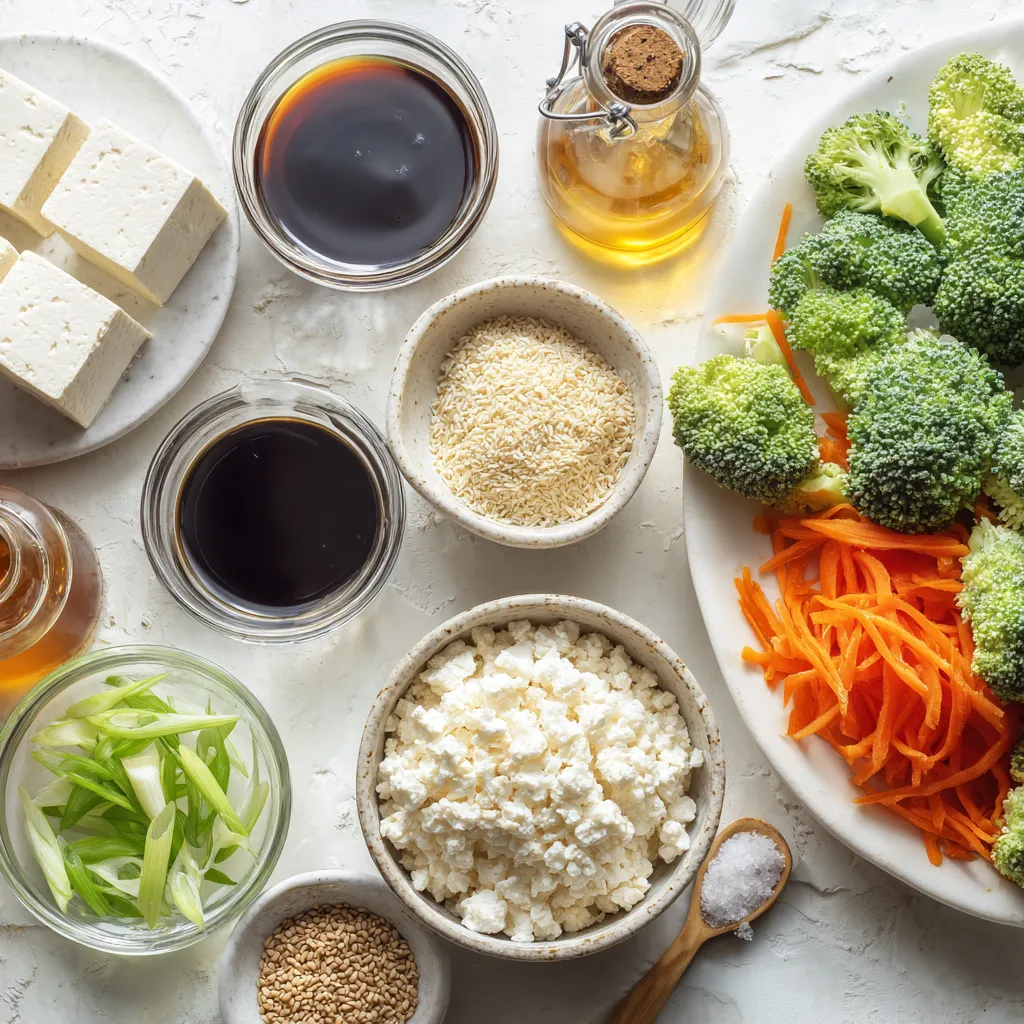
List of Main Ingredients
– 1 block of firm tofu, pressed and cut into bite-sized cubes
– 1/4 cup low-sodium soy sauce
– 2 tablespoons honey or maple syrup (for vegan option)
– 1 tablespoon rice vinegar
– 1 tablespoon toasted sesame oil
– 1 teaspoon garlic powder
– 1 teaspoon ground ginger
– 1 cup cooked brown rice or quinoa
– 1 cup broccoli florets, cut into small pieces
– 1/2 red bell pepper, thinly sliced
– 1 medium carrot, peeled and julienned
– 2 green onions, sliced into rounds
– Toasted sesame seeds for garnish
– Salt and pepper to taste
Optional Ingredients for Customization
You can easily make this dish your own. Try adding different veggies like snap peas or mushrooms. You might swap brown rice for cauliflower rice for a low-carb option. Consider adding sliced avocado for creaminess. A drizzle of chili oil can spice things up too.
Tips for Selecting Fresh Produce
When choosing veggies, look for bright colors and firm textures. For broccoli, choose florets that are dark green with no yellowing. The red bell pepper should feel heavy and have a shiny skin. For carrots, pick those that are smooth and straight. Fresh green onions should be crisp with vibrant green tops. Always buy what looks best to ensure great flavor in your dish.

Step-by-Step Instructions
Preparing the Marinade
Start by making the teriyaki marinade. In a medium bowl, whisk together:
– 1/4 cup low-sodium soy sauce
– 2 tablespoons honey or maple syrup
– 1 tablespoon rice vinegar
– 1 tablespoon toasted sesame oil
– 1 teaspoon garlic powder
– 1 teaspoon ground ginger
Mix until well combined. This marinade will give your tofu a rich flavor.
Marinating the Tofu
Next, take your block of firm tofu. Press it to remove excess water and cut it into bite-sized cubes. Place the tofu in the bowl with the marinade. Toss gently to coat every piece. Let it marinate for at least 15 minutes. This step is key to infusing flavor.
Cooking the Tofu in the Air Fryer
While the tofu marinates, preheat your air fryer to 375°F (190°C). Once heated, place the tofu cubes in the air fryer basket. Make sure they are in a single layer. Do not overcrowd the basket. Air fry for 12-15 minutes. Shake the basket halfway through. This helps them cook evenly and become crispy.
Steaming the Vegetables
While the tofu cooks, prepare the vegetables. Steam 1 cup of broccoli florets, 1/2 red bell pepper sliced, and 1 medium carrot julienned. Steam for 3-5 minutes. The vegetables should be tender but still bright and crisp.
Assembling the Teriyaki Bowls
Now it’s time to put it all together. Start with a scoop of cooked brown rice or quinoa at the bottom of each bowl. Add the crispy teriyaki tofu on top. Arrange the steamed vegetables around the tofu. Finally, garnish with sliced green onions and toasted sesame seeds for extra flavor. Adjust with salt and pepper to taste. Enjoy your colorful and tasty meal!
Tips & Tricks
Best Practices for Air Frying Tofu
Tofu can be tricky, but I have some tips. First, always press your tofu. This removes extra water. Less water helps the tofu crisp up well. Cut your tofu into even cubes. This ensures even cooking.
How to Achieve Crispy Tofu
Crispy tofu is a game changer. When marinating, let your tofu sit for at least 15 minutes. This helps it soak up the flavors. Spread the tofu in a single layer in the air fryer. If you pile it up, it won’t get crisp. Shake the basket halfway through cooking. This helps all sides brown nicely.
Enhance Flavor with Additional Seasonings
Want to kick it up a notch? Try adding more spices. A pinch of red pepper flakes adds heat. A bit of lime juice brightens the dish. You can also add fresh herbs like cilantro for freshness. Experiment and find your favorite mix!
Pro Tips
- Choose the Right Tofu: Use firm or extra-firm tofu for the best texture and to ensure it holds its shape during cooking.
- Marination Time: For enhanced flavor, let the tofu marinate for at least 30 minutes or even up to a few hours if you have the time.
- Air Fryer Tips: Avoid overcrowding the air fryer basket; this allows the tofu to crisp up evenly without steaming.
- Vegetable Variety: Feel free to mix in other vegetables like snap peas or zucchini for added color and nutrition in your bowls.

Variations
Vegetarian and Vegan Substitutes
For a vegetarian or vegan twist, use maple syrup instead of honey. This keeps the dish plant-based. You can also swap out the tofu. Tempeh works well, and it adds a nutty flavor. Another option is chickpeas. They bring a hearty texture and soak up the teriyaki sauce nicely.
Alternative Protein Options
If you prefer another protein, try using seitan or edamame. Seitan mimics meat well and has a great chew. Edamame adds protein and a pop of color. For a lighter meal, grilled chicken or shrimp can also shine in this dish. Just adjust cooking times to ensure everything cooks properly.
Different Vegetable Combinations
Feel free to mix up the veggies. Snap peas or zucchini can add a fresh crunch. Cauliflower or asparagus are great choices too. You can even add baby spinach for a nutrient boost. Just remember to steam them lightly to keep them vibrant and crisp.
Storage Info
Storing Leftovers
After enjoying your Air Fryer Teriyaki Tofu Bowls, you may have some leftovers. Store them in an airtight container. This keeps the tofu and veggies fresh. Make sure to refrigerate within two hours after cooking. Your leftovers will stay good for 3 to 4 days.
Reheating Tips
When you are ready to eat your leftovers, reheat them for the best taste. You can use the air fryer, microwave, or stove. If using the air fryer, heat at 350°F (175°C) for about 5-7 minutes. This helps the tofu regain its crispiness. If using a microwave, heat in short bursts to avoid sogginess. Stir occasionally for even heating.
Freezing Options for Tofu and Vegetables
You can freeze the tofu and vegetables if you want to save them for later. First, cool them completely. Then, place them in freezer-safe bags or containers. Make sure to remove as much air as possible. The tofu can last up to 3 months in the freezer. When ready to eat, thaw in the fridge overnight and reheat.
FAQs
Can I Use Extra-Firm Tofu?
Yes, you can use extra-firm tofu. Extra-firm tofu holds its shape well. It also gives a nice texture when cooked. Just remember to press it to remove excess moisture. This step helps the tofu absorb the teriyaki sauce better.
How Can I Make This Recipe Gluten-Free?
To make this recipe gluten-free, use gluten-free soy sauce. Tamari is a great option. It works just like regular soy sauce but is gluten-free. Also, ensure your honey or maple syrup is pure and gluten-free.
What Can I Serve with Teriyaki Tofu Bowls?
You can serve your teriyaki tofu bowls with various sides. Try adding edamame for protein. Pickled ginger adds a nice tang. You can also include seaweed salad for extra flavor. If you want, serve it with a light soup, like miso.
How Long Does Leftover Teriyaki Tofu Last?
Leftover teriyaki tofu lasts about three to four days in the fridge. Store it in an airtight container. The tofu may lose some crispness, but it will still taste great. Reheat it in the air fryer for a few minutes to regain some crunch.
This guide covered all you need for delicious teriyaki tofu bowls. We explored key ingredients, step-by-step cooking, and helpful tips. You can customize with fresh produce or swap proteins. Remember to store leftovers properly to enjoy later. With practice, you will master crispy tofu and tasty teriyaki. Keep experimenting to find your perfect flavor. Enjoy cooking and share your bowls with friend

Air-Fried Teriyaki Tofu Bowls
Ingredients
- 1 block firm tofu, pressed and cut into bite-sized cubes
- 0.25 cup low-sodium soy sauce
- 2 tablespoons honey or maple syrup (for vegan option)
- 1 tablespoon rice vinegar
- 1 tablespoon toasted sesame oil
- 1 teaspoon garlic powder
- 1 teaspoon ground ginger
- 1 cup cooked brown rice or quinoa
- 1 cup broccoli florets, cut into small pieces
- 0.5 red bell pepper thinly sliced
- 1 medium carrot peeled and julienned
- 2 green onions sliced into rounds
- to taste toasted sesame seeds for garnish
- to taste salt and pepper
Instructions
- In a medium mixing bowl, whisk together the soy sauce, honey (or maple syrup), rice vinegar, sesame oil, garlic powder, and ginger powder to create a flavorful teriyaki marinade.
- Carefully add the cubed tofu to the marinade, gently tossing it to ensure each piece is evenly coated. Allow the tofu to marinate for at least 15 minutes.
- While the tofu is marinating, preheat your air fryer to 375°F (190°C).
- Once ready, place the marinated tofu cubes into the air fryer basket in a single layer. Air fry the tofu for 12-15 minutes, shaking the basket halfway through.
- In the meantime, prepare the vegetables by lightly steaming the broccoli florets, red bell pepper slices, and julienned carrot for about 3-5 minutes.
- To assemble the bowls, add a generous scoop of cooked brown rice or quinoa to the bottom of each bowl. Top it with the crispy teriyaki tofu and arrange the steamed vegetables around it.
- Garnish the dish with sliced green onions and a sprinkle of toasted sesame seeds.
- Adjust the seasoning with salt and pepper to taste before serving.


![When making vegetable and bean chili, gather these items first: - 1 tablespoon olive oil - 1 large onion, finely diced - 3 cloves garlic, minced - 1 bell pepper (red or yellow), chopped into bite-sized pieces - 1 medium carrot, diced into small cubes - 1 medium zucchini, diced - 1 cup corn kernels (fresh or frozen will work) - 1 can (15 oz) black beans, rinsed thoroughly and drained - 1 can (15 oz) kidney beans, rinsed thoroughly and drained - 1 can (15 oz) diced tomatoes with their juices - 2 cups vegetable broth (low sodium recommended) - 2 tablespoons chili powder - 1 teaspoon ground cumin - 1 teaspoon smoked paprika - Salt and pepper to taste - Fresh cilantro, chopped (for garnish) - Avocado slices (for serving, optional) These ingredients create a rich, hearty dish that warms you up. You can change this recipe to fit your taste. Here are some ideas: - Add more beans, like pinto or cannellini beans. - Swap in different vegetables, such as spinach or sweet potatoes. - Mix in some hot peppers for a spicy kick. - Use different herbs, like oregano or thyme, for extra flavor. - Top with cheese or sour cream if you prefer. These options let you make the chili your own! This vegetable and bean chili is not only tasty but also healthy. Here’s a quick breakdown of its nutrition: - Calories: Around 250 per serving - Protein: About 12 grams - Carbohydrates: Roughly 40 grams - Fiber: Nearly 12 grams - Fat: Around 5 grams This chili is high in fiber and protein, making it a satisfying meal. You can enjoy it guilt-free! For the full recipe, check out the [Full Recipe]. First, heat 1 tablespoon of olive oil in a large pot over medium heat. When the oil is hot, add 1 large onion, finely diced. Cook the onion for about 5 minutes. It should turn soft and clear. Next, add 3 minced garlic cloves. Stir the garlic in for 1 to 2 minutes. It should smell great and turn light gold. Now, add in a chopped bell pepper, a diced carrot, and a diced zucchini. Cook these veggies for 5 to 7 minutes. Stir them often as they start to soften and brighten. Then, mix in 1 cup of corn kernels. Let them cook for an extra 3 minutes. This adds sweet flavor and color. Next, add 1 can each of black beans and kidney beans, both rinsed and drained. Then, pour in 1 can of diced tomatoes with their juices and 2 cups of vegetable broth. Sprinkle in 2 tablespoons of chili powder, 1 teaspoon of ground cumin, and 1 teaspoon of smoked paprika. Stir everything together well. Increase the heat until it boils. Once boiling, lower the heat to let it simmer. Keep it uncovered for about 30 minutes. Stir occasionally to avoid sticking. Taste and add salt and pepper as you like. Once thickened, remove it from the heat. Let it sit for a few minutes. This helps the flavors mix well. Now, ladle the chili into bowls. You can top each bowl with freshly chopped cilantro. If you want, add avocado slices for a creamy finish. Check out the Full Recipe for more details! To boost the flavor of your vegetable and bean chili, try these tips: - Use Fresh Herbs: Fresh cilantro or parsley adds a bright taste. - Add Citrus: A squeeze of lime or lemon brightens the dish. - Incorporate Spices: Experiment with chipotle powder for heat or oregano for depth. You can also let the chili sit for a few hours or overnight. This resting time lets the flavors meld and deepen. If your chili is too thick, add more vegetable broth. Start with a half cup and stir well. If it’s too thin, simmer it longer. This helps the liquid reduce and thicken. You can also mash some beans to make the chili creamier. Serve your chili with various toppings. Here are some ideas: - Sliced avocado for creaminess - Shredded cheese for a cheesy touch - Crème fraîche or sour cream for richness - Crispy tortilla chips for crunch Pair your chili with warm bread or cornbread on the side. It’s a great way to soak up every delicious drop. For the full recipe, check out the robust vegetable & bean chili. Enjoy your hearty comfort food delight! {{image_4}} If you want a vegan chili, this recipe is already perfect! All the ingredients are plant-based. For gluten-free versions, check your vegetable broth and spices. Most brands are safe, but read labels to be sure. You can switch to gluten-free grains like quinoa or rice as a side. Feel free to change up the beans or veggies. If you don’t have black beans, use pinto or cannellini beans. You can also mix in lentils for added protein. For vegetables, try adding sweet potatoes, spinach, or even kale. This adds flavor and nutrition to your dish. To make your chili spicy, add more chili powder or diced jalapeños. You can also use hot sauce for an extra kick. If you prefer mild flavors, reduce the chili powder and smoked paprika. This way, everyone can enjoy their bowl of chili. For the full recipe, check out the detailed instructions and ingredient list! To keep your vegetable and bean chili fresh, let it cool first. Once cool, store it in an airtight container. Place the container in the fridge. Your chili will stay good for about 3 to 5 days. If you want to enjoy it later, freezing is a great option. You can freeze your chili for up to 3 months. First, let it cool completely. Then, pour it into a freezer-safe container. Leave some space at the top, as the chili will expand when frozen. Label the container with the date. This way, you will know when to use it. When you are ready to eat, thaw the chili in the fridge overnight. For quick reheating, use the microwave or the stove. If microwaving, heat in short bursts, stirring in between. On the stove, warm it over medium heat until it bubbles. Always check that it is hot all the way through before serving. Enjoy your hearty comfort food delight! For the full recipe, check out the detailed steps above. Yes, you can use canned beans. Canned beans save time and effort. Just rinse them well to remove excess sodium. For this chili, I recommend black beans and kidney beans. They add great texture and flavor. Vegetable bean chili lasts about 4 to 5 days in the fridge. Make sure to store it in an airtight container. The flavors actually improve over time, making it even tastier! You can serve this chili with many sides. Try crispy tortilla chips for crunch. Warm bread or cornbread pairs well too. Add a dollop of sour cream or Greek yogurt for creaminess. Don't forget fresh avocado slices for extra flavor! Check the Full Recipe for more serving ideas. This blog post covered all you need for a great vegetable bean chili. We explored the ingredients, showing how to customize it and understand its nutrition. The step-by-step instructions guide you through cooking, while tips enhance its flavor. Variations help you adapt to different diets. Finally, we discussed storage methods and answered common questions. Cooking a tasty chili doesn't have to be hard. You now have tools to make it your own and enjoy it for days. Happy cooking!](https://goldendishy.com/wp-content/uploads/2025/06/710b1993-2890-4a51-b686-850c3b1d6686-768x768.webp)


![To make vegan creamy pesto pasta, gather these fresh and simple ingredients. - 12 oz pasta (penne, spaghetti, or your favorite variety) - 2 cups fresh basil leaves, tightly packed - 1/2 cup raw cashews (soaked in water for at least 2 hours) - 1/4 cup nutritional yeast (for a cheesy flavor) - 3 cloves garlic, minced - 1/4 cup extra virgin olive oil - 1 tablespoon fresh lemon juice - Sea salt and freshly ground black pepper, to taste - 1 cup cherry tomatoes, halved (for topping) - Extra fresh basil leaves (for garnish) Each ingredient plays a vital role. The pasta is the base, while basil brings freshness. Cashews create a rich, creamy texture. Nutritional yeast adds a cheesy taste, perfect for vegan dishes. Garlic gives depth, while olive oil provides smoothness. Lemon juice brightens the flavors. Salt and pepper enhance everything. Cherry tomatoes add color and sweetness. Extra basil leaves make the dish look beautiful. For the full recipe, check out the link to ensure a delicious meal! First, fill a large pot with water and add a generous amount of salt. Bring the water to a rapid boil. This step is key; the salt helps flavor the pasta. Once boiling, add 12 ounces of your favorite pasta, like penne or spaghetti. Cook according to the package instructions. You want the pasta to be al dente, which means it should be tender but still firm to bite. Usually, this takes about 8 to 12 minutes. When the pasta is ready, drain it well and set it aside. Next, it’s time to make the vegan pesto. Grab your blender or food processor. Add 2 cups of fresh basil leaves, 1/2 cup of soaked raw cashews, and 1/4 cup of nutritional yeast. Also, include 3 cloves of minced garlic and 1 tablespoon of fresh lemon juice. Season with a pinch of sea salt and freshly ground black pepper. Blend this mixture until it becomes smooth and creamy. If it doesn't blend well, scrape down the sides of the blender and blend again until you get a silky texture. Now, combine the drained pasta with the creamy pesto sauce. Use a large mixing bowl for this. Pour the pesto over the pasta. With a pair of tongs or a spatula, toss everything together. Ensure that each piece of pasta gets coated with the vibrant pesto. If the sauce looks too thick, add a little water, one teaspoon at a time, until it reaches the desired consistency. Don't forget to taste! Adjust the seasoning with more salt, pepper, or lemon juice if needed. Finally, gently fold in 1 cup of halved cherry tomatoes for a fresh burst of flavor. Serve this delicious dish warm, garnished with extra basil leaves. Enjoy your vegan creamy pesto pasta! For the complete recipe, check the [Full Recipe]. Soaked cashews are the secret to a smooth and creamy sauce. They soften and blend well, making the pesto rich. Soak them in water for at least two hours before use. This step is key for a silky texture. If your pesto is too thick, don’t worry. Just add water! Start with a teaspoon at a time. Blend until you reach your desired creaminess. This helps the sauce hug the pasta perfectly. Don’t stop at just basil! You can spice it up with some red pepper flakes for heat. A pinch of black pepper adds depth. Try adding a bit of garlic powder for more flavor. Lemon juice adds freshness, but balance is key. If it’s too tangy, add a pinch of sugar or more cashews. This helps round out the flavors and brings the dish to life. Pair this pasta with roasted vegetables for a colorful plate. A side salad adds crunch and freshness. For a drink, consider a light white wine, like Sauvignon Blanc. As for portion sizes, aim for about one and a half cups per person. This ensures everyone leaves satisfied. Enjoy this dish warm for the best flavor experience! {{image_4}} You can change nuts or seeds in your pesto. Try using almonds or sunflower seeds. Each option brings a unique taste. For those avoiding gluten, select gluten-free pasta. Options like brown rice or chickpea pasta work well. Both choices give a nice texture and flavor. To mix up the flavor, add different herbs like parsley or spinach. These herbs bring extra freshness to your dish. You can also incorporate various vegan cheeses. Options like cashew cheese or nutritional yeast can enhance the creamy taste. This helps create layers of flavor in your pesto. Make your dish fresh by using seasonal veggies. For example, zucchini or asparagus can add crunch and color. You can also try different tomatoes. Roasted tomatoes can bring a sweet touch, while cherry tomatoes add a pop of freshness. Finish with garnishes like pine nuts or extra basil for a lovely look. For the complete recipe, check the Full Recipe. After enjoying your vegan creamy pesto pasta, store any leftovers in an airtight container. This keeps the pasta fresh and tasty. Place it in the fridge right away. The best storage time is up to 3 days. Beyond that, the pasta may lose its flavor and texture. To reheat your pasta, the best method is using a stovetop. Heat a pan over medium heat. Add a splash of water or olive oil to keep it moist. Stir gently to warm it up. When reheating, avoid high heat, as this can dry out the sauce. You want to keep that creamy goodness intact. Enjoy your delicious meal again! To make vegan creamy pesto pasta, follow these simple steps: 1. Cook the Pasta: Bring salted water to a boil. Add 12 oz of your pasta and cook until tender. This usually takes about 8-12 minutes. Drain and set aside. 2. Prepare the Pesto: In a blender, add 2 cups of fresh basil leaves, 1/2 cup of soaked raw cashews, and 3 minced garlic cloves. Pour in 1/4 cup of nutritional yeast and 1 tablespoon of lemon juice. Add a pinch of sea salt and black pepper. Blend until smooth. 3. Emulsify with Olive Oil: While blending, slowly add 1/4 cup of extra virgin olive oil. Keep blending until creamy. If it’s too thick, add water, one teaspoon at a time. 4. Combine Pasta and Pesto: In a large bowl, mix the drained pasta with your creamy pesto. Toss gently to coat the pasta well. 5. Final Touches: Taste the mix and adjust the seasoning. Fold in 1 cup of halved cherry tomatoes for a fresh touch. 6. Serve: Serve warm with extra basil leaves on top. Enjoy your delicious vegan creamy pesto pasta! Yes, you can freeze vegan creamy pesto pasta. Here are some tips to keep it tasty: - Cool Before Freezing: Let the pasta cool down before packing it. - Use Airtight Containers: Store the pasta in airtight containers or freezer bags. - Leave Space: Leave some room in the container for the pasta to expand. - Label and Date: Always label your containers with the date. Use within 2-3 months for best quality. When ready to eat, thaw in the fridge overnight. Reheat gently on the stove or in the microwave. Add a splash of water if it seems dry. If you don’t have nutritional yeast, try these alternatives: - Grated Vegan Cheese: Use a dairy-free cheese for a similar flavor. - Ground Flaxseed: This can add a nutty taste, though it won't mimic the cheese flavor. - T nutritional yeast: You can use this if you want a similar profile. - Parmesan Substitute: Some brands offer vegan parmesan that works well in pesto. Each substitute will change the flavor a bit, so adjust to your taste! This blog post covered how to make vegan creamy pesto pasta. You learned about ingredients, cooking pasta, and blending the pesto. We explored tips for smooth texture and flavor. I shared variations to keep things fresh, plus storage and reheating advice. In the end, making this dish is quick and fun. Enjoy experimenting with flavors and textures. This pasta will please vegans and non-vegans alike!](https://goldendishy.com/wp-content/uploads/2025/07/928f57b2-1357-48f3-b20e-4d7b01e4c937-768x768.webp)
