Air Fryer Mozzarella Sticks Crispy and Cheesy Snack

Are you ready for a quick and easy snack that’s crispy on the outside and gooey on the inside? Let’s dive into making Air Fryer Mozzarella Sticks! This recipe is packed with flavor and perfect for game nights or movie marathons. You’ll love how simple and quick it is to whip up this cheesy delight. Follow along as I guide you through each step to achieve mozzarella stick perfection!
Why I Love This Recipe
- Perfectly Crispy: The air fryer gives these mozzarella sticks a delightful crunch without the excess oil, making them a healthier snack option.
- Quick and Easy: This recipe requires minimal prep time and delivers deliciously cheesy results in just over an hour.
- Customizable Flavors: With the addition of garlic and onion powder, these sticks are bursting with flavor, but you can easily adjust the seasonings to suit your taste.
- Perfect for Dipping: Serve these mozzarella sticks with marinara sauce for a classic pairing that enhances the cheesy goodness.
Ingredients
Essential Ingredients for Air Fryer Mozzarella Sticks
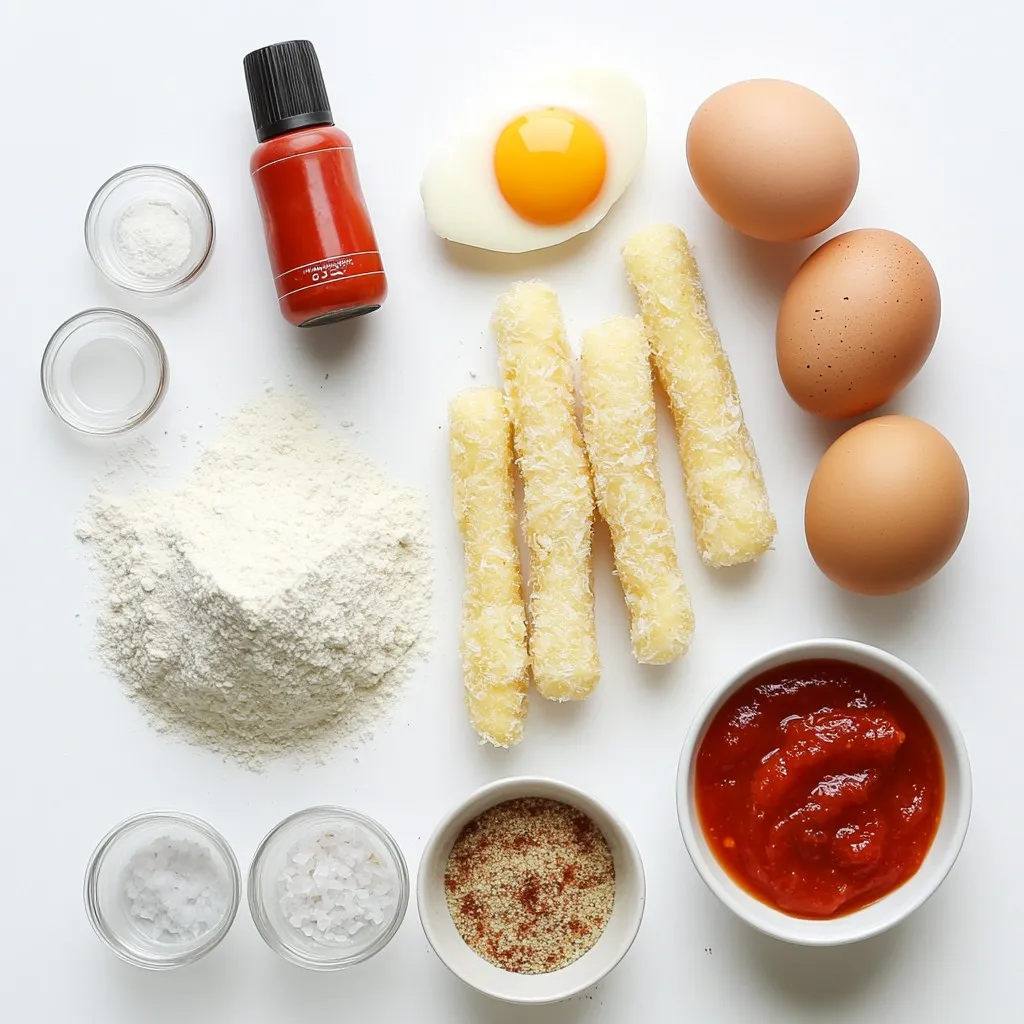
To make crispy air fryer mozzarella sticks, you need the following:
– 12 mozzarella cheese sticks
– 1 cup all-purpose flour
– 2 large eggs
– 1 cup Italian seasoned breadcrumbs
– 1 teaspoon garlic powder
– 1 teaspoon onion powder
– ½ teaspoon salt
– ½ teaspoon black pepper
– Cooking spray
– Marinara sauce for dipping
These ingredients are key. The mozzarella sticks provide that gooey center, while the flour and eggs help the breadcrumbs stick.
Optional Ingredients for Enhanced Flavor
You can add extra flavors to your mozzarella sticks. Some great options include:
– Crushed red pepper for heat
– Dried herbs like oregano or basil
– Parmesan cheese mixed with breadcrumbs
These optional ingredients boost the taste. They add a new layer of flavor that makes your snack even better.
Substitutions for Dietary Needs
You can easily swap ingredients to fit dietary needs. Here are some ideas:
– Use gluten-free flour and breadcrumbs for a gluten-free option.
– For a dairy-free version, try vegan cheese sticks.
– Instead of eggs, use a flaxseed mixture as a binder.
These substitutions keep your mozzarella sticks delicious while catering to different diets. Always ensure the replacements match your taste preferences and dietary restrictions.

Step-by-Step Instructions
Preparing the Cheese Sticks
Start by freezing the mozzarella sticks. Place them in the freezer for at least one hour. Freezing helps them stay firm. This way, they won’t melt too quickly when you cook them. The result? A gooey, cheesy center that is oh-so-delicious!
Setting Up the Breading Station
Now, let’s get our breading station ready. Grab three bowls. In the first bowl, pour in one cup of all-purpose flour. This is for a light coating. In the second bowl, crack two large eggs and whisk them until they are blended. They should look slightly frothy. The third bowl needs the flavor! Mix one cup of Italian seasoned breadcrumbs with one teaspoon of garlic powder, one teaspoon of onion powder, half a teaspoon of salt, and half a teaspoon of black pepper. This mix will give your mozzarella sticks a tasty crunch.
Breading Techniques for Optimal Crispiness
It’s time to bread the cheese sticks! Take out your frozen mozzarella sticks. First, dredge each stick in the flour. Shake off any extra flour. Next, dip it into the egg mixture. Make sure it’s fully coated. Lastly, roll the stick in the breadcrumb mix. Press lightly to help the breadcrumbs stick well. This step is key for that crispy finish.
Air Fryer Preheating and Cooking Instructions
Now, let’s preheat the air fryer. Set it to 390°F (200°C) and let it preheat for about five minutes. This ensures the mozzarella sticks cook at the right temperature. Once preheated, place the breaded sticks in a single layer inside the air fryer basket. Make sure they don’t overlap. Lightly spray them with cooking spray. This adds extra crispiness. Cook the mozzarella sticks for six to eight minutes. Watch for that golden brown color. Once they look crispy, they’re ready! Enjoy with marinara sauce for dipping.
Tips & Tricks
Achieving the Perfect Crispiness
To get that perfect crispy texture, freezing the mozzarella sticks is key. Freeze them for at least one hour. This keeps them firm during cooking. When you bread the sticks, make sure to coat them well. Start with flour, then dip in egg, and finish with breadcrumbs. Press the breadcrumbs gently to ensure they stick. Lightly spray the sticks with cooking spray before air frying. This adds a nice crunch.
Common Mistakes to Avoid
One mistake is not freezing the cheese long enough. If the cheese melts too fast, you lose that gooey center. Another mistake is overcrowding the air fryer basket. This can cause uneven cooking and soggy sticks. Always place them in a single layer. Avoid skipping the cooking spray! It helps the sticks crisp up nicely.
Serving Suggestions and Dipping Sauces
Serve your mozzarella sticks hot with marinara sauce for dipping. The tangy flavor pairs perfectly with the cheesy goodness. You can also try ranch dressing or a spicy aioli for a twist. For a fun touch, add some chopped herbs or chili flakes to your sauce. Enjoy these crispy snacks at parties or as a tasty treat at home.
Pro Tips
- Freeze the Cheese: For the best results, freeze the mozzarella sticks for at least an hour before breading. This prevents them from melting too quickly and helps maintain a gooey center while achieving a crispy exterior.
- Season Your Breadcrumbs: Enhance the flavor of your mozzarella sticks by adding extra herbs and spices to the breadcrumb mixture. Consider mixing in some Italian seasoning or crushed red pepper for a spicy kick.
- Don’t Overcrowd the Basket: When air frying, make sure to place the mozzarella sticks in a single layer without overlapping. This allows for even cooking and maximum crispiness.
- Check for Doneness: Keep an eye on the mozzarella sticks as they cook. Air fryers can vary, so check them around the 6-minute mark to ensure they reach a perfect golden brown without burning.

Variations
Flavor Variations with Different Seasonings
You can easily change the taste of your mozzarella sticks. Try adding spices to the breadcrumb mix. Here are some ideas:
– Cajun seasoning for a spicy kick.
– Smoked paprika for a smoky flavor.
– Parmesan cheese to add a nutty touch.
Mix these seasonings with the garlic and onion powder. This way, you create a unique snack every time.
Cheese Alternatives for Unique Twists
While mozzarella is a classic choice, you can try other cheeses too. Here are a few fun options:
– Cheddar for a sharp taste.
– Pepper Jack for some heat.
– String cheese for a fun twist.
Each cheese melts differently, giving you a new texture and flavor. Experiment and see what you like best!
Gluten-Free and Vegan Options
You can make mozzarella sticks fit special diets. For gluten-free sticks, use gluten-free flour and breadcrumbs. Many brands offer options that taste great.
If you want a vegan version, use plant-based cheese. There are many types available now. You can also bread them with chickpea flour and gluten-free breadcrumbs. This way, you enjoy the same crispy treat without animal products.
Feel free to get creative. The possibilities are endless!
Storage Info
How to Store Leftover Mozzarella Sticks
Leftover mozzarella sticks are easy to store. First, let the cooked sticks cool down. Then, place them in an airtight container. Make sure the container seals well to keep them fresh. You can store them in the fridge for up to three days.
Reheating Methods for Leftovers
To enjoy your leftover mozzarella sticks, reheating is key. You can use the air fryer for the best results. Set the air fryer to 350°F (175°C). Place the sticks in a single layer and heat for about 3 to 5 minutes. This keeps them crispy. You can also use an oven. Preheat it to 375°F (190°C) and bake for 8 to 10 minutes.
Freezing Mozzarella Sticks for Later Use
Freezing mozzarella sticks is a great way to enjoy them later. To freeze, place the uncooked, breaded sticks on a baking sheet. Make sure they are not touching. Freeze them for about 1 hour. Once firm, transfer the sticks to a freezer bag. They can last up to three months in the freezer. When ready to eat, cook them straight from the freezer without thawing. Adjust the cooking time to 8 to 10 minutes for perfect results.
FAQs
Can I make Air Fryer Mozzarella Sticks without breadcrumbs?
Yes, you can skip the breadcrumbs. Instead, use crushed nuts or crushed cornflakes. Both options add crunch without traditional breadcrumbs. You may need to adjust cooking time since they may brown differently.
How long should I freeze the mozzarella sticks before cooking?
Freeze the mozzarella sticks for at least 1 hour. This step is key. It keeps the cheese from melting too fast. Proper freezing ensures you get that gooey center when cooked.
What dipping sauces pair well with mozzarella sticks?
Marinara sauce is the classic choice. Its tangy flavor complements the cheesy sticks perfectly. Other great options include ranch dressing, garlic aioli, or even a spicy marinara. Each adds a tasty twist to your snack.
Can I use fresh mozzarella cheese for this recipe?
Using fresh mozzarella is possible, but results may vary. Fresh cheese has more moisture, making it harder to fry. If you use it, cut the cheese into smaller pieces. Freeze them for longer to help achieve the right texture.
This guide covered all you need for air fryer mozzarella sticks. We talked about essential and optional ingredients, step-by-step cooking, and storage tips. I shared ways to make them crisp and tasty, plus fun variations to try. Don’t forget about the great dipping sauces you can use. Now, you can make these snacks just right, impressing family and friends. Think about these tips next time you’re craving a cheese treat! Enjoy your cookin

Crispy Air Fryer Mozzarella Sticks
Ingredients
- 12 pieces mozzarella cheese sticks
- 1 cup all-purpose flour
- 2 large eggs
- 1 cup Italian seasoned breadcrumbs
- 1 teaspoon garlic powder
- 1 teaspoon onion powder
- 0.5 teaspoon salt
- 0.5 teaspoon black pepper
- 1 spray cooking spray
- to taste marinara sauce for dipping
Instructions
- Start by placing the mozzarella sticks in the freezer for at least 1 hour.
- Organize three bowls for the breading process: one with flour, one with whisked eggs, and one with breadcrumbs mixed with seasonings.
- Dredge each frozen mozzarella stick in flour, dip in egg, and roll in the breadcrumb mixture.
- Preheat the air fryer to 390°F (200°C) for about 5 minutes.
- Place the breaded mozzarella sticks in a single layer in the air fryer basket and lightly spray with cooking spray.
- Air fry the mozzarella sticks for 6-8 minutes until golden brown and crispy.
- Carefully transfer the cooked mozzarella sticks and let them cool for about a minute before serving with marinara sauce.


![- 2 medium zucchinis - 1 cup cherry tomatoes - 1/4 cup fresh basil leaves The fresh produce makes this dish feel bright and lively. Zucchini adds a crunchy texture, while cherry tomatoes bring a sweet burst. Basil gives a fragrant touch that brightens every bite. When you use fresh ingredients, you elevate the salad. - 1 cup fresh mozzarella balls Fresh mozzarella balls, or bocconcini, are creamy and soft. They add richness to the salad that balances the fresh flavors. Their bite-sized shape makes them easy to enjoy. I recommend using high-quality mozzarella for the best taste. - 2 tablespoons balsamic glaze - 2 tablespoons extra-virgin olive oil - Salt and black pepper - 1 clove garlic (optional) The dressing ties all the ingredients together. Balsamic glaze provides sweetness and depth, while olive oil adds richness. Salt and pepper enhance the natural flavors. If you want an extra kick, add minced garlic. It brings a wonderful aroma and taste to the dish. For the full recipe, check out the detailed instructions on how to make this fresh and flavorful dish. To start, you need to spiralize the zucchinis. This will make long, noodle-like strands. A spiralizer works best for this task. If you do not have one, you can use a vegetable peeler. Just slice thin ribbons of zucchini instead. Next, combine all salad components in a large bowl. Add the spiralized zucchini, cherry tomatoes, and fresh mozzarella balls. This colorful mix creates a vibrant base for your salad. In a small bowl, whisk together balsamic glaze and olive oil. This will help blend the flavors nicely. If you want a bolder taste, add minced garlic to the dressing. The garlic gives it a nice kick. Now, pour the dressing over the zucchini noodle mixture. Sprinkle salt and black pepper to taste. These simple seasonings enhance the dish's flavors. Use your hands or tongs to toss the salad gently. Make sure all the ingredients are well coated. To finish, add the torn basil leaves on top of the salad. This adds a fresh aroma and flavor. Gently toss the salad again to mix the basil throughout. For serving, you can put it in a big bowl. A light drizzle of balsamic glaze on top makes it look even better. For the full details, check out the [Full Recipe]. If you want to switch things up, there are great options. For mozzarella, try using burrata. Burrata is creamier and adds a rich twist. You can also use vegan cheese if you prefer a plant-based option. For the dressing, consider a light vinaigrette. A mix of lemon juice, olive oil, and a dash of mustard works well. This gives a fresh flavor while cutting calories. To keep the salad fresh, store it properly. Use an airtight container to keep the salad from getting soggy. If you layer the ingredients, place the zucchini at the bottom. This helps keep moisture away from the tomatoes and cheese. On busy days, you can prep the salad in advance. Spiralize the zucchini and chop the tomatoes ahead of time. Just add the dressing and basil when you're ready to eat. This saves you time without losing flavor. To boost the taste, consider adding fresh herbs like oregano or parsley. They add depth and freshness. You can also sprinkle in some crushed red pepper for a bit of heat. For extra crunch, serve the salad with toasted pine nuts or sunflower seeds. These add a nice texture contrast and make the dish even more enjoyable. You can find the full recipe [here](#). {{image_4}} You can add protein to your Zucchini Noodle Caprese Salad for a fuller meal. Here are two great options: - Grilled chicken or shrimp: Both add a tasty twist and extra nutrients. Cook them simply with salt, pepper, and olive oil. Slice and mix them in. - Chickpeas for a vegetarian option: These add a nice crunch and plant-based protein. Just rinse and toss them in for a hearty touch. Mixing up flavors can keep this salad exciting. Here are some ideas: - Adding different dressing styles: Try pesto, ranch, or lemon vinaigrette for a fresh taste. Each will give your salad a unique flair. - Incorporating seasonal vegetables: Add bell peppers, corn, or avocado. These can enhance the texture and flavor while keeping it fresh and vibrant. How you serve this salad can change its vibe. Consider these styles: - Zucchini noodle bowls: Serve it in deep bowls for a casual gathering. It makes it easy for guests to dig in. - Plated salads for special occasions: For a fancy dinner, plate it neatly. This elevates the look and makes it feel more special. These variations can help you customize your Zucchini Noodle Caprese Salad. Choose your favorites to make it truly yours! For the full recipe, check out the details above. To store leftovers, place your Zucchini Noodle Caprese Salad in an airtight container. This keeps the salad fresh and prevents odors from mixing. Use a container that fits the salad snugly to minimize air exposure. Ideal storage containers: - Glass containers with tight lids - BPA-free plastic containers - Silicone food bags Zucchini noodles can stay fresh in the fridge for about 2 to 3 days. Cherry tomatoes and mozzarella also last up to this time frame. Always check for signs of spoilage. Signs of spoilage: - Slimy texture on zucchini - Mold growth on tomatoes - Sour smell from mozzarella Freezing zucchini noodles is a great way to keep them longer. However, fresh zucchini noodles can lose their texture when thawed. To freeze, spiralize the zucchini and place it in a freezer-safe bag. Remove as much air as possible before sealing. Best practices for freezing prepared salad: - Avoid freezing with the dressing; add it later. - Store without fresh basil, as it does not freeze well. - Use within 1 to 2 months for the best flavor. For the full recipe, refer back to the Zucchini Noodle Caprese Salad section. Zucchini noodles last about 3 to 5 days in the fridge. Store them in an airtight container. They will keep fresh and crisp during this time. If they start to look slimy, it’s best to toss them out. Yes, you can use other vegetables. Some great alternatives are carrots, cucumbers, and sweet potatoes. Each offers a unique taste and texture, making your salad fun and versatile. Yes, this salad is gluten-free. The main ingredients contain no gluten. Zucchini, tomatoes, and cheese all fit into a gluten-free diet. Enjoy this dish without worry! You can prep some parts ahead. Spiralize the zucchini and cut the tomatoes a day before. However, add the dressing just before serving. This keeps the salad fresh and crunchy. This salad pairs well with grilled chicken or shrimp. It also goes great with crusty bread or a light soup. For drinks, try a crisp white wine or sparkling water. Enjoy the mix of flavors! For the full recipe, check out the details above! This blog explored a delicious and fresh Zucchini Noodle Caprese Salad. You learned about key ingredients like zucchini, cherry tomatoes, and mozzarella. The instructions simplified making this dish with easy steps. Tips offered ways to customize and store your salad. Variations let you add protein or seasonal flavors. This salad is perfect for any meal. With its bright flavors, it suits busy days or special occasions. Enjoy your cooking adventure and make this salad often!](https://goldendishy.com/wp-content/uploads/2025/07/4c5bc4a7-43a5-40d0-aa85-49819cbbae48-768x768.webp)


![- 1 bunch of fresh asparagus, trimmed (about 16-20 spears) - 1 cup freshly grated Parmesan cheese - 1/2 cup panko breadcrumbs - 3 cloves garlic, finely minced - 1 teaspoon garlic powder - 1/2 teaspoon fine sea salt - 1/4 teaspoon freshly ground black pepper - 2 large eggs, lightly beaten - 2 tablespoons extra virgin olive oil - 1 tablespoon fresh parsley, finely chopped For the best flavor, choose fresh asparagus that is bright green with firm stalks. Look for Parmesan cheese that you grate yourself. Pre-grated cheese often lacks the rich taste you want. When selecting panko breadcrumbs, ensure they are light and airy for that perfect crunch. It’s important to use fresh garlic for the best taste. Always measure your ingredients accurately for consistent results. Each serving of Garlic Parmesan Asparagus Fries offers a tasty balance of nutrients. These fries are low in calories and high in vitamins A and C. They provide healthy fats from olive oil and protein from eggs and cheese. One serving typically contains around 200 calories, 10g of protein, and 15g of fat. This makes them a healthier alternative to regular fries. Enjoy them guilt-free as a snack or side dish! To make Garlic Parmesan Asparagus Fries, start by gathering your ingredients. You will need fresh asparagus, Parmesan cheese, panko breadcrumbs, garlic, eggs, and olive oil. Next, preheat your oven to 425°F (220°C) and line a baking sheet with parchment paper for easy cleanup. In a shallow bowl, mix the panko breadcrumbs, grated Parmesan cheese, minced garlic, garlic powder, sea salt, and black pepper. Stir well to combine all the flavors. In another bowl, beat the eggs until they are smooth and a bit frothy. Now, take each asparagus spear and dip it in the egg mixture. Make sure to coat it well, but let any extra egg drip off. Then, roll the asparagus in the breadcrumb mix, pressing gently to ensure an even coat. Place the coated spears on your prepared baking sheet in a single layer. Drizzle the olive oil over the asparagus. This helps them get that nice crispy texture as they bake. Place the baking sheet in your oven. Bake the asparagus fries for about 15 to 20 minutes. Keep checking until they are fork-tender and the coating is a beautiful golden brown. Once done, take the baking sheet out of the oven. Let the fries cool for a few minutes. This step is important as it helps them crisp up even more. For a lovely presentation, serve your Garlic Parmesan Asparagus Fries on a long platter. Add a small bowl of marinara sauce or garlic aioli for dipping. This adds a tasty twist that everyone will love. Finally, sprinkle some fresh parsley on top for a touch of color and flavor. For the full recipe and more details, check out the [Full Recipe]. To get your Garlic Parmesan Asparagus Fries crispy, follow a few steps. First, use fresh asparagus. The fresher, the better! Next, coat each spear well with the egg and breadcrumb mixture. This helps the coating stick. Press the breadcrumbs onto the asparagus for a nice layer. Finally, drizzle olive oil over the fries. This adds flavor and aids crispiness. I’ve seen a few common mistakes in the kitchen. One is overcrowding the baking sheet. It causes steaming, making your fries soggy. Arrange the asparagus in a single layer. Another mistake is not preheating the oven. A hot oven ensures that the fries cook evenly. Lastly, don’t skip the panko breadcrumbs. They give the perfect crunch. Garnishing adds fun to your dish. Try these ideas to elevate your fries! First, sprinkle more parsley for color. You can also add lemon zest for a fresh taste. If you like heat, sprinkle some red pepper flakes on top. For a dip, serve marinara sauce or a creamy garlic aioli. These little touches make your Garlic Parmesan Asparagus Fries stand out. For the full recipe, check out the earlier section. {{image_4}} You can easily make these fries vegan. Instead of eggs, use a flax egg. Mix one tablespoon of ground flaxseed with three tablespoons of water. Let it sit for a few minutes to thicken. This mixture works great to bind the panko and cheese. For cheese, try using a vegan Parmesan. It adds flavor without dairy. This way, everyone can enjoy these tasty fries! To make Garlic Parmesan Asparagus Fries gluten-free, swap regular breadcrumbs for gluten-free panko. You can also use crushed nuts or almond flour. Both options give a nice crunch. Just ensure all your ingredients are gluten-free. This way, you can enjoy these fries without worry. Want to spice things up? Add some cayenne pepper or chili flakes to the breadcrumb mixture. This gives your fries a nice kick. You can also mix in some dried herbs like oregano or thyme. Fresh herbs like rosemary can add an amazing flavor too. Feel free to experiment and find your favorite taste! For the full recipe, check out the detailed instructions above. You can store leftover Garlic Parmesan Asparagus Fries in the fridge. Use an airtight container. They will stay fresh for up to three days. Make sure the fries are cool before sealing the container. This helps keep them crisp. To reheat, use an oven or air fryer. Preheat the oven to 350°F (175°C). Place the fries on a baking sheet. Heat for about 10 minutes. This keeps them crispy. Avoid using the microwave, as it makes them soggy. You can freeze these fries for later use. First, let them cool completely. Then, place them in a freezer-safe bag. Remove as much air as possible. They can last for up to three months. When ready to eat, bake from frozen at 425°F (220°C) for 20-25 minutes. Enjoy the crunch just like fresh! To make Garlic Parmesan Asparagus Fries, you start by preheating your oven to 425°F (220°C). Next, line a baking sheet with parchment paper. This helps with easy cleanup. Combine panko breadcrumbs, grated Parmesan cheese, minced garlic, garlic powder, sea salt, and black pepper in a shallow bowl. Mix them well. In another bowl, beat two eggs until they look frothy. Dip each asparagus spear into the eggs, letting the excess drip off. Roll them in the breadcrumb mix, ensuring they are coated evenly. Place the spears on the baking sheet in one layer. Drizzle olive oil on top. Bake for 15-20 minutes until crispy and golden. Finally, sprinkle fresh parsley on top for a nice finish. For the full recipe, check out the detailed instructions above. Yes, you can use frozen asparagus, but it may not be as crisp. Frozen asparagus tends to have more moisture. This can lead to soggy fries. If you use frozen asparagus, thaw and drain it well before coating. Pat it dry with a paper towel to remove excess water. This step helps keep the fries crispy when baked. If you need a substitute for Parmesan cheese, try nutritional yeast for a vegan option. It has a cheesy flavor and works well in this recipe. Grated Pecorino Romano offers a similar taste, though it is saltier. If you want a milder cheese, use grated mozzarella. Just remember, the flavor may change with these swaps, but they will still be tasty! This guide covers all you need for perfect Garlic Parmesan Asparagus Fries. We explored key ingredients, measurements, and nutrition. I provided step-by-step instructions to help you bake and serve. Plus, we shared tips for crispiness, mistakes to watch for, and fun garnishing ideas. In the end, try out variations like vegan or gluten-free. Proper storage can keep your fries fresh and tasty. With these insights, you can make delicious fries every time. Enjoy experimenting and sharing these yummy treats!](https://goldendishy.com/wp-content/uploads/2025/07/ccbce488-a3dc-4dce-b527-37d827ece95a-768x768.webp)