Garlic Parmesan Monkey Bread Irresistible Flavor Treat
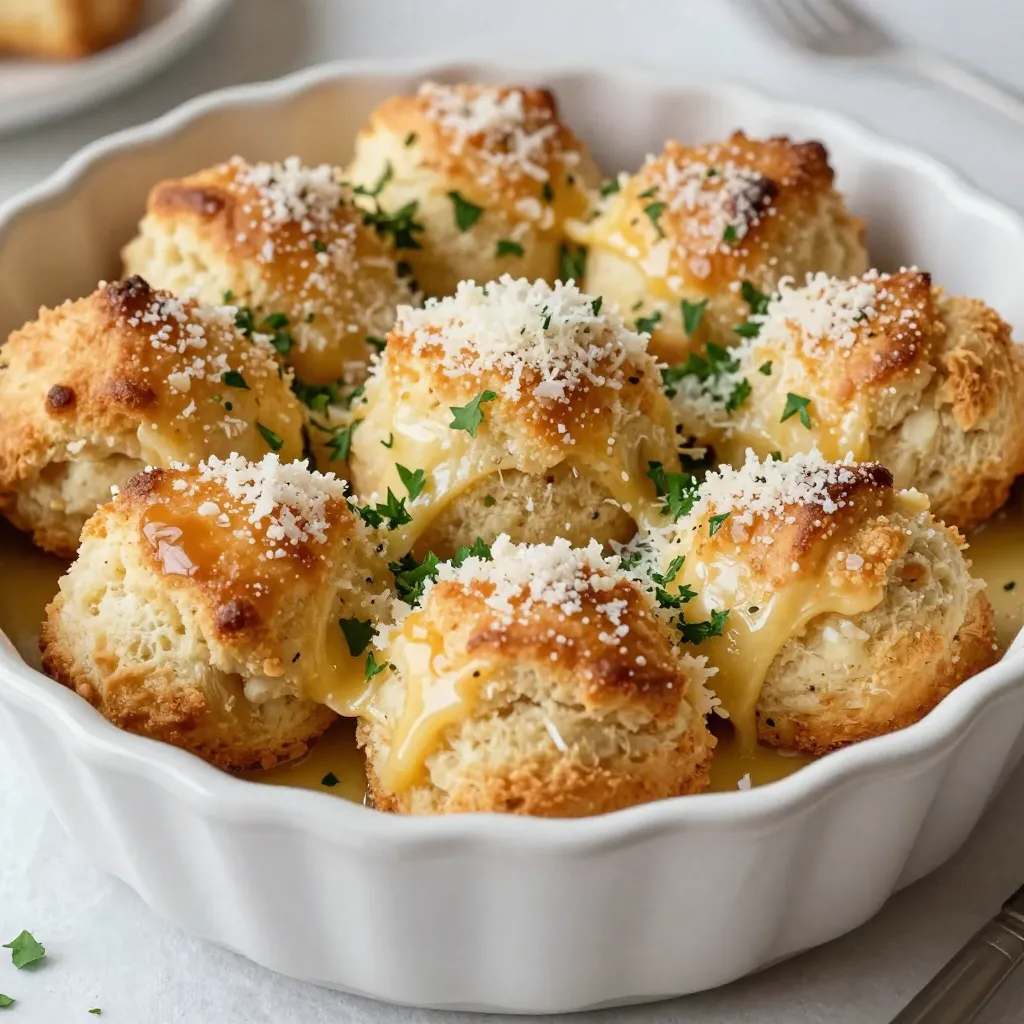
Are you ready to elevate your snack game? Garlic Parmesan Monkey Bread packs bold flavor into every bite. This warm, cheesy treat is perfect for any gathering or just a night at home. I’ll guide you through simple steps and share my best tips to make this dish a crowd-pleaser. Dive in and discover how to create this mouthwatering appetizer that everyone will love!
Why I Love This Recipe
- Easy to Make: This recipe is incredibly simple, requiring just a few ingredients and minimal preparation time, making it perfect for beginner cooks.
- Flavor Packed: The combination of garlic and Parmesan creates a rich, savory flavor that is always a crowd-pleaser.
- Fun to Share: Monkey bread is designed for pulling apart, making it a fun and interactive dish for parties and gatherings.
- Versatile: You can easily customize this recipe by adding your favorite herbs or spices, or even incorporating other cheeses for a unique twist!
Ingredients
List of Required Ingredients
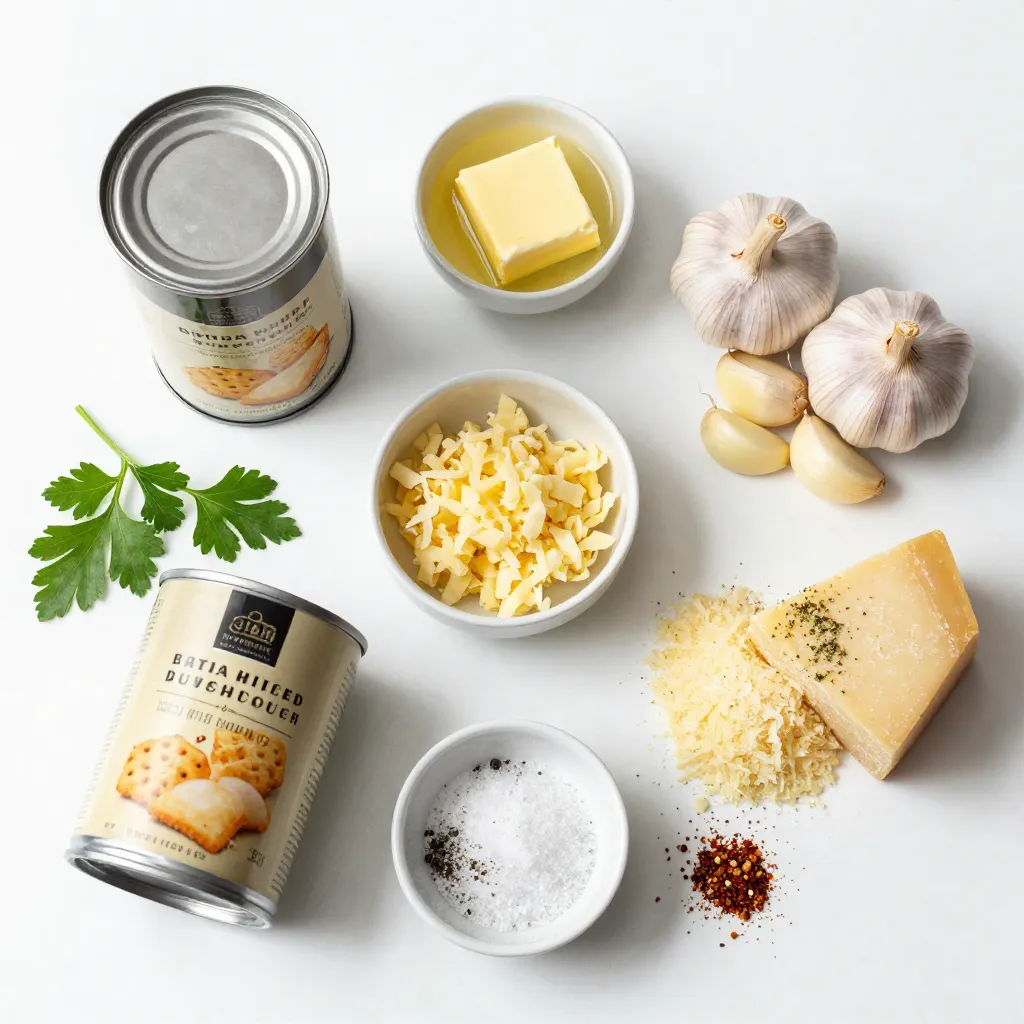
To make Garlic Parmesan Monkey Bread, gather these key items:
– 3 cans of refrigerated biscuit dough
– 1/2 cup unsalted butter, melted
– 4 cloves garlic, minced
– 1 cup freshly grated Parmesan cheese
– 2 teaspoons Italian seasoning
– 1 teaspoon dried parsley
– 1/2 teaspoon kosher salt
– 1/4 teaspoon freshly ground black pepper
Optional Ingredients for Extra Flavor
You can add extra zest to your monkey bread with these ingredients:
– 1/4 teaspoon crushed red pepper flakes (for heat)
– Extra grated Parmesan for garnish
– Fresh chopped parsley for color
Ingredient Substitutions
You can switch some ingredients if needed:
– Use olive oil instead of unsalted butter for a lighter taste.
– Swap Parmesan with Pecorino Romano for a sharper flavor.
– If you don’t have Italian seasoning, use a mix of dried basil and oregano.
– Use gluten-free biscuit dough for a gluten-free version.
These options keep the dish tasty and flexible!
Step-by-Step Instructions
Prepping the Oven and Bundt Pan
First, set your oven to 350°F (175°C). This heat makes the bread rise well. Next, take a bundt pan and grease it. You can use cooking spray or softened butter. This step helps the bread come out easily later.
Preparing the Biscuit Dough
Open the cans of biscuit dough. Use a knife to cut each biscuit into four pieces. This gives you tasty, bite-sized morsels. Make sure to keep them even for the best results.
Making the Garlic Butter and Cheese Mixture
In a medium bowl, mix the melted butter with the minced garlic. Stir well so the garlic spreads through the butter. In another bowl, combine the grated Parmesan cheese, Italian seasoning, dried parsley, salt, black pepper, and crushed red pepper flakes (if you like some heat). Whisk until everything is well mixed.
Coating and Layering the Biscuit Pieces
Take a piece of biscuit and dip it into the garlic butter. Make sure it gets fully coated. Let any extra butter drip off. Then, roll that piece in the cheese mixture. Make sure it is completely covered. Repeat this for all the biscuit pieces.
After coating, layer the biscuit pieces in the greased bundt pan. Make sure they are arranged evenly. This step ensures an even bake and a nice pull-apart texture.
Baking the Garlic Parmesan Monkey Bread
Drizzle any leftover garlic butter over the layered biscuit pieces. This adds extra flavor. Now, place the bundt pan in the preheated oven. Bake for about 30-35 minutes. Look for a rich golden brown top. This signals that the dough is fully cooked.
Cooling and Presentation
Once baked, take the pan out and let it cool for about 10 minutes. This helps the bread set. Carefully flip it onto a serving plate. Enjoy the sight as the delicious bread tumbles out. Serve it warm, adding extra grated Parmesan and a sprinkle of fresh parsley for color. For a fun touch, offer a side of marinara sauce for dipping!
Tips & Tricks
Essential Tips for Perfect Monkey Bread
– Use Fresh Ingredients: Always choose fresh garlic and high-quality Parmesan cheese for the best taste.
– Grease the Pan Well: A well-greased bundt pan prevents sticking. Use cooking spray or softened butter.
– Cut Even Pieces: Cut the biscuit dough into equal quarters. This ensures even cooking and easy pulling apart.
– Layer Carefully: Place the biscuit pieces in layers. This helps them bake evenly and creates a nice pull-apart effect.
– Check the Bake: Keep an eye on the bread while it bakes. Look for a golden brown color to know it’s ready.
Common Mistakes to Avoid
– Skipping the Garlic Butter: Don’t skip the garlic butter! It adds essential flavor.
– Overcrowding the Pan: Avoid packing the biscuit pieces too tightly. This can lead to uneven baking.
– Not Drizzling Extra Butter: Always drizzle leftover garlic butter over the top before baking. It adds more flavor.
– Not Letting it Cool: Give the bread some time to cool before flipping it. This helps it hold its shape.
Enhancing Flavor with Additional Ingredients
– Add Fresh Herbs: Mix in fresh basil or thyme for an extra flavor boost.
– Include Cheese Variations: Try using mozzarella or cheddar for a different taste.
– Spice it Up: Add jalapeños or extra crushed red pepper flakes for heat.
– Serve with Dipping Sauces: Pair with marinara or garlic aioli for added flavor.
Pro Tips
- Use Fresh Garlic: Freshly minced garlic will provide a more robust and vibrant flavor compared to pre-minced options, enhancing the overall taste of your monkey bread.
- Parmesan Quality Matters: Opt for freshly grated Parmesan cheese instead of pre-packaged to achieve a richer, creamier texture and deeper flavor in each bite.
- Adjust Seasoning: Feel free to tweak the seasoning based on your preference. Add more red pepper flakes for a spicy kick or extra dried herbs for a more aromatic profile.
- Let it Rest: Allow the monkey bread to cool for a few minutes before serving. This will help the pieces hold together better when you pull them apart.
Variations
Different Cheeses to Use
You can switch up the cheese in your Garlic Parmesan Monkey Bread. Instead of Parmesan, try mozzarella for a gooey texture. Cheddar adds a sharp bite, while Gruyère offers a nutty flavor. Experiment with a mix of cheeses to find your favorite. Each type will change the taste and texture of the bread.
Adding Vegetables or Meats
Want to make your monkey bread heartier? Add veggies or meats! Chopped spinach or roasted red peppers can bring freshness. For meat lovers, consider adding cooked bacon or sausage. Just be sure to chop everything small, so it mixes well with the dough. This makes each bite full of flavor and fun.
Sweet vs. Savory Monkey Bread Options
You can also play with flavors by making sweet versions. Swap garlic and cheese for cinnamon and sugar. Use brown sugar and a bit of vanilla for a dessert twist. Add fruits like apples or berries for a fruity touch. This way, your monkey bread can be a treat any time of day!
Storage Info
Best Way to Store Leftovers
To keep your Garlic Parmesan Monkey Bread fresh, let it cool completely first. After that, wrap it tightly in plastic wrap or store it in an airtight container. This method helps to lock in moisture and flavor. You can keep it in the fridge for up to three days. If you notice any dryness, just add a little butter before serving.
How to Reheat for Freshness
When you’re ready to enjoy your leftovers, preheat your oven to 350°F (175°C). Place the monkey bread in an oven-safe dish and cover it with aluminum foil. Heat it for about 10-15 minutes or until warm. This method keeps the bread soft and tasty. If you prefer, you can microwave individual pieces for about 30 seconds. Just keep an eye on it to avoid overheating.
Freezing Tips for Longer Storage
If you want to store your Garlic Parmesan Monkey Bread for a longer time, freezing is a great option. First, wrap the cooled bread in plastic wrap, then place it in a freezer bag. Make sure to remove as much air as possible. You can freeze it for up to three months. When you want to eat it, thaw it in the fridge overnight and then reheat it in the oven as mentioned before. This way, you can savor that delicious flavor anytime!
FAQs
Can I make Garlic Parmesan Monkey Bread ahead of time?
Yes, you can prepare it ahead of time. Make the dough and coat the pieces. Then, cover the bundt pan with plastic wrap and store it in the fridge. Bake it the next day. This saves time and makes for a quick snack or meal.
What can I serve with this monkey bread?
Garlic Parmesan Monkey Bread is great on its own. However, it pairs well with marinara sauce for dipping. You can also serve it with a fresh salad or a bowl of soup. These sides add a nice balance to the meal.
How do I know when the monkey bread is fully cooked?
Check the color of the top. It should be a rich golden brown. You can also insert a toothpick into the center. If it comes out clean, the bread is done. This ensures that the dough is fully cooked.
Can I use different types of dough for this recipe?
Yes, you can use other types of dough. Try using pizza dough or homemade bread dough. Each will give a different flavor and texture. Experiment to find your favorite style!
You learned about the key ingredients for Garlic Parmesan Monkey Bread and how to prep them. I shared step-by-step instructions, tips, and possible variations to elevate your dish. Remember to store leftovers correctly for maximum freshness. This recipe is flexible; feel free to experiment with flavors. Whether sweet or savory, it’s sure to delight. Enjoy making this fun and tasty treat for your next gatherin

Garlic Parmesan Monkey Bread
Ingredients
- 3 cans refrigerated biscuit dough
- 0.5 cup unsalted butter, melted
- 4 cloves garlic, minced
- 1 cup freshly grated Parmesan cheese
- 2 teaspoons Italian seasoning
- 1 teaspoon dried parsley
- 0.5 teaspoon kosher salt
- 0.25 teaspoon freshly ground black pepper
- 0.25 teaspoon crushed red pepper flakes (optional)
Instructions
- Preheat the Oven: Set your oven to 350°F (175°C) and generously grease a bundt pan with cooking spray or softened butter to prevent sticking.
- Prepare the Biscuit Dough: Open the cans of biscuit dough and use a knife to cut each biscuit into four equal pieces for bite-sized morsels.
- Make the Garlic Butter: In a medium mixing bowl, combine the melted butter with the minced garlic. Stir the mixture until the garlic is evenly distributed throughout the butter.
- Prepare the Cheese Mixture: In a separate bowl, whisk together the grated Parmesan cheese, Italian seasoning, dried parsley, salt, black pepper, and crushed red pepper flakes (if using) until well combined.
- Coat the Biscuit Pieces: Take a quartered biscuit piece and dip it into the garlic butter, ensuring that it is thoroughly coated. Allow any excess butter to drip off.
- Add the Cheese Coating: Roll the buttered biscuit piece in the Parmesan mixture, making sure it is completely covered. Repeat this process for all biscuit quarters.
- Layer in the Bundt Pan: Begin layering the coated biscuit pieces in the greased bundt pan. Arrange them evenly to ensure an even bake and a beautiful pull-apart texture.
- Finish with Garlic Butter: Drizzle any leftover garlic butter over the top of the arranged biscuit pieces to enhance flavor.
- Bake to Perfection: Place the bundt pan in the preheated oven and bake for approximately 30-35 minutes, or until the top is a rich golden brown and the dough is fully cooked through.
- Cool and Serve: After baking, remove the monkey bread from the oven and let it cool in the pan for about 10 minutes. Carefully flip it onto a serving plate, allowing the delicious bread to tumble out beautifully.
![To make Cheesy Ranch Potatoes, you will need a few simple items. Gather these ingredients before you start cooking: - 2 pounds baby potatoes, halved - 1 cup shredded sharp cheddar cheese - ½ cup creamy sour cream - 1 packet ranch dressing mix (about 1 ounce) - 3 tablespoons extra virgin olive oil - 1 teaspoon garlic powder - 1 teaspoon onion powder - Salt and freshly ground black pepper to taste - 2 green onions, finely sliced (for garnish) Each ingredient plays a key role in creating that cheesy, ranch-flavored goodness. The baby potatoes serve as the base, providing a tender texture. Sharp cheddar cheese adds a rich, creamy taste. Sour cream brings a tangy flavor, while the ranch dressing mix ties everything together with its herby notes. The garlic and onion powders enhance the overall taste, making every bite delicious. Don't forget the green onions; they add a fresh crunch on top! For the complete recipe, check out the [Full Recipe]. - Preheat the oven to 400°F (200°C). This makes sure your potatoes cook evenly. - In a large bowl, mix the olive oil, ranch dressing mix, garlic powder, onion powder, salt, and pepper. Stir until well combined. - Add the halved baby potatoes to the bowl. Toss them until every piece is coated in the ranch mixture. This step adds great flavor. - Line a baking sheet with parchment paper. This helps with easy cleanup. - Spread the coated potatoes on the lined baking sheet in a single layer. This helps them roast evenly. - Roast the potatoes for 25-30 minutes. They should turn golden brown and be tender when pierced. - Take the baking sheet out of the oven and sprinkle cheddar cheese over the hot potatoes. - Return the baking sheet to the oven for 5-7 minutes. Wait until the cheese melts and bubbles. - Drizzle sour cream over the cheesy potatoes and top with sliced green onions. This adds a fresh touch. Check out the Full Recipe for more details! To make Cheesy Ranch Potatoes, start by preheating your oven to 400°F (200°C). This helps the potatoes roast evenly. Spread the potatoes out on a lined baking sheet. This ensures they cook well and get crispy. Check for doneness by piercing them with a fork. They should be tender and golden brown. To boost flavor, try adding herbs like parsley or dill. You can also mix in spices like paprika or cayenne for a kick. If you want a different cheese, use mozzarella or pepper jack. Each type brings a unique taste and texture to the dish. For serving, use a colorful bowl to show off the cheesy ranch potatoes. Add a sprinkle of extra cheddar on top for flair. You can also place whole green onion tops around the edge for a fresh look. These simple steps make your dish appealing and ready for guests. For the full recipe, follow the steps provided in the earlier sections. Enjoy your cooking! {{image_4}} You can make Cheesy Ranch Potatoes even more fun with simple swaps. - Using different types of cheese: Try mozzarella for a milder taste or pepper jack for a kick. You can even mix cheeses for a rich flavor. - Substituting Greek yogurt for sour cream: Greek yogurt gives you a nice tang and adds protein. It’s a healthier option that keeps your potatoes creamy. Change the flavor to keep things exciting. - Spicy ranch version: Add a teaspoon of cayenne pepper to the ranch mix. This will give your potatoes a nice heat. - Herb-infused options: Mix in dried herbs like thyme or rosemary. This adds a fresh taste that pairs well with the cheese. Making Cheesy Ranch Potatoes work for everyone is easy! - Vegan adaptations: Swap the cheese for a vegan cheese and use coconut yogurt. This keeps all the creamy goodness without dairy. - Gluten-free adjustments: Use a gluten-free ranch mix. Most ranch mixes are gluten-free, but always check the labels. Feel free to explore these variations to make this dish your own! For the full recipe, check out Cheesy Ranch Potatoes Delight. To keep your cheesy ranch potatoes fresh, store them in the fridge. Place them in an airtight container. They will last about 3 to 5 days. Make sure they cool completely before sealing. For longer storage, you can freeze them. Put the cooled potatoes in a freezer-safe bag. They can last up to 2 months in the freezer. To reheat your potatoes, the best method is using an oven. Preheat the oven to 350°F (175°C). Spread the potatoes on a baking sheet. Heat them for about 15 to 20 minutes. This will help keep the texture crispy. You can also use a microwave. Place the potatoes in a microwave-safe dish. Heat them in short bursts of 1 minute. Stir in between to ensure even heating. To keep flavor and texture, avoid reheating them too long. If they dry out, add a little bit of sour cream or cheese on top. These tips will help you enjoy the cheesy ranch potatoes just as much as the first time. You can tell the potatoes are done by checking a few signs. First, they should be golden brown and crispy on the outside. Second, when you poke them with a fork, they should feel soft inside. If the fork slides in easily, your potatoes are ready to enjoy! Yes, you can prepare Cheesy Ranch Potatoes ahead of time! Start by following the recipe steps, but stop before roasting. Cover the potatoes and store them in the fridge for up to 24 hours. When you’re ready to bake, simply add extra time in the oven if they are cold. This way, you can enjoy them fresh without much fuss. These cheesy potatoes pair well with many dishes. Serve them alongside grilled chicken or steak for a filling meal. They also go great with a fresh salad or steamed veggies. For a fun twist, try them with barbecue or as a side for tacos. The options are endless, making it easy to create a delicious meal. For the complete cooking steps, check out the Cheesy Ranch Potatoes Delight 🥔. In this blog post, we covered how to make Cheesy Ranch Potatoes. We started with the ingredients, then walked through easy steps to prepare and roast them. I shared helpful tips, variations, and storage info to keep your dish fresh. These potatoes are a tasty side for any meal. You can customize them to fit your taste. Enjoy making this dish, and let it add flavor to your table!](https://goldendishy.com/wp-content/uploads/2025/06/4f138a04-3393-4361-b7e8-8b602e29b2ef-768x768.webp)
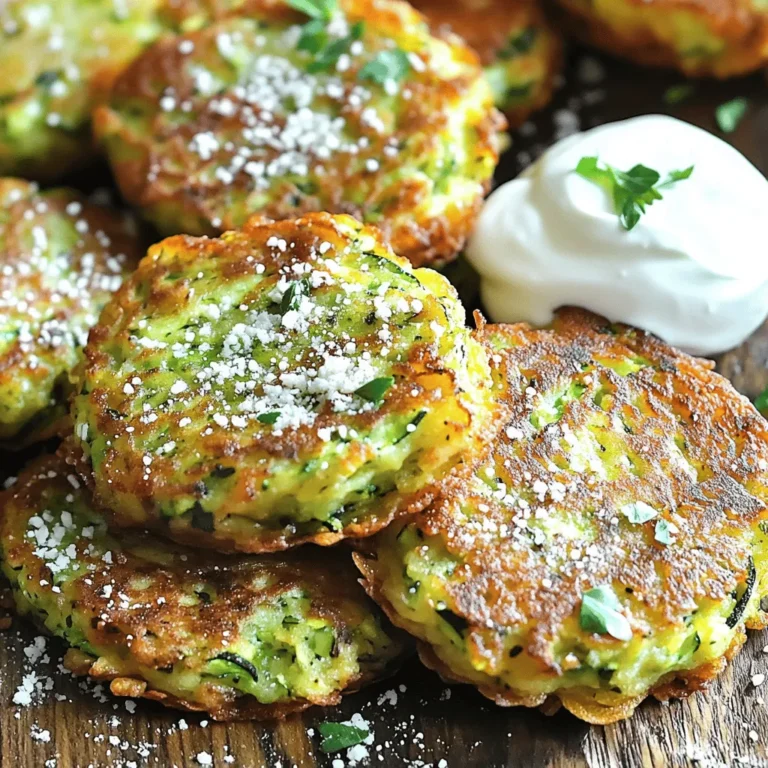
![- 4 medium zucchinis, sliced into 1/2-inch thick rounds - 4 tablespoons extra virgin olive oil - 2 tablespoons freshly squeezed lemon juice - 1 teaspoon freshly grated lemon zest - 2 teaspoons dried oregano - 1 teaspoon garlic powder - 1 teaspoon sea salt - 1/2 teaspoon freshly cracked black pepper - 2 tablespoons fresh parsley, finely chopped (for garnish) You can use other oils for grilling. Avocado oil or sesame oil works well. If you have fresh herbs, use them instead of dried ones. Fresh oregano or basil adds great flavor. Adjust the amount based on your taste. When selecting zucchinis, look for ones that are firm and shiny. Avoid any that feel soft or have blemishes. Choose smaller zucchinis for a sweeter taste. Check for seasonal zucchinis in late summer. They are often at their best during this time. To make the marinade, start with a large bowl. Add the olive oil, lemon juice, and lemon zest. Next, sprinkle in the dried oregano, garlic powder, sea salt, and black pepper. Whisk everything together until mixed well. This blend of flavors makes your zucchini taste great. Marinating time is key. Let the zucchini sit in the marinade for 10 to 15 minutes. This helps the zucchini soak up the zesty flavors. Skipping this step means missing out on rich taste. First, preheat your grill to medium-high heat, about 400°F (200°C). A hot grill gives your zucchini nice grill marks and a smoky flavor. When ready, carefully place the marinated zucchini rounds on the grill. Cook them for 3 to 4 minutes on each side. Watch for tender slices with grill marks. This means they are perfectly grilled. When done, transfer the zucchini to a serving platter. Arrange them in a fan shape for a pretty look. For garnish, sprinkle fresh parsley on top. This adds a pop of color and a burst of flavor. You can also drizzle extra olive oil and sprinkle sea salt for extra taste. Enjoy your Lemon Herb Grilled Zucchini! For the complete recipe, check the [Full Recipe]. To avoid sticking on the grill, start with a clean grill. Oil the grates well before adding zucchini. This creates a non-stick surface. Use a paper towel dipped in oil to wipe the grates. For even cooking, cut zucchini into uniform pieces. I recommend 1/2-inch thick rounds. This size cooks well without burning. Grill over medium-high heat for best results. You can boost flavor with fresh herbs like basil or thyme. They add a nice twist. For a bit of heat, try red pepper flakes or sliced jalapeños. Both pair well with the lemony taste. The best grill types for zucchini are gas or charcoal grills. Both give great flavor and heat. A grill basket can help keep slices from falling through the grates. Use tongs for safe flipping. For a great grilling experience, have a spatula and a timer handy. These tools help track cooking time and make flipping easy. For the complete process, check the Full Recipe. {{image_4}} You can change the flavors of your grilled zucchini by trying different herbs and spices. Instead of oregano, use thyme or basil for a fresh twist. You can also add a pinch of red pepper flakes for a little heat. Mixing in some smoked paprika can give your dish a nice depth. Incorporating other citrus flavors makes the marinade even more fun. Try lime or orange juice instead of lemon. Both options add a unique taste that pairs well with zucchini. You can also mix lemon with lime for a zesty combo. Grilled zucchini pairs well with many other vegetables. Bell peppers, eggplant, and asparagus are great choices. You can slice them into similar sizes for even cooking. Cooking times vary, so keep an eye on your veggies. Zucchini takes about 3-4 minutes per side. Bell peppers need about 5-7 minutes, while eggplant may take up to 8 minutes. This way, you can enjoy a colorful mix on your plate. Grilled zucchini makes a tasty side dish for many meals. It pairs well with proteins like grilled chicken, fish, or steak. You can also serve it alongside grains like quinoa or couscous for a filling meal. For fun side dish ideas, try serving grilled zucchini with a yogurt sauce. A sprinkle of feta cheese or a handful of nuts can also add a nice touch. For more flavor, drizzle balsamic glaze over the top. For a complete guide to making this dish, check out the Full Recipe. To store leftover grilled zucchini, let it cool first. Place it in an airtight container. This keeps it fresh and prevents odors from mixing. You can store it in the fridge. It usually lasts for about 3 to 5 days. Reheating grilled zucchini can be tricky. The best method is to use a skillet. Heat the skillet over medium-low heat. Add a small drizzle of olive oil. Place the zucchini in the skillet. Cook it for about 2 to 3 minutes on each side. This keeps the texture nice and firm. You can also add it to pasta or salads for a tasty twist. Yes, you can freeze grilled zucchini! To do this, let it cool completely first. Then, arrange the slices in a single layer on a baking sheet. Freeze them for about 1 to 2 hours. Once frozen, transfer the slices to a freezer bag. Remove as much air as possible. Grilled zucchini can last for up to 3 months in the freezer. When ready to use, thaw it in the fridge overnight. You can also toss it directly into soups or stews. For the full recipe, check out the Lemon Herb Grilled Zucchini recipe. To cut zucchini for grilling, slice it into 1/2-inch thick rounds. This thickness helps the zucchini cook evenly and stay firm. You can also cut them into long strips if you prefer a different shape. Just ensure your slices are uniform. This way, they will grill at the same rate. For added flavor, you can cut the zucchini lengthwise and brush the cut sides with olive oil. Yes, you can prepare Lemon Herb Grilled Zucchini ahead of time. To do this, marinate the zucchini slices a few hours before grilling. You can store them in the fridge for up to 24 hours in the marinade. This will enhance the flavor. Just remember to grill them right before serving for the best taste and texture. If grilling later, store the grilled zucchini in an airtight container. Grilled zucchini is very healthy. It is low in calories and high in vitamins. Zucchini is a great source of vitamin C, which boosts your immune system. It also contains potassium, which helps with heart health. Plus, grilling keeps the zucchini's nutrients intact while adding a nice smoky flavor. Enjoy it as a side dish or in salads. You can find the full recipe in the main article. In this article, we covered the key ingredients for Lemon Herb Grilled Zucchini and preparation steps. You learned how to marinate, grill, and enhance flavors. I shared tips for choosing fresh zucchini and creative variations. Remember, fresh ingredients lead to the best taste. Enjoy experimenting with different herbs or vegetables. Grilled zucchini is not just simple but also healthy and tasty. Now, you are ready to impress at your next meal!](https://goldendishy.com/wp-content/uploads/2025/06/34b028ee-fd33-4782-b46e-eaef12af4b53-768x768.webp)