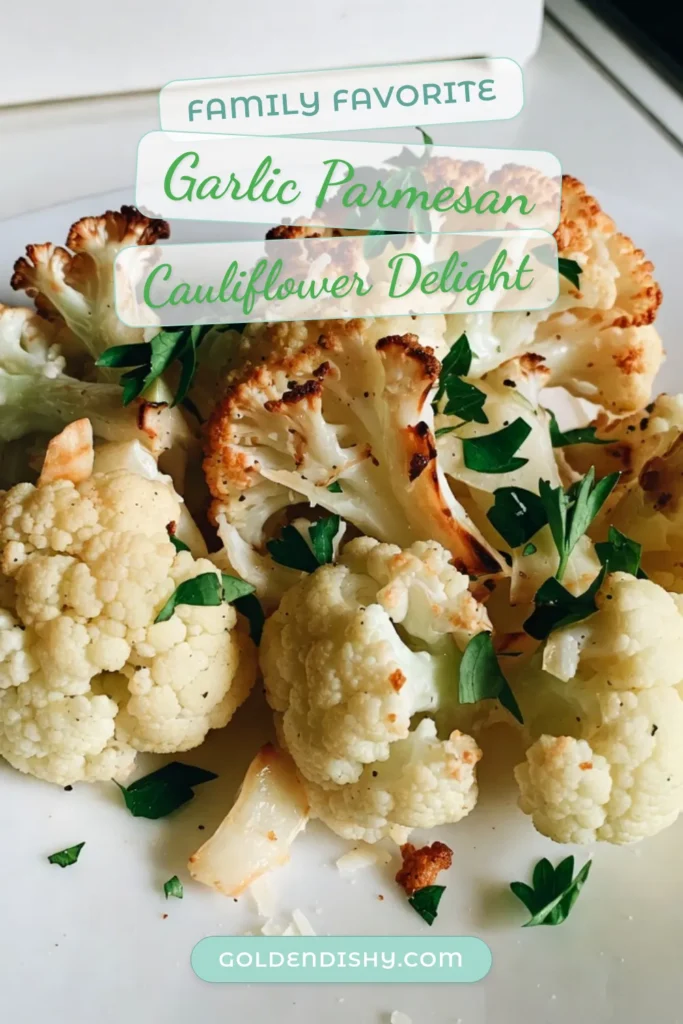
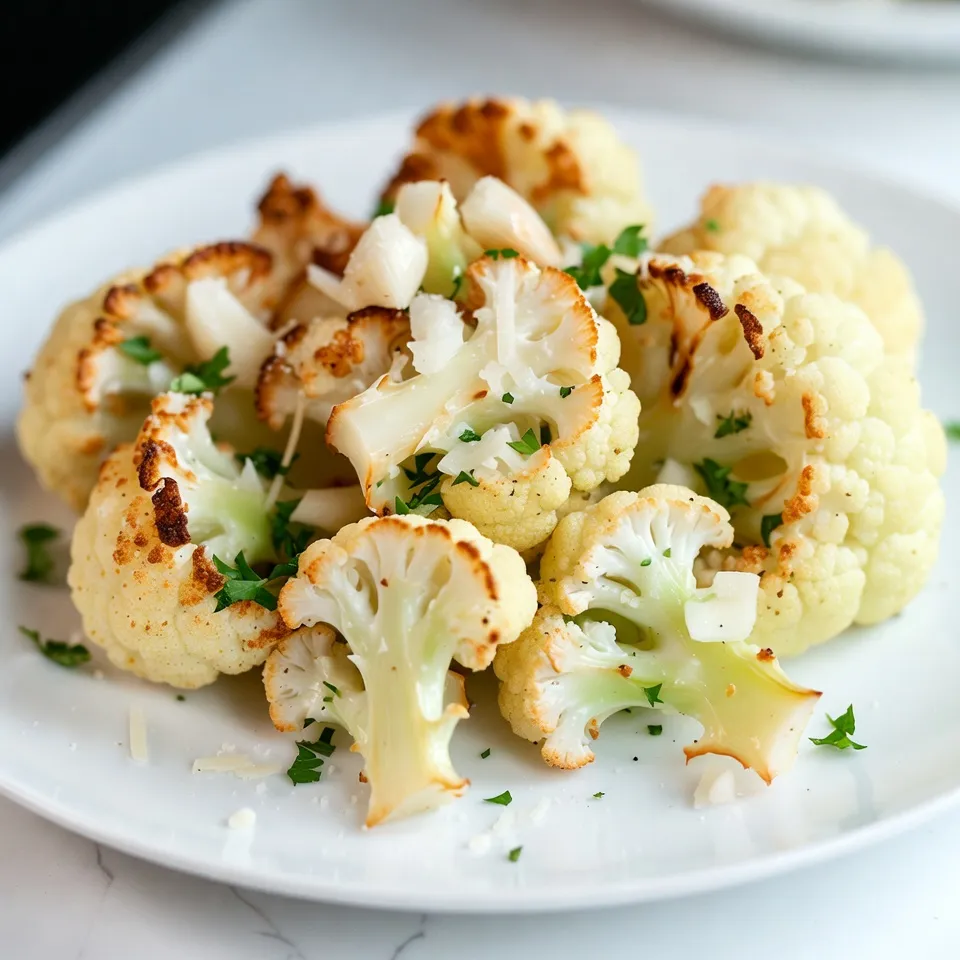
Garlic Parmesan Roasted Cauliflower Flavor Boost Recipe
Are you ready to take your side dishes to the next level? This Garlic Parmesan Roasted Cauliflower recipe packs bold flavor and charm. You just need a few simple ingredients to turn this veggie into a star on your plate. It’s easy, tasty, and perfect for any meal. Let’s dive into this delicious way to enjoy cauliflower that brings warmth to your table!
Why I Love This Recipe
- Delicious Flavor Combination: The rich garlic and savory Parmesan meld beautifully with the roasted cauliflower, creating a mouthwatering dish that excites the taste buds.
- Healthy Yet Satisfying: This recipe transforms cauliflower into a nutritious side dish that’s both filling and guilt-free, making it perfect for any meal.
- Easy Preparation: With minimal chopping and quick assembly, this recipe is simple enough for weeknight dinners yet impressive enough for entertaining guests.
- Versatile Serving Options: Whether as a side dish, a snack, or a salad topper, this roasted cauliflower adapts to any occasion and pairs well with a variety of main dishes.
Ingredients
Main Ingredients
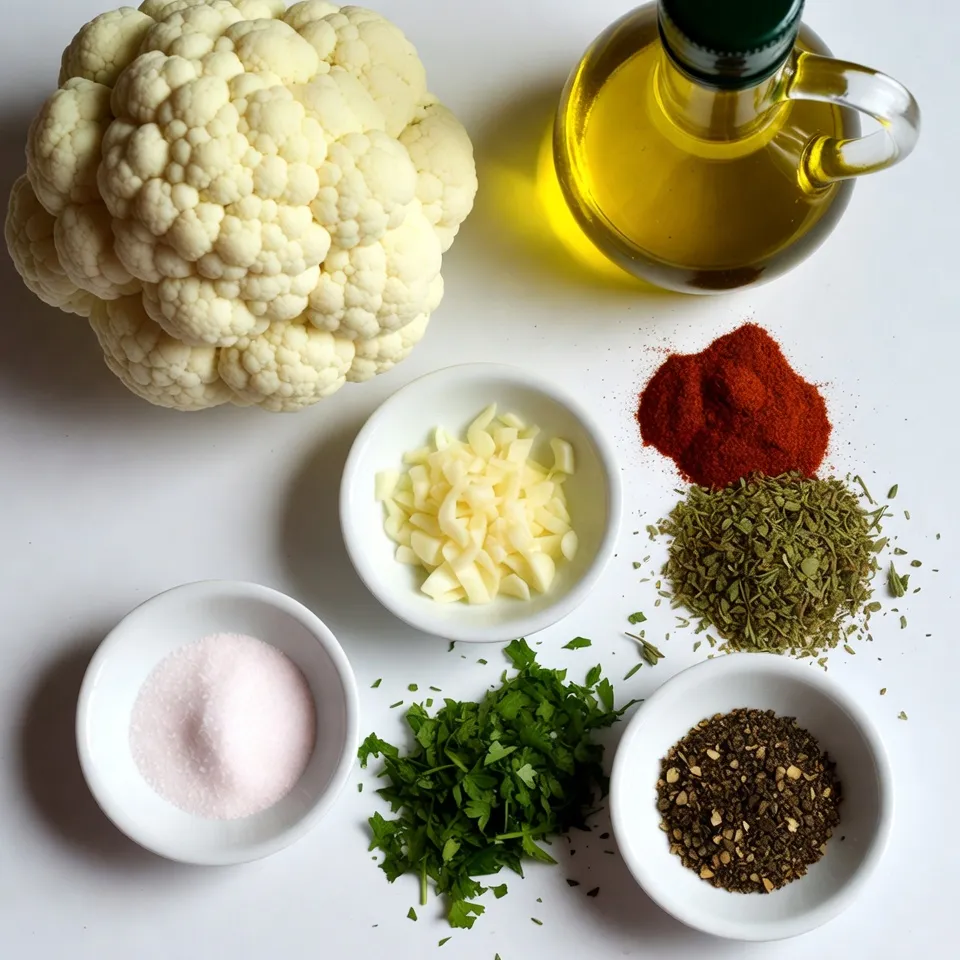
– 1 large head of cauliflower
– 4 cloves of fresh garlic
– 1/4 cup finely grated Parmesan cheese
Seasoning and Oils
– 3 tablespoons extra virgin olive oil
– 1 teaspoon smoked paprika
– 1 teaspoon dried Italian herb blend
Garnish
– Sea salt
– Freshly cracked black pepper
– Fresh parsley
The main ingredients for Garlic Parmesan Roasted Cauliflower create a strong base of flavor. The cauliflower, with its hearty texture, absorbs the garlic’s rich taste. I love using fresh garlic because it brings a punch that dried garlic cannot match. The Parmesan adds a creamy, salty note that melts beautifully as it roasts.
The seasoning and oils enhance the dish even more. Extra virgin olive oil not only helps the cauliflower roast evenly but also adds healthy fats. Smoked paprika gives a subtle warmth and depth that makes each bite exciting. The Italian herb blend brings classic flavors that round out the dish perfectly.
Garnishing with sea salt and freshly cracked black pepper elevates the taste. Fresh parsley adds a bright touch and makes the dish visually appealing. Together, these ingredients create a side dish that is both simple and gourmet. You can feel the love in each bite!
Step-by-Step Instructions
Preheating and Preparation
– Preheat the oven to 425°F (220°C).
– Cut the cauliflower into bite-sized florets.
Start by making sure your oven is hot. This helps the cauliflower roast well. Next, grab your cauliflower. Cut it into small pieces. These bite-sized florets will cook evenly and get crispy.
Mixing Ingredients
– Combine cauliflower, garlic, olive oil, and seasonings in a bowl.
In a large bowl, add the florets. Throw in minced garlic, olive oil, smoked paprika, and dried herbs. Use your hands or a spatula to mix. Make sure every piece is covered well. This step adds great flavor to your cauliflower.
Roasting in the Oven
– Spread on a baking sheet in a single layer.
– Roast for 25-30 minutes, stirring halfway.
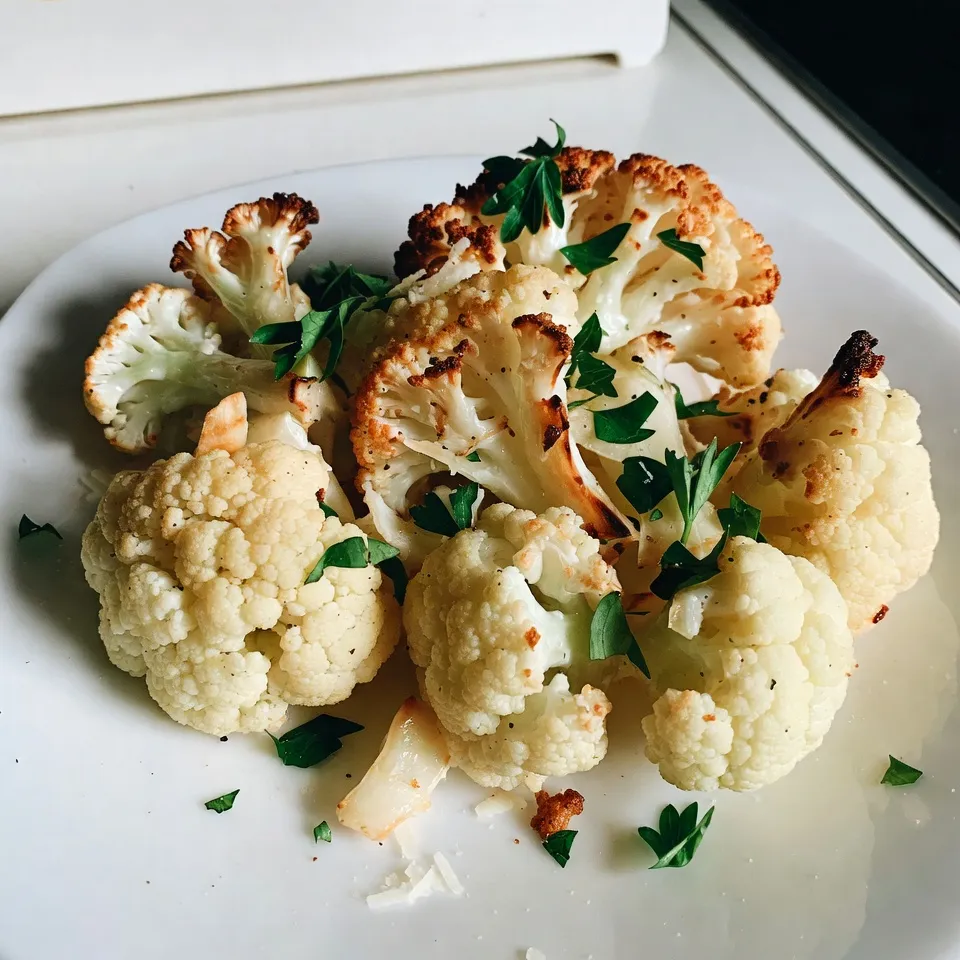
Line a baking sheet with parchment paper. Spread the seasoned cauliflower in one layer. This allows it to roast nicely. Place it in the oven. Roast for 25 to 30 minutes. Halfway through, stir the florets. This helps them brown and become tender. You want them golden and crisp at the edges.
Once done, remove the baking sheet. The smell will be amazing!
Tips & Tricks
Achieving Perfect Roasting
To get the best roasted cauliflower, spread the florets out evenly on the baking sheet. This helps each piece cook well. Stir the florets halfway through the cooking time. This step ensures that all sides brown nicely and become crispy.
Enhancing Flavor
For a fresh twist, add lemon zest. It brings out the flavors and makes the dish brighter. You can also try different cheeses. Asiago or Pecorino can add a unique taste that complements the garlic and cauliflower.
Serving Suggestions
Presentation matters! Serve your roasted cauliflower in a stylish bowl. This makes it more appealing. Before serving, drizzle a little olive oil over the top. It adds flavor and gives a nice shine to the dish.
Pro Tips
- Choose Fresh Cauliflower: Always select a cauliflower head that is firm and free from blemishes for the best flavor and texture.
- Customize Seasonings: Feel free to experiment with different spices such as cumin or curry powder to give your roasted cauliflower a unique twist.
- Serve Immediately: Roasted vegetables are best enjoyed fresh from the oven when they are still warm and crispy.
- Store Properly: If you have leftovers, store them in an airtight container in the refrigerator and reheat them at a low temperature to retain their texture.
Variations
Flavor Variations
You can easily change the flavor of your roasted cauliflower.
– Add crushed red pepper flakes for heat. This gives it a nice spicy kick.
– Substitute garlic powder for fresh garlic. This makes prep quicker and still tasty.
Dietary Adjustments
You can make this dish fit your diet needs.
– Make it vegan by using nutritional yeast instead of Parmesan. It still gives a cheesy flavor.
– Verify that all ingredients are gluten-free. This is key for those with gluten issues.
Additional Ingredients
Want to make it even better? Try these additions.
– Incorporate roasted nuts for crunch. Almonds or walnuts work great.
– Add in other vegetables like Brussels sprouts or broccoli. This makes the dish colorful and diverse.
Feel free to mix and match these ideas. Your roasted cauliflower will be unique and delicious!
Storage Info
Storing Leftovers
After enjoying your Garlic Parmesan Roasted Cauliflower, let it cool down first. This step is key. Once cool, place it in an airtight container. This keeps your leftovers fresh and tasty.
Reheating Instructions
When you want to enjoy the cauliflower again, I recommend using the oven. Preheat the oven to 350°F (175°C) and place the cauliflower on a baking sheet. Heat for about 10-15 minutes for the best texture. If you’re in a hurry, you can use the microwave. Just heat for 1-2 minutes, but know it won’t be as crispy.
Shelf Life
You can keep your roasted cauliflower for about 3-5 days in the fridge. For the best taste and texture, try to eat it within those days. Enjoy the flavors while they last!
FAQs
How do I make Garlic Parmesan Roasted Cauliflower vegan?
To make Garlic Parmesan Roasted Cauliflower vegan, simply substitute the Parmesan cheese with nutritional yeast. Nutritional yeast has a cheesy flavor and works well in many dishes. It adds a nice depth to your cauliflower without using dairy.
Can I use frozen cauliflower?
Yes, you can use frozen cauliflower for this recipe. Just remember to adjust the roasting time. Frozen cauliflower may take a little longer to roast. Keep an eye on it and make sure it gets hot and crispy.
What can I serve with Garlic Parmesan Roasted Cauliflower?
Garlic Parmesan Roasted Cauliflower pairs well with grilled meats, making it a great side dish. You can also serve it alongside pasta dishes for a tasty meal. It adds a nice crunch and flavor to any plate.
This blog post detailed how to make Garlic Parmesan Roasted Cauliflower. We covered ingredients like fresh garlic, olive oil, and Parmesan cheese. Next, I shared a step-by-step guide for roasting and seasoning. You learned helpful tips for perfecting the dish and ways to add your own twist.
In conclusion, this tasty side will impress anyone. Try different cheeses or veggies to make it your own. Enjoy a healthy treat that fits any mea

Garlic Parmesan Roasted Cauliflower
Ingredients
- 1 large head cauliflower, cut into bite-sized florets
- 4 cloves fresh garlic, minced
- 1/4 cup finely grated Parmesan cheese
- 3 tablespoons extra virgin olive oil
- 1 teaspoon smoked paprika
- 1 teaspoon dried Italian herb blend
- to taste sea salt
- to taste freshly cracked black pepper
- to garnish fresh parsley, chopped
Instructions
- Begin by preheating your oven to 425°F (220°C) to ensure it reaches the perfect roasting temperature.
- In a large mixing bowl, combine the cauliflower florets, minced garlic, olive oil, smoked paprika, dried Italian herbs, sea salt, and freshly cracked black pepper. Use your hands or a spatula to toss the ingredients thoroughly until every floret is well-coated with the mixture.
- Line a baking sheet with parchment paper for easy cleanup, then spread the seasoned cauliflower in a single layer to ensure even roasting.
- Place the baking sheet in the preheated oven and roast the cauliflower for 25-30 minutes. Be sure to stir the florets halfway through the cooking time to promote even browning and tenderness; you want the edges to be golden and crisp.
- Once the cauliflower is perfectly roasted, remove it from the oven and immediately sprinkle the finely grated Parmesan cheese over the hot cauliflower, allowing it to melt into the nooks and crannies.
- Pop the baking sheet back in the oven for an additional 5 minutes, just until the cheese has melted and forms a slightly crispy, golden layer atop the cauliflower.
- After the final roasting, take the baking sheet out and garnish the dish generously with freshly chopped parsley for a pop of color and freshness before serving.

![- 8 oz (about 225g) rotini or penne pasta - 1 cup cherry tomatoes, halved - 1 cucumber, finely diced - 1/2 red onion, finely chopped - 1 bell pepper (any color), diced into small pieces - 1 cup Kalamata olives, pitted and sliced in half - 1 cup feta cheese, crumbled into bite-sized pieces - 1/4 cup fresh parsley, roughly chopped - 1/4 cup high-quality olive oil - 2 tablespoons red wine vinegar (optional for flavor) - 1 tablespoon freshly squeezed lemon juice - 1 teaspoon dried oregano - Sea salt and freshly cracked black pepper to taste You can make this salad your own. Try adding: - Grilled chicken or shrimp for protein - Artichoke hearts for extra flavor - Sun-dried tomatoes for a sweeter touch - Avocado for creaminess - Different herbs like mint or dill for freshness Fresh ingredients shine in this salad. Here’s how to pick the best: - Choose firm, bright cherry tomatoes. They should smell sweet. - Look for a cucumber with smooth skin. It should feel heavy for its size. - Pick bell peppers that are shiny and firm. Avoid any with soft spots. - For olives, select Kalamata that are dark and plump. - Get feta cheese that is crumbly and moist, not dry. Using fresh ingredients elevates the flavor and makes your Easy Greek Pasta Salad a true delight. For the full recipe, check out the Mediterranean Delight Pasta Salad 🥗! Start by boiling a large pot of salted water. This step is key to flavor. Add 8 oz of rotini or penne pasta. Cook it according to the package directions until it is al dente. This should take about 8-10 minutes. Once the pasta is cooked, drain it well. Rinse the pasta under cold water to stop the cooking and cool it down. This keeps the texture just right. In a large mixing bowl, add the cooled pasta. Next, toss in 1 cup of halved cherry tomatoes, 1 diced cucumber, and 1/2 finely chopped red onion. Don’t forget 1 diced bell pepper, which adds color and crunch. Add 1 cup of Kalamata olives that you’ve pitted and sliced. Finally, sprinkle in 1/4 cup of roughly chopped fresh parsley. Mix everything well to combine the flavors. In a small bowl, whisk together the dressing. Use 1/4 cup of high-quality olive oil. Add 2 tablespoons of red wine vinegar or fresh lemon juice if you prefer a brighter taste. Squeeze in 1 tablespoon of lemon juice for extra zest. Mix in 1 teaspoon of dried oregano. Season with sea salt and freshly cracked black pepper to taste. Whisk until the ingredients blend into a smooth dressing. Drizzle the dressing over the pasta and vegetable mix. Toss gently to coat all the ingredients well with the dressing. This step is crucial for flavor. Now, softly fold in the crumbled feta cheese. Be careful not to break the cheese too much; you want those nice chunks. For the best flavor, cover the salad with plastic wrap. Place it in the refrigerator for at least 20 minutes. This waiting period allows the flavors to blend beautifully. After chilling, taste the salad. Adjust the seasoning with more salt, pepper, or lemon juice if needed. Enjoy making this Easy Greek Pasta Salad! For the Full Recipe, check the link. To make the best Greek pasta salad, start with the right pasta. Use rotini or penne, as they hold the dressing well. Cook the pasta just right. It should be al dente, so it stays firm. Rinse it under cold water after cooking. This step cools the pasta and stops it from cooking more. Next, chop your veggies evenly. This way, each bite has a bit of everything. Fresh ingredients bring the best flavor. Use ripe cherry tomatoes and a crisp cucumber. Kalamata olives add a nice briny touch. Don’t forget the feta cheese! It should be crumbly but not too small. Many people overcook the pasta. This makes it mushy and not enjoyable. Also, don’t skip the rinsing step. It keeps the pasta from sticking together. Another mistake is not seasoning enough. Taste your salad after mixing. You might need more salt, pepper, or lemon juice. Always adjust to make it perfect for your palate. Lastly, let your salad chill before serving. This step allows the flavors to blend and deepen. A quick chill of at least 20 minutes works wonders. For more flavor, try adding fresh herbs. Basil or dill can brighten the dish. If you like heat, add a pinch of red pepper flakes. This gives your salad a nice kick. Experiment with your dressing too! Swap red wine vinegar for lemon juice for a brighter taste. A splash of balsamic vinegar can also add depth. Lastly, if you want a creamier salad, mix in some Greek yogurt. It adds richness without overpowering other flavors. For the full recipe, check out the Mediterranean Delight Pasta Salad. Enjoy making this simple and colorful dish! {{image_4}} You can easily add proteins to your Easy Greek Pasta Salad. Grilled chicken or canned tuna are great choices. They boost the dish's nutrition and make it more filling. For chicken, use cooked, diced pieces. For tuna, just drain and flake it. Mix your chosen protein right into the salad for a complete meal. Feel free to switch up the veggies in your pasta salad. Different colors and flavors keep it exciting. Try adding artichoke hearts, sun-dried tomatoes, or roasted red peppers. You can also use zucchini or spinach for a fresh twist. Just chop them into small pieces and mix them in. If you want a vegan version, swap feta cheese for a plant-based alternative. Nutritional yeast can also add a cheesy flavor without dairy. For gluten-free options, use gluten-free pasta. There are many types available now. This way, you can enjoy the salad without worry. Check labels to ensure all ingredients meet your dietary needs. Find the full recipe at [Full Recipe]. To keep your Easy Greek Pasta Salad fresh, store it in an airtight container. This helps prevent air and moisture from spoiling your salad. If you have leftovers, make sure to cool the salad before sealing it. This keeps the flavors intact and avoids sogginess. You can also separate the dressing if you want to keep the salad crisp for longer. This salad tastes best cold, so there’s no need to reheat it. If you find the pasta has absorbed the dressing, add a splash of olive oil or lemon juice. Toss it gently to revive the flavors. If you stored the salad in the fridge, let it sit at room temperature for about 10 minutes before serving. This will enhance the taste and texture. Your Easy Greek Pasta Salad can last about 3 to 5 days in the fridge. Always check for any signs of spoilage. Look for changes in color or texture. If you notice any off smells, discard it. Trust your senses; if something seems off, it’s better to be safe. Enjoy your salad while it's fresh for the best taste! You can store Easy Greek Pasta Salad in the fridge for about 3 to 5 days. Keep it in a sealed container to keep it fresh. If you see any signs of spoilage, like an off smell or discoloration, it's best to toss it out. Yes, you can make this salad ahead of time! In fact, it tastes better after sitting for a while. The flavors meld together nicely. I recommend making it a few hours in advance or even the night before. Just remember to add the feta cheese right before serving to keep it fresh. Greek Pasta Salad pairs well with various dishes. You can serve it alongside grilled chicken, lamb, or fish. It also works great as a side for burgers or sandwiches. If you're having a picnic, it's perfect with some crusty bread and hummus. Yes, you can substitute feta cheese if you prefer. Try using goat cheese or ricotta for a different flavor. For a dairy-free option, you can use a plant-based cheese. Just keep in mind that the taste will change slightly, but the salad will still be delicious! This blog post covers how to make Easy Greek Pasta Salad. We discussed essential ingredients and tips for freshness. You learned steps to prepare the salad, mix the ingredients, and make the dressing. We highlighted ways to enhance flavors and avoid common mistakes. Plus, you can try various protein and veggie options. Finally, you got storage tips to keep the salad fresh. Enjoy making this salad for your next meal or gathering! It’s simple, tasty, and fun to customize.](https://goldendishy.com/wp-content/uploads/2025/06/0fc22d26-3c6f-4a8e-aae2-92058968a948-768x768.webp)
. - Combine 1 cup warm water, 2 ¼ teaspoons yeast, and 1 teaspoon sugar. - Let this sit for 5-10 minutes until it becomes frothy. This means the yeast is ready. - In a large bowl, mix 3 cups flour and 1 teaspoon salt. - Pour in the activated yeast mixture and 2 tablespoons olive oil. - Use your hands to mix until a sticky dough forms. - Place the dough on a floured surface and knead for about 5 minutes. - The goal is a smooth and elastic dough. - Lightly grease a bowl and place the kneaded dough inside. - Cover it with a kitchen towel and let it rise for 1 hour. - Once it doubles in size, gently punch it down to release air. - Roll the dough into a rectangle, about ½ inch thick. - Transfer it to a baking sheet, and score it into breadstick shapes. You can find the complete process in the Full Recipe. To make great breadsticks, check your dough's texture. The dough should feel smooth and soft. If it sticks to your fingers, it is too wet. If it pulls away cleanly, you’re on the right track. Knead it until it is elastic. This gives you that perfect bite. For the best results, preheat your oven to 425°F (220°C). This hot oven helps the breadsticks puff up and get golden. Line your baking sheet with parchment paper. This keeps your breadsticks from sticking and makes cleanup easy. Bake for 12-15 minutes. Watch for a golden brown color, that means they are ready! Want to spice things up? You can add extra flavors to your breadsticks. Try adding crushed red pepper for heat or fresh basil for a hint of sweetness. You can also use different cheeses. Cheddar or pepper jack can give you a fun twist. Mix and match to find your favorite! For the full recipe, check out the detailed steps. {{image_4}} You can change the cheese to make each batch unique. Try using cheddar for a sharp taste. Pepper jack adds a fun spicy kick. Mix and match cheeses to create your favorite flavor. Just remember, the more cheese, the better! If you want a vegan option, use plant-based cheese. There are many tasty brands available today. You can also make a garlic spread with olive oil and herbs instead of butter. This keeps the flavor rich while being dairy-free. Add fresh herbs to bring new life to your breadsticks. Chopped basil or thyme can add a lovely aroma. You can mix herbs into the dough or sprinkle them on top before baking. These small changes make a big difference. Try one of these variations next time you bake your cheesy garlic breadsticks using the Full Recipe! To store leftover breadsticks, let them cool completely first. Place them in an airtight container. This keeps them fresh. You can also wrap them in plastic wrap. Store them at room temperature for up to two days. If you want them to last longer, keep them in the fridge. Just remember, cold breadsticks can lose some of their warmth. Freezing is a great way to keep these breadsticks tasty for later. After they cool, wrap each breadstick in plastic wrap. Then, place them in a freezer bag. Make sure to remove as much air as possible. This helps avoid freezer burn. To reheat, take them out and let them thaw first. Then, bake them at 350°F (175°C) for about 10 minutes. They will taste fresh again! When stored properly, these breadsticks stay fresh for about two days at room temperature. In the fridge, they can last up to a week. If frozen, they can last for about three months. Just remember, the sooner you eat them, the better they will taste. For more details, check the Full Recipe. To make your breadsticks extra cheesy, you can add more cheese. Here are some tips: - Use a blend of mozzarella and cheddar for depth. - Sprinkle cheese on top before baking. - Add cheese to the dough for a cheesy base. - Mix in cream cheese with your garlic butter for a rich flavor. Each of these tips gives your breadsticks a gooey, cheesy texture. It enhances the flavor and makes every bite delightful. Yes, you can prepare these breadsticks ahead of time! Here’s how: - Make the dough and let it rise. - Shape the breadsticks and cover them with plastic wrap. - Store in the fridge for up to 24 hours. When you are ready, just take them out to rise a bit more and bake. This method saves time and allows you to enjoy fresh breadsticks without the fuss. Dipping sauces elevate your cheesy garlic breadsticks. Here are some great options: - Marinara sauce adds a classic touch. - Garlic butter enhances the garlic flavor. - Ranch dressing offers a creamy contrast. - Alfredo sauce gives a rich, cheesy dip. These dips not only complement the breadsticks but also add fun flavors to each bite. You can mix and match to find your perfect pairing! In this post, I shared how to make delicious cheesy garlic breadsticks. We covered essential ingredients, step-by-step instructions, and helpful tips. I also shared variations if you want something different. Now, you have the tools and knowledge to create your own. Enjoy these tasty treats with family or friends. Happy cooking!](https://goldendishy.com/wp-content/uploads/2025/06/f014268d-bdac-4f9e-9ca6-06fbafbccd76-768x768.webp)