
Parmesan Herb Zucchini Fries Crunchy and Irresistible
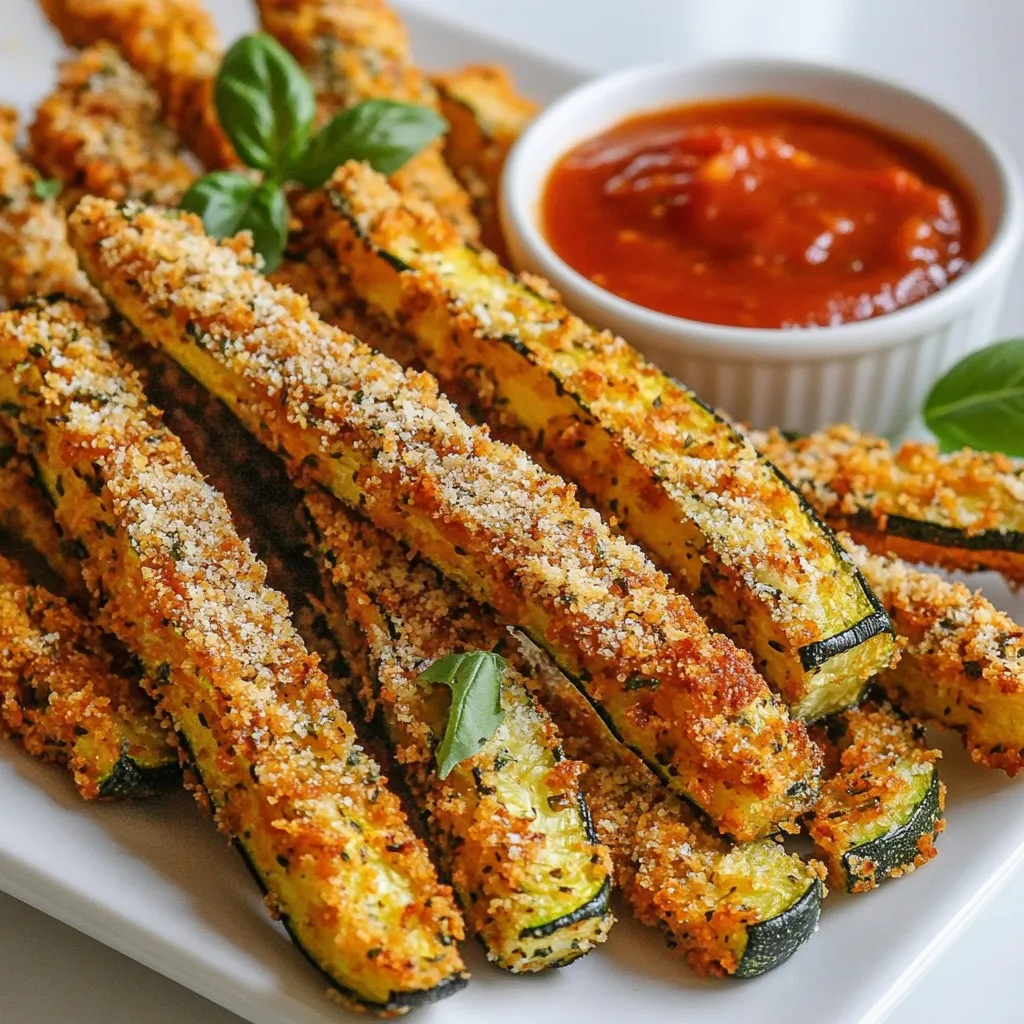

Looking for a tasty and healthy snack? Try my Parmesan Herb Zucchini Fries! These crispy delights are easy to make, using fresh zucchini, Parmesan cheese, and simple spices you probably have at home. In just 30 minutes, you’ll enjoy a crunchy treat that’s perfect for dipping or munching on their own. Let’s dive into the ingredients, tips, and tricks to make your own irresistible fries!
Why I Love This Recipe
- Healthy Option: These zucchini fries are a guilt-free snack that allows you to enjoy a crispy treat without compromising on nutrition.
- Simple Preparation: With minimal ingredients and straightforward steps, this recipe is easy to whip up, making it perfect for busy weeknights.
- Customizable Flavor: You can easily tweak the seasonings or add your favorite herbs to personalize the flavor to your liking.
- Family-Friendly: These crispy zucchini fries are a hit with both kids and adults, making them an excellent addition to any meal or party platter.
Ingredients
List of Main Ingredients
– 3 medium zucchinis, cut into fry-shaped sticks
– 1 cup breadcrumbs (panko recommended for maximum crunch)
– 1/2 cup freshly grated Parmesan cheese
Spices and Seasonings
– 1 teaspoon garlic powder
– 1 teaspoon onion powder
– 1 teaspoon dried oregano
– 1 teaspoon dried basil
– Salt and freshly cracked black pepper to taste
Binding Ingredients
– 2 large eggs
– 1 tablespoon extra-virgin olive oil
I love using fresh, high-quality ingredients for my Parmesan herb zucchini fries. The zucchinis are the star of this dish. Choose medium-sized zucchinis for the best texture. They should be firm and bright.
Next, I recommend using panko breadcrumbs. They add an amazing crunch. The Parmesan cheese gives a rich, savory flavor. Grate it fresh for the best results.
The spices are simple but make a big impact. Garlic powder and onion powder add depth. Oregano and basil bring that classic Italian taste. Salt and pepper balance all the flavors.
Binding is key for keeping the coating on. The eggs create a perfect layer for the breadcrumbs to stick. A drizzle of extra-virgin olive oil adds flavor and helps with browning.
These ingredients come together to create a snack that is both delicious and healthy. They are perfect for dipping or as a side dish.

Step-by-Step Instructions
Preparing the Oven and Baking Sheet
– Preheat oven to 425°F (220°C). This step is key for crispiness.
– Line the baking sheet with parchment paper. This helps to avoid sticking.
Preparing the Coating Mixture
– In a shallow bowl, combine breadcrumbs and Parmesan cheese. I love using panko for extra crunch.
– Add garlic powder, onion powder, oregano, and basil. Mix well to combine all flavors.
Coating the Zucchini Fries
– In another bowl, whisk the eggs. This will make a smooth egg wash.
– Take each zucchini stick and dip it in the egg wash first. Let any excess egg drip off.
– Then, coat the zucchini in the breadcrumb mixture. Press gently so the crumbs stick well.
Baking the Fries
– Arrange the coated zucchini fries on the baking sheet. Space them evenly for crispiness.
– Drizzle olive oil over the fries. This helps them get golden and crunchy.
– Bake for 20-25 minutes, turning the fries halfway through. They should be golden brown and crispy when done.
Tips & Tricks
Achieving Maximum Crispiness
– Use panko breadcrumbs for extra crunch. They create a light, airy texture.
– Drizzle olive oil evenly over fries. This helps them brown and adds flavor.
Flavor Enhancements
– Consider adding chili flakes for heat. They give a nice kick to the fries.
– Try different herbs for variation. Fresh thyme or rosemary can change the taste.
Troubleshooting Common Issues
– To ensure even cooking, space the fries well on the baking sheet. This allows air to flow around them.
– To avoid soggy fries, make sure to coat the zucchini sticks well. Excess moisture can lead to a soft texture.
Pro Tips
- Choose the Right Zucchini: Opt for medium-sized zucchinis for the best texture and flavor. Smaller zucchinis can be too watery, while larger ones can be tough.
- Experiment with Seasoning: Feel free to add your favorite spices or herbs to the breadcrumb mixture for a personalized touch. Paprika or cayenne can add a nice kick!
- For Extra Crunch: Consider double-dipping the zucchini fries in the egg wash and breadcrumb mixture for a thicker crust that crisps up beautifully.
- Storage Tips: Leftover zucchini fries can be stored in an airtight container in the fridge for up to 3 days. Reheat in the oven to maintain crispiness.

Variations
Flavor Variations
You can easily change up the flavor of your zucchini fries. For an Italian twist, add more herbs. Try mixing in thyme, rosemary, or parsley. These herbs enrich the taste and give a fragrant aroma. If you like heat, consider making spicy zucchini fries. Simply add cayenne pepper or paprika to the breadcrumb mix. This adds a kick that pairs well with the cheesy flavor.
Meal Pairing Suggestions
When serving your zucchini fries, dips make a big difference. Marinara sauce is a classic choice. Its tangy flavor complements the cheese. Garlic aioli is another great dip. It adds creaminess and a rich garlic taste. For main dishes, consider serving them with grilled chicken or fish. They also pair well with burgers or sandwiches.
Gluten-Free Option
If you need a gluten-free option, no problem! You can substitute regular breadcrumbs with gluten-free breadcrumbs. Make sure to check the labels for any hidden gluten. This way, everyone can enjoy these delicious fries without worry.
Storage Info
Best Storage Methods
To keep your Parmesan herb zucchini fries fresh, store leftovers in the fridge. Place them in an airtight container. This helps to keep them crisp for about three days. If you want to freeze them, do it before cooking. Lay the uncooked fries on a baking sheet, freeze for a few hours, then put them in a freezer bag. They will stay fresh for up to two months.
Reheating Instructions
To reheat your fries and keep them crispy, use an oven or air fryer. Preheat your oven to 400°F (200°C). Place the fries on a baking sheet and heat for about 10 minutes. In an air fryer, set it to 350°F (175°C) and cook for about 5-7 minutes. This way, you maintain that delightful crunch.
FAQs
How do I make Zucchini Fries crispy?
To make zucchini fries crispy, use panko breadcrumbs. They give a great crunch. You should also ensure you coat each fry well with the egg wash. This helps the breadcrumbs stick better. Drizzle olive oil evenly over the fries before baking. Bake at 425°F for 20-25 minutes. Turn them halfway through to brown evenly. Let them cool for a few minutes after baking. This helps them firm up and stay crisp.
Can I prepare Zucchini Fries in advance?
Yes, you can prepare zucchini fries in advance. Cut the zucchini and coat them as instructed. Lay them on the baking sheet and cover with plastic wrap. Store them in the fridge for up to a day. You can also freeze uncooked fries. Just place them in a single layer on a baking sheet, freeze until solid, and then transfer to a bag. When ready, bake them from frozen; just add a few extra minutes to the cooking time.
Are Zucchini Fries healthy?
Zucchini fries are a healthy snack option. Zucchini is low in calories and high in water content. It offers vitamins A and C, which are good for your skin and eyes. The fiber in zucchini helps with digestion. Using a small amount of olive oil keeps the dish light. The Parmesan cheese adds flavor without needing much. Overall, these fries are a tasty way to enjoy veggies!
You now have all the key steps to make delicious zucchini fries. Remember to choose fresh zucchinis and the right spices for great flavor. With tips on crispiness and variations, you can customize this dish to fit your taste. Zucchini fries are a tasty snack or side that’s also healthy. Try pairing them with your favorite dips for a perfect treat. I hope you enjoy making and sharing these fries as much as I d

Crispy Parmesan Herb Zucchini Fries
Ingredients
- 3 medium zucchinis, cut into fry-shaped sticks
- 1 cup breadcrumbs (panko recommended)
- 0.5 cup freshly grated Parmesan cheese
- 1 teaspoon garlic powder
- 1 teaspoon onion powder
- 1 teaspoon dried oregano
- 1 teaspoon dried basil
- to taste Salt and freshly cracked black pepper
- 2 large eggs
- 1 tablespoon extra-virgin olive oil
Instructions
- Begin by preheating your oven to 425°F (220°C). Line a baking sheet with parchment paper to prevent sticking and ensure even cooking.
- In a shallow mixing bowl, combine the breadcrumbs, grated Parmesan cheese, garlic powder, onion powder, dried oregano, dried basil, a pinch of salt, and black pepper. Mix thoroughly to distribute all ingredients evenly. Set this mixture aside.
- In a separate bowl, crack the eggs and whisk them until the yolks and whites are fully blended, creating a smooth egg wash.
- Take each zucchini fry and dunk it into the egg wash first, allowing any excess egg to drip off. Then transfer it to the breadcrumb mixture, coating it thoroughly. Press gently to help the breadcrumbs adhere well to the zucchini.
- Arrange the coated zucchini fries in a single layer on the prepared baking sheet, ensuring they are evenly spaced for optimal crispiness. Drizzle the olive oil over the top to enhance the texture and flavor.
- Place the baking sheet in the oven and bake for about 20-25 minutes, turning the fries halfway through cooking for even browning. They should be golden brown and have a satisfying crunch when done.
- Once baked, remove the zucchini fries from the oven and allow them to cool for a few minutes. This will help them firm up slightly before serving.
![To make crispy air fryer chicken wings, you need the right ingredients. Here’s what you’ll need: - 2 pounds of chicken wings - 1 tablespoon baking powder - 1 teaspoon garlic powder - 1 teaspoon onion powder - 1 teaspoon smoked paprika - 1 teaspoon salt - ½ teaspoon black pepper - ½ teaspoon cayenne pepper (optional, for heat) - 2 tablespoons olive oil These ingredients help create a crunchy skin and juicy meat. The spice mix is key to adding flavor. The baking powder helps crisp the skin. Garlic and onion powders give a savory kick. Smoked paprika adds a touch of smokiness. The salt enhances all the flavors. Black pepper brings a mild heat, while cayenne adds more spice if you like it hot. You can add a few optional touches to enhance your dish. Fresh parsley, finely chopped, looks great as a garnish. It adds color and freshness to the wings. As for dipping sauces, ranch or blue cheese dressing pairs perfectly with these wings. You can also try hot sauce for an extra kick! For the full recipe, check out the main article. Start by preheating your air fryer to 400°F (200°C). This step is key for crispy wings. Make sure the fryer is empty and clean. Let it heat up while you prepare the chicken. Rinse 2 pounds of chicken wings under cold water. Pat them dry with paper towels. Dry wings help get that nice crunch. In a bowl, mix these spices: - 1 tablespoon baking powder - 1 teaspoon garlic powder - 1 teaspoon onion powder - 1 teaspoon smoked paprika - 1 teaspoon salt - ½ teaspoon black pepper - ½ teaspoon cayenne pepper (optional for heat) After mixing, add the wings to the bowl. Drizzle with 2 tablespoons of olive oil. Toss well so every wing gets coated. You want flavor in every bite! Carefully place the wings in the air fryer basket in a single layer. Avoid crowding them. This allows air to circulate and crisp them up. Cook for 25-30 minutes. Flip the wings halfway through for even cooking. Look for a golden-brown color and crispy texture. After cooking, let the wings rest for a few minutes. This keeps them juicy. Finally, garnish with fresh parsley and serve with ranch or blue cheese dressing. Enjoy your crispy air fryer chicken wings! You can find the full recipe above. To make your wings extra crispy, start with dry wings. Pat them well with paper towels. The baking powder helps create crunch. It pulls moisture away and makes the skin crisp. Air fry at 400°F (200°C) for the best results. Flip them halfway through to ensure even cooking. If you want more crunch, give them a quick broil after cooking. One mistake is overcrowding the air fryer basket. This stops air from flowing around the wings. Cook in batches if needed. Another error is not drying the wings enough. Wet wings lead to soggy skin. Lastly, avoid using too much oil. A little goes a long way. The oil helps the spices stick and adds flavor without making them greasy. Use a good air fryer that heats evenly. A basket-style air fryer works well. You’ll need mixing bowls for seasoning the wings. A set of measuring spoons is also handy for accuracy. Finally, have a good pair of tongs for flipping the wings safely. A meat thermometer can help check if they are cooked through. For the full recipe, be sure to check the linked instructions. {{image_4}} You can easily change the flavor of your wings. To make Buffalo wings, toss them in hot sauce before serving. For BBQ wings, add your favorite BBQ sauce after cooking. You can even mix flavors! Try garlic parmesan by adding garlic powder and parmesan cheese. Each variation brings a new taste to your plate. Wing sizes can change the cooking time. For small wings, cook for 20-25 minutes. Medium wings need about 25-30 minutes. Large wings may take 30-35 minutes. Always check for doneness. The internal temperature should reach 165°F (74°C). This ensures safe and tasty wings. If you don't have an air fryer, you can bake or fry wings. To bake, set your oven to 425°F (220°C) and cook wings for 40-45 minutes. Flip them halfway. For frying, heat oil to 350°F (175°C) and fry wings for 8-10 minutes. Each method offers its own delicious crunch. For the complete recipe, check out the [Full Recipe]. After enjoying your crispy air fryer chicken wings, you may have some left. To keep them fresh, place the wings in an airtight container. This helps keep moisture out. Store them in the fridge for up to three days. If you want to keep them longer, consider freezing them. To reheat your wings, the air fryer is best. Preheat it to 375°F (190°C). Place the wings in the basket in a single layer. Heat them for 5 to 10 minutes. This method helps keep the wings crispy. You can also use an oven, but the air fryer works wonders for crispiness. If you freeze your wings, they can last for up to three months. Place the cooled wings in a freezer-safe bag. Remove as much air as possible before sealing. When you want to eat them, thaw the wings overnight in the fridge. Then, reheat them in the air fryer for a crispy finish. This is a great way to enjoy your crispy air fryer chicken wings later. For the full recipe, check out the complete guide! To get crispy wings, start with dry wings. Use paper towels to remove excess moisture. Baking powder is your secret weapon! It helps make the skin crisp. Coat the wings evenly with the spice mix. Arrange them in a single layer in the air fryer. Don’t overcrowd them; air needs to flow. Flip the wings halfway through cooking for even crispiness. Keep an eye on them for a nice golden color. Yes, you can use frozen chicken wings! Just remember to thaw them first. You can leave them in the fridge overnight or run them under cold water. After thawing, pat them dry. Then, follow the same steps in the Full Recipe. Cooking time may be a bit longer, so check for doneness. When serving crispy wings, ranch and blue cheese dressings are classic choices. They add creaminess and balance the spice. You can also try honey mustard for sweetness or hot sauce for extra heat. Experiment with different sauces to find your favorite match! In this post, we explored how to make crispy air fryer chicken wings. We covered essential ingredients, step-by-step instructions, and helpful tips. You can experiment with flavors like buffalo and BBQ, too. Remember to store leftovers properly and reheat safely for the best taste. Enjoy your tasty wings and share them with friends or family. Now, you have all the tools to make crispy wings at home whenever you want. Happy cooking!](https://goldendishy.com/wp-content/uploads/2025/06/40ff0ca3-8982-419f-b213-91fbe0dabedd-768x768.webp)
![- 2 medium zucchinis - 1 cup cherry tomatoes - 1/4 cup fresh basil leaves The fresh produce makes this dish feel bright and lively. Zucchini adds a crunchy texture, while cherry tomatoes bring a sweet burst. Basil gives a fragrant touch that brightens every bite. When you use fresh ingredients, you elevate the salad. - 1 cup fresh mozzarella balls Fresh mozzarella balls, or bocconcini, are creamy and soft. They add richness to the salad that balances the fresh flavors. Their bite-sized shape makes them easy to enjoy. I recommend using high-quality mozzarella for the best taste. - 2 tablespoons balsamic glaze - 2 tablespoons extra-virgin olive oil - Salt and black pepper - 1 clove garlic (optional) The dressing ties all the ingredients together. Balsamic glaze provides sweetness and depth, while olive oil adds richness. Salt and pepper enhance the natural flavors. If you want an extra kick, add minced garlic. It brings a wonderful aroma and taste to the dish. For the full recipe, check out the detailed instructions on how to make this fresh and flavorful dish. To start, you need to spiralize the zucchinis. This will make long, noodle-like strands. A spiralizer works best for this task. If you do not have one, you can use a vegetable peeler. Just slice thin ribbons of zucchini instead. Next, combine all salad components in a large bowl. Add the spiralized zucchini, cherry tomatoes, and fresh mozzarella balls. This colorful mix creates a vibrant base for your salad. In a small bowl, whisk together balsamic glaze and olive oil. This will help blend the flavors nicely. If you want a bolder taste, add minced garlic to the dressing. The garlic gives it a nice kick. Now, pour the dressing over the zucchini noodle mixture. Sprinkle salt and black pepper to taste. These simple seasonings enhance the dish's flavors. Use your hands or tongs to toss the salad gently. Make sure all the ingredients are well coated. To finish, add the torn basil leaves on top of the salad. This adds a fresh aroma and flavor. Gently toss the salad again to mix the basil throughout. For serving, you can put it in a big bowl. A light drizzle of balsamic glaze on top makes it look even better. For the full details, check out the [Full Recipe]. If you want to switch things up, there are great options. For mozzarella, try using burrata. Burrata is creamier and adds a rich twist. You can also use vegan cheese if you prefer a plant-based option. For the dressing, consider a light vinaigrette. A mix of lemon juice, olive oil, and a dash of mustard works well. This gives a fresh flavor while cutting calories. To keep the salad fresh, store it properly. Use an airtight container to keep the salad from getting soggy. If you layer the ingredients, place the zucchini at the bottom. This helps keep moisture away from the tomatoes and cheese. On busy days, you can prep the salad in advance. Spiralize the zucchini and chop the tomatoes ahead of time. Just add the dressing and basil when you're ready to eat. This saves you time without losing flavor. To boost the taste, consider adding fresh herbs like oregano or parsley. They add depth and freshness. You can also sprinkle in some crushed red pepper for a bit of heat. For extra crunch, serve the salad with toasted pine nuts or sunflower seeds. These add a nice texture contrast and make the dish even more enjoyable. You can find the full recipe [here](#). {{image_4}} You can add protein to your Zucchini Noodle Caprese Salad for a fuller meal. Here are two great options: - Grilled chicken or shrimp: Both add a tasty twist and extra nutrients. Cook them simply with salt, pepper, and olive oil. Slice and mix them in. - Chickpeas for a vegetarian option: These add a nice crunch and plant-based protein. Just rinse and toss them in for a hearty touch. Mixing up flavors can keep this salad exciting. Here are some ideas: - Adding different dressing styles: Try pesto, ranch, or lemon vinaigrette for a fresh taste. Each will give your salad a unique flair. - Incorporating seasonal vegetables: Add bell peppers, corn, or avocado. These can enhance the texture and flavor while keeping it fresh and vibrant. How you serve this salad can change its vibe. Consider these styles: - Zucchini noodle bowls: Serve it in deep bowls for a casual gathering. It makes it easy for guests to dig in. - Plated salads for special occasions: For a fancy dinner, plate it neatly. This elevates the look and makes it feel more special. These variations can help you customize your Zucchini Noodle Caprese Salad. Choose your favorites to make it truly yours! For the full recipe, check out the details above. To store leftovers, place your Zucchini Noodle Caprese Salad in an airtight container. This keeps the salad fresh and prevents odors from mixing. Use a container that fits the salad snugly to minimize air exposure. Ideal storage containers: - Glass containers with tight lids - BPA-free plastic containers - Silicone food bags Zucchini noodles can stay fresh in the fridge for about 2 to 3 days. Cherry tomatoes and mozzarella also last up to this time frame. Always check for signs of spoilage. Signs of spoilage: - Slimy texture on zucchini - Mold growth on tomatoes - Sour smell from mozzarella Freezing zucchini noodles is a great way to keep them longer. However, fresh zucchini noodles can lose their texture when thawed. To freeze, spiralize the zucchini and place it in a freezer-safe bag. Remove as much air as possible before sealing. Best practices for freezing prepared salad: - Avoid freezing with the dressing; add it later. - Store without fresh basil, as it does not freeze well. - Use within 1 to 2 months for the best flavor. For the full recipe, refer back to the Zucchini Noodle Caprese Salad section. Zucchini noodles last about 3 to 5 days in the fridge. Store them in an airtight container. They will keep fresh and crisp during this time. If they start to look slimy, it’s best to toss them out. Yes, you can use other vegetables. Some great alternatives are carrots, cucumbers, and sweet potatoes. Each offers a unique taste and texture, making your salad fun and versatile. Yes, this salad is gluten-free. The main ingredients contain no gluten. Zucchini, tomatoes, and cheese all fit into a gluten-free diet. Enjoy this dish without worry! You can prep some parts ahead. Spiralize the zucchini and cut the tomatoes a day before. However, add the dressing just before serving. This keeps the salad fresh and crunchy. This salad pairs well with grilled chicken or shrimp. It also goes great with crusty bread or a light soup. For drinks, try a crisp white wine or sparkling water. Enjoy the mix of flavors! For the full recipe, check out the details above! This blog explored a delicious and fresh Zucchini Noodle Caprese Salad. You learned about key ingredients like zucchini, cherry tomatoes, and mozzarella. The instructions simplified making this dish with easy steps. Tips offered ways to customize and store your salad. Variations let you add protein or seasonal flavors. This salad is perfect for any meal. With its bright flavors, it suits busy days or special occasions. Enjoy your cooking adventure and make this salad often!](https://goldendishy.com/wp-content/uploads/2025/07/4c5bc4a7-43a5-40d0-aa85-49819cbbae48-768x768.webp)