
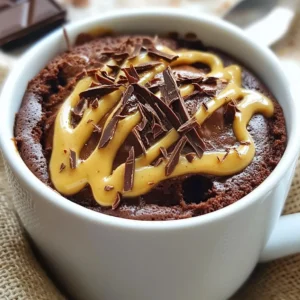
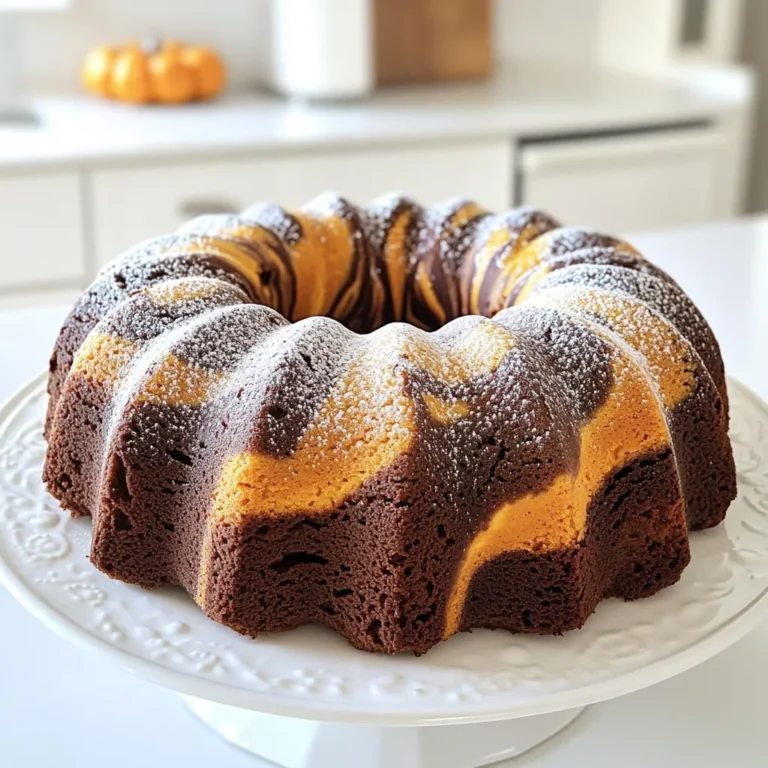
Chocolate Peanut Butter Mug Cake Simple and Quick Treat


Looking for a quick and easy treat? Try this Chocolate Peanut Butter Mug Cake! In just a few minutes, you’ll have a warm, gooey dessert packed with rich chocolate and creamy peanut butter. Perfect for late-night cravings or a quick snack, this mug cake is simple to make. Join me as I walk you through the ingredients, cooking steps, and tips to create your very own delicious mug cake. Let’s get baking!
Why I Love This Recipe
- Quick and Easy: This mug cake can be prepared in just 5 minutes, making it perfect for a last-minute dessert craving.
- Decadent Flavor: The combination of chocolate and peanut butter creates a rich, indulgent flavor that’s hard to resist.
- Customizable: You can easily modify this recipe by adding your favorite mix-ins, such as nuts or different types of chocolate.
- No Oven Required: Since this recipe is made in the microwave, you don’t need to turn on the oven, making it a hassle-free option.
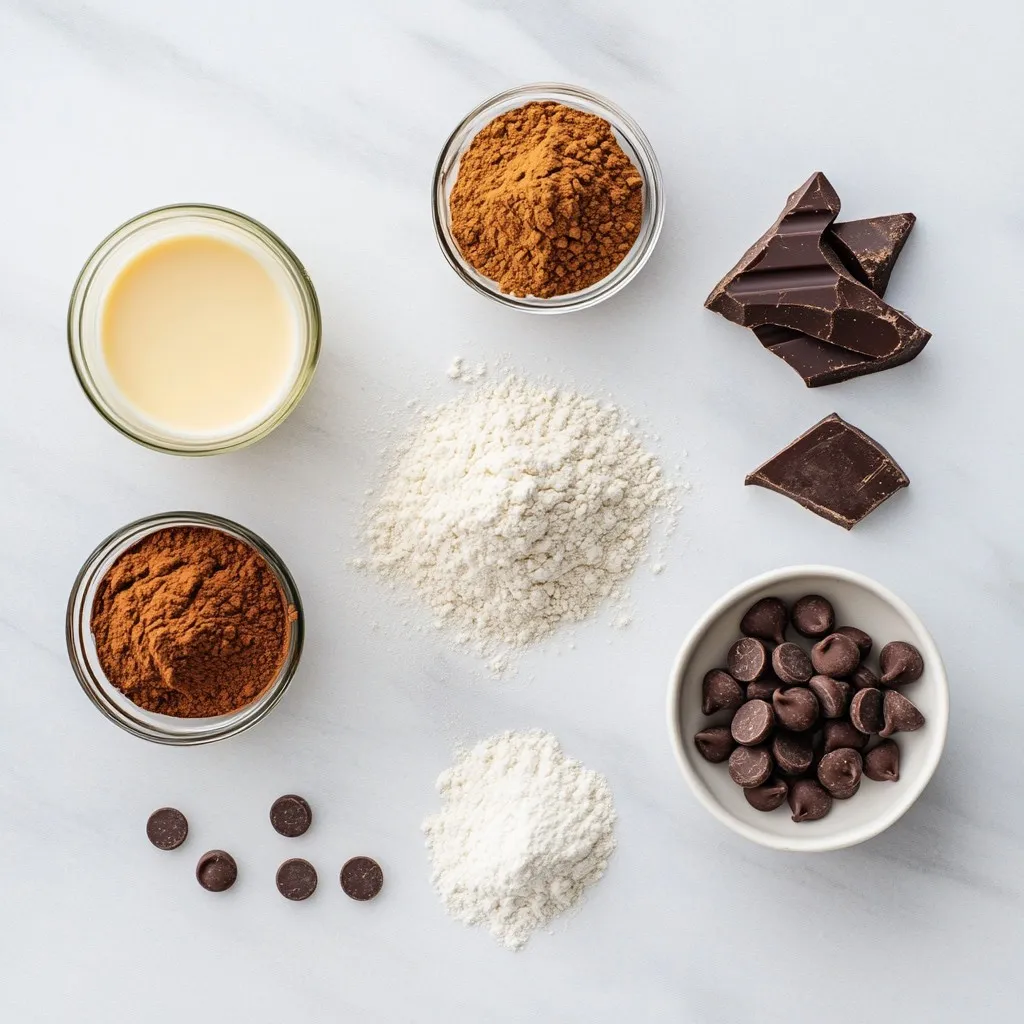
Ingredients
Main Ingredients
– 4 tablespoons all-purpose flour
– 4 tablespoons granulated sugar
– 2 tablespoons unsweetened cocoa powder
– 1/8 teaspoon baking powder
– 1/8 teaspoon salt
– 3 tablespoons milk (dairy or non-dairy)
– 2 tablespoons creamy peanut butter
– 2 tablespoons vegetable oil
– 1/2 teaspoon pure vanilla extract
– 1 tablespoon semi-sweet chocolate chips (optional)
Let’s dive into what you need for this delicious mug cake. First, gather your dry ingredients. You will need flour, sugar, cocoa powder, baking powder, and salt. These make the base of your cake. The flour gives it structure, while the cocoa powder adds that rich chocolate flavor.
Next, for the wet ingredients, you will use milk, creamy peanut butter, vegetable oil, and vanilla extract. The milk keeps the cake moist. Peanut butter adds creaminess and a nutty taste. The oil ensures a tender crumb, and vanilla boosts the flavor profile.
If you want more chocolate, add semi-sweet chocolate chips. They melt and create pockets of gooey goodness. This treat is quick and easy, perfect for satisfying your sweet tooth in just minutes.
Equipment Needed
– Microwave-safe mug
– Small whisk or fork
For making this mug cake, you need a microwave-safe mug. It should hold all the ingredients without spilling. A small whisk or fork helps mix everything well. These tools make the process simple and fun. Now, you are ready to create a chocolate peanut butter delight!
Step-by-Step Instructions
Preparing the Dry Ingredients
Start by taking a microwave-safe mug. Add the following dry ingredients:
– 4 tablespoons all-purpose flour
– 4 tablespoons granulated sugar
– 2 tablespoons unsweetened cocoa powder
– 1/8 teaspoon baking powder
– 1/8 teaspoon salt
Mix these dry ingredients well using a small whisk or fork. Make sure there are no lumps left in your mix. This step is key for a smooth cake.
Mixing the Wet Ingredients
Now it’s time to add the wet ingredients. Pour in:
– 3 tablespoons milk (dairy or non-dairy)
– 2 tablespoons creamy peanut butter
– 2 tablespoons vegetable oil
– 1/2 teaspoon pure vanilla extract
Stir the mixture together until it becomes a smooth batter. Break up any dry pockets of flour. If you want more chocolate, add 1 tablespoon of semi-sweet chocolate chips. Gently fold them into the batter.
Cooking the Mug Cake
Place the mug in the microwave and cook it on high for 1 minute. After 1 minute, check the cake’s consistency. It should look set but still soft. If it seems too wet, microwave for an extra 10-15 seconds. Be careful not to overcook it. The cake continues to cook even after you take it out.
After cooking, let the mug cake sit for about a minute. This cools it down a bit. For a fun touch, top your cake with more peanut butter or whipped cream. A sprinkle of chocolate shavings makes it look fancy!
Tips & Tricks
Achieving the Perfect Texture
To get the best texture, avoid overcooking your mug cake. The microwave heats quickly, so keep an eye on it. Start with one minute. You want it soft but set. If it looks wet, add just 10-15 seconds more. Remember, the cake continues cooking after you take it out.
Mixing Techniques
A smooth batter is key for a good mug cake. Start with the dry ingredients. Mix flour, sugar, cocoa, baking powder, and salt well. Use a small whisk or fork to break up lumps. When you add wet ingredients, stir it vigorously. This helps make sure there are no dry pockets of flour.
Customizing Your Recipe
Want to change it up? Adding chocolate chips is a great idea. Fold in one tablespoon of semi-sweet chocolate chips to your batter right before you cook it. You can also top the cake with extra peanut butter or whipped cream. Sprinkling chocolate shavings adds a fun touch!
Pro Tips
- Use Room Temperature Ingredients: Make sure your peanut butter and milk are at room temperature for a smoother batter that combines easily.
- Microwave Variations: Microwave wattages vary; start with 1 minute and add time in small increments to prevent overcooking.
- Add a Pinch of Espresso Powder: For a richer chocolate flavor, add a tiny pinch of espresso powder to the dry ingredients.
- Experiment with Toppings: Get creative! Try adding sliced bananas, crushed nuts, or a drizzle of caramel for extra flavor.

Variations
Nut-Free Option
If you want a nut-free treat, swap the peanut butter. Use almond butter or sunflower seed butter. Both give a similar creamy texture. Sunflower seed butter adds a unique taste. This change helps you enjoy the mug cake without nuts.
Gluten-Free Modification
You can make this mug cake gluten-free! Just replace all-purpose flour with gluten-free flour. Rice flour or almond flour works well. Make sure to check the blend for the best results. This way, everyone can enjoy this delicious dessert.
Flavor Enhancements
Want to kick the flavor up a notch? Try adding spices! A pinch of cinnamon adds warmth. Or, mix in a splash of espresso for a coffee boost. These simple changes make your mug cake even more exciting.
Storage Info
Storing Leftovers
To store your chocolate peanut butter mug cake, let it cool first. Place it in an airtight container. Keep it in the fridge for up to three days. This method helps keep the cake moist and tasty. If you have any toppings, like whipped cream, store those separately. This way, your cake stays fresh and delicious.
Reheating Suggestions
When you’re ready to enjoy your leftover mug cake, reheating is simple. Use the microwave for the best results. Put the mug cake in the microwave for about 10-15 seconds. Check if it is warm enough. If it needs more time, heat it in small bursts. This method keeps the cake soft and prevents overcooking.
Freezing Options
Yes, you can freeze your mug cake! First, make sure it is completely cool. Wrap it tightly in plastic wrap or foil. Then, place it in a freezer-safe bag. It can last up to three months in the freezer. When you want to eat it, thaw it in the fridge overnight and reheat as needed. Enjoy your sweet treat anytime!
FAQs
How do I make a mug cake without eggs?
You can make a mug cake without eggs by using alternatives. Some great options include:
– Applesauce: Use 1/4 cup for one egg.
– Mashed banana: Use 1/4 cup for one egg.
– Flaxseed meal: Mix 1 tablespoon with 2.5 tablespoons of water; let it sit for a few minutes.
These options work well and keep the cake moist. Each adds a unique flavor too.
Can I use alternative sweeteners?
Yes, you can use alternative sweeteners in your mug cake. Some good options include:
– Stevia: Use less than sugar since it’s much sweeter.
– Honey: Use about 3/4 of the amount of sugar.
– Maple syrup: Same as honey, use a bit less than sugar.
These options can help cut down on sugar while still giving you a sweet treat.
What can I serve with my Chocolate Peanut Butter Mug Cake?
You have fun options to pair with your mug cake! Consider:
– Vanilla ice cream: A scoop on top adds creaminess.
– Whipped cream: Light and fluffy, it complements the cake well.
– Fresh berries: Strawberries or raspberries add a tart contrast.
These pairings make your dessert even more enjoyable. Experiment and find your favorite!
This blog post covered how to make a simple chocolate peanut butter mug cake. We looked at key ingredients and needed equipment. You learned step-by-step instructions for mixing and cooking. Tips helped you achieve the perfect texture. We also explored variations for nut-free and gluten-free options. Finally, I shared storage methods and answers to common questions.
With these steps, you can enjoy a delicious treat in minutes. Happy bakin
Chocolate Peanut Butter Mug Cake
Ingredients
- 4 tablespoons all-purpose flour
- 4 tablespoons granulated sugar
- 2 tablespoons unsweetened cocoa powder
- 1 teaspoon baking powder
- 1 teaspoon salt
- 3 tablespoons milk (dairy or non-dairy)
- 2 tablespoons creamy peanut butter
- 2 tablespoons vegetable oil
- 1 teaspoon pure vanilla extract
- 1 tablespoon semi-sweet chocolate chips (optional)
Instructions
- Start by taking a microwave-safe mug and add the all-purpose flour, granulated sugar, unsweetened cocoa powder, baking powder, and salt. Mix these dry ingredients thoroughly with a small whisk or fork until they are well blended and no lumps remain.
- Next, pour in the milk of your choice, followed by the creamy peanut butter, vegetable oil, and pure vanilla extract. Stir the mixture together vigorously until it transforms into a smooth batter, ensuring there are no dry pockets of flour left.
- If you’re craving an extra chocolatey indulgence, gently fold in the semi-sweet chocolate chips now, allowing them to be evenly distributed throughout the batter.
- Place the mug in the microwave and cook on high for 1 minute. After 1 minute, check the consistency of the cake; it should appear set but soft. If it’s still too wet, microwave for an additional 10-15 seconds. Remember, the cake will continue to cook slightly after removing from the microwave, so be careful not to overdo it!
- Once cooked, let the mug cake sit for about a minute to cool slightly. For an added touch of whimsy, top your cake with a dollop of additional peanut butter or a swirl of whipped cream, and finish with a sprinkle of chocolate shavings for a delightful presentation.

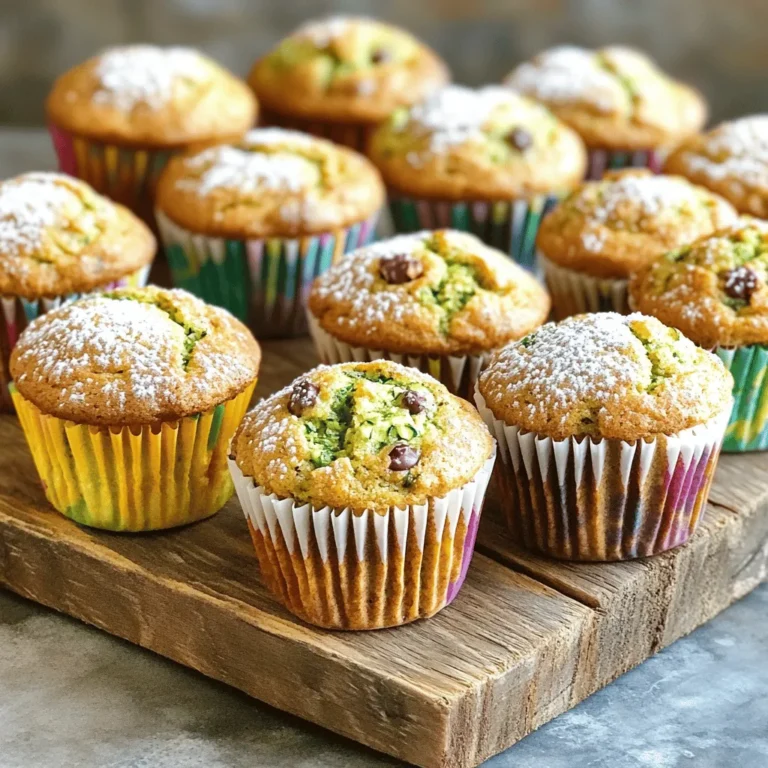
![- 1 cup all-purpose flour - 1 cup whole wheat flour - 1 tablespoon pumpkin pie spice - ½ cup granulated sugar - 1 can (15 oz) pumpkin puree - 2 large eggs - ½ cup brewed coffee, cooled - ⅓ cup vegetable oil - Optional mix-ins: ½ cup chocolate chips or nuts - Baking soda - Baking powder - Salt - Brown sugar - Pure vanilla extract The main ingredients form the base of your muffins. The blend of all-purpose and whole wheat flour adds great texture. Pumpkin puree brings moisture and a rich flavor. You can’t forget the pumpkin pie spice; it gives that cozy fall taste. Granulated sugar adds sweetness, while brown sugar provides depth. For the additional ingredients, eggs help the muffins rise and become fluffy. Brewed coffee gives a coffee kick, enhancing the flavor without being too strong. Vegetable oil keeps them moist. If you want, add chocolate chips or nuts for extra fun. Now, let’s talk staples. Baking soda and baking powder help the muffins rise. Salt balances the sweetness. Finally, pure vanilla extract adds a warm note that ties everything together. You can find the full recipe at the end. Set your oven to 350°F (175°C). This temperature helps the muffins rise nicely. Line or grease the muffin tin to keep the muffins from sticking. I prefer using paper liners for easy cleanup. In a large mixing bowl, whisk together the flours, baking soda, baking powder, pumpkin pie spice, and salt. This step is key for even flavor and texture. Make sure there are no lumps in the mixture. In another bowl, mix the granulated sugar and brown sugar until smooth. Then, add the pumpkin puree, eggs, cooled coffee, vegetable oil, and vanilla extract. Stir until everything is well combined. The mixture should look creamy and inviting. Gradually mix the dry ingredients into the wet mixture. Use a spatula to fold gently. Avoid overmixing; a few lumps are just fine. If you want, gently fold in chocolate chips or nuts for added flavor and texture. Spoon the batter into the muffin tins. Fill each cup about two-thirds full to allow for rising. Place the muffin tin in the oven and bake for 18-22 minutes. To check for doneness, insert a toothpick into a muffin. If it comes out clean, they are ready. Let the muffins cool in the pan for about 5 minutes. After that, transfer them to a wire rack to cool completely. Enjoy them warm for a cozy treat! For an extra touch, serve with cinnamon sugar or maple syrup. You can find the full recipe [here]. To make your muffins light and fluffy, avoid overmixing the batter. Stir gently until the dry and wet ingredients just come together. A few lumps are okay! Also, use room temperature ingredients. This helps the batter mix better and rise well. For a stronger coffee taste, try substituting brewed coffee with espresso. This adds depth to the flavor. Another great tip is to sprinkle some cinnamon sugar on top of the muffins before baking. This gives them a sweet, crispy crust that enhances their cozy taste. These muffins taste best when warm. Enjoy them with a fresh cup of coffee. For added sweetness, drizzle some maple syrup on top or spread a little cream cheese frosting. These simple touches make your cozy fall treat even more delightful! {{image_4}} You can easily make these muffins gluten-free. Simply swap the all-purpose flour with a gluten-free flour mix. Make sure to check the blend. Some mixes work better in baked goods than others. Using a good quality mix helps maintain texture and taste. If you want a dairy-free version, use almond milk instead of regular milk. Almond milk adds a light flavor that pairs well with the spices. For oil, replace vegetable oil with coconut oil. Coconut oil adds a subtle sweetness and complements the pumpkin nicely. To add some crunch, you can mix in nuts like walnuts or pecans. They add a nice texture and flavor. You can also play with spices. Try adding a pinch of nutmeg or cardamom for a twist. If you love chocolate, consider adding chocolate chunks. They melt perfectly and create a rich taste. To keep your pumpkin spice latte muffins fresh, place them in an airtight container at room temperature. This method helps maintain their soft texture and rich flavor. If you have a lot of muffins, you can stack them with parchment paper between layers. This prevents them from sticking together. If you want to enjoy these muffins later, freezing is a great option. First, let the muffins cool completely. Wrap each muffin in plastic wrap, then place them in a freezer bag. Make sure to remove as much air as possible to avoid freezer burn. You can store them in the freezer for up to three months. When you're ready to eat one, take it out and let it thaw at room temperature. You can also reheat it in the microwave for about 15-20 seconds. To keep your muffins moist and tasty over time, consider these tips: - Add a slice of bread to the container. This helps keep the muffins moist. - Avoid exposing them to direct sunlight or heat sources, as this can dry them out. - If you notice any muffins getting stale, you can toast them lightly. This can bring back some of their original flavor. Storing your pumpkin spice latte muffins correctly ensures you can enjoy their warm, cozy flavors for days to come. For the full recipe, check the earlier section! Yes, you can add more pumpkin puree. However, this change will affect the muffins. Adding extra puree makes the muffins moister. It may also make them denser. If you want a lighter muffin, keep the amount as in the Full Recipe. You can try adding an extra tablespoon at first. This way, you can see how the texture changes. These muffins last about three days at room temperature. Keep them in an airtight container. They can also last about a week in the fridge. The cold helps keep them fresh longer. If you want to save them for later, freeze them. They stay good for about three months in the freezer. Just remember to wrap them well. Yes, you can make these muffins without eggs. Here are some good substitutes: - 1/4 cup unsweetened applesauce - 1/4 cup mashed banana - 1 tablespoon flaxseed meal mixed with 2.5 tablespoons water Each option helps bind the muffins. They also add moisture. Choose the one you like best for a vegan version. You can use several options instead of brewed coffee. Here are some alternatives: - Brewed tea for a lighter flavor - Milk or almond milk for a creamy texture - Pumpkin spice tea for a fall twist These options help keep the muffins moist and tasty. You can experiment with what you have at home. These Pumpkin Spice Latte Muffins mix simple ingredients in easy steps. You learned how to combine flours, spices, and pumpkin puree for a tasty treat. I shared tips for perfect muffins and ways to store them well. Remember, you can adjust flavors to your liking. Try nuts or different spices for variety. Whether you enjoy them warm or frozen, these muffins are sure to please. Happy baking!](https://goldendishy.com/wp-content/uploads/2025/06/a78bef71-23f4-423c-981c-d5caf094e886-768x768.webp)