Honey Sriracha Chicken Tacos Flavorful and Easy Meal
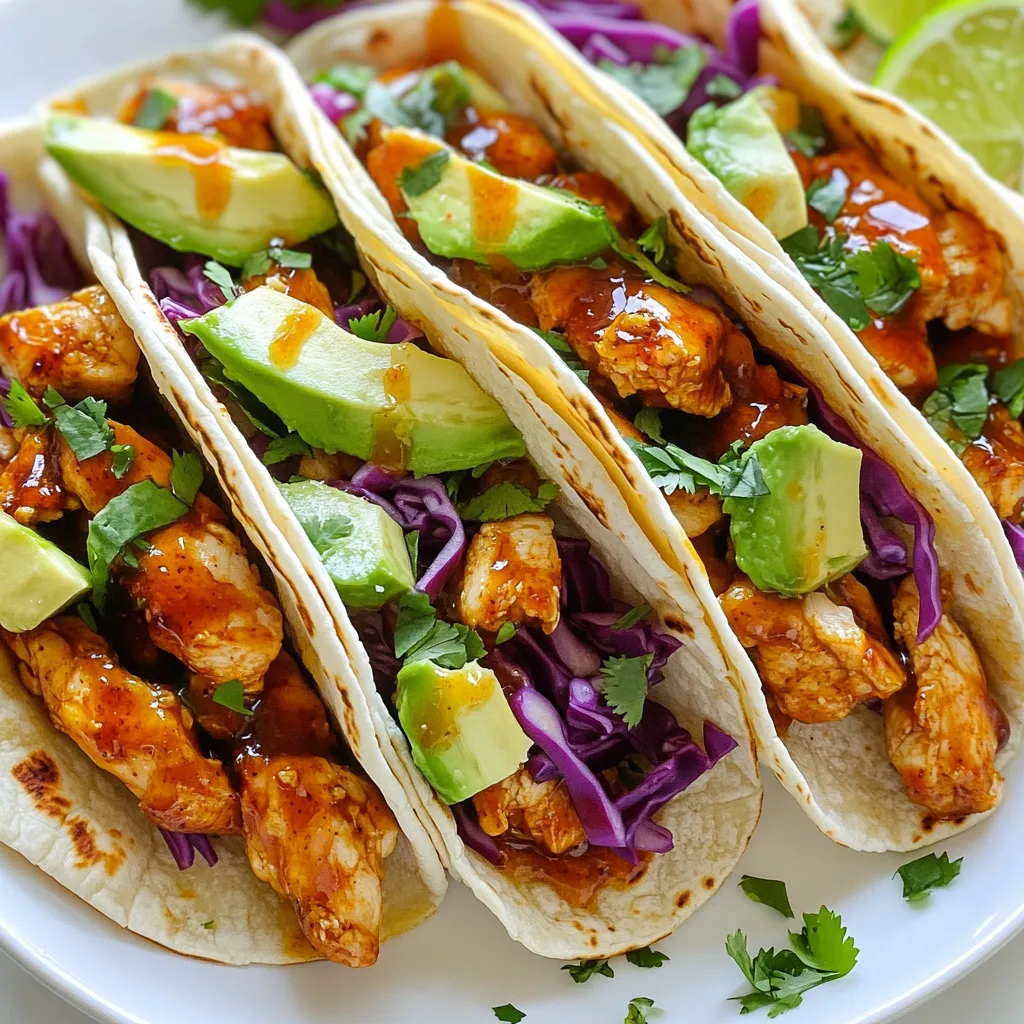
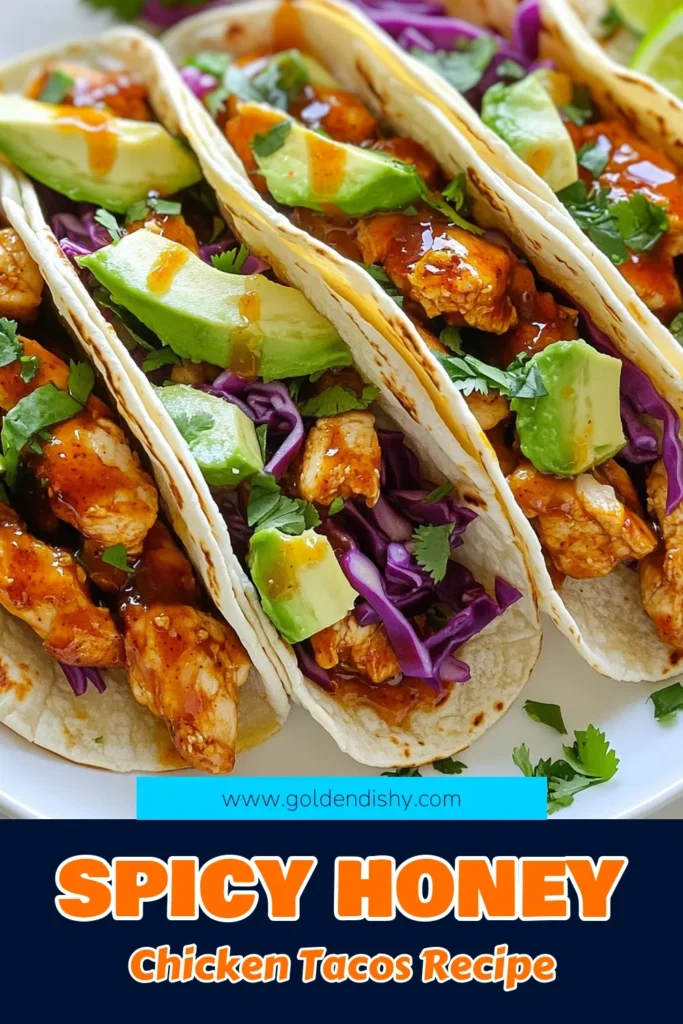
Get ready for a tasty twist on taco night with my Honey Sriracha Chicken Tacos! This dish combines sweet honey and spicy Sriracha for a flavor explosion. It’s simple to make and packed with delicious toppings. Whether you’re a busy parent or a cooking newbie, I’ll guide you step-by-step to create a meal that your family will love. Let’s dive into the ingredients and get cooking!
Why I Love This Recipe
- Bold Flavor Combination: The mix of sweet honey and spicy Sriracha creates a tantalizing flavor that is both unique and satisfying.
- Quick and Easy: This recipe comes together in just about an hour, making it perfect for a weeknight dinner or a quick meal prep.
- Fresh and Healthy Ingredients: With fresh vegetables and lean chicken, these tacos are a wholesome choice that doesn’t compromise on taste.
- Customizable Toppings: Feel free to add your favorite toppings like salsa, cheese, or jalapeños to make each taco your own.
Ingredients
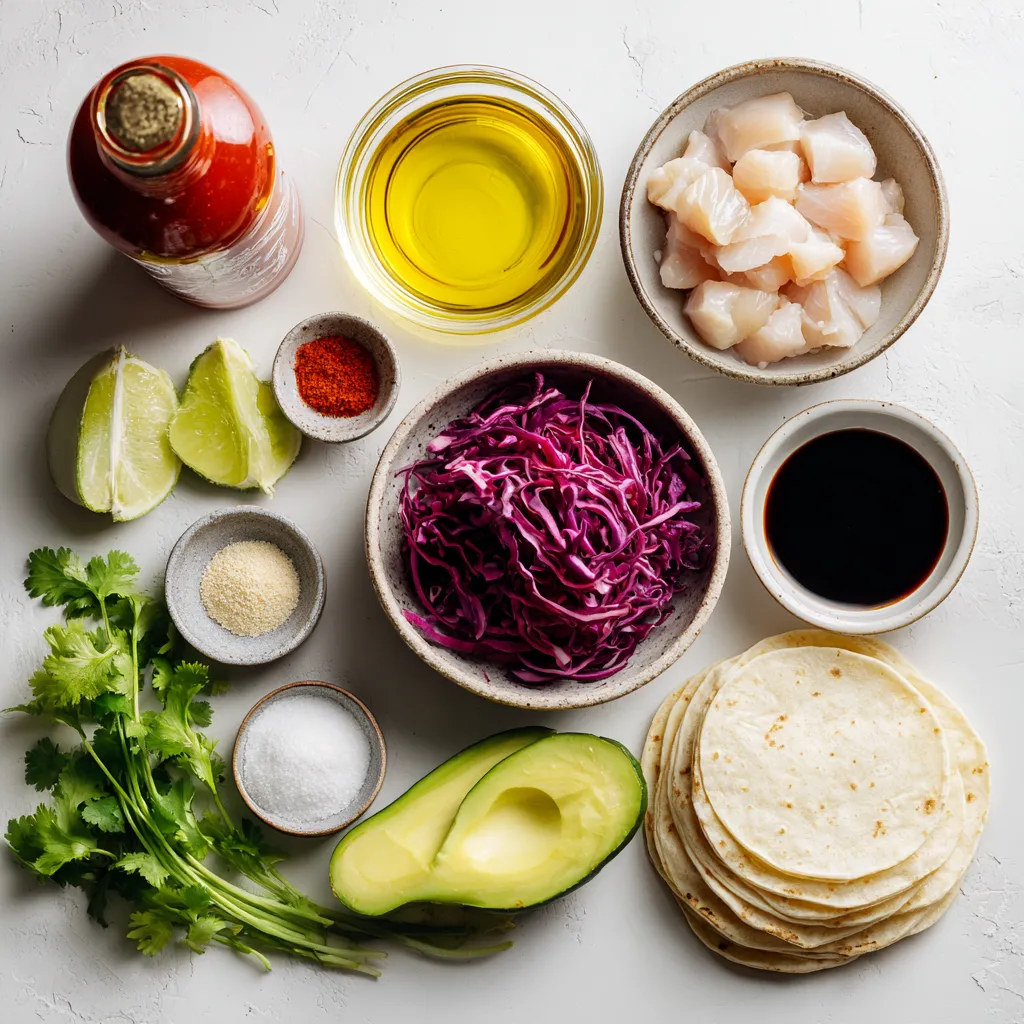
List of Ingredients
Chicken and Marinade Components
– 2 boneless, skinless chicken breasts
– 2 tablespoons honey
– 2 tablespoons Sriracha sauce
– 1 tablespoon soy sauce
– 1 tablespoon olive oil
– 1 teaspoon garlic powder
– 1 teaspoon smoked paprika
– Salt and freshly cracked black pepper, to taste
Tortilla and Topping Essentials
– 8 small corn or flour tortillas
– 1 cup red cabbage, finely shredded
– 1 ripe avocado, sliced
Optional Garnishes
– Fresh cilantro leaves, for garnish
– Lime wedges, for serving
This list gives you everything you need for those tasty Honey Sriracha Chicken Tacos. The chicken marinates in a sweet and spicy mix that brings out bold flavors. You can use either corn or flour tortillas, depending on your preference. Don’t skip the toppings! The crunchy cabbage and creamy avocado add texture and freshness. Fresh cilantro and lime wedges finish the dish with a bright touch. Each ingredient plays a role in creating a delicious taco experience!
Step-by-Step Instructions
Marinate the Chicken
– Whisk Together Marinade Ingredients: In a medium bowl, mix 2 tablespoons of honey, 2 tablespoons of Sriracha sauce, 1 tablespoon of soy sauce, 1 teaspoon of garlic powder, and 1 teaspoon of smoked paprika. Add a pinch of salt and pepper. Make sure everything blends well.
– Coat Chicken and Refrigerate: Place 2 boneless, skinless chicken breasts in a resealable bag or a dish. Pour the marinade over the chicken. Seal the bag or cover the dish. Refrigerate for at least 30 minutes, or up to 2 hours for more flavor.
Cooking the Chicken
– Preheat the Cooking Surface: When ready to cook, preheat your grill or a large skillet over medium-high heat. If using a skillet, add 1 tablespoon of olive oil.
– Grill or Pan-Fry Instructions: Remove the chicken from the marinade. Let excess marinade drip off. Grill or pan-fry the chicken for about 6-7 minutes on each side. Cook until the chicken reaches an internal temperature of 165°F (75°C).
– Check Internal Temperature: Use a meat thermometer to ensure the chicken is fully cooked. This helps keep the chicken safe to eat.
Assemble the Tacos
– Prepare Tortillas: While the chicken rests, warm 8 small corn or flour tortillas in a skillet over low heat or in the microwave. This makes them soft and easy to fold.
– Layer Toppings and Garnishes: For each tortilla, add a handful of shredded red cabbage. Top with sliced chicken and a few slices of ripe avocado. Finish with fresh cilantro leaves for brightness. Serve lime wedges on the side for added flavor.
Tips & Tricks
Best Cooking Methods
Grill vs. Skillet:
Grilling gives chicken a nice smoky flavor. The char adds a great taste. A skillet is perfect for a quick meal. It allows you to cook indoors easily. Both methods work well, so choose what suits you best.
How to Achieve Optimal Charring:
To get good char, preheat your grill or skillet well. Avoid moving the chicken too much while it cooks. This helps form a crust. Cook until it reaches 165°F (75°C) for safety and flavor.
Flavor Enhancement Tips
Marinating Times:
Marinate the chicken for at least 30 minutes. This allows the flavors to soak in. If you have more time, go for 2 hours. The longer it marinates, the better it tastes.
Additional Seasonings and Sauces:
You can add more spices to the marinade. Try adding cumin or onion powder for extra flavor. A splash of lime juice brightens the dish. Experiment to find your favorite blend.
Perfecting Tortilla Warmth
Methods for Softening Tortillas:
Warm tortillas in a skillet over low heat. You can also wrap them in a damp paper towel and microwave for 30 seconds. This makes them soft and easy to fold.
Storing Warm Tortillas:
To keep tortillas warm, stack them in a clean cloth. This keeps them soft while you finish cooking. Avoid letting them cool too much; warm tortillas are key for great tacos.
Pro Tips
- Marinate for Maximum Flavor: Allow the chicken to marinate for at least 2 hours, or overnight if possible, to deepen the flavor and ensure every bite is packed with sweetness and spice.
- Check for Doneness: Use a meat thermometer to confirm the chicken has reached an internal temperature of 165°F (75°C) for safe consumption, ensuring it remains juicy and tender.
- Warm Tortillas Properly: For the best texture, warm tortillas in a skillet over low heat until pliable, or wrap them in a damp paper towel and microwave for 20-30 seconds.
- Fresh Garnishes Matter: Don’t skip the fresh cilantro and lime wedges; they add a vibrant flavor that balances the sweetness of the honey and the heat of the Sriracha.
Variations
Alternative Proteins
You can switch up the chicken in these tacos. Try beef, pork, or plant-based options.
– Beef: Use ground beef for a classic twist. Cook it until brown, then mix with the marinade.
– Pork: Thinly slice pork tenderloin. Marinate and grill it just like the chicken.
– Plant-Based: Use tofu or tempeh for a veggie option. Press and cube, then marinate and cook until crispy.
Topping Variations
You can also change the toppings to add more flavor and texture.
– Vegetables: Use shredded carrots, diced tomatoes, or sliced radishes. Each one adds a unique crunch.
– Salsas: Try a mango salsa for sweetness or a spicy tomato salsa for a kick.
– Cheese: Crumbled feta or shredded cheddar both work great. They add creaminess to each bite.
– Sour Cream: A dollop of sour cream or Greek yogurt can cool down the heat.
Spice Levels
Adjust the spice to fit your taste.
– Sriracha: Add more for a hotter taco. Less will give you a milder flavor.
– Alternative Heat Sources: Use jalapeños or chili flakes for extra spice. You can also use sweet chili sauce for a different flavor.
Feel free to mix and match these variations to find your perfect taco!
Storage Info
Leftovers
When you have leftovers, proper storage is key. For chicken, let it cool first. Place it in an airtight container. This keeps it fresh for up to three days. If you have leftover tacos, it’s best to store the components separately. The tortillas can get soggy if you store them with the chicken and toppings.
– Best Practices for Storing Chicken:
– Cool chicken to room temperature.
– Use an airtight container.
– Store in the fridge for up to three days.
– Storing Tacos vs. Components:
– Store tortillas separately to prevent sogginess.
– Keep toppings like cabbage and avocado in separate containers.
Reheating Instructions
Reheating your tacos needs care to keep them tasty. You can use an oven, skillet, or microwave. Each method has its perks.
– Oven: Preheat the oven to 350°F. Place chicken and tortillas on a baking sheet. Heat for about 10 minutes until warm.
– Skillet: Heat a skillet over medium heat. Add chicken for about 3-5 minutes, turning to heat evenly. Warm tortillas for about 30 seconds per side.
– Microwave: Place chicken and tortillas on a microwave-safe plate. Cover with a damp paper towel. Heat in 30-second bursts until warm.
Freezing Options
If you want to save your tacos for later, freezing is a great option. It keeps the flavors intact and is easy to reheat.
– How to Freeze and Reheat Tacos:
– Let chicken and components cool completely.
– Wrap chicken tightly in plastic wrap, then in foil.
– Place tortillas in a freezer bag, removing as much air as possible.
– To reheat, thaw overnight in the fridge or use the microwave. Then, follow the reheating instructions above.
FAQs
What can I substitute for Sriracha?
You can use any hot sauce you like. Here are some alternatives:
– Chili Garlic Sauce: This sauce is spicy and garlicky.
– Sambal Oelek: A fresh and bright chili paste.
– Buffalo Sauce: This will give a tangy flavor.
– Homemade Option: Mix red pepper flakes with vinegar for a quick fix.
Each substitute has a different taste. Choose based on your preference.
Can I make this recipe ahead of time?
Yes, you can prep the chicken early. Here are some tips:
– Marinate the Chicken: You can marinate it for up to 2 hours.
– Pre-cook: Cook the chicken a day before. Store it in the fridge.
– Assemble Later: You can warm the tortillas and assemble the tacos just before serving.
This saves time and keeps the flavors fresh.
What side dishes pair well with Honey Sriracha Chicken Tacos?
These sides go great with your tacos:
– Mexican Rice: A simple, flavorful side.
– Black Beans: Healthy and filling.
– Corn Salad: Adds a sweet crunch.
– Chips and Guacamole: A fun and tasty snack.
These options enhance the meal and add variety. Enjoy your taco night!
This blog covered making tasty Honey Sriracha Chicken Tacos. You learned about key ingredients, marinating, and cooking the chicken. I shared tips for perfecting your tacos and offered ideas for variations. Remember, you can use different proteins and toppings to mix things up. Store and reheat leftovers properly for the best taste. Now, it’s time to get cooking! Enjoy your flavorful creations and impress your friends with these taco

Sweet and Spicy Honey Sriracha Chicken Tacos
Ingredients
- 2 pieces boneless, skinless chicken breasts
- 2 tablespoons honey
- 2 tablespoons Sriracha sauce
- 1 tablespoon soy sauce
- 1 tablespoon olive oil
- 1 teaspoon garlic powder
- 1 teaspoon smoked paprika
- to taste Salt and freshly cracked black pepper
- 8 pieces small corn or flour tortillas
- 1 cup red cabbage, finely shredded
- 1 piece ripe avocado, sliced
- for garnish Fresh cilantro leaves
- for serving Lime wedges
Instructions
- In a medium mixing bowl, whisk together the honey, Sriracha sauce, soy sauce, garlic powder, smoked paprika, and a pinch of salt and pepper until fully combined.
- Place the chicken breasts in a resealable plastic bag or a shallow dish. Pour the marinade over the chicken, ensuring it is well-coated. Seal the bag or cover the dish and refrigerate for a minimum of 30 minutes, or up to 2 hours to enhance the flavor infusion.
- When ready to cook, preheat your grill or a large skillet over medium-high heat. Add the olive oil to the skillet if using.
- Remove the chicken from the marinade, allowing any excess marinade to drip off. Grill or pan-fry the chicken for approximately 6-7 minutes on each side, or until the chicken reaches an internal temperature of 165°F (75°C) and exhibits a nice char.
- Once cooked, transfer the chicken to a cutting board and allow it to rest for about 5 minutes. This will help retain the juices. After resting, slice the chicken into bite-sized pieces.
- While the chicken is resting, warm the tortillas in a skillet over low heat or in the microwave until they are soft and pliable.
- For each tortilla, place a generous handful of shredded red cabbage as the base. Top with a portion of sliced chicken and a few slices of avocado.
- Finish by garnishing with fresh cilantro leaves. Serve with lime wedges on the side for an extra burst of flavor when squeezed over the tacos.
![- 1 lb baby carrots (or regular carrots, peeled and sliced into sticks) - 2 tablespoons olive oil - 3 tablespoons pure maple syrup - 2 tablespoons Dijon mustard - 1 tablespoon fresh thyme leaves (or 1 teaspoon dried thyme) These key items create the sweet and tangy glaze that makes the carrots shine. Baby carrots are sweet and tender, while regular carrots add a heartier texture. The olive oil helps the glaze stick and adds a rich flavor. Pure maple syrup brings sweetness, and Dijon mustard adds a kick. Fresh thyme gives an earthy note that ties it all together. - Salt and pepper to taste - Zest of 1 lemon (for garnish) - Additional herbs (like parsley or chives) These optional items can elevate your dish. Salt and pepper enhance all flavors. Lemon zest adds a bright note that contrasts beautifully with the sweet glaze. Extra herbs can give a pop of color and flavor. Feel free to mix and match these garnishes to make your dish unique. For the full recipe, check out [Full Recipe]. First, you need to preheat your oven to 425°F (220°C). This step helps the carrots roast perfectly. If you’re using regular carrots, peel them first. Then, slice them into sticks about 1/2 inch thick. Cutting them evenly ensures they cook at the same rate. Baby carrots can go straight into the oven without any slicing. Next, grab a small mixing bowl. In it, whisk together the following ingredients: - 2 tablespoons olive oil - 3 tablespoons pure maple syrup - 2 tablespoons Dijon mustard - 1 tablespoon fresh thyme leaves (or 1 teaspoon dried thyme) - A pinch of salt and pepper Whisk until all the ingredients blend into a smooth glaze. This glaze gives the carrots a sweet and tangy flavor that really shines. Now, transfer the carrots to a large mixing bowl. Pour the glaze over the carrots. Toss them gently to coat each piece evenly. You want every carrot stick to be covered in that tasty mixture. Spread the glazed carrots in a single layer on a baking sheet lined with parchment paper. Make sure there's space between each piece; this helps them roast evenly. Place the baking sheet in the oven and roast for 20-25 minutes. Remember to toss the carrots halfway through. This ensures they brown nicely on all sides. When they finish roasting, the carrots should be tender and caramelized, looking delicious. You can find the full recipe for these amazing Maple Dijon Glazed Carrots to make them at home! To make your Maple Dijon glazed carrots pop, think about adding spices or herbs. Try a pinch of cayenne for heat or a dash of garlic powder for depth. Fresh herbs like parsley or dill can also brighten the dish. These small changes can bring a new twist to the recipe. Adjusting sweetness levels is another way to suit your taste. If you love sweet, add more maple syrup. If you prefer less sweetness, cut back slightly. Balancing the sweet and tangy flavors makes each bite exciting. Even cooking is key for great roasted carrots. Cut your carrots into uniform pieces. This ensures they cook at the same rate. For baby carrots, you can roast them whole. If using regular carrots, aim for 1/2 inch thick sticks. If you want to try alternatives to oven roasting, consider steaming or sautéing. Steaming keeps the carrots tender and bright. Sautéing in a pan with the glaze gives a nice caramelization as well. Both methods can work well, but roasting brings out the best flavors. Find the full recipe for Maple Dijon glazed carrots to explore even more cooking tips! {{image_4}} You can easily swap out some ingredients in this recipe. If you're out of maple syrup, try honey or agave syrup. Both add a nice sweetness but change the flavor a bit. You can also use brown sugar, but it will change the glaze's texture. For the mustard, Dijon is great, but you can use yellow mustard for a milder taste. Spicy brown mustard adds a kick. You can even try whole grain mustard for a rustic feel. Each option brings a new twist to the dish. You can make these glazed carrots on the stovetop if you prefer. Simply steam the carrots until tender. Then, toss them in the glaze in a pan over low heat. This method gives you a softer texture. If you're hosting a big dinner, you can serve these carrots in many ways. For a casual meal, serve them right from the baking dish. For a fancy dinner, arrange them on a platter and drizzle extra glaze on top. You can even add some nuts for crunch. For the full recipe, check the link provided. Enjoy exploring these variations! To keep your maple Dijon glazed carrots fresh, use airtight containers. Glass or plastic containers work well. Make sure the carrots cool down before sealing them. This helps prevent moisture build-up. Store the leftovers in the fridge. They stay good for about three to five days. When reheating glazed carrots, the oven is best. Preheat it to 350°F (175°C). Spread the carrots on a baking sheet and heat for about 10 minutes. This keeps them crispy and tasty. You can also use the microwave. Heat them in short bursts of 30 seconds. Stir between each burst to keep flavors intact. How long do roasted carrots last in the fridge? Roasted carrots can last about 3 to 5 days in the fridge. Store them in an airtight container. This helps keep them fresh and tasty. Can I make this recipe ahead of time? Yes, you can make this recipe ahead of time. Roast the carrots and let them cool. Then, store them in the fridge. Reheat them before serving for the best flavor. Is this recipe suitable for vegan diets? Yes, this recipe is vegan-friendly. It uses maple syrup and mustard, which are both plant-based. You can enjoy this dish without any animal products. How can I make this gluten-free? This recipe is already gluten-free. Dijon mustard is often gluten-free, but always check the label. This way, you ensure it fits your diet. What meals pair well with glazed carrots? Glazed carrots pair well with roasted chicken, grilled fish, or a hearty grain dish. Their sweet and tangy flavor adds balance to savory meals. Can I use other vegetables in this recipe? Yes! You can use other veggies like parsnips or sweet potatoes. Just adjust the cooking time for different vegetables. Enjoy the variety! For the full recipe, check out the Maple Dijon Glazed Carrots recipe to explore all the tasty details. Maple Dijon glazed carrots are both tasty and easy to make. We covered essential ingredients like carrots, olive oil, and Dijon mustard. Each step, from roasting to optional flavor tweaks, helps you create the best dish. Remember to store leftovers properly and reheat them for full flavor. Feel free to experiment with variations to match your taste. With this recipe, you can impress at any meal. Now, gather your ingredients and enjoy making these delicious carrots!](https://goldendishy.com/wp-content/uploads/2025/07/c1b9af90-3a4b-46ea-8cf2-4dca4008c015-768x768.webp)