Honey Sriracha Meatballs Flavorful and Simple Recipe


If you’re craving a sweet and spicy dish, you’re in for a treat! My Honey Sriracha Meatballs recipe is not just flavorful—it’s simple to make, too. Packed with bold flavors, these meatballs will impress your friends and family. Let’s dive into the ingredients and cooking steps that get you a tasty meal in no time. Get ready to enjoy every bite!
Why I Love This Recipe
- Simple Ingredients: This recipe uses everyday ingredients that are easy to find in any grocery store, making it perfect for a quick weeknight dinner.
- Flavor Explosion: The combination of honey and Sriracha creates a perfect balance of sweetness and heat that is truly addictive.
- Versatile Dish: These meatballs can be served as an appetizer, main dish, or even in a sandwich, making them incredibly versatile for any occasion.
- Easy Cleanup: Baking the meatballs on a lined sheet makes cleanup a breeze, allowing you to enjoy your meal without the hassle.
Ingredients
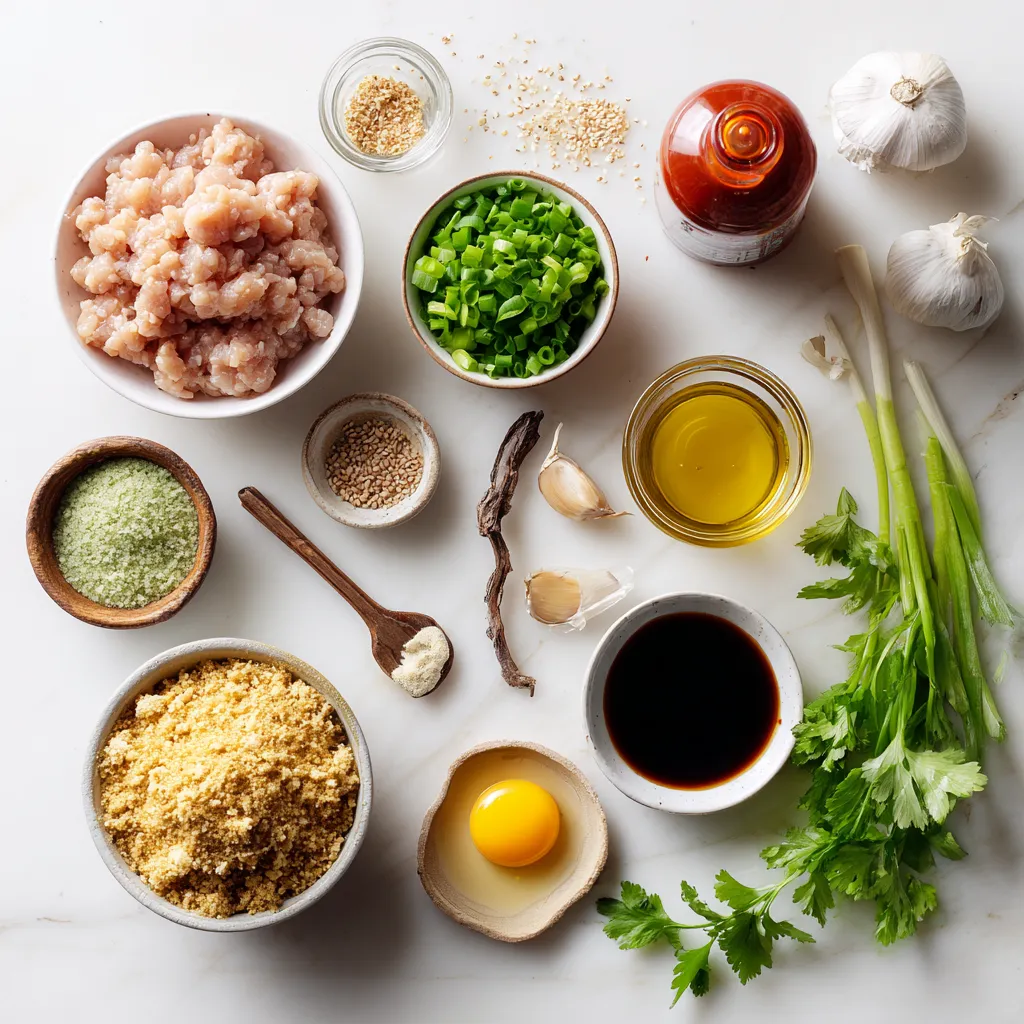
Main Ingredients for Honey Sriracha Meatballs
– 1 pound ground chicken (or substitute ground turkey)
– 1/2 cup plain breadcrumbs
– 1/4 cup finely chopped green onions
– 2 cloves garlic, minced
– 1 large egg, beaten
– 1 tablespoon soy sauce (low-sodium recommended)
– 1 teaspoon freshly grated ginger
– Salt and freshly ground black pepper to taste
– 1/3 cup honey (preferably raw)
– 1/4 cup Sriracha sauce (adjust to taste)
– 1 tablespoon rice vinegar
– Sesame seeds (for garnish)
– Fresh cilantro leaves (for garnish)
The main ingredients for Honey Sriracha Meatballs create a perfect blend. Ground chicken gives the meatballs a tender bite. Breadcrumbs add texture, while green onions and garlic bring a fresh taste. The egg helps bind everything together. Low-sodium soy sauce adds a savory note. Honey and Sriracha create a sweet and spicy kick. Ginger adds warmth, and rice vinegar brightens the dish.
Optional Substitutions and Variations
You can swap ground chicken for ground turkey for a different flavor. If you want a vegetarian version, try using lentils or chickpeas. You can also use panko instead of plain breadcrumbs for a crunchier texture. For a gluten-free option, use gluten-free breadcrumbs and tamari instead of soy sauce. Adjust the Sriracha based on your heat preference. You can even add chopped bell peppers or carrots for extra veggies.
Garnishes and Serving Suggestions
Garnishes make your dish pop. Sprinkle sesame seeds over the meatballs for crunch. Fresh cilantro leaves add color and flavor. Serve these meatballs on a platter, drizzled with leftover glaze. For parties, add toothpicks for easy eating. Pair them with rice or noodles for a complete meal. You can also serve them as appetizers with dipping sauces.
Step-by-Step Instructions
Preparation and Mixing the Ingredients
First, preheat your oven to 400°F (200°C). Line a baking sheet with parchment paper. This will help with cleanup later. In a large bowl, mix the ground chicken, breadcrumbs, chopped green onions, minced garlic, beaten egg, soy sauce, grated ginger, salt, and pepper. Use your hands for the best mix. Blend the ingredients well until they form a uniform mixture. This should take about 2 minutes.
Shaping and Baking the Meatballs
Next, take small portions of the mixture and shape them into 1-inch meatballs. Place each meatball on the baking sheet. Make sure to leave space between them. This helps them cook evenly. After that, it’s time to prepare the glaze. In a small bowl, whisk together the honey, Sriracha sauce, and rice vinegar. Set aside a couple of tablespoons for later. Brush or drizzle the glaze over the meatballs before baking them.
Now, place the baking sheet in the oven. Bake the meatballs for 18 to 20 minutes. They should turn golden brown and reach an internal temperature of 165°F (75°C).
Glazing and Serving the Meatballs
When the meatballs are done, take them out of the oven. Brush them with the reserved Sriracha honey sauce for an extra kick. For a lovely finish, sprinkle sesame seeds and fresh cilantro on top. Serve them warm, and enjoy this tasty dish!
Tips & Tricks
Achieving the Perfect Flavor Balance
To get the best flavor from your Honey Sriracha Meatballs, use fresh ingredients. Fresh garlic and ginger make a big difference. The honey adds sweetness, and the Sriracha brings heat. Adjust the amount of Sriracha to suit your taste. If you like it spicier, add more Sriracha. For a milder flavor, reduce it. Mix your meatball ingredients well. This helps blend all flavors.
Cooking Methods: Oven vs. Air Fryer
You can cook your meatballs in the oven or an air fryer. Both methods work well. The oven gives a nice, even cook. Set it to 400°F (200°C) and bake for 18-20 minutes. Ensure they reach an internal temperature of 165°F (75°C). An air fryer cooks faster. It can give you a crispier outside. If you choose the air fryer, cook at 375°F (190°C) for about 12-15 minutes. Check for doneness as you would in the oven.
Handling and Storing Leftovers
Store any leftover meatballs in an airtight container. Keep them in the fridge for up to three days. You can also freeze them for longer storage. Place them in a freezer bag, and they can last for about three months. When you’re ready to eat, thaw them in the fridge overnight. Reheat them in the oven or microwave. Drizzle some extra honey Sriracha sauce on top for added flavor. This keeps your meatballs tasty and fresh!
Pro Tips
- Use Lean Meat: Opt for lean ground chicken or turkey to keep the meatballs moist without excess fat.
- Adjust Spice Level: Feel free to adjust the amount of Sriracha based on your heat preference; start with less and add more if desired.
- Prep Ahead: You can prepare the meatballs in advance and refrigerate them. Bake them fresh right before serving for best results.
- Experiment with Glazes: Try adding different flavors to your glaze, such as lime juice or garlic, for a unique twist each time.

Variations
Alternate Meat Options: Turkey, Beef, or Vegetarian
You can swap the ground chicken for ground turkey or beef. Turkey gives a lighter taste. Beef adds a richer flavor. If you want a vegetarian option, use lentils or chickpeas. Just mash them well and follow the same steps. This keeps the dish tasty for everyone.
Spice Level Adjustments and Flavor Enhancements
To change the heat, adjust the Sriracha. For a milder taste, use less. For more heat, add a bit more Sriracha. You can also mix in red pepper flakes or chili paste. If you like sweet and spicy, add more honey. A touch of lime juice can brighten the flavors, too.
Creative Ways to Serve Honey Sriracha Meatballs
These meatballs are great on their own or with sides. You can serve them over rice or noodles for a full meal. For a fun snack, put them on toothpicks. They are perfect for parties! You can also add them to a wrap with fresh veggies. Drizzle more glaze on top for extra flavor.
Storage Info
How to Properly Store Leftover Meatballs
To keep your Honey Sriracha meatballs fresh, let them cool first. Once they cool, place them in an airtight container. This helps the meatballs stay moist and flavorful. Store them in the fridge for up to three days. If you want to keep them longer, freezing is a great option.
Freezing Tips for Meal Prep
Freezing meatballs is easy. First, let them cool completely. Then, arrange the meatballs in a single layer on a baking sheet. Freeze them for about two hours. After they are firm, transfer them to a freezer-safe bag. Label the bag with the date. You can freeze them for up to three months. This way, you have a quick meal ready whenever you need it!
Reheating Instructions for Optimal Taste
Reheating Honey Sriracha meatballs is simple. For the best taste, use the oven. Preheat the oven to 350°F (175°C). Place the meatballs on a baking sheet and cover them with foil. Bake for about 10-15 minutes. If you prefer the microwave, heat them in 30-second bursts until warm. Just be careful not to overcook them! Enjoy your tasty meatballs again!
FAQs
What can I use instead of ground chicken?
You can use ground turkey or ground beef as a substitute. Each option offers a different flavor. Ground turkey is leaner than beef, while beef adds a richer taste. If you prefer, you can even use plant-based meat for a vegetarian option. This keeps the dish light while still being tasty.
How do I make Honey Sriracha Meatballs spicier?
To add more heat, increase the Sriracha sauce in the glaze. You can also mix in red pepper flakes or cayenne pepper into the meatball mixture. For a smoky flavor, try adding chipotle powder. Always taste as you go to find your perfect spice level.
Are Honey Sriracha Meatballs healthy?
Honey Sriracha Meatballs can be a healthy choice. They use lean meat and fresh ingredients. The honey adds sweetness but also some natural sugars. If you watch portion sizes, they fit well in a balanced diet. You can lower calories by using less honey or opting for whole-grain breadcrumbs.
You now know how to make Honey Sriracha Meatballs from start to finish. We covered key ingredients, useful tips, and various ways to enjoy this dish. Remember, adjust the spice level to your liking and explore different meats. Whether you bake or air fry, these meatballs promise great flavor. Use the storage tips to keep your leftovers fresh. Enjoy this tasty dish with family or friends and make it your ow

Honey Sriracha Meatballs
Ingredients
- 1 pound ground chicken
- 0.5 cup plain breadcrumbs
- 0.25 cup finely chopped green onions
- 2 cloves garlic, minced
- 1 large egg, beaten
- 1 tablespoon soy sauce
- 1 teaspoon freshly grated ginger
- to taste salt and freshly ground black pepper
- 0.33 cup honey
- 0.25 cup Sriracha sauce
- 1 tablespoon rice vinegar
- for garnish sesame seeds
- for garnish fresh cilantro leaves
Instructions
- Begin by preheating your oven to 400°F (200°C). Prepare a baking sheet by lining it with parchment paper.
- In a large mixing bowl, combine the ground chicken, breadcrumbs, chopped green onions, minced garlic, beaten egg, soy sauce, grated ginger, salt, and pepper. Mix thoroughly until evenly combined.
- Shape the mixture into small meatballs, approximately 1-inch in diameter, and place them on the prepared baking sheet.
- In a separate bowl, whisk together the honey, Sriracha sauce, and rice vinegar. Set aside a couple of tablespoons for later.
- Brush or drizzle the Sriracha honey glaze over each meatball.
- Transfer the baking sheet to the oven and bake for 18-20 minutes until cooked through and golden brown.
- Once baked, remove the meatballs and brush them with the reserved Sriracha honey sauce.
- Garnish with sesame seeds and fresh cilantro leaves before serving.
![- 2 medium zucchinis, grated - 1 cup feta cheese, crumbled - 1/2 cup all-purpose flour - 1 teaspoon salt - 1/2 teaspoon black pepper - 1/2 teaspoon garlic powder - 1/2 cup fresh dill, chopped - 1/2 cup green onions, finely chopped - 2 large eggs - Olive oil, for frying To make Greek zucchini fritters, you need fresh and simple ingredients. Start with two medium zucchinis. Grate them finely and set them aside. This step is crucial because zucchini holds a lot of water. Next, grab a cup of feta cheese. Crumble it into small pieces to add a salty, creamy punch. You will also need half a cup of all-purpose flour. This helps bind the fritters together. For seasoning, use one teaspoon of salt, half a teaspoon of black pepper, and half a teaspoon of garlic powder. This mixture will give your fritters a nice flavor. Don’t forget the herbs! A half cup of fresh dill and a half cup of finely chopped green onions add freshness. Finally, you need two large eggs to hold everything together. For frying, have olive oil on hand. These ingredients come together to create a dish that is tasty and simple. For the full recipe, check the detailed instructions. First, grate the zucchinis into a large bowl. Sprinkle 1 teaspoon of salt over the grated zucchini. Let it rest for about 10 minutes. This step helps pull out moisture from the zucchini, which is key for great fritters. After 10 minutes, take a clean kitchen towel. Wrap the zucchini and squeeze it gently. Remove as much liquid as you can. This makes the fritters crispier. In another bowl, mix the squeezed zucchini with crumbled feta cheese, chopped dill, and finely chopped green onions. Add the flour, eggs, black pepper, and garlic powder. Stir everything well until you have a smooth batter. Now, heat about 1/4 inch of olive oil in a skillet over medium heat. The oil should be hot enough that a small drop of batter sizzles when added. Using a spoon, drop spoonfuls of the batter into the hot oil. Flatten each fritter slightly with the back of the spoon. Be careful not to overcrowd the pan; fry in batches if needed. Cook for about 3-4 minutes on each side. You want them to be golden brown and crispy. Once done, place the fritters on a plate lined with paper towels to soak up extra oil. Serve them warm. For extra flavor, top with more crumbled feta and a dollop of Greek yogurt or tzatziki sauce. Enjoy your tasty Greek Zucchini Fritters! For the full recipe, check [Full Recipe]. To make great Greek zucchini fritters, start by squeezing out excess moisture from the grated zucchini. After salting, let the zucchini sit for ten minutes. This helps draw out the water. Next, use a clean towel to squeeze the zucchini until it feels dry. If you skip this step, the fritters might turn out soggy. Adjust cooking time for crispiness. Fry the fritters for three to four minutes on each side. If your fritters are not crispy, try increasing the heat slightly. But be careful! Too high a heat can burn them. Garnishing can elevate your fritters. Try crumbled feta cheese on top. Fresh dill adds a nice touch too. A dollop of Greek yogurt or tzatziki sauce pairs perfectly. These add creaminess and flavor. For side dishes, think about serving a light salad. A fresh cucumber salad or a simple tomato salad works well. These sides balance the rich flavors of the fritters. Using the right frying pan is key. A non-stick skillet helps with even cooking. It also makes flipping the fritters easier. For shaping and flipping, have a spatula handy. A spoon works well for dropping the batter into the oil. If you want uniform fritters, use an ice cream scoop. This helps you get the same size every time. For the full recipe, check out the details above. Enjoy your cooking! {{image_4}} You can switch up the cheese in your fritters. Goat cheese adds a tangy flavor that pairs well with zucchini. If you want a milder taste, use mozzarella. Fresh herbs can also change the taste. Adding parsley gives a fresh touch, while mint adds a sweet note. Experiment with both for a unique twist! You can bake your fritters instead of frying them. This method cuts down the oil and keeps them light. Preheat your oven to 400°F (200°C). Place the fritters on a baking sheet and lightly spray them with oil. Bake for around 20 minutes, flipping halfway for an even cook. If you own an air fryer, use it for a crispier finish. Set your air fryer to 375°F (190°C). Cook the fritters in a single layer for about 10 minutes. Shake the basket halfway through to ensure they cook evenly. Serve your fritters on a bed of fresh salad. This adds crunch and freshness to your meal. You can top them with diced tomatoes, cucumber, and a drizzle of olive oil. Pair your fritters with different dipping sauces. Tzatziki is a classic choice, but you can try a spicy yogurt dip or a sweet chili sauce. These sauces will elevate the flavors and make your dish even more enjoyable. For the full recipe, check out the complete guide on Greek Zucchini Fritters! To store your Greek zucchini fritters, first let them cool completely. Place them in an airtight container. This keeps them fresh and tasty. Refrigerate the fritters for up to three days. If you want to keep them longer, freezing is a great option. To reheat your fritters, use an oven or skillet. Preheat your oven to 350°F (175°C). Place the fritters on a baking sheet for about 10 minutes. This will keep them crispy. If you use a skillet, add a bit of olive oil. Heat on medium until they are warm and crispy. Avoid microwaving, as this can make them soggy. You can freeze the fritters before or after cooking. To freeze before cooking, shape the fritters and place them on a baking sheet. Freeze them for about an hour. Then, transfer them to a freezer bag. To freeze after cooking, let them cool completely first. Then, store them in an airtight container. For thawing, place them in the fridge overnight. Reheat them in the oven or skillet for best results. Enjoy your Greek zucchini fritters any time! For the complete recipe, check the Full Recipe. To keep your zucchini fritters from falling apart, you must remove excess moisture. Grate the zucchinis and sprinkle them with salt. Let them rest for about 10 minutes. This helps draw out water. Afterward, use a clean towel to squeeze out the liquid. The drier the zucchini, the better the fritters will hold together. Next, bind the mixture well. Use enough flour and eggs to hold everything together. The flour acts as a glue, while the eggs provide structure. If your batter feels too loose, add a bit more flour until it thickens. Yes, you can make the batter ahead of time. Store it in the fridge for up to two hours. This way, you save time when you are ready to fry. Just remember that fresh batter is best for frying. If you wait too long, the zucchini may release more moisture. Give the batter a quick stir before cooking. Greek zucchini fritters are great with several sides. You can serve them with Greek yogurt or tzatziki sauce. These dips add a cool and creamy contrast. A simple salad with tomatoes and cucumbers pairs well too. For a heartier meal, try serving them with grilled chicken or lamb. To make gluten-free zucchini fritters, swap the all-purpose flour for a gluten-free flour blend. You can also use almond flour or chickpea flour. These options work well and provide a nice flavor. Just keep in mind that different flours absorb moisture differently. You may need to adjust the amount based on your chosen flour. Start with the same amount and tweak as needed for the right batter consistency. For the best results, follow the Full Recipe for guidance. In this article, we explored making delicious Greek zucchini fritters. You learned about key ingredients, preparation steps, and helpful tips. I also shared variations to suit your taste and how to store leftovers. These fritters are easy to make and can be adjusted for different diets. Enjoy the tasty result and impress your family or friends. Happy cooking!](https://goldendishy.com/wp-content/uploads/2025/07/cb7a2661-c5f6-4b7c-b480-ad49d75e704d-768x768.webp)