Honey Mustard Pretzel Chicken Crunchy and Tasty Meal


Are you ready to take dinner to the next level? Honey Mustard Pretzel Chicken is a crunchy and tasty meal that will impress everyone at your table. This dish combines juicy chicken with a crispy pretzel coating and a tangy honey mustard sauce. In this post, I’ll guide you through each step, share tips for perfecting the recipe, and even suggest fun variations. Let’s get cooking!
Why I Love This Recipe
- Unique Flavor Combination: The sweet and tangy honey mustard pairs beautifully with the crunchy pretzel coating, creating a delightful balance of flavors that is sure to impress.
- Crispy Texture: The crushed pretzels and panko breadcrumbs deliver an irresistible crunch that elevates the chicken from ordinary to extraordinary.
- Easy Preparation: This recipe is straightforward and quick, making it perfect for busy weeknights while still feeling gourmet.
- Versatile Serving Options: Serve it with roasted vegetables, a fresh salad, or even on a bun for a delicious sandwich, allowing for creativity in your meal presentation.
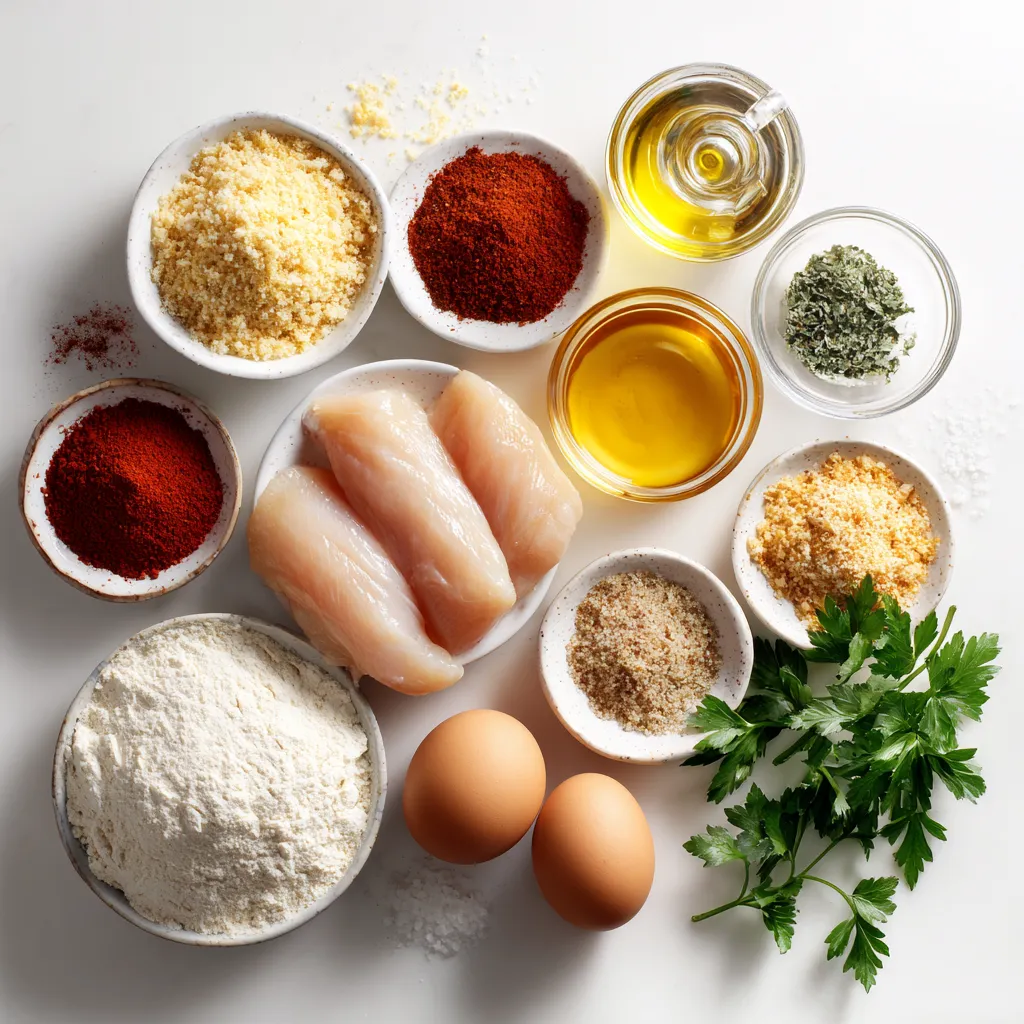
Ingredients
Main Ingredients
– 4 boneless, skinless chicken breasts
– 1 cup pretzels, finely crushed into small pieces
– 1/2 cup panko bread crumbs
– 1/4 cup all-purpose flour
– 1/2 teaspoon garlic powder
– 1/2 teaspoon onion powder
– 1/2 teaspoon smoked paprika
– 1/2 teaspoon salt
– 1/4 teaspoon freshly cracked black pepper
– 2 large eggs
The main ingredients create a tasty crunch. The chicken gives a solid base. Pretzels add crunch and a salty bite. Panko bread crumbs make it extra crispy. The seasonings give the dish its unique flavor.
Honey Mustard Mixture
– 1/4 cup honey
– 1/4 cup Dijon mustard
– 1 tablespoon apple cider vinegar
The honey mustard mixture adds a sweet and tangy flavor. Honey brings sweetness, while Dijon mustard gives a nice kick. Apple cider vinegar balances the mix, making it bright and tasty.
Garnishes
– Fresh parsley, finely chopped
Fresh parsley adds a pop of color. It gives a fresh taste to the rich chicken. Sprinkle it on top just before serving for a lovely touch.
Step-by-Step Instructions
Preparation Steps
1. Preheat your oven to 400°F (200°C). This helps cook the chicken evenly.
2. Line a large baking sheet with parchment paper to keep the chicken from sticking.
3. In a shallow dish, mix the crushed pretzels, panko bread crumbs, garlic powder, onion powder, smoked paprika, salt, and black pepper. Stir until everything blends well.
Coating the Chicken
1. Take one chicken breast and dredge it in all-purpose flour. Shake off any extra flour.
2. Dip the floured chicken into the beaten eggs. Let excess egg drip back into the dish.
3. Press the chicken into the pretzel mixture, making sure it coats all sides. Place the coated chicken on the baking sheet. Repeat this for each chicken breast.
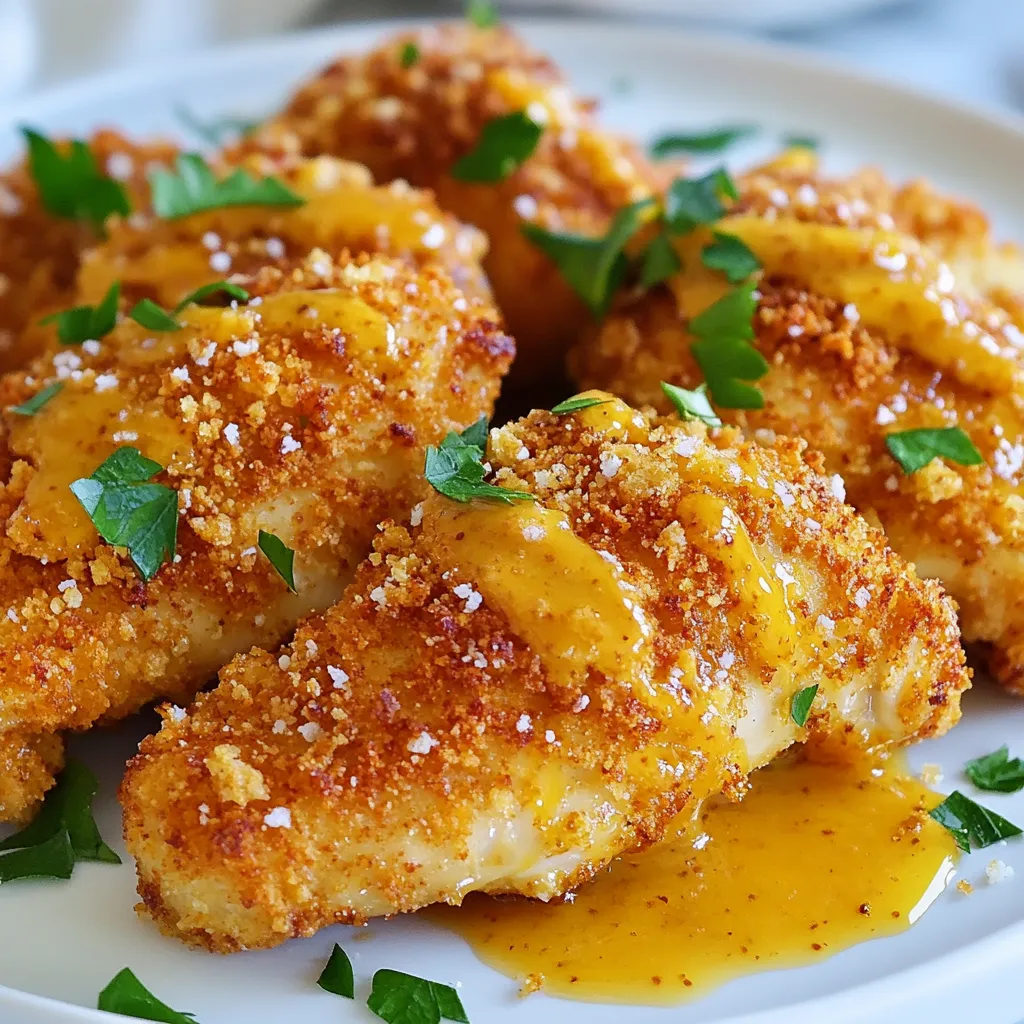
Baking the Chicken
1. Drizzle half of the honey mustard sauce over each piece of chicken. Make sure it covers well.
2. Bake in the oven for 20 to 25 minutes. The chicken should turn golden brown and be cooked through.
3. In the last five minutes, drizzle the remaining honey mustard sauce over the chicken. This adds extra flavor.
4. When finished, take the chicken out of the oven. Let it rest for a few minutes before serving.
Tips & Tricks
Cooking Techniques
To ensure even cooking of chicken, choose breasts of similar size. Thin pieces cook faster. Use a meat thermometer to check doneness. Chicken should reach 165°F (75°C). This will keep it juicy and safe to eat.
Achieving a crispy texture comes from the pretzel coating. Press the chicken firmly into the pretzel mix. This helps it stick better during baking. Bake until golden brown. The last five minutes of baking, drizzle more honey mustard. This adds flavor and moisture.
Flavor Enhancements
Customizing the honey mustard sauce is easy. You can adjust the sweetness by adding more honey or vinegar. Use spicy mustard for a kick. This will give your dish a unique twist.
Adding extra spices for flavor can elevate your dish. Try cayenne for heat or smoked paprika for depth. A pinch of herbs like thyme or rosemary can also enhance the taste. These simple changes make a big impact.
Presentation Tips
Serving suggestions can make your meal look gourmet. Arrange the chicken on a large platter. Drizzle extra honey mustard sauce over the top. Garnish with fresh parsley for color.
Plating the chicken attractively adds to the dining experience. Use a clean plate with a colorful side, like roasted veggies. A vibrant green salad pairs well, too. This keeps the meal fresh and appealing.
Pro Tips
- Use Fresh Ingredients: Opt for fresh chicken breasts and high-quality honey and mustard for the best flavor.
- Crush Pretzels Finely: Ensure your pretzel crumbs are finely crushed to create a better coating that adheres well to the chicken.
- Rest the Chicken: Allow the chicken to rest for a few minutes after baking. This helps the juices redistribute, making the chicken juicier.
- Customize the Sauce: Feel free to adjust the honey and mustard ratios in the sauce to suit your taste preferences; add more honey for sweetness or more mustard for tang.
Variations
Healthier Versions
You can make this dish healthier in a few simple ways.
– Use whole grain pretzels for more fiber.
– Try gluten-free pretzels if you need a gluten-free option.
Both swaps maintain the tasty crunch and flavor you love. They also keep the meal nutritious and satisfying.
Flavor Profile Adjustments
Want to change the taste a bit? You can easily adjust the flavor.
– Experiment with different mustard types, like honey or spicy mustard.
– Add heat by mixing in cayenne pepper or chili flakes.
These changes let you create a dish that fits your taste. You might even find a new favorite!
Meal Pairings
This chicken pairs well with many side dishes. Here are some ideas:
– Serve it with roasted seasonal vegetables for color and flavor.
– A fresh green salad also makes a great side.
For dips, try ranch or extra honey mustard sauce. They add a nice touch to your meal.
Storage Info
Storing Leftovers
To keep your Honey Mustard Pretzel Chicken fresh, use airtight containers. Glass or plastic containers work well. Store the chicken in the fridge for up to three days. If you want it to last longer, freezing is a great option.
Freezing Chicken
To freeze the chicken, let it cool first. Wrap each piece in plastic wrap or foil. Then, place them in a freezer-safe bag. Make sure to remove as much air as possible. The chicken can stay in the freezer for up to three months. To reheat, thaw it in the fridge overnight. Bake it at 350°F (175°C) until heated through.
Best Practices for Freshness
To maintain flavor, store the sauce separately. This helps keep the chicken crispy. When reheating, avoid the microwave. Instead, use the oven for a better texture. Enjoy your meal as fresh as possible!
FAQs
How do I ensure the chicken stays moist?
To keep the chicken juicy, follow these tips:
– Use boneless, skinless chicken breasts.
– Dredge the chicken in flour first.
– Dip it in egg to lock in moisture.
– Press it well into the pretzel coating.
– Bake at 400°F for just 20 to 25 minutes.
– Let it rest after baking for a few minutes.
These steps help create a flavorful crust while keeping the inside tender.
Can I prepare this recipe ahead of time?
Yes, you can make this dish ahead of time. Here’s how:
– Prepare the chicken and coat it.
– Place it on your baking sheet and cover it.
– Store it in the fridge for up to 24 hours.
– When ready, just bake it straight from the fridge.
This makes meal prep easy and saves time on busy days.
What dipping sauces pair well with Honey Mustard Pretzel Chicken?
There are many tasty sauces to serve with this dish:
– Extra honey mustard sauce for a sweet kick.
– Ranch dressing for a creamy contrast.
– BBQ sauce for a smoky flavor.
– A spicy aioli for a bit of heat.
These sauces add fun and flavor to the meal!
In this post, we explored making Honey Mustard Pretzel Chicken. You learned about key ingredients, from boneless chicken to fresh parsley. We covered step-by-step instructions for prepping, coating, and baking the chicken. I shared tips for even cooking and achieving a crispy finish. You also discovered variations and how to store leftovers. This dish is simple, tasty, and perfect for any meal. Enjoy your cooking adventure and impress your friends and family with this recip

Honey Mustard Pretzel Chicken
Ingredients
- 4 pieces boneless, skinless chicken breasts
- 1 cup pretzels, finely crushed into small pieces
- 1 2 panko bread crumbs
- 1 4 cup all-purpose flour
- 1 2 teaspoon garlic powder
- 1 2 teaspoon onion powder
- 1 2 teaspoon smoked paprika
- 1 2 teaspoon salt
- 1 4 teaspoon freshly cracked black pepper
- 2 large eggs
- 1 4 cup honey
- 1 4 cup Dijon mustard
- 1 tablespoon apple cider vinegar
- 1 to taste fresh parsley, finely chopped (for garnish)
Instructions
- Begin by preheating your oven to 400°F (200°C). Line a large baking sheet with parchment paper to prevent sticking.
- In a shallow dish, thoroughly combine the crushed pretzels, panko bread crumbs, garlic powder, onion powder, smoked paprika, salt, and black pepper. Ensure everything is well mixed, then set the mixture aside.
- In another shallow dish, crack the eggs and whisk them together until they are smooth and homogenous.
- In a separate small bowl, whisk together the honey, Dijon mustard, and apple cider vinegar until the mixture is completely smooth; set this aside for later use.
- Take one chicken breast and dredge it in the all-purpose flour, ensuring to shake off any excess. Next, dip it into the beaten eggs, allowing any excess egg to drip back into the dish.
- Carefully press the coated chicken breast into the pretzel mixture, making sure it's evenly covered on all sides. Transfer the coated chicken to the prepared baking sheet. Repeat this for all chicken breasts.
- Once all chicken pieces are on the baking sheet, drizzle half of the honey mustard sauce over the top of each one, ensuring an even distribution.
- Bake in the preheated oven for 20 to 25 minutes, or until the chicken is cooked through and achieves a beautiful golden-brown color.
- In the final 5 minutes of baking, drizzle the remaining honey mustard sauce generously over the chicken and return it to the oven to heat through.
- When the baking time is complete, carefully remove the chicken from the oven and allow it to rest for a few minutes. Garnish each piece with chopped parsley before serving.

![For Lemon Basil Zucchini Orzo, you will need: - 1 cup of orzo pasta - 2 medium zucchinis, diced into bite-sized cubes - 1 cup of vegetable broth - 1 tablespoon of extra-virgin olive oil - 3 cloves of garlic, finely minced - Zest and juice of 1 large lemon - 1/4 cup of fresh basil leaves, chopped roughly - 1/4 teaspoon of red pepper flakes (adjust to taste) - Salt and freshly cracked black pepper, to taste - Grated Parmesan cheese, for garnish (optional) You can make your dish pop with these garnishes: - Extra fresh basil leaves - A sprinkle of lemon zest - A drizzle of olive oil These will add color and flavor to your meal. To make this dish, gather these tools: - A medium-sized pot for cooking orzo - A large skillet for sautéing - A colander for draining orzo - A sharp knife for chopping - A cutting board for prepping ingredients Having these on hand will make your cooking easier and more fun. For the full recipe, follow the steps carefully to enjoy a tasty, fresh meal. Start by boiling water in a medium pot. You need about 4 cups of water. When it boils, add 1 cup of orzo pasta. Cook it for 9 to 11 minutes, following the package instructions. You want it to be al dente, so check it often. Once it's cooked, drain the orzo in a colander and set it aside. This pasta adds a nice texture to your meal. Next, grab a large skillet and heat 1 tablespoon of extra-virgin olive oil over medium heat. Once the oil is hot, add 3 cloves of minced garlic. Sauté for about 1 minute. You want it fragrant, but don’t let it brown. After that, toss in 2 medium zucchinis, diced into bite-sized cubes. Stir them together for 4 to 5 minutes. The zucchinis should soften but still have some crunch. If you like it spicy, add 1/4 teaspoon of red pepper flakes at this point. Now it's time to bring it all together. Pour in 1 cup of vegetable broth and squeeze the juice of 1 large lemon into the skillet. Let it simmer gently for 3 to 4 minutes. This helps the flavors mix well. After that, stir in the cooked orzo pasta, zest from the lemon, and 1/4 cup of roughly chopped fresh basil leaves. Season it all with salt and freshly cracked black pepper to taste. Mix thoroughly. If the dish seems a bit dry, add a splash more vegetable broth for a creamy finish. Finally, let it cook on low heat for another 2 to 3 minutes before serving. For the full recipe, check out the instructions above. To get the best texture in your Lemon Basil Zucchini Orzo, cook the orzo just right. Follow the package time closely, aiming for al dente. This means it should be firm but not hard. After cooking, drain it well. Avoid overcooking the zucchini. Sauté them until they are tender but still have a little bite. This keeps your dish fresh and exciting. You can boost the flavor in this dish easily. Fresh lemon juice gives a bright taste. Adding lemon zest will enhance this citrus flavor even more. For a bit of heat, use red pepper flakes, but adjust to your taste. If you want a richer flavor, sprinkle on some grated Parmesan cheese before serving. Fresh basil is key too; it adds a deep, herbal note that ties everything together. Serve your Lemon Basil Zucchini Orzo in shallow bowls for a lovely look. Add a few extra basil leaves on top for color. A sprinkle of lemon zest makes it pop, adding brightness to the dish. You can also drizzle a little olive oil on top for a nice finish. Don't forget to use your best bowls; good presentation makes the dish even more appealing. For the full recipe, check out the earlier section. {{image_4}} You can make this dish vegan by skipping the cheese. Use nutritional yeast instead for a cheesy taste. This works well with the lemon and basil. You can add more veggies like bell peppers or spinach for extra flavor. To make this dish gluten-free, swap the orzo with gluten-free pasta. Rice or quinoa can also work well. These options keep the dish light and fresh. Always check labels to ensure they are gluten-free. If you want to add protein, consider chickpeas or lentils. They pair nicely with the lemon and basil. Grilled chicken or shrimp are also great choices. Just cook them separately and mix them in at the end. This makes the meal hearty and satisfying. For the full recipe, check the Full Recipe section. Store any leftover Lemon Basil Zucchini Orzo in an airtight container. Place it in the fridge. It stays fresh for up to 3 days. Before serving again, check for any signs of spoilage. If it smells off or has changed color, toss it out. You can freeze Lemon Basil Zucchini Orzo, but with a few tips. Let the dish cool completely before freezing. Use a freezer-safe container or bag. It can last up to 2 months in the freezer. When you're ready to eat, thaw it in the fridge overnight. To reheat, use a skillet over low heat. Add a splash of broth to help it stay creamy. Stir frequently until it's warmed through. You can also use the microwave. Heat in short bursts, stirring in between, until hot. Enjoy your meal just like it was fresh! For the full recipe, check out the original. Yes, you can use other pasta types. Try penne or farfalle for a twist. Both will work well with the flavors in this dish. Just remember to adjust the cooking time as needed. Check the package for the best cooking instructions. To add heat, sprinkle in red pepper flakes. You can also add diced jalapeños or a dash of hot sauce. Start with a small amount and taste as you go. This way, you can find the perfect level of spice that suits your taste. Zucchini is low in calories and full of vitamins. It helps keep you hydrated and is a good source of fiber. Basil has anti-inflammatory properties and is rich in antioxidants. This herb can boost your immune system and enhance your mood. Together, they make a nutritious choice for any meal. For a full recipe, check the [Full Recipe]. This blog post covered the key ingredients and steps to make a tasty dish. You learned about cooking orzo, sautéing garlic and zucchini, and combining flavors. Tips helped achieve great texture and presentation. Variations offered vegan and gluten-free options. Remember to store leftovers properly and reheat them well. Use these insights to create a meal you love. Enjoy the process and make it your own! With some practice, you'll impress everyone with your cooking skills.](https://goldendishy.com/wp-content/uploads/2025/07/61f764e1-906e-4d38-9844-2e2d556314ee-768x768.webp)
![- 4 salmon fillets (approximately 6 oz each) - 3 tablespoons miso paste (white or yellow) - 2 tablespoons honey - 1 tablespoon soy sauce (or tamari for gluten-free) - 1 tablespoon rice vinegar - 1 tablespoon sesame oil - 2 cloves garlic, minced - 1 teaspoon freshly grated ginger - Green onions, thinly sliced (for garnish) - Sesame seeds (for garnish) This list has everything you need for a tasty miso glazed salmon. The salmon fillets are the star of the show. Miso paste adds a rich flavor. Honey gives it a touch of sweetness. Soy sauce or tamari brings in saltiness. Rice vinegar adds a bit of tang. Sesame oil gives a nice nutty taste. Garlic and ginger add warmth and depth. Don't forget the green onions and sesame seeds! They make the dish look great and add a bit of crunch. You can find the full recipe to see how to combine these ingredients into a delicious meal. To start, gather your ingredients. In a mixing bowl, combine the miso paste, honey, soy sauce, rice vinegar, sesame oil, minced garlic, and grated ginger. Use a whisk to blend the ingredients. Mix until smooth and creamy. This glaze adds a sweet and savory flavor to the salmon. Next, place the salmon fillets in a shallow dish or a sealable bag. Pour the miso glaze over the salmon. Make sure each piece is well-coated. Cover the dish or seal the bag and marinate the salmon in the fridge. For best results, allow it to marinate for at least 30 minutes. If you have time, two hours gives a richer flavor. Now, preheat your oven to 400°F (200°C). Line a baking sheet with parchment paper to prevent sticking. After marinating, take the salmon out of the glaze. Let any excess glaze drip off, then place the fillets skin-side down on the sheet. Bake the salmon for 12 to 15 minutes. The fish is done when it turns opaque and flakes easily with a fork. You can find the complete instructions in the [Full Recipe]. You can boost the taste of miso glazed salmon by adding fresh herbs. Try using cilantro or basil for a fresh kick. You can also add spices like chili flakes for heat or black sesame seeds for extra crunch. These small tweaks can take your dish to a whole new level. For the best flavor, I suggest marinating the salmon for at least 30 minutes. If you have time, let it sit for up to 2 hours. This longer marinating lets the flavors soak in deeply. Just remember not to marinate too long, as the acid in the marinade can make the fish mushy. While baking the salmon is great, you can also broil or grill it. Broiling gives a nice char and caramelization, making it even tastier. If you grill, keep the heat medium to avoid burning the glaze. Whichever method you choose, keep an eye on the salmon. It cooks fast! {{image_4}} You can switch the salmon for other fish, like cod or trout. Both work well with miso glaze. Chicken is another great option. You can use chicken breasts or thighs. The cooking time will change, so check for doneness. For plant-based choices, try tofu or tempeh. Both absorb flavors well. Marinate them just like you do with salmon. Bake them until golden brown and firm. You can adjust the taste of the miso glaze. If you like it sweeter, add more honey. For a saltier flavor, increase the soy sauce. You can also try adding a splash of citrus juice. Lime or lemon will brighten the dish. Feel free to add other ingredients too. A spoonful of sriracha gives a spicy kick. You can also mix in chopped herbs like cilantro or basil for freshness. To make a full meal, serve the salmon with sides. Steamed vegetables like broccoli or green beans add color and nutrition. Jasmine rice or quinoa pairs well too. You can also add a simple salad for crunch. For a fun twist, serve the salmon on a bed of noodles. Drizzle some leftover glaze for extra flavor. Check out the Full Recipe for more tips on creating a balanced plate. To store leftover miso glazed salmon, let it cool first. Place it in an airtight container. Make sure to cover it well so it stays fresh. It can last in the fridge for up to three days. If your salmon has a strong smell, it’s best to throw it away. To freeze the salmon, wrap each piece tightly in plastic wrap. Then, place them in a freezer-safe bag. This method helps prevent freezer burn. Miso glazed salmon can be frozen for up to three months. When you’re ready to eat it, move it to the fridge for a night to thaw. For reheating, use an oven or a stovetop. If using the oven, preheat it to 350°F (175°C). Place the salmon on a baking sheet. Heat it for about 10 minutes. This method keeps it moist. If you prefer the stovetop, heat a pan over low heat. Add a splash of water to keep the fish from drying out. Cook for a few minutes until warmed through. You should marinate the salmon for at least 30 minutes. This gives the flavors time to soak in. For a richer taste, I recommend marinating for up to 2 hours. The longer the fish sits in the marinade, the better the flavor will be. Yes, you can use different types of miso. White miso is sweeter and milder. Yellow miso is a bit stronger but still smooth. Red miso is more intense and salty. Each type brings a unique flavor to the salmon. Experiment with what you like best! I love serving Miso Glazed Salmon with steamed rice. Jasmine or brown rice works great. You can also add some roasted veggies or a fresh salad. These sides balance the rich glaze. They make your plate colorful and fun! Check out the Full Recipe for more ideas. This blog post showed how to make miso-glazed salmon. You learned about the key ingredients, preparation, and cooking steps. I shared tips to enhance flavor and offered variations if you want to try something new. Proper storage can keep leftovers tasty for later. Remember, cooking should be fun! Experiment with flavors and enjoy your meal. With these insights and tips, you will create a dish that’s both delicious and satisfying. Happy cooking!](https://goldendishy.com/wp-content/uploads/2025/07/7f43d765-f0ef-46f9-86e2-eabd5628ba72-768x768.webp)