Cheesy Garlic Pull-Apart Bread Delightful and Easy


Welcome to the world of Cheesy Garlic Pull-Apart Bread! This warm, gooey treat is a favorite at any gathering. You’ll love how easy it is to make with just a few simple ingredients like bread, cheese, and garlic. In this guide, I’ll show you step-by-step how to create this delicious dish. Whether for a snack, party, or dinner, it’s sure to impress. Let’s dive in and get baking!
Why I Love This Recipe
- Comfort Food Classic: This cheesy garlic pull-apart bread is the epitome of comfort food, perfect for sharing with family and friends during cozy gatherings.
- Easy to Make: The straightforward steps make this recipe accessible for cooks of all levels, ensuring delicious results every time without the fuss.
- Customizable Flavors: You can easily adapt this recipe by adding your favorite herbs or cheeses, allowing for a personalized touch that suits your taste.
- Impressive Presentation: This bread not only tastes amazing but also looks fantastic when served, making it a showstopper on any table.
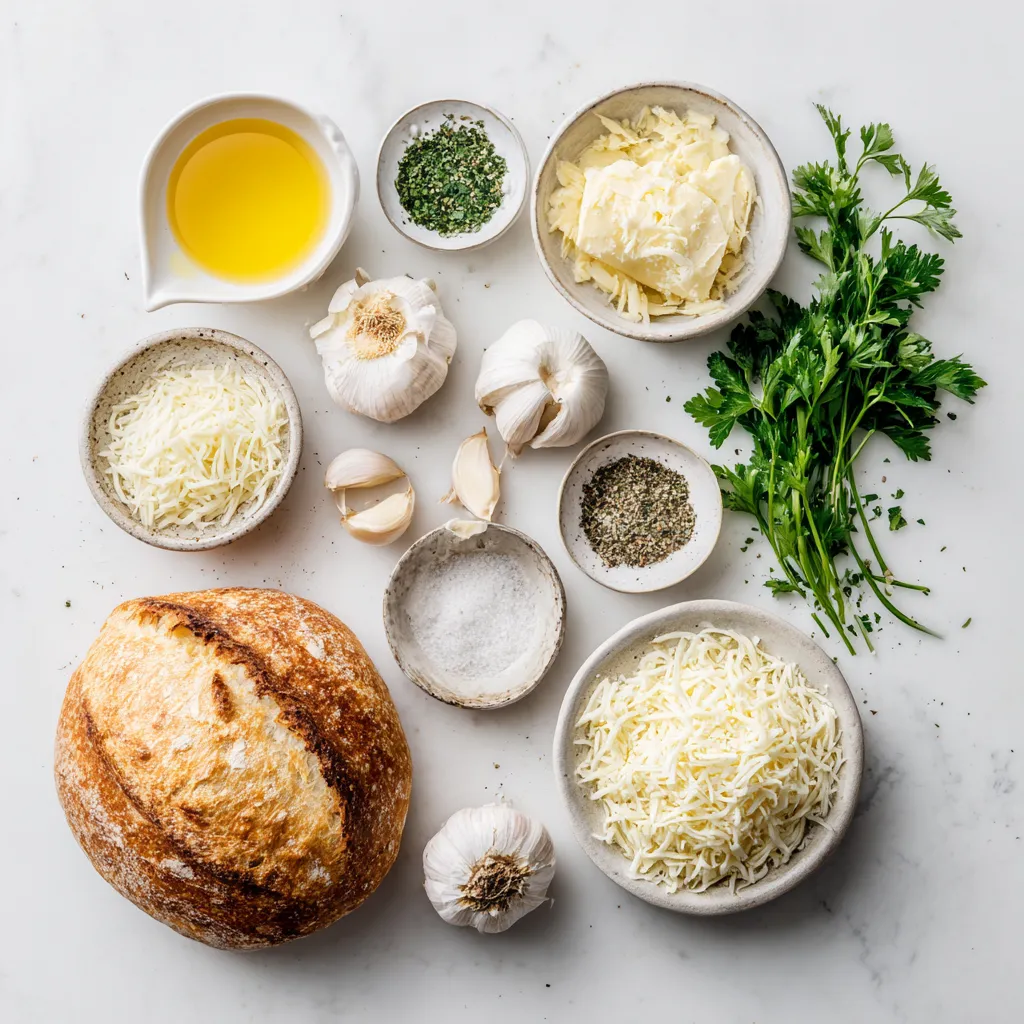
Ingredients
To make Cheesy Garlic Pull-Apart Bread, you need a few simple ingredients. Each one adds flavor and texture. Here’s what you’ll need:
– Bread Type: Choose a large loaf of fresh sourdough or Italian bread. Both give a nice chewy texture.
– Garlic and Herbs: You’ll need 4 cloves of minced garlic, 1 teaspoon of dried oregano, and 1 teaspoon of dried parsley. These ingredients create a fragrant and tasty garlic butter.
– Cheese Varieties: Use 1 cup of shredded mozzarella cheese and 1/2 cup of grated Parmesan cheese. They melt beautifully and add a rich, cheesy flavor.
– Butter and Seasoning: You’ll need 1/2 cup (1 stick) of unsalted butter, melted. Add salt and pepper to taste for extra flavor.
These ingredients work together to make each bite of bread gooey and delicious. They also help create that mouthwatering aroma that fills your kitchen while baking.
Step-by-Step Instructions
Prepping the Oven
First, I preheat my oven to 350°F (175°C). This step gets the oven ready for baking. A hot oven helps the bread bake evenly.
Mixing the Garlic Butter
Next, I grab a medium bowl. I pour in 1/2 cup of melted butter. After that, I add 4 minced garlic cloves. I also include 1 teaspoon of dried oregano and 1 teaspoon of dried parsley. A pinch of salt and pepper adds flavor. I mix everything well and set the garlic butter aside. The aroma will make you eager to bake!
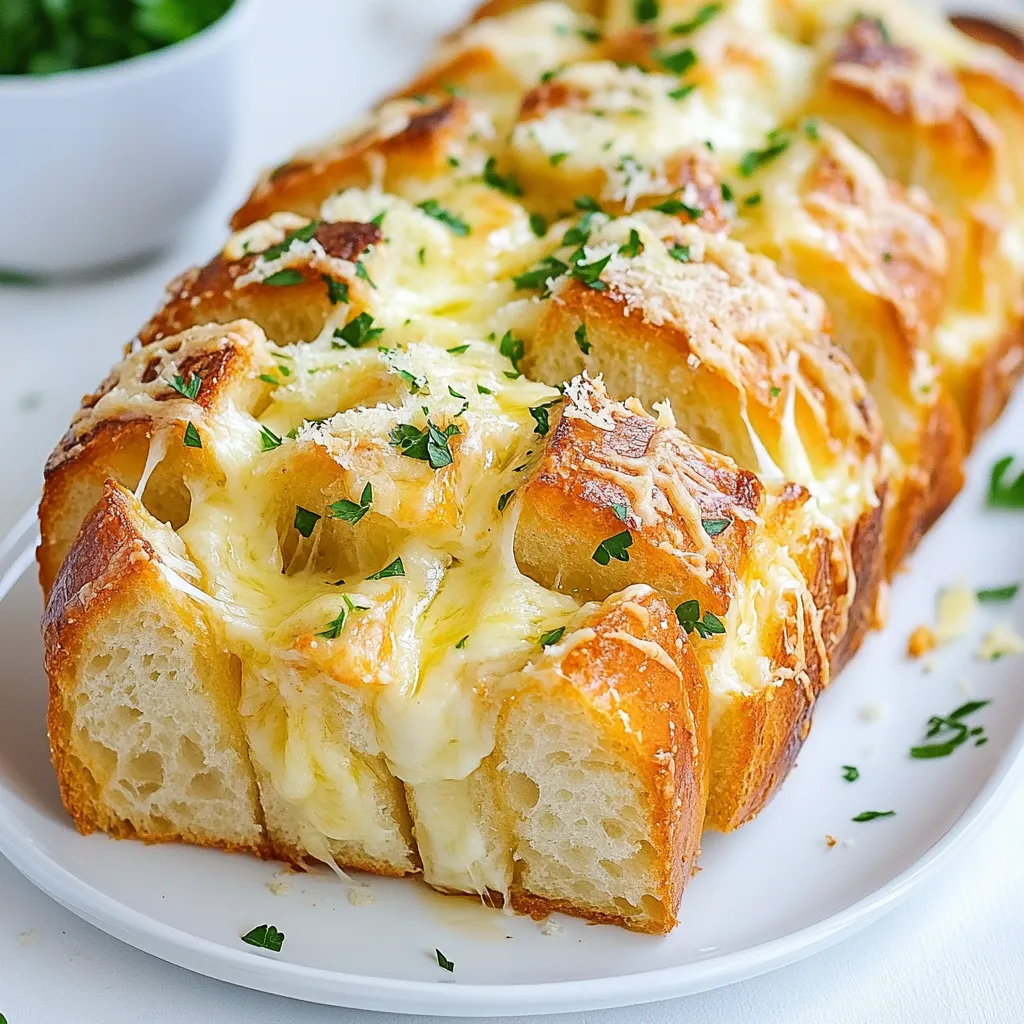
Cutting and Filling the Bread
For the bread, I take a large loaf of sourdough or Italian bread. Using a serrated knife, I carefully slice the loaf into 1-inch thick pieces. I ensure not to cut all the way through the bottom. This keeps the loaf intact. Once sliced, I lay the bread on aluminum foil. I drizzle half of the garlic butter over the bread, letting it seep into the slices. Then, I fill each slice with shredded mozzarella cheese and sprinkle Parmesan cheese in the gaps.
Baking Process
I drizzle the rest of the garlic butter on top of the loaf. Then, I wrap the bread in aluminum foil. This creates a sealed package that keeps the bread moist. I place the wrapped loaf on a baking sheet. I bake it for 15 minutes. After that, I carefully open the foil to let the top show. I bake for an additional 10-15 minutes. I watch for the cheese to melt and the top to turn golden brown.
Serving Suggestions
Once the bread is done, I remove it from the oven. I let it cool for a few minutes. If I want, I can garnish it with fresh parsley for color. When it’s time to serve, I place it on a wooden board. This makes it easy for everyone to pull apart the cheesy slices. It’s perfect for sharing with friends or family!
Tips & Tricks
Ensuring Perfect Flavor
To get the best taste from your Cheesy Garlic Pull-Apart Bread, use fresh ingredients. Fresh garlic gives a bold flavor. Opt for high-quality mozzarella and Parmesan cheese for that gooey goodness. Adding a pinch of salt and pepper to the garlic butter enhances the taste. Experiment with herbs like thyme or rosemary for a twist.
Tools and Utensils Needed
Having the right tools makes cooking easier. Here’s what you’ll need:
– Serrated bread knife
– Medium-sized mixing bowl
– Measuring cups and spoons
– Aluminum foil
– Baking sheet
These tools help you prepare and bake the bread without hassle.
Common Mistakes to Avoid
Avoid cutting the bread too deep. You want it to hold together. If you don’t drizzle enough garlic butter, the bread might taste dry. Be sure to stuff plenty of cheese between the slices. Lastly, don’t skip the final baking time; this makes the cheese melt perfectly and creates a crispy top.
Pro Tips
- Choose the Right Bread: Use a fresh sourdough or Italian loaf for the best flavor and texture. These breads have a sturdy crust that holds up well to the fillings and allows for easy pull-apart servings.
- Customize Your Cheeses: Feel free to mix different types of cheeses such as cheddar, gouda, or even a spicy pepper jack for a unique twist. The variety will enhance the flavor profile and add dimension.
- Make Ahead: You can prepare the garlic butter mixture and slice the bread in advance. Store them separately in the fridge, then assemble and bake when you’re ready to serve for a fresh-out-of-the-oven experience.
- Serve with Dips: Enhance your cheesy pull-apart bread experience by serving it with marinara or homemade garlic dip. This adds an extra layer of flavor and an inviting option for your guests.
Variations
Different Cheese Options
You can use many types of cheese in this bread. Mozzarella is the star, but others shine too. Try cheddar for a sharp taste. Gouda adds a rich, smoky flavor. Fontina melts well and gives a creamy texture. Mix and match your favorites for unique bites.
Added Ingredients (Bacon, Veggies)
Want to switch it up? Add cooked bacon for a savory crunch. Just chop it into small bits and tuck it between the bread slices. You can also sneak in veggies. Spinach or roasted peppers add color and nutrients. Just remember to chop them finely.
Flavor Variations (Spicy, Herbal)
If you love heat, sprinkle in some red pepper flakes. This gives the bread a spicy kick. For a fresh taste, add fresh herbs like basil or thyme. These herbs brighten the flavor and smell amazing. Experiment with your favorite spices to find your perfect blend!
Storage Info
How to Store Leftovers
To keep your cheesy garlic pull-apart bread fresh, wrap it tightly in plastic wrap. You can also place it in an airtight container. Store it at room temperature for up to two days. If you want it to last longer, refrigerate it. Just note that refrigeration may dry it out a bit.
Reheating Instructions
When it’s time to enjoy leftovers, preheat your oven to 350°F (175°C). Unwrap the bread and place it on a baking sheet. Heat it for about 10-15 minutes. This warms the bread and melts the cheese again, making it gooey and tasty. You can also microwave individual pieces for about 20-30 seconds. Just be careful not to overheat, or it may become tough.
Freezing and Thawing Tips
If you want to freeze your cheesy garlic pull-apart bread, wrap it well in plastic wrap and then in foil. This keeps it safe from freezer burn. It can stay in the freezer for up to three months. When you’re ready to eat it, thaw it overnight in the fridge. After that, reheat it in the oven to bring back its original texture and flavor.
FAQs
Can I use a different bread type?
Yes, you can use other bread types. Some great options include French bread or ciabatta. These breads can offer a different texture and flavor. Just make sure the bread is fresh and sturdy enough to hold the cheese and garlic butter.
How to make it gluten-free?
To make this dish gluten-free, choose a gluten-free bread. Many stores sell gluten-free options that work well. You can use a gluten-free sourdough or Italian bread. Just ensure that all your other ingredients, like cheese and butter, are also gluten-free.
What can I serve with Cheesy Garlic Pull-Apart Bread?
This cheesy bread pairs nicely with various dishes. Here are some ideas:
– Soups, like tomato or minestrone
– Salads, such as Caesar or mixed greens
– Dips, like marinara or spinach artichoke
These options enhance your meal and keep things tasty.
How to adjust the recipe for a smaller or larger loaf?
To adjust for size, simply change the amount of bread and other ingredients. For a smaller loaf, cut the cheese and butter in half. For a larger loaf, double the ingredients. Just keep the baking time in mind. Check for doneness by looking for bubbly cheese and a golden top.
Cheesy Garlic Pull-Apart Bread combines simple ingredients and clear steps. You learned how to choose bread, mix flavors, and bake perfectly. Remember, you can customize with different cheeses or toppings. With these tips, you can avoid common mistakes. Store leftovers right and enjoy them later. Now you have the know-how to impress friends and family at your next gathering. Get cooking and share your delicious creatio

Cheesy Garlic Pull-Apart Bread
Ingredients
- 1 large loaf fresh sourdough or Italian bread
- 0.5 cup unsalted butter, melted
- 4 cloves garlic, minced
- 1 teaspoon dried oregano
- 1 teaspoon dried parsley
- to taste salt and pepper
- 1 cup shredded mozzarella cheese
- 0.5 cup grated Parmesan cheese
- optional fresh parsley for garnish
Instructions
- Begin by preheating your oven to 350°F (175°C) to prepare for baking.
- In a medium-sized mixing bowl, combine the melted butter, minced garlic, dried oregano, dried parsley, and a pinch of salt and pepper. Mix thoroughly and set this flavorful garlic butter aside.
- With a serrated bread knife, carefully slice the loaf of bread into 1-inch thick slices, ensuring that you don’t cut all the way through the bottom. The goal is to keep the loaf intact for easy pull-apart sections.
- Lay the bread onto a large piece of aluminum foil, leaving it slightly open for easy handling.
- Generously drizzle half of the prepared garlic butter mixture over the bread, making certain to pour some into the crevices between the slices for maximum flavor.
- Stuff each slice with a hearty amount of shredded mozzarella cheese, and sprinkle the grated Parmesan cheese in between the cuts to create a gooey, cheesy experience.
- Take the remaining garlic butter and drizzle it generously over the top of the loaf, ensuring a lovely flavor infusion.
- Carefully wrap the bread in the aluminum foil, creating a sealed package, and place it on a baking sheet to catch any drips.
- Bake the wrapped bread in your preheated oven for 15 minutes. After this time, carefully open the foil to expose the top of the loaf, and continue baking for an additional 10-15 minutes until the cheese is melted, bubbly, and the top turns a delightful golden brown.
- Once done, remove the bread from the oven and allow it to cool for a few minutes before serving. If desired, garnish with freshly chopped parsley for a colorful touch.
- Serve the bread warm, inviting guests to pull apart the cheesy, aromatic slices and enjoy every delicious bite!
![To make Cheesy Ranch Potatoes, you will need a few simple items. Gather these ingredients before you start cooking: - 2 pounds baby potatoes, halved - 1 cup shredded sharp cheddar cheese - ½ cup creamy sour cream - 1 packet ranch dressing mix (about 1 ounce) - 3 tablespoons extra virgin olive oil - 1 teaspoon garlic powder - 1 teaspoon onion powder - Salt and freshly ground black pepper to taste - 2 green onions, finely sliced (for garnish) Each ingredient plays a key role in creating that cheesy, ranch-flavored goodness. The baby potatoes serve as the base, providing a tender texture. Sharp cheddar cheese adds a rich, creamy taste. Sour cream brings a tangy flavor, while the ranch dressing mix ties everything together with its herby notes. The garlic and onion powders enhance the overall taste, making every bite delicious. Don't forget the green onions; they add a fresh crunch on top! For the complete recipe, check out the [Full Recipe]. - Preheat the oven to 400°F (200°C). This makes sure your potatoes cook evenly. - In a large bowl, mix the olive oil, ranch dressing mix, garlic powder, onion powder, salt, and pepper. Stir until well combined. - Add the halved baby potatoes to the bowl. Toss them until every piece is coated in the ranch mixture. This step adds great flavor. - Line a baking sheet with parchment paper. This helps with easy cleanup. - Spread the coated potatoes on the lined baking sheet in a single layer. This helps them roast evenly. - Roast the potatoes for 25-30 minutes. They should turn golden brown and be tender when pierced. - Take the baking sheet out of the oven and sprinkle cheddar cheese over the hot potatoes. - Return the baking sheet to the oven for 5-7 minutes. Wait until the cheese melts and bubbles. - Drizzle sour cream over the cheesy potatoes and top with sliced green onions. This adds a fresh touch. Check out the Full Recipe for more details! To make Cheesy Ranch Potatoes, start by preheating your oven to 400°F (200°C). This helps the potatoes roast evenly. Spread the potatoes out on a lined baking sheet. This ensures they cook well and get crispy. Check for doneness by piercing them with a fork. They should be tender and golden brown. To boost flavor, try adding herbs like parsley or dill. You can also mix in spices like paprika or cayenne for a kick. If you want a different cheese, use mozzarella or pepper jack. Each type brings a unique taste and texture to the dish. For serving, use a colorful bowl to show off the cheesy ranch potatoes. Add a sprinkle of extra cheddar on top for flair. You can also place whole green onion tops around the edge for a fresh look. These simple steps make your dish appealing and ready for guests. For the full recipe, follow the steps provided in the earlier sections. Enjoy your cooking! {{image_4}} You can make Cheesy Ranch Potatoes even more fun with simple swaps. - Using different types of cheese: Try mozzarella for a milder taste or pepper jack for a kick. You can even mix cheeses for a rich flavor. - Substituting Greek yogurt for sour cream: Greek yogurt gives you a nice tang and adds protein. It’s a healthier option that keeps your potatoes creamy. Change the flavor to keep things exciting. - Spicy ranch version: Add a teaspoon of cayenne pepper to the ranch mix. This will give your potatoes a nice heat. - Herb-infused options: Mix in dried herbs like thyme or rosemary. This adds a fresh taste that pairs well with the cheese. Making Cheesy Ranch Potatoes work for everyone is easy! - Vegan adaptations: Swap the cheese for a vegan cheese and use coconut yogurt. This keeps all the creamy goodness without dairy. - Gluten-free adjustments: Use a gluten-free ranch mix. Most ranch mixes are gluten-free, but always check the labels. Feel free to explore these variations to make this dish your own! For the full recipe, check out Cheesy Ranch Potatoes Delight. To keep your cheesy ranch potatoes fresh, store them in the fridge. Place them in an airtight container. They will last about 3 to 5 days. Make sure they cool completely before sealing. For longer storage, you can freeze them. Put the cooled potatoes in a freezer-safe bag. They can last up to 2 months in the freezer. To reheat your potatoes, the best method is using an oven. Preheat the oven to 350°F (175°C). Spread the potatoes on a baking sheet. Heat them for about 15 to 20 minutes. This will help keep the texture crispy. You can also use a microwave. Place the potatoes in a microwave-safe dish. Heat them in short bursts of 1 minute. Stir in between to ensure even heating. To keep flavor and texture, avoid reheating them too long. If they dry out, add a little bit of sour cream or cheese on top. These tips will help you enjoy the cheesy ranch potatoes just as much as the first time. You can tell the potatoes are done by checking a few signs. First, they should be golden brown and crispy on the outside. Second, when you poke them with a fork, they should feel soft inside. If the fork slides in easily, your potatoes are ready to enjoy! Yes, you can prepare Cheesy Ranch Potatoes ahead of time! Start by following the recipe steps, but stop before roasting. Cover the potatoes and store them in the fridge for up to 24 hours. When you’re ready to bake, simply add extra time in the oven if they are cold. This way, you can enjoy them fresh without much fuss. These cheesy potatoes pair well with many dishes. Serve them alongside grilled chicken or steak for a filling meal. They also go great with a fresh salad or steamed veggies. For a fun twist, try them with barbecue or as a side for tacos. The options are endless, making it easy to create a delicious meal. For the complete cooking steps, check out the Cheesy Ranch Potatoes Delight 🥔. In this blog post, we covered how to make Cheesy Ranch Potatoes. We started with the ingredients, then walked through easy steps to prepare and roast them. I shared helpful tips, variations, and storage info to keep your dish fresh. These potatoes are a tasty side for any meal. You can customize them to fit your taste. Enjoy making this dish, and let it add flavor to your table!](https://goldendishy.com/wp-content/uploads/2025/06/4f138a04-3393-4361-b7e8-8b602e29b2ef-768x768.webp)
. To start, you need to preheat your grill or oven. If you choose to grill, set it to medium-high heat. This will help create a nice char on the corn. If baking sounds better, preheat your oven to 400°F (200°C). Both methods work well, giving you tasty corn. Next, prepare the garlic butter mixture. In a mixing bowl, combine melted unsalted butter, minced garlic, smoked paprika, sea salt, and black pepper. Whisk this mix together until all the ingredients blend well. The aroma will fill your kitchen, making it hard to wait for the corn! Now, it’s time to coat the corn. Take each ear of corn and brush it with your garlic butter mix. Make sure to cover every kernel. This ensures each bite bursts with flavor. For grilling, place the corn on the grill grates. Rotate it every 2-3 minutes until charred and tender, about 10-12 minutes total. If baking, wrap the corn in aluminum foil and bake for 20-25 minutes, turning halfway. After cooking, sprinkle grated Parmesan cheese on top while it’s still hot. Optionally, drizzle with fresh lemon juice for added flavor. Finally, garnish your corn with chopped parsley for a bright finish. Enjoy your Garlic Parmesan Corn on the Cob! For a complete guide, check out the Full Recipe. Grilling corn on the cob can be fun and easy. First, soak the husked corn in water for 15 minutes before grilling. This helps keep the corn moist. When you're ready, heat your grill to medium-high. Place the corn directly on the grates. Rotate the corn every 2-3 minutes. This gives it even cooking and a nice char. In about 10-12 minutes, the corn will be bright and tender. For the best garlic flavor, use fresh garlic. Mince the cloves finely to release the oils. Mix it well with the melted butter before brushing it on the corn. If you want a stronger taste, let the garlic sit in the butter for a bit. This helps the flavors blend. You can also add a touch of garlic powder if you like more depth. If you prefer a bit of heat, add a pinch of cayenne pepper to your garlic butter. For those who enjoy a milder taste, skip the pepper entirely. You can also adjust the smoked paprika amount. Start with less, then taste as you go. Everyone has different spice levels, so make it your own. Remember, you can always add more spice, but you can’t take it out! For the full recipe, check out the Garlic Parmesan Corn on the Cob section. {{image_4}} To change up the flavor, you can add more spices. Try adding chili powder for heat. You can also mix in some Italian herbs, like oregano or basil. They give a fresh lift. If you love herbs, fresh cilantro is a great choice. Just chop it fine and add it to your garlic butter mix. This will make your corn taste even better! Parmesan is great, but other cheeses can work too. For a creamier taste, use feta cheese. It adds a nice tang. If you want something sharper, try aged cheddar. It gives a bold kick. You can even use vegan cheese if you prefer. Just make sure it melts well. Each cheese choice will give your corn a unique twist. Serving corn on the cob can be fun and playful. Try cutting the corn into smaller pieces for easy sharing. You can also serve it on skewers for a fun touch. Drizzle it with a spicy sauce for extra flavor. If you want a fancy look, sprinkle some microgreens on top. They add color and freshness. For the full recipe, check out the detailed steps to make this dish shine! After enjoying your Garlic Parmesan Corn on the Cob, you may have some left. It’s best to store it in an airtight container. Let the corn cool to room temperature first. Wrap each ear in plastic wrap or foil for extra protection. This keeps it fresh and tasty for later. Store the container in the fridge. It can last about 3 to 4 days. When you’re ready to enjoy the leftover corn, reheating it is simple. You can use the microwave, grill, or oven. For the microwave, place the corn on a plate and cover it with a damp paper towel. Heat in short bursts of 30 seconds. Check to see if it’s warm. If using the grill, wrap the corn in foil to avoid drying out. Heat for about 5 to 7 minutes. For the oven, preheat to 350°F (175°C) and bake wrapped corn for 10 to 15 minutes. Freezing is a great option if you want to save the corn for a long time. Husk the corn and cut the kernels off the cob if you prefer. Place the kernels in a freezer bag, removing as much air as possible. Label the bag with the date. You can also freeze whole cobs. Wrap each cob in plastic wrap and place it in a freezer bag. The corn can last up to 6 months in the freezer. When you’re ready to use it, thaw in the fridge overnight before reheating. You can pair Garlic Parmesan Corn on the Cob with many easy side dishes. Some great options include: - Grilled chicken or fish - Fresh salad with vinaigrette - Coleslaw for crunch - Roasted potatoes for heartiness - Tomato and mozzarella salad for freshness These sides complement the sweet, buttery flavor of the corn. They also create a colorful plate. Yes, you can make Garlic Parmesan Corn on the Cob in the oven. Preheat your oven to 400°F (200°C). Wrap the corn tightly in aluminum foil to keep it moist. Bake for 20-25 minutes. Turn the foil halfway through cooking. This method gives you tender corn, full of flavor. To prevent the corn from sticking to the grill, follow these tips: - Preheat the grill to medium-high heat. - Brush the grill grates with oil before placing the corn. - Make sure to coat the corn with the garlic butter mixture. This keeps it moist and adds flavor. - Rotate the corn every few minutes to avoid sticking. These steps help you achieve perfectly grilled corn every time. Enjoy your cooking! Making Garlic Parmesan Corn on the Cob is simple and fun. We covered the best ingredients, tools, and methods. Preheating is key, and the garlic butter really adds flavor. You learned grilling tips and how to customize with herbs or spices. Don't forget about storage and reheating for later. Enjoy your delicious corn, and share it with friends. Each bite can bring smiles, making it worth the effort. Now, get cooking!](https://goldendishy.com/wp-content/uploads/2025/07/bd43f489-c25e-441e-8123-0082a4d55c21-768x768.webp)