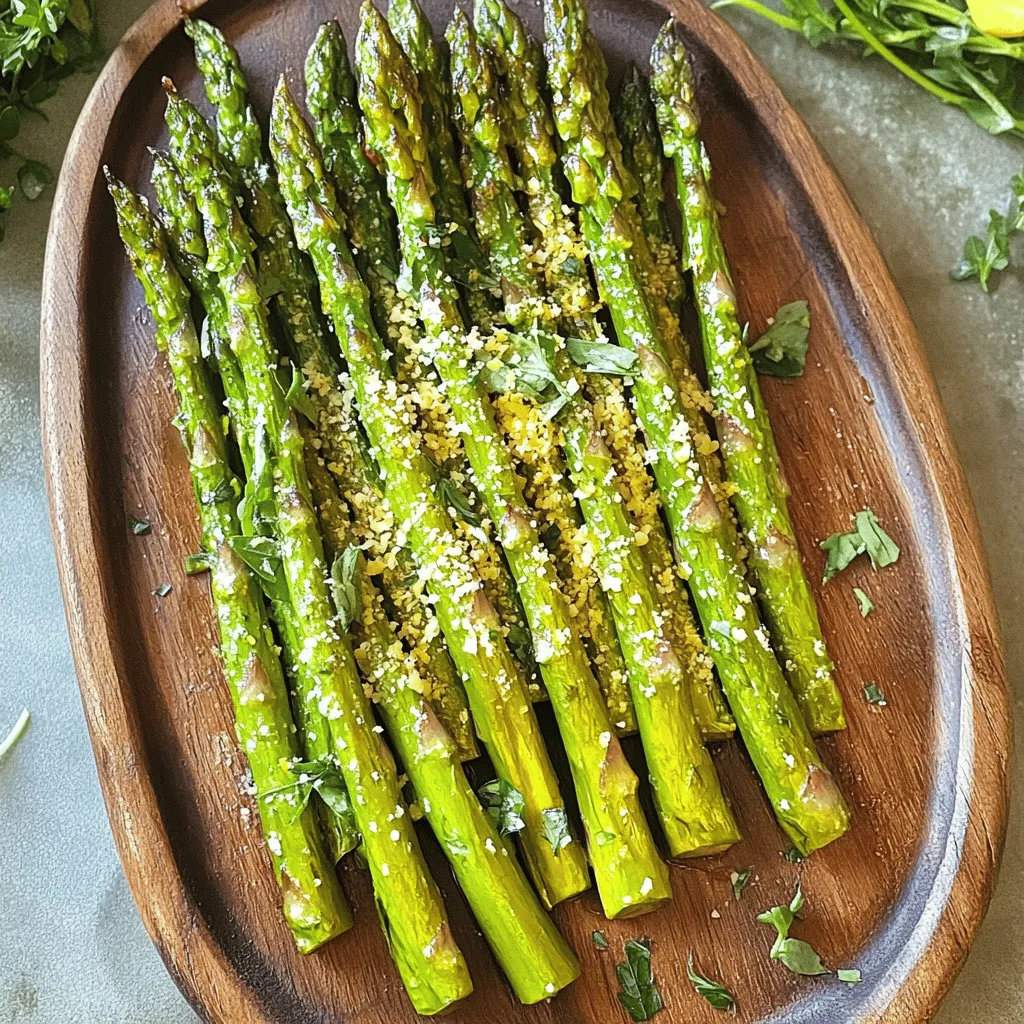
Crispy Parmesan Herb Air Fryer Asparagus Delight
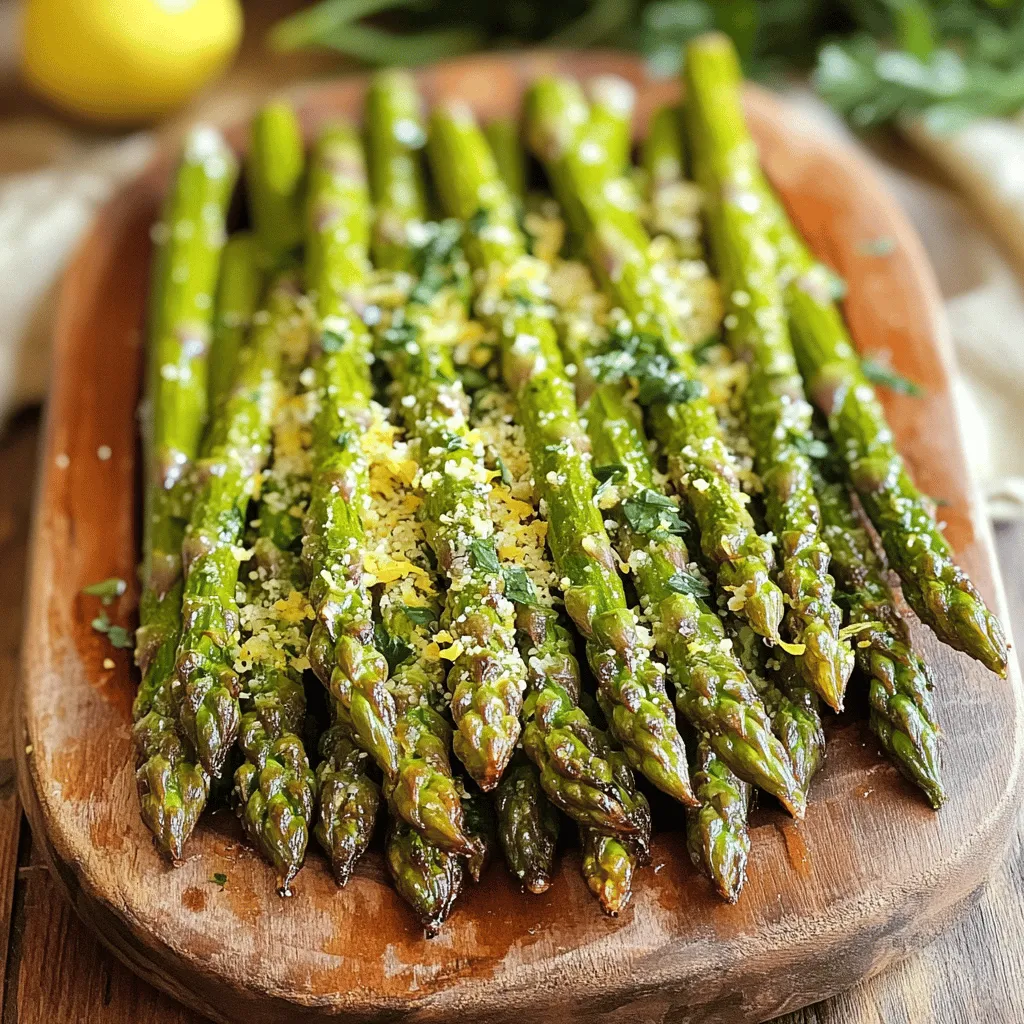
Looking for a quick, tasty side dish? You’ll love my Crispy Parmesan Herb Air Fryer Asparagus! This dish is easy to make and packed with flavor. Fresh asparagus, olive oil, and Parmesan cheese create a crunchy delight. Whether you want a healthy snack or a side for dinner, this recipe has you covered. Let’s dive into the ingredients and get cooking!
Ingredients
Fresh Asparagus
To start, you need one bunch of fresh asparagus. Look for bright green spears. They should feel firm and snap easily when bent. Trim the ends to remove any tough parts. This helps ensure you get tender bites with each crispy spear.
Olive Oil and Seasonings
Next, gather 2 tablespoons of extra virgin olive oil. This adds richness and helps the seasonings stick. You’ll also need a mix of spices: 1 teaspoon each of garlic powder, dried oregano, and dried thyme. Add ½ teaspoon of sea salt and ¼ teaspoon of black pepper. These flavors make the asparagus pop!
Cheese and Flavor Enhancers
For that delicious cheesy taste, use ¼ cup of freshly grated Parmesan cheese. It adds a savory touch and a nice crunch when cooked. Finally, zest one lemon. The bright lemon zest lifts the dish with its fresh citrus note. These ingredients blend beautifully for a delightful dish!
Step-by-Step Instructions
Preheating the Air Fryer
First, you need to preheat your air fryer. Set it to 400°F (200°C). Let it heat for about 5 minutes. This step is key for crispy asparagus.
Preparing the Herb Marinade
Next, grab a medium mixing bowl. Add 2 tablespoons of extra virgin olive oil. Then, mix in 1 teaspoon of garlic powder, 1 teaspoon of dried oregano, and 1 teaspoon of dried thyme. Toss in ½ teaspoon of sea salt and ¼ teaspoon of black pepper. Whisk everything together until it blends well. This herb mix adds lots of flavor.
Coating the Asparagus
Take your trimmed asparagus spears and place them in the bowl. Gently toss the asparagus in the herb marinade. Make sure every spear gets coated nicely. After that, sprinkle ¼ cup of freshly grated Parmesan cheese on top. Toss again to evenly distribute the cheese. This gives the asparagus that crispy, cheesy crust.
Arranging and Cooking the Asparagus
Now, it’s time to arrange the asparagus. Place the coated spears in a single layer in the air fryer basket. If your basket is small, cook in batches for even results. Air fry the asparagus for 8 to 10 minutes. Remember to shake the basket halfway through. This will help them cook evenly. When they are done, they should look crispy and golden-brown. Finally, take them out and sprinkle with fresh lemon zest for a burst of flavor. Enjoy your crispy Parmesan herb asparagus!
Tips & Tricks
Achieving the Perfect Crispiness
To get that perfect crispiness, start with fresh asparagus. Make sure you trim the ends. This helps them cook evenly. Coat the asparagus well with the olive oil and spices. The oil helps the cheese stick and adds flavor. Don’t crowd the air fryer basket. Leave space for hot air to flow. This keeps each spear crispy.
Recommended Cooking Times for Varying Asparagus Thickness
Cooking time can change based on thickness. Thin asparagus takes about 8 minutes. Medium-sized spears need around 10 minutes. Thick asparagus may require up to 12 minutes. Always check for doneness. The asparagus should look golden brown and feel tender but firm. If you shake the basket halfway through, it helps them cook evenly.
Presentation Tips for Serving
Serve your crispy asparagus on a nice platter. Drizzle a bit of olive oil over the top. This adds shine and flavor. Sprinkle fresh herbs like parsley or basil for color. A pinch of lemon zest on top brightens the dish. This makes it look and taste fresh. Enjoy this tasty delight as an appetizer or a side dish with your meal!
Variations
Garlic Parmesan Variation
If you love garlic, you can boost its flavor. Add 1-2 minced garlic cloves to the herb mix. This makes the dish even more fragrant and tasty. The garlic pairs well with the Parmesan. It gives the asparagus a lovely depth of flavor. You can also roast the garlic before mixing it in. This adds a sweet, mellow taste that is divine!
Adding Heat with Red Pepper Flakes
Want some spice? Sprinkle red pepper flakes over the asparagus. Start with 1/4 teaspoon for a mild kick. You can add more if you like it hot! The heat from the flakes contrasts well with the cheese. This variation makes the dish exciting and fun. It’s perfect for those who enjoy a bit of heat in their meals.
Vegan Option with Nutritional Yeast
For a vegan twist, swap Parmesan with nutritional yeast. Use about 1/4 cup for a cheesy flavor. Nutritional yeast is packed with nutrients and adds a savory taste. Combine it with garlic powder and herbs for a full flavor. This option keeps the dish creamy without using dairy. It’s a great choice for anyone on a plant-based diet.
Storage Info
Storing Leftovers
After you enjoy your crispy Parmesan herb air fryer asparagus, you may have some left. To store it, let the asparagus cool completely. Place the leftovers in an airtight container. You can keep it in the fridge for up to three days. This will help keep the flavor fresh.
Reheating Instructions
When you want to eat the leftovers, reheating properly is key. I recommend using your air fryer again. Set it to 350°F (175°C). Place the asparagus inside for about 3-5 minutes. This will help restore the crispiness. You can also use a regular oven if you prefer, but the air fryer works best.
Freezing for Later Use
If you want to freeze the asparagus, make sure it is fully cooled first. Place the cooled pieces in a freezer bag. Squeeze out as much air as possible before sealing. You can store it in the freezer for up to two months. When you’re ready to eat, thaw it in the fridge overnight and reheat as mentioned before.
FAQs
How do I make sure my asparagus is crispy?
To keep your asparagus crispy, use fresh, firm spears. Trim any tough ends. Toss them in olive oil and seasonings evenly. Make sure to space them out in the air fryer. This helps hot air circulate. Air fry at 400°F (200°C) for 8-10 minutes. Shake the basket halfway through cooking. This ensures even crispness.
Can I use a different cheese instead of Parmesan?
Yes, you can use other cheeses. Pecorino Romano adds a salty kick. Cheddar gives a rich, creamy flavor. Nutritional yeast is great for a vegan option. It provides a cheesy taste without dairy. Each cheese changes the dish’s flavor, so choose what you love.
What can I serve with asparagus as a side dish?
Crispy asparagus pairs well with many dishes. Try it with grilled chicken or fish. It also complements pasta salads or quinoa bowls. For a hearty meal, serve it with steak or pork chops. Add it to an omelet for a tasty breakfast or brunch idea.
How do I choose fresh asparagus at the store?
Look for bright green asparagus with firm stems. The tips should be closed and compact. Avoid any yellowing or soft spots. The spears should snap easily when bent. This indicates freshness. If you can, buy asparagus that is in season for the best flavor.
In this blog post, we explored how to make delicious air-fried asparagus. We covered fresh ingredients, step-by-step cooking, and tips for perfect results. Variations like garlic parmesan and vegan options add fun twists. Store leftovers properly to enjoy later. Remember, a few simple steps lead to crisp asparagus that enhances your meal. Use these tips and enjoy your cooking adventure!

![To make easy garlic parmesan knots, gather these key items: - 1 package (16 oz) refrigerated pizza dough - 4 tablespoons unsalted butter, melted - 4 cloves garlic, minced - 1/4 cup grated Parmesan cheese - 1/2 teaspoon salt - 1/4 teaspoon black pepper These ingredients create the base for your tasty knots. The pizza dough gives them a nice texture, while butter and garlic add rich flavor. You might consider adding these for extra taste: - 1 tablespoon fresh parsley, chopped (or 1 teaspoon dried parsley) - Pinch of red pepper flakes Fresh parsley adds color and a fresh taste. Red pepper flakes give a little heat, so use them if you like spice. To make your cooking easier, have these tools on hand: - Sharp knife or pizza cutter - Baking sheet - Parchment paper - Small bowl - Pastry brush Using these tools helps with cutting the dough and baking the knots evenly. They make the process smooth and simple. For the full recipe, refer to the details above. Start by preheating your oven to 400°F (200°C). This heat helps the knots rise and bake well. Line a baking sheet with parchment paper. This keeps the knots from sticking. Next, take the refrigerated pizza dough. Roll it out on a clean, floured surface. Aim for a rectangle about ¼ inch thick. This thickness ensures even cooking. Slice the dough into strips. Each strip should be about 1 inch wide and 6 inches long. Take one strip and tie it into a knot. Tuck the ends underneath to keep them secure. Place each knot on the prepared baking sheet, leaving space between them. In a small bowl, combine melted butter, minced garlic, salt, black pepper, and red pepper flakes if desired. This garlic butter mixture gives the knots a rich flavor. Use a brush to apply the mixture on top of each knot. Make sure to get some garlic pieces on top. Now, it’s time to bake! Place the baking sheet in the oven and bake for 12-15 minutes. Watch for a golden brown color on the knots. When done, take them out and let them cool for a few minutes. Brush any leftover garlic butter on top for extra flavor. You can find the full recipe in the ingredients section. To get your knots just right, oven temperature matters. Always preheat to 400°F (200°C). This helps them cook evenly. Roll your pizza dough to about ¼ inch thick. If it's too thick, the knots may not cook well inside. Cut the strips 1 inch wide and 6 inches long. This size allows them to twist easily and cook evenly. For a burst of flavor, use fresh garlic. Fresh garlic gives more taste than jarred. Add herbs like rosemary or thyme for more depth. You can also mix in different cheeses, like mozzarella or cheddar. A pinch of red pepper flakes adds a nice kick. Try different spices to find your perfect blend. One common mistake is overcrowding the baking sheet. Leave space between knots so they rise well. Don't skip brushing the garlic butter mixture on top. It adds flavor and a nice shine. Lastly, keep an eye on them while baking. They can go from golden brown to burnt quickly. For the full recipe, click here: [Full Recipe]. {{image_4}} You can play with the cheese in your garlic knots. Instead of Parmesan, try mozzarella for a melty twist. You might also use cheddar for a sharp taste. Goat cheese adds creaminess, while feta offers a salty kick. Combine different cheeses for a fun mix. Each choice brings a unique flavor to your knots. Want to spice things up? Add herbs like oregano or thyme for extra flavor. A pinch of cayenne pepper gives a nice heat. You could also add lemon zest for a fresh twist. Try mixing in Italian seasoning for a classic touch. Be creative to find your perfect blend of spices. If you want to change the base, you have options. You can use bread dough for a fluffier texture. Biscuit dough makes a quick and easy choice, too. For a gluten-free option, try a gluten-free pizza dough. Each dough type gives a different taste and texture to your knots. Check out the Full Recipe for more ideas. To store your leftover garlic parmesan knots, first let them cool down. Place them in an airtight container. This keeps them fresh and prevents drying out. If you plan to eat them in a day or two, the fridge works well. For longer storage, the freezer is a better choice. Reheating your garlic parmesan knots is easy. For the best taste, use the oven. Preheat it to 350°F (175°C). Place the knots on a baking sheet. Heat them for about 5-7 minutes. This restores the crispy texture. You can also use a microwave. Heat them for about 30 seconds. However, the texture may not be as nice as oven heating. If you want to freeze garlic parmesan knots, wrap them well. Use plastic wrap or aluminum foil. Then, place them in a freezer bag. Squeeze out as much air as you can. They can stay in the freezer for up to three months. When ready to eat, thaw them in the fridge overnight. Reheat as described earlier. Your knots will taste almost fresh! For the full recipe, check out the earlier section. Yes, you can use homemade dough. Just make sure it has the right texture. If your dough is soft, it may not hold the knot shape well. Use a simple recipe that yields a stretchy and firm dough for best results. This way, you get that fresh flavor and texture right from your kitchen. Garlic parmesan knots last about 2-3 days at room temperature. Store them in an airtight container to keep them fresh. If you want to save them longer, put them in the fridge, where they can last up to a week. Just remember, they taste best when fresh! Yes, you can make garlic knots without garlic. You can swap garlic with herbs or spices. Try using Italian seasoning or even pesto for flavor. This way, you still get a tasty knot without the garlic punch. Garlic parmesan knots pair well with many dishes. You can serve them with marinara sauce for dipping. They also go great alongside pasta, salads, or soups. If you want a fun snack, try them with cheese or charcuterie boards. The options are endless! You’ve learned how to make delicious garlic parmesan knots. We covered all the key ingredients, tools, and step-by-step baking instructions. I shared tips to avoid common mistakes and enhance flavors. You also discovered fun variations and how to store and reheat your knots. With these skills, you can impress anyone at your next meal. Enjoy your tasty creation and make it your own! Happy cooking!](https://goldendishy.com/wp-content/uploads/2025/07/36d16f76-26da-465a-ba33-0a5ce8f4ea78-768x768.webp)