Avocado Corn Salad Fresh and Flavorful Delight
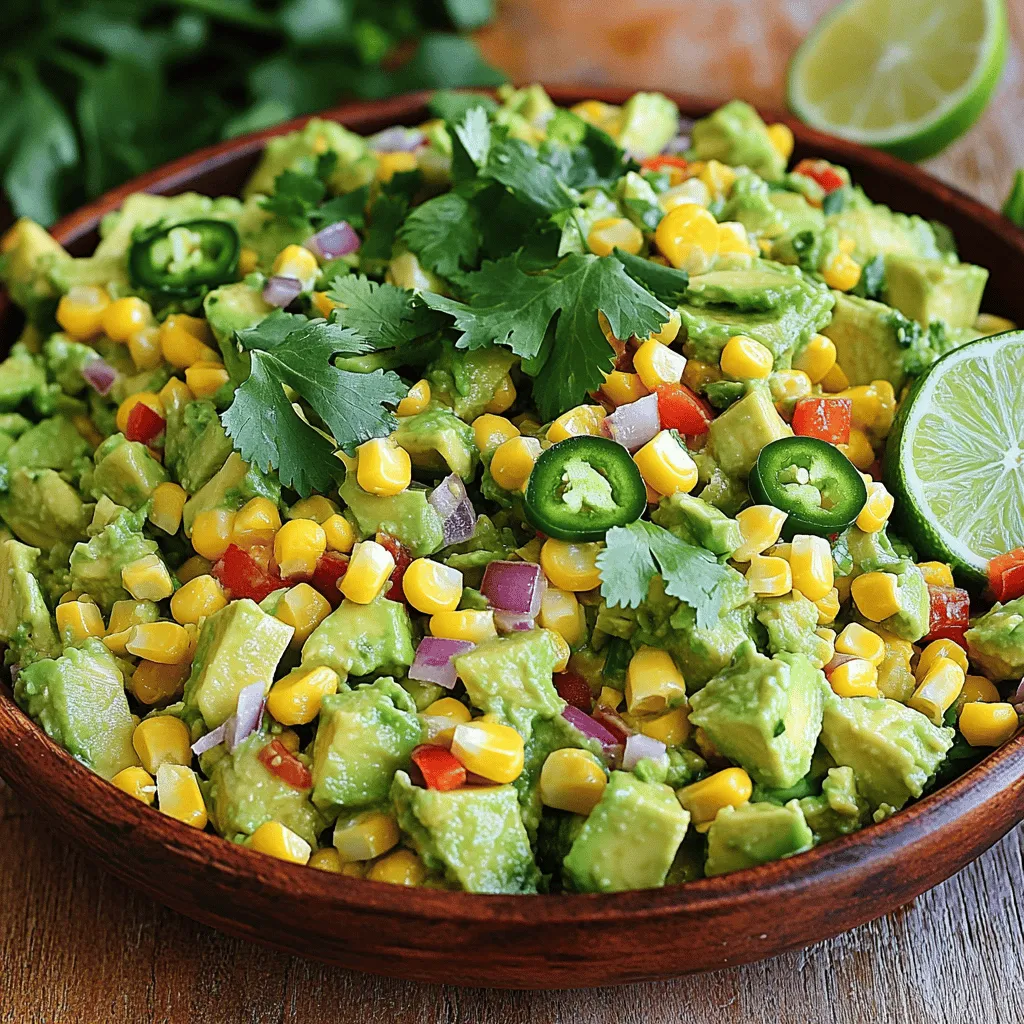
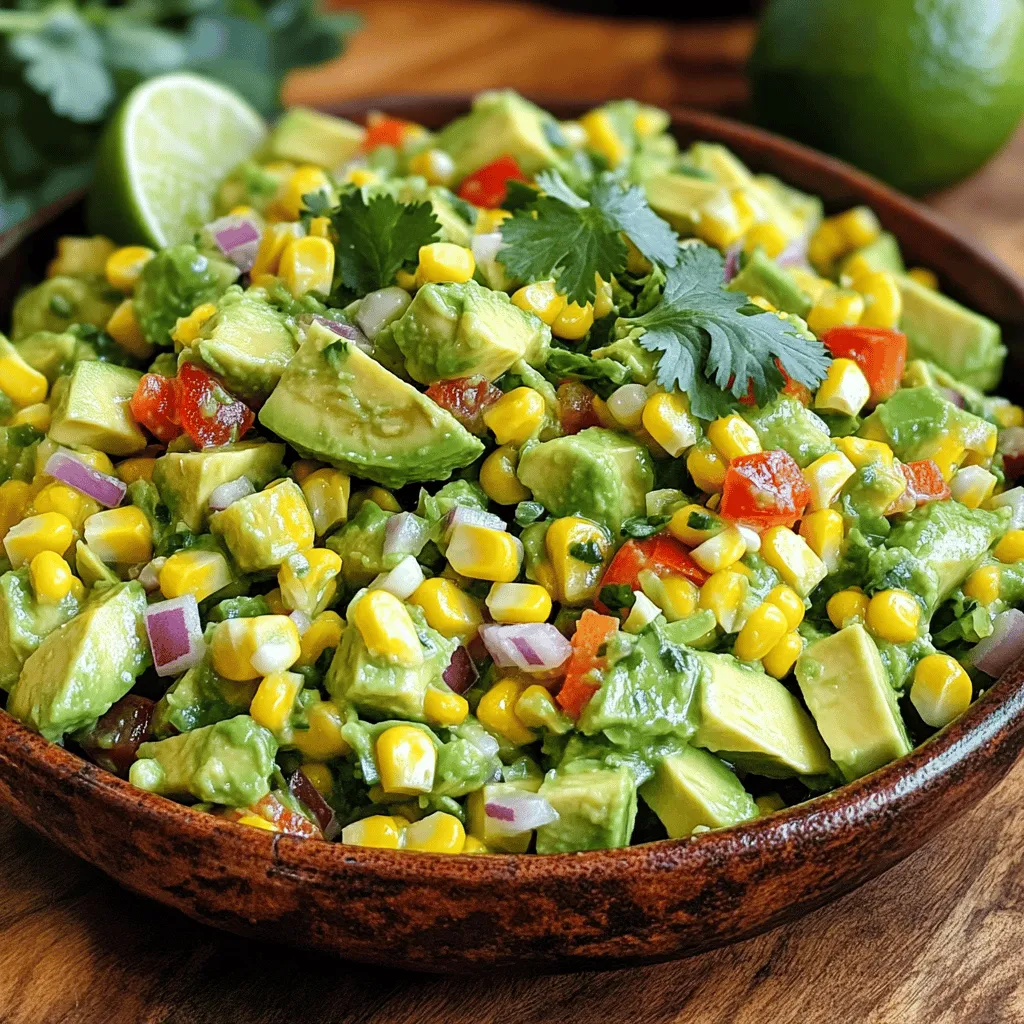
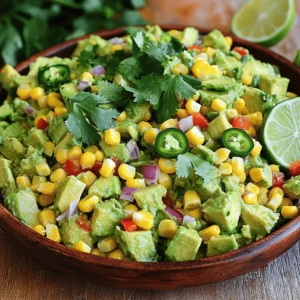
Looking for a fresh and tasty dish that shines at any meal? Look no further! This Avocado Corn Salad combines creamy avocados and sweet corn for a delightfully vibrant side. Whether you’re planning a picnic, a family dinner, or simply craving a light snack, this recipe is perfect. Join me as I share the easy steps to make this delicious salad, along with tips, variations, and storage advice! Dive in!
Ingredients
List of Ingredients
– 2 ripe avocados, diced into bite-sized pieces
– 1 cup fresh corn kernels (or 1 can of corn, drained and rinsed)
– 1 medium red bell pepper, diced
– 1 jalapeño pepper, deseeded and minced (optional, for a spicy kick)
– 1/4 cup red onion, finely chopped
– 1/4 cup fresh cilantro, roughly chopped
– Juice of 2 limes, freshly squeezed
– 2 tablespoons extra-virgin olive oil
– Salt and black pepper, to taste
– 1/2 teaspoon smoked paprika, for a hint of smokiness
This salad shines with ripe avocados and sweet corn. The avocados should feel soft but not mushy. They bring a creamy texture that pairs well with the corn. You can use fresh corn or canned corn for this recipe. Fresh corn adds a crisp bite, while canned corn is quick and easy.
The red bell pepper adds beautiful color and sweetness. If you like spice, the jalapeño brings heat without being overpowering. Just remove the seeds to control the heat level.
Red onion gives a sharp crunch that balances the creaminess of the avocados. Fresh cilantro adds a burst of flavor. Lime juice brightens everything, while olive oil makes it rich. The seasoning, including salt, black pepper, and smoked paprika, enhances the dish.
Gather these ingredients to create a fresh and flavorful salad that is easy to prepare and enjoyable to eat.
Step-by-Step Instructions
Preparation Steps Overview
Mixing avocados and vegetables
Start by taking a large bowl. Add the diced avocados, fresh corn kernels, diced red bell pepper, minced jalapeño (if you like spice), and finely chopped red onion. Use a spatula to mix gently. Be careful not to mash the avocados.
Preparing the dressing
In a small bowl, whisk together the freshly squeezed lime juice, extra-virgin olive oil, smoked paprika, salt, and black pepper. Mix until it is well combined. This dressing adds great flavor.
Combining the salad ingredients
Drizzle the dressing over the avocado and vegetable mixture. Toss the salad gently. Make sure everything is coated but keep the avocados whole.
Final adjustments and resting time
Fold in the chopped cilantro. Stir lightly to mix in the fresh taste. Taste your salad. Adjust the seasoning if needed. You can add more lime juice or salt. Let the salad rest for about 10 minutes at room temperature. This helps the flavors blend together.
Tips & Tricks
Essential Tips for Perfecting the Salad
How to select ripe avocados:
Choose avocados that feel slightly soft when you press them. They should not be too mushy. Check for dark green to black skin, which indicates ripeness. If they are hard, let them sit at room temperature for a few days.
Keeping avocados from browning:
To stop avocados from browning, use lime juice. The acid slows down oxidation. Keep the salad covered in the fridge if you have leftovers. This helps keep it fresh and bright.
Adjusting seasoning to taste:
Taste your salad before serving. If it needs more flavor, add more lime juice or salt. You can also add more smoked paprika for a smokier taste. Trust your taste buds to guide you.
Ideal serving temperature:
Serve the salad cold or at room temperature. If you chill it, let it sit out for a few minutes before serving. This helps the flavors pop! Enjoy it fresh for the best taste.
Variations
Creative Additions
You can make avocado corn salad even better by adding some fun twists. Here are some ideas:
– Adding proteins: You can add grilled chicken or black beans for extra protein. Chicken gives a nice taste and texture. Black beans add fiber and keep it plant-based. Just mix them in gently.
– Incorporating fruit: Adding fruits like mango or pineapple brings sweetness. Mango adds a tropical vibe, and pineapple gives a zesty kick. Dice them small and fold them in carefully.
– Using different dressings or seasonings: Explore various dressings for different flavors. Try a honey-lime dressing for sweetness or a spicy vinaigrette for heat. You can also switch up the seasonings. Cumin or chili powder can add depth.
These simple changes make your salad unique and delightful. Enjoy experimenting!
Storage Info
Best Practices for Storing the Salad
To keep your avocado corn salad fresh, store it in the fridge. Use an airtight container to prevent it from drying out. If you have leftovers, try to eat them within two days for the best taste.
How long does it stay fresh? The salad tastes best on the first day. After 24 hours, the avocados may brown. If you notice browning, add more lime juice to help slow it down.
If you want to reheat the salad, avoid it. The avocados do not do well when heated. Instead, enjoy it cold or at room temperature. If you prefer a warm dish, consider making a separate warm corn salad.
FAQs
How can I make this salad ahead of time?
You can prepare this salad a few hours before you serve it. Chop the veggies and mix them in a bowl. Keep the dressing separate until you are ready to eat. This way, the avocados stay fresh, and the flavors stay bright.
Is there a vegetarian version?
Yes! This salad is already vegetarian. It contains no meat or animal products. You can enjoy it as is, or add other veggies for more flavor.
Can I use frozen corn instead of fresh?
Absolutely! Frozen corn works well in this salad. Just thaw it and drain any extra water before using it. This makes it quick and easy.
What are the health benefits of avocado and corn?
Avocados are full of healthy fats, fiber, and vitamins. They help keep your heart healthy. Corn is a good source of fiber and has many nutrients too. Together, they make a tasty and nutritious salad.
This blog post shared a simple recipe for a fresh salad. I covered the essential ingredients, like ripe avocados and fresh corn, and guided you through the easy steps to prepare it. You learned tips for selecting and storing your ingredients and some tasty variations to try. Remember to enjoy this refreshing salad on warm days. Use the ideas in this post to make it your own and keep it fresh. A healthy salad can bring color and taste to your meals. Enjoy!

![To make teriyaki chicken lettuce wraps, you need a few key ingredients. These create the rich flavors and fresh textures. Here’s what you’ll need: - 1 lb (450g) boneless, skinless chicken breast, finely diced - 1 tablespoon canola oil - 1/2 cup bell pepper, finely chopped (choose red or yellow for sweetness) - 1/2 cup carrot, grated (for a touch of crunch) - 3 green onions, beautifully sliced - 2 cloves garlic, minced (for aromatic depth) - 1/4 cup low-sodium soy sauce (to control saltiness) - 2 tablespoons honey (for a hint of natural sweetness) - 1 tablespoon rice vinegar (to balance flavors) - 1 teaspoon sesame oil (for a nutty aroma) - 1 teaspoon fresh ginger, grated (adds a zesty kick) - 1 head of butter lettuce or iceberg lettuce, with leaves gently separated These ingredients come together to create a joyful, tasty meal. Garnishes can elevate your dish. While not required, they add flair and flavor. Here are some great options: - Sesame seeds (for garnish, optional but recommended) - Fresh cilantro or parsley, for garnish (optional) Adding these garnishes can make your wraps look and taste even better. Lettuce is key for wraps. It holds the filling perfectly. Here are tips to choose the best lettuce: - Look for crisp, fresh leaves. Avoid any wilting or browning. - Butter lettuce has a soft, pliable texture, perfect for wrapping. - Iceberg lettuce offers a nice crunch but can be thicker. Choose what you like best for your teriyaki chicken lettuce wraps. To start, gather your ingredients. You need: - 1 lb boneless, skinless chicken breast, finely diced - 1 tablespoon canola oil - 1/2 cup bell pepper, finely chopped - 1/2 cup carrot, grated - 3 green onions, beautifully sliced - 2 cloves garlic, minced - 1/4 cup low-sodium soy sauce - 2 tablespoons honey - 1 tablespoon rice vinegar - 1 teaspoon sesame oil - 1 teaspoon fresh ginger, grated - 1 head of butter or iceberg lettuce, leaves separated - Sesame seeds and fresh herbs for garnish Make sure your chicken is chopped small. This helps it cook evenly. Chop the bell pepper finely for sweetness and color. Grate the carrot for crunch. Slice the green onions thin. Mince the garlic and grate the ginger to release their flavors. Heat the canola oil in a large skillet over medium heat. Wait until the oil shimmers. Add the diced chicken and cook it for 5-7 minutes. Stir often until the chicken is brown and fully cooked. Then, add the minced garlic, grated ginger, and chopped bell pepper. Sauté this mixture for 2-3 minutes. The bell pepper should soften and blend with the chicken. In a small bowl, whisk together the soy sauce, honey, rice vinegar, and sesame oil. When well combined, pour this sauce into the skillet. Now, gently fold in the grated carrots and sliced green onions. Cook for another 2-3 minutes. This helps the sauce coat everything and thicken slightly. Remove the skillet from heat. Let the teriyaki chicken cool for a few minutes. This resting time allows the flavors to meld beautifully. To serve, take a lettuce leaf and place a generous spoonful of the teriyaki chicken mixture in the center. This creates your wrap. For added flavor, sprinkle sesame seeds and fresh herbs on top. Serve the wraps right away. Encourage everyone to wrap them up and enjoy the fresh, vibrant flavors. For the full details on making this dish, check out the Full Recipe. For juicy chicken, choose fresh chicken breast. Cut it into small, even pieces. This helps it cook evenly. Heat your skillet before adding oil. Use medium heat to avoid burning. Stir the chicken often. This keeps it from sticking and ensures even cooking. Add garlic and ginger early. This builds a great flavor base. Cook until the chicken is completely brown and firm. To wrap your lettuce, use large, whole leaves. Butter or iceberg lettuce works best. Place a spoonful of chicken in the center. Fold the sides in first, then roll it up. This keeps the filling secure. Make sure the wrap is tight but not too tight. You want it to hold together without falling apart. Arrange your wraps on a platter. Add extra garnishes like sesame seeds for a beautiful look. You can change the flavor of your wraps easily. Add extra veggies like cucumbers or radishes. They give a nice crunch. For a spicy kick, include sliced jalapeños or sriracha sauce. If you like nuts, add chopped peanuts or cashews. You can also switch the protein. Try ground turkey or tofu for a new taste. Mix and match to find your favorite flavor combo. For the complete recipe, check out the [Full Recipe]. {{image_4}} You can switch up the protein in your wraps. If you like beef, use ground beef or diced steak. For a lighter choice, try shrimp or fish, like salmon. If you prefer turkey, ground turkey works well too. Each protein brings its own flavor and texture. Just adjust the cooking time to ensure everything cooks through. To make these wraps vegetarian or vegan, use tofu or tempeh. Both options absorb flavors well. Press and cube the tofu before cooking to remove extra moisture. For a tasty twist, you can use cooked lentils or chickpeas. These options give a hearty bite while keeping your meal plant-based. Add fun flavors to your wraps! You can mix in crushed peanuts or cashews for crunch. Fresh herbs like basil or mint can add a fresh taste. Spice lovers may enjoy a dash of sriracha or chili flakes for heat. You can also add diced pineapple or mango for a sweet twist. These enhancements make your wraps even more exciting! For the complete recipe, check the [Full Recipe]. After enjoying your teriyaki chicken lettuce wraps, you may have leftovers. To store them, place the wraps in an airtight container. Keep the chicken mixture and lettuce leaves separate. This helps keep the lettuce crisp and fresh. Store in the fridge for up to three days. When you're ready to enjoy your leftovers, simply reheat the chicken mixture. Use a skillet over medium heat. Stir until heated through, about 5 minutes. Avoid microwaving the lettuce, as it may become soggy. Assemble the wraps just before eating for the best taste. Meal prepping makes weeknight cooking easy. You can prepare the chicken mixture ahead and store it in the fridge. Use the Full Recipe to guide your prep. To save time, chop vegetables on the weekend. This way, you have everything ready to go when you need a quick dinner. Enjoy your healthy wraps any night! To make the sauce, start with low-sodium soy sauce for a savory base. Add honey for sweetness and rice vinegar for a tangy kick. Then, mix in sesame oil for a nutty aroma. Combine these in a bowl and whisk until smooth. This sauce balances flavors, making your wraps burst with taste. Yes, you can make this dish ahead of time. Prepare the teriyaki chicken mixture and store it in an airtight container. Keep it in the fridge for up to three days. When ready to eat, reheat the mixture in a skillet over medium heat. Serve it with fresh lettuce leaves for a quick meal. Pair your lettuce wraps with some light side dishes. Here are a few great options: - Steamed jasmine rice for a filling side. - Edamame sprinkled with sea salt for a healthy snack. - A simple cucumber salad for a refreshing crunch. - Miso soup for warmth and depth. These sides complement the flavors of the wraps beautifully. For the full recipe, check out [Full Recipe]. Teriyaki chicken lettuce wraps are fun and tasty. We covered key ingredients, cooking steps, and tips to make them juicy. You learned how to customize and store your wraps for busy nights. This dish fits many diets with easy variations and great sides. Enjoy trying new flavors and sharing with friends. You now have all the tools to create delicious wraps that anyone can love. Keep experimenting and have fun in the kitchen!](https://goldendishy.com/wp-content/uploads/2025/06/72f6a023-630c-4819-9e2f-2135bf5b7418-768x768.webp)
