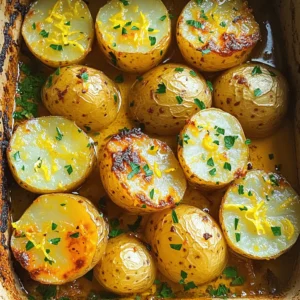
Greek Lemon Potatoes Flavorful and Easy Recipe Guide

If you’re craving a dish that bursts with flavor, you’ve come to the right place! Greek Lemon Potatoes are a simple yet delicious side dish that brings a taste of the Mediterranean right to your table. In this guide, I’ll share a clear step-by-step recipe, essential cooking tips, and some exciting variations to try. Let’s unlock the secrets to making these zesty potatoes that everyone will love!
Ingredients
To make Greek Lemon Potatoes, you need a few simple ingredients that bring bold flavors together. Here’s the complete list:
– 2 lbs baby potatoes, halved
– 1/4 cup extra virgin olive oil
– 4 cloves garlic, finely minced
– 1 tablespoon dried oregano
– Zest of 2 fresh lemons
– 1/4 cup freshly squeezed lemon juice
– 1 cup vegetable broth
– Salt and freshly ground black pepper to taste
– Fresh parsley, chopped (for garnish)
Each ingredient plays a key role in crafting this dish. Baby potatoes are the star. They are tender and creamy once cooked, making them perfect for this recipe. The extra virgin olive oil adds richness and depth.
Garlic gives a nice punch, while oregano adds that classic Greek flavor. Lemon zest and juice brighten the dish with fresh citrus notes. Vegetable broth keeps the potatoes moist and adds more flavor.
Finally, salt and pepper enhance every bite. Don’t forget the fresh parsley! It adds a splash of color and freshness when serving.
Gather these ingredients, and you’re ready to create a dish that’s sure to impress!
Step-by-Step Instructions
Preparation Steps
– Preheating the oven
Start by preheating your oven to 400°F (200°C). This step sets the stage for perfect cooking.
– Mixing the lemon herb mixture
In a large bowl, combine 1/4 cup of extra virgin olive oil, 4 minced garlic cloves, 1 tablespoon of dried oregano, the zest of 2 lemons, and 1/4 cup of lemon juice. Add salt and pepper to taste. Whisk until the mixture is smooth.
– Coating the potatoes
Add 2 lbs of halved baby potatoes to the bowl. Toss them well to coat with the lemon herb mixture. Make sure every potato is covered.
– Preparing the baking dish
Pour 1 cup of vegetable broth into a large baking dish. This keeps the potatoes moist while they cook. Spread the coated potatoes on top of the broth evenly.
Baking Process
– Covering with foil
Seal the baking dish tightly with aluminum foil. This traps steam and helps cook the potatoes evenly. Place the dish in the oven.
– Uncovering and finishing baking
After 30 minutes, carefully remove the foil. Be careful of the hot steam. Continue baking the potatoes for another 20-25 minutes. They should be golden brown and fork-tender.
– Resting and garnishing before serving
Once done, take the dish out of the oven and let it rest for a minute. Just before serving, sprinkle with chopped fresh parsley for a burst of color and flavor. Enjoy these Lemon Zest Greek Potatoes warm!
Tips & Tricks
Cooking Tips
– Tips for selecting the best baby potatoes
Choose firm, smooth baby potatoes. Look for ones without blemishes or soft spots. Varieties like Yukon Gold or red potatoes work great. Their thin skin adds flavor and texture.
– How to achieve the perfect golden color
Bake the potatoes uncovered for the last 20-25 minutes. This lets them crisp up nicely. Make sure to coat them well in olive oil and seasonings. This helps the outside brown beautifully.
– Importance of resting time
Let the potatoes rest for a minute after baking. This helps the flavors settle and enhances the taste. A short rest also allows the steam to escape, keeping them crispy.
Serving Suggestions
– Ideal side dishes to accompany Greek Lemon Potatoes
These potatoes pair well with grilled chicken, lamb, or fish. They also go great with a fresh Greek salad. For a full meal, consider serving with tzatziki or pita bread.
– Presentation tips for serving
Serve the potatoes in a shallow dish. This shows off their golden color. Add lemon wedges on the side for a fresh look. A sprinkle of fresh parsley adds a nice touch too.

Variations
Ingredient Substitutions
Alternative herbs and spices
You can change the flavor by using fresh herbs. Try thyme or rosemary instead of oregano. Basil adds a nice twist too. Feel free to mix and match to find your favorite blend.
Variations using sweet potatoes
If you want a sweeter taste, use sweet potatoes. They pair well with lemon. Just cut them into similar sizes as baby potatoes. Follow the same steps for cooking. The result is a tasty twist on the classic dish.
Adding protein for a complete meal
To make Greek Lemon Potatoes a full meal, add protein. Chicken thighs or shrimp work great. Simply place the protein in the baking dish with the potatoes. Adjust cooking time as needed to ensure everything cooks through.
Cooking Methods
How to make Greek Lemon Potatoes in an air fryer
An air fryer makes cooking fast and easy. Preheat it to 400°F (200°C). Toss the seasoned potatoes in a bowl. Place them in the air fryer basket. Cook for about 25-30 minutes, shaking the basket halfway through. This method gives you crispy potatoes without the oven.
Stovetop methods for quicker cooking
You can also cook Greek Lemon Potatoes on the stovetop. Start by boiling halved potatoes in salted water. Cook them until tender, about 10-15 minutes. Drain and return them to the pot. Add the lemon herb mixture and cook over medium heat. Stir until they are golden and coated. This method is faster and still delicious!
Storage Info
Short-term Storage
To store leftover Greek Lemon Potatoes, let them cool first. Place them in an airtight container. Seal it well to keep out air and moisture. Store the container in the fridge. Your potatoes will stay fresh for up to 3 days.
When you’re ready to enjoy them again, reheat in the oven. Preheat to 350°F (175°C) for best results. Place the potatoes on a baking sheet. Heat them for about 15-20 minutes. This helps restore their crispiness and flavor. You can also reheat them in a microwave. Use a microwave-safe dish and cover it loosely. Heat for 1-2 minutes, checking often.
Long-term Storage
If you want to keep the potatoes longer, consider freezing them. However, freezing can change their texture. The potatoes may become a bit mushy when thawed. For freezing, let the cooked potatoes cool completely. Spread them in a single layer on a baking sheet. Freeze until solid, then transfer to a freezer-safe bag.
To thaw, move the potatoes to the fridge overnight. This slow method helps keep their taste and texture. When ready to eat, reheat in the oven at 350°F (175°C) until warm. Avoid reheating in the microwave after freezing, as this may worsen texture.
FAQs
Common Inquiries
What makes Greek Lemon Potatoes unique?
Greek Lemon Potatoes stand out due to their bright flavors. The mix of lemon juice, zest, and garlic creates a fresh taste. The oregano adds a hint of earthiness, making these potatoes a perfect side dish. The use of vegetable broth keeps them moist and flavorful.
Can I use other types of potatoes?
Yes, you can use other potatoes. While baby potatoes are best for their size, larger varieties work too. Just cut them down to similar sizes to ensure even cooking. Yukon Gold or red potatoes can also add a nice touch to the dish.
How long will leftovers last in the refrigerator?
Leftovers can last about 3 to 5 days in the fridge. Store them in an airtight container to keep them fresh. Reheat in the oven or microwave for best results. The flavors often deepen, making them even tastier the next day.
Additional Questions
Are Greek Lemon Potatoes gluten-free?
Yes, Greek Lemon Potatoes are gluten-free. The ingredients used have no gluten. This makes them a great choice for those with gluten sensitivities or celiac disease.
Can I make this recipe vegan?
Absolutely! This recipe is already vegan-friendly. The ingredients do not contain any animal products. You can enjoy these flavorful potatoes without any concern.
What is the nutritional value of Greek Lemon Potatoes?
Greek Lemon Potatoes are nutritious. They are low in calories and high in vitamins. Potatoes provide fiber, vitamin C, and potassium. Olive oil adds healthy fats, while garlic offers health benefits too.
Greek Lemon Potatoes are simple yet packed with flavor. You learned about the ingredients, preparation, baking, and tips for success. I shared ways to store leftovers and varied the recipe too. Each step makes these potatoes delightful.
In the end, these potatoes can enhance any meal. They are customizable and easy to make. Enjoy your cooking adventure with Greek Lemon Potatoes!

. To start, you need to mash the chickpeas. Use a fork or a potato masher. Mash until you have a chunky texture. You want to leave some whole chickpeas. This gives your sandwich a nice bite and texture. Next, add the tahini, lemon juice, and Dijon mustard to the chickpeas. Mix everything well. You should have a creamy base. Now, chop the red onion, celery, and grate the carrot. Fold these veggies into the chickpeas. The crunch from the veggies adds great flavor and color to your salad. Now it's time to season your chickpea mixture. Add salt and black pepper to taste. Adjust the flavors to your liking. If you want more tang, add lemon juice. If you prefer creaminess, add more tahini. For the bread, lightly toast it if you want a crunch. Spread a generous amount of the chickpea salad on two slices of bread. Add a few crisp lettuce leaves on top. If you like, add thin slices of tomatoes and cucumbers. Place the other slices of bread on top. Cut each sandwich in half for easy eating. You can serve them right away or wrap them in parchment paper for later. For a nice touch, arrange the sandwiches on a wooden board or plate. Enjoy this fresh and flavorful meal! For the complete recipe, check the Full Recipe above. To prepare chickpeas, start with rinsing and draining. Use a fine mesh strainer for this task. Rinsing removes excess sodium from canned chickpeas. Draining helps avoid excess water that can make your salad soggy. You want the chickpeas dry but not overly crushed. Adjusting seasoning is key for a tasty salad. Start with salt and pepper. Taste your mixture before serving. Add more lemon juice for brightness. If you want creaminess, add more tahini. These simple changes can enhance the dish. Make your meal look nice with a few easy tips. Use a rustic wooden board or a bright plate. This adds charm to your presentation. Garnish with fresh dill on top of the sandwich. Serve with colorful veggie sticks on the side. It makes for an eye-catching and healthy display. For the full recipe, check the section above. {{image_4}} You can change up the chickpeas in this sandwich. Try using black beans or lentils instead. Both options give a different taste and texture. For extra creaminess, swap tahini with vegan mayonnaise. This will make the mix smooth and rich. You can even blend both for a unique flavor. Herbs and spices can change the taste of your sandwich. Instead of dill, use parsley or cilantro for a fresh kick. You can also add garlic powder or smoked paprika for depth. For a spicy twist, throw in some chopped jalapeños or a dash of hot sauce. These additions can bring a fun zing to your meal. When it comes to bread, you have many choices. Whole grain bread is great, but you can also use gluten-free options. Try wraps made from rice or corn for a lighter touch. This makes for a fun, portable meal. Each bread type changes the sandwich's feel, so choose what you love! To keep leftovers fresh, store your chickpea salad in an airtight container. Make sure to refrigerate it right away. This helps keep the flavors intact for up to three days. When ready to eat, just give it a good stir. You can enjoy it cold or make a fresh sandwich. If you want to store the chickpea salad for longer, freezing is a great option. Place the chickpea salad mixture in a freezer-safe container. Leave some space at the top to allow for expansion. It will stay good for about three months. When you're ready to eat it, let it thaw in the fridge overnight. To refresh your sandwich after storage, you can add a bit of olive oil or lemon juice. This helps bring back the moisture and flavor. If you want, you can toast the bread again for a crunchy bite. This simple step makes your sandwich taste fresh and delicious again. Enjoy your meal! To make this sandwich gluten-free, choose gluten-free bread. Many stores offer great options. Look for brands made from rice or almond flour. You can also try lettuce wraps instead of bread. This keeps it fresh and light too! Yes, you can. Make the chickpea salad a day ahead. Store it in an airtight container in the fridge. It stays good for about three days. Just remember to add fresh toppings right before serving for best flavor. Chickpeas are packed with protein and fiber. They help keep you full and satisfied. This sandwich is low in fat and high in vitamins. The veggies add crunch and nutrients. Tahini brings in healthy fats and flavor. Overall, this sandwich is a tasty way to eat healthy! This blog covered how to make a tasty chickpea salad sandwich. We explored main ingredients, step-by-step instructions, and storage tips. You learned how to adjust flavors and choose the right bread. Remember, you can customize the recipe with different herbs or legumes. Enjoy this easy meal any day! It’s healthy, quick, and delicious. I hope you try it soon. Your taste buds will thank you!](https://goldendishy.com/wp-content/uploads/2025/06/7c039c45-1f39-49ec-9b48-b25c6f87980b-768x768.webp)