
Crispy Garlic Parmesan Potato Wedges Simple Snack Idea
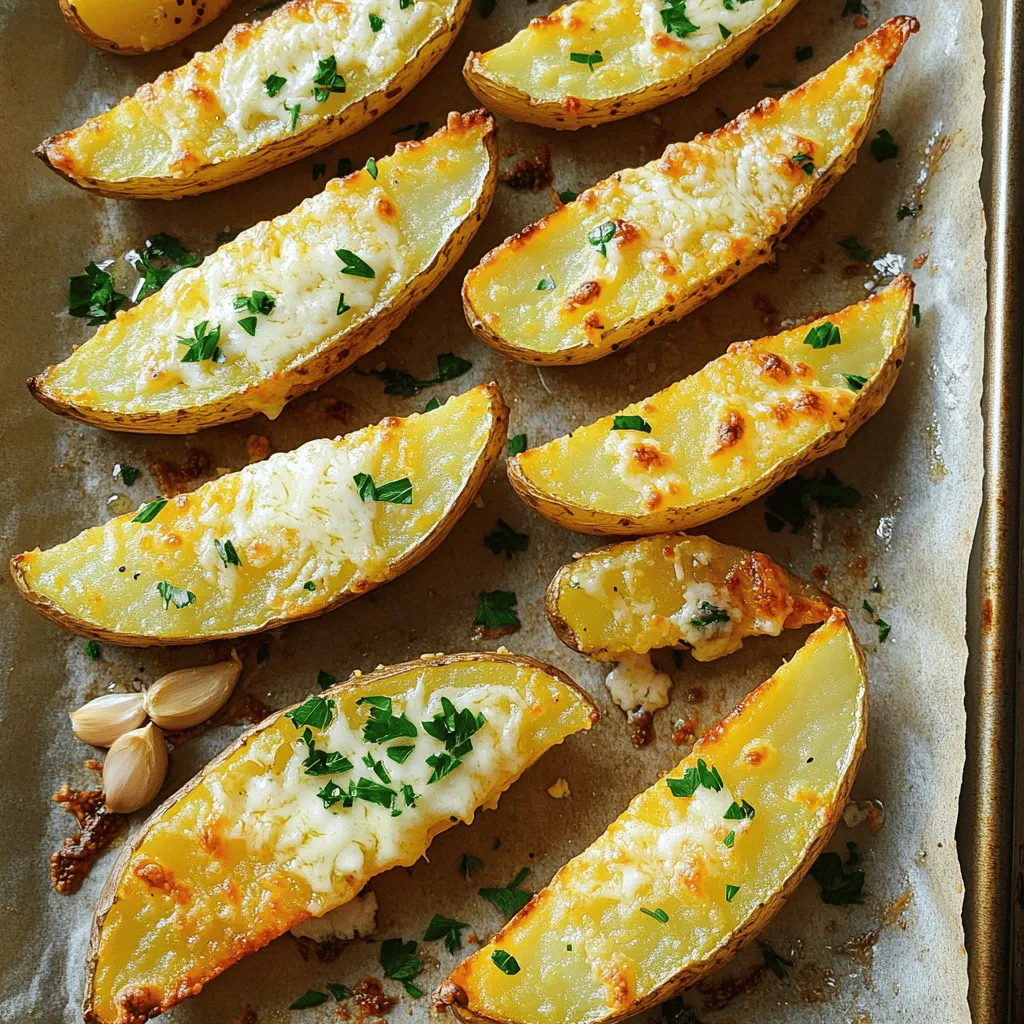
Are you craving a snack that’s both crispy and packed with flavor? Look no further! My Crispy Garlic Parmesan Potato Wedges are the perfect bite-sized treat. With a few simple ingredients and easy steps, you’ll serve up a warm, cheesy delight. Whether for movie night or a quick snack, these wedges will satisfy your cravings. Ready to transform your potatoes into a delicious snack? Let’s dive in!
Ingredients
Essential Ingredients
To make crispy garlic Parmesan potato wedges, you’ll need a few simple items:
– 4 large russet potatoes, scrubbed and cut into generous wedges
– ¼ cup extra virgin olive oil
– 4 cloves of garlic, finely minced
– 1 cup freshly grated Parmesan cheese
– 1 tablespoon dried Italian herb mix (a blend of oregano, thyme, and basil)
– 1 teaspoon smoked paprika for added flavor
– Salt and freshly cracked black pepper to taste
– Fresh parsley, finely chopped (for a vibrant garnish)
Russet potatoes are perfect because they are starchy. This helps the wedges get crisp. Fresh garlic adds a strong, tasty kick. Using fresh Parmesan cheese will give the best flavor.
Measurement Guide
For great flavor and texture, use these measurements:
– Potatoes: 4 large russets give a good serving size.
– Olive oil: ¼ cup keeps the wedges crisp without being greasy.
– Garlic: 4 cloves provide a bold garlic taste.
– Parmesan cheese: 1 cup melts beautifully and adds richness.
– Herbs: 1 tablespoon of dried mix adds depth.
– Paprika: 1 teaspoon brings a subtle smokiness.
– Salt and pepper: Use to your taste. Start with ½ teaspoon of each.
If you want to switch things up, try using different cheeses like cheddar or mozzarella. Fresh herbs can replace dried ones but use more of them for the same punch.
Step-by-Step Instructions
Preparation Steps
First, preheat your oven to 425°F (220°C). This high heat will help the wedges become crispy. Next, take a large baking sheet and line it with parchment paper. This step makes cleanup easier and helps the wedges crisp up nicely.
Now, let’s mix the garlic herb mixture. In a large mixing bowl, combine ¼ cup of extra virgin olive oil, 4 cloves of finely minced garlic, and 1 tablespoon of dried Italian herbs. I like to use a blend of oregano, thyme, and basil. Add 1 teaspoon of smoked paprika for a hint of warmth, and season with salt and black pepper to taste. Whisk until the mixture is well combined and fragrant.
Cooking the Wedges
Time to coat the potato wedges! Add 4 large russet potatoes—cut into generous wedges—to the bowl with the garlic herb mixture. Gently toss the wedges in the mixture, making sure every piece is well-coated. This step ensures that each wedge tastes great.
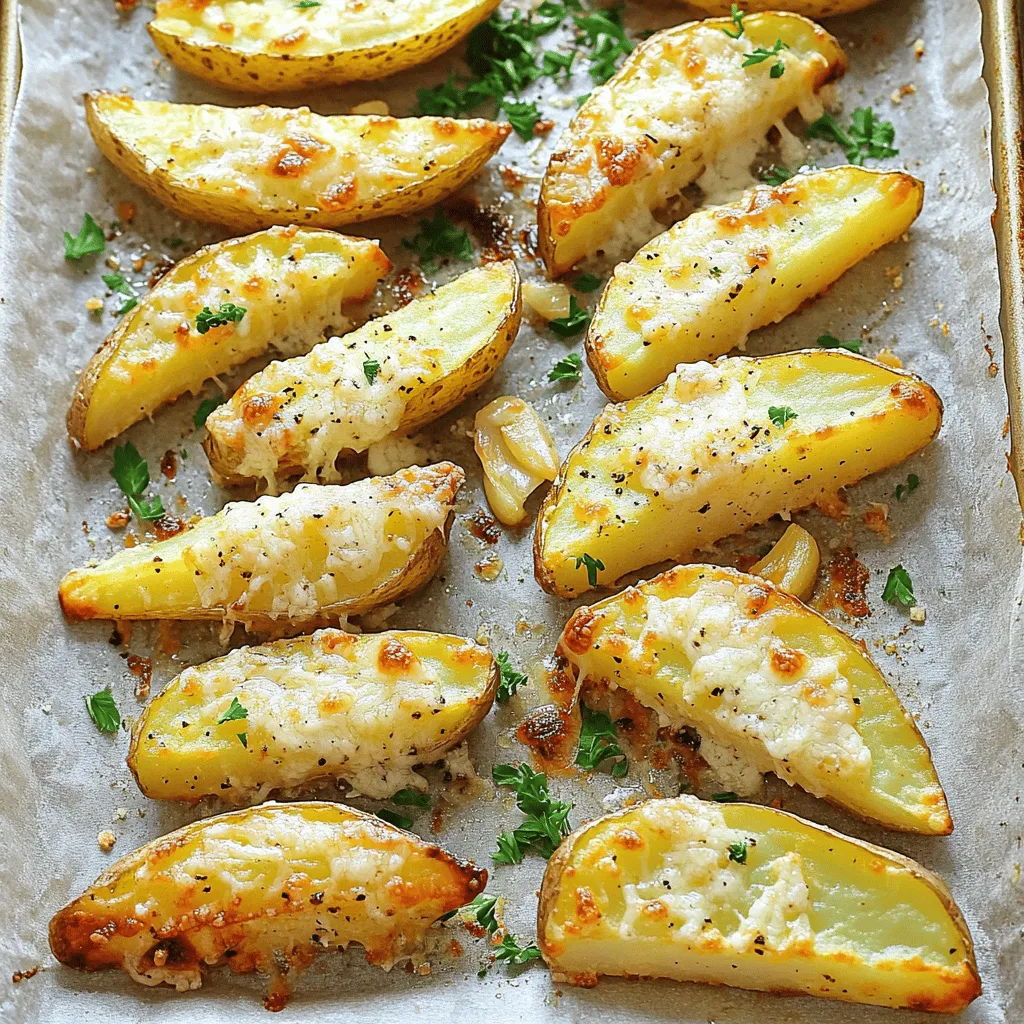
Next, arrange the coated wedges on the lined baking sheet. Spread them out in a single layer. Make sure not to overcrowd the pan; this helps the wedges get that amazing crispiness. Place the baking sheet in your preheated oven and bake for 25-30 minutes. Remember to flip the wedges halfway through. This helps them brown evenly and turn golden.
Finishing Touches
Once they’re baked, take the wedges out of the oven. Immediately sprinkle 1 cup of freshly grated Parmesan cheese over the hot wedges. The heat will help the cheese melt into the wedges, making them even better.
Put the baking sheet back in the oven for an extra 5 minutes. This time allows the cheese to get bubbly and golden brown, creating a delightful topping. After the final baking, take them out and garnish with finely chopped fresh parsley. This adds a pop of color and freshness. Serve these crispy garlic Parmesan potato wedges hot for the best experience!
Tips & Tricks
Achieving Perfect Crispiness
To get those potato wedges crispy, start with the right potato. Russet potatoes are the best choice. They have a high starch content that helps them crisp up well.
Next, cut the wedges evenly. This ensures they cook at the same rate. When you coat them with oil and seasonings, make sure to toss them well. Every wedge should be covered.
The spacing on the baking sheet is key. Lay the wedges out in a single layer. If they touch, steam forms, which leads to soggy wedges. Use a large baking sheet if needed.
Flavor Enhancements
To elevate the flavor, think about adding spices. Some ideas include cayenne pepper for heat or garlic powder for an extra kick. You could even try adding fresh herbs like rosemary or thyme.
Dipping sauces can make your wedges even better. Classic choices include ranch or ketchup. For something unique, try a spicy aioli or a tangy yogurt dip. These pair well and add a fun twist to your snack.
Variations
Flavor Variations
You can easily change the taste of your crispy garlic Parmesan potato wedges. Try adding different spices to make them spicy or herb-filled. For spicy wedges, mix in cayenne pepper or chili powder. You could also add paprika for a smoky kick.
If you want a more herbaceous flavor, consider using fresh herbs like rosemary or thyme. Fresh herbs can bring a bright taste that pairs well with garlic.
You can also get creative with the cheese. Swap out Parmesan for cheddar for a rich and sharp flavor. Feta cheese adds a tangy twist that works well with garlic. Just remember, the cheese should melt nicely for the best taste.
Preparation Methods
While baking is great, you can try other cooking methods too. Air frying your wedges gives them a crunchy texture with less oil. Simply follow the same steps as the recipe, but adjust the cooking time to 15-20 minutes in the air fryer.
Frying is another option if you want a rich flavor. Heat oil in a pot and fry the wedges until golden brown. This method will yield crispy results, but be cautious with hot oil.
You can also use other types of potatoes. Sweet potatoes give a sweet and earthy taste. Gold potatoes are creamy and less starchy, which makes them great for a soft texture. You can even try other vegetables like zucchini or carrots. Just cut them into thick wedges for even cooking.
Storage Info
Storing Leftovers
To keep your crispy garlic Parmesan potato wedges fresh, store them in an airtight container. Place them in the fridge if you plan to eat them within three days. They will stay safe and tasty for that time. If you want to keep them longer, freeze the wedges. They can last up to three months in the freezer. Just make sure to let them cool completely before freezing. This keeps them from getting soggy.
Reheating Instructions
When you want to enjoy your leftover wedges, the best way to reheat them is in the oven. Preheat your oven to 400°F (200°C). Place the wedges on a baking sheet lined with parchment paper. Bake for about 10-15 minutes until they are heated through and warm. To restore their crispiness, try not to overcrowd the pan. If you prefer using a microwave, be aware that they may lose their crunch. For the best results, stick to the oven method. Enjoy your delicious snack again!
FAQs
How do I make potato wedges crispier?
To make potato wedges crispier, avoid common mistakes. One common error is not drying the potatoes after washing them. Moisture leads to soggy wedges. Always pat them dry with a clean towel before cooking.
Another mistake is overcrowding the baking sheet. When wedges are too close, they steam instead of roast. Give them space to breathe on the pan for that golden crunch.
For expert tips, try soaking the wedges in cold water for about 30 minutes before cooking. This removes excess starch, allowing for a crispier texture. Also, don’t skip the extra virgin olive oil; it helps with browning and crisping. Lastly, flip the wedges halfway through baking to promote even cooking.
Can I prepare these potato wedges ahead of time?
Yes, you can prepare these potato wedges ahead of time. Cut them and toss them in the garlic herb mixture. Then, store them in the fridge for up to 24 hours. This makes meal prep super easy!
However, keep in mind that the longer they sit, the less crispy they might become. The oil can soak into the potatoes, which affects texture. For the best flavor and crunch, bake them shortly after coating.
What dipping sauces pair well with garlic Parmesan wedges?
Dipping sauces can elevate your garlic Parmesan wedges. Classic choices include ketchup or ranch dressing. They add a nice contrast to the savory flavors.
For something creative, try a garlic aioli or spicy sriracha mayo. Others love a tangy balsamic reduction for a gourmet touch. Explore different flavors to find your favorite pairing!
Crispy Garlic Parmesan Potato Wedges are a delight. We covered key ingredients, cooking steps, and tips for crispiness. You now know how to tweak flavors and create variations. If you follow the guidelines, your wedges will impress anyone. Storing and reheating them is easy, so enjoy every bite later, too. This dish is perfect as a side or snack. Ready to make your own delicious wedges? Start cooking, and savor the flavor!

![- 1 bunch of fresh asparagus, trimmed (about 16-20 spears) - 1 cup freshly grated Parmesan cheese - 1/2 cup panko breadcrumbs - 3 cloves garlic, finely minced - 1 teaspoon garlic powder - 1/2 teaspoon fine sea salt - 1/4 teaspoon freshly ground black pepper - 2 large eggs, lightly beaten - 2 tablespoons extra virgin olive oil - 1 tablespoon fresh parsley, finely chopped For the best flavor, choose fresh asparagus that is bright green with firm stalks. Look for Parmesan cheese that you grate yourself. Pre-grated cheese often lacks the rich taste you want. When selecting panko breadcrumbs, ensure they are light and airy for that perfect crunch. It’s important to use fresh garlic for the best taste. Always measure your ingredients accurately for consistent results. Each serving of Garlic Parmesan Asparagus Fries offers a tasty balance of nutrients. These fries are low in calories and high in vitamins A and C. They provide healthy fats from olive oil and protein from eggs and cheese. One serving typically contains around 200 calories, 10g of protein, and 15g of fat. This makes them a healthier alternative to regular fries. Enjoy them guilt-free as a snack or side dish! To make Garlic Parmesan Asparagus Fries, start by gathering your ingredients. You will need fresh asparagus, Parmesan cheese, panko breadcrumbs, garlic, eggs, and olive oil. Next, preheat your oven to 425°F (220°C) and line a baking sheet with parchment paper for easy cleanup. In a shallow bowl, mix the panko breadcrumbs, grated Parmesan cheese, minced garlic, garlic powder, sea salt, and black pepper. Stir well to combine all the flavors. In another bowl, beat the eggs until they are smooth and a bit frothy. Now, take each asparagus spear and dip it in the egg mixture. Make sure to coat it well, but let any extra egg drip off. Then, roll the asparagus in the breadcrumb mix, pressing gently to ensure an even coat. Place the coated spears on your prepared baking sheet in a single layer. Drizzle the olive oil over the asparagus. This helps them get that nice crispy texture as they bake. Place the baking sheet in your oven. Bake the asparagus fries for about 15 to 20 minutes. Keep checking until they are fork-tender and the coating is a beautiful golden brown. Once done, take the baking sheet out of the oven. Let the fries cool for a few minutes. This step is important as it helps them crisp up even more. For a lovely presentation, serve your Garlic Parmesan Asparagus Fries on a long platter. Add a small bowl of marinara sauce or garlic aioli for dipping. This adds a tasty twist that everyone will love. Finally, sprinkle some fresh parsley on top for a touch of color and flavor. For the full recipe and more details, check out the [Full Recipe]. To get your Garlic Parmesan Asparagus Fries crispy, follow a few steps. First, use fresh asparagus. The fresher, the better! Next, coat each spear well with the egg and breadcrumb mixture. This helps the coating stick. Press the breadcrumbs onto the asparagus for a nice layer. Finally, drizzle olive oil over the fries. This adds flavor and aids crispiness. I’ve seen a few common mistakes in the kitchen. One is overcrowding the baking sheet. It causes steaming, making your fries soggy. Arrange the asparagus in a single layer. Another mistake is not preheating the oven. A hot oven ensures that the fries cook evenly. Lastly, don’t skip the panko breadcrumbs. They give the perfect crunch. Garnishing adds fun to your dish. Try these ideas to elevate your fries! First, sprinkle more parsley for color. You can also add lemon zest for a fresh taste. If you like heat, sprinkle some red pepper flakes on top. For a dip, serve marinara sauce or a creamy garlic aioli. These little touches make your Garlic Parmesan Asparagus Fries stand out. For the full recipe, check out the earlier section. {{image_4}} You can easily make these fries vegan. Instead of eggs, use a flax egg. Mix one tablespoon of ground flaxseed with three tablespoons of water. Let it sit for a few minutes to thicken. This mixture works great to bind the panko and cheese. For cheese, try using a vegan Parmesan. It adds flavor without dairy. This way, everyone can enjoy these tasty fries! To make Garlic Parmesan Asparagus Fries gluten-free, swap regular breadcrumbs for gluten-free panko. You can also use crushed nuts or almond flour. Both options give a nice crunch. Just ensure all your ingredients are gluten-free. This way, you can enjoy these fries without worry. Want to spice things up? Add some cayenne pepper or chili flakes to the breadcrumb mixture. This gives your fries a nice kick. You can also mix in some dried herbs like oregano or thyme. Fresh herbs like rosemary can add an amazing flavor too. Feel free to experiment and find your favorite taste! For the full recipe, check out the detailed instructions above. You can store leftover Garlic Parmesan Asparagus Fries in the fridge. Use an airtight container. They will stay fresh for up to three days. Make sure the fries are cool before sealing the container. This helps keep them crisp. To reheat, use an oven or air fryer. Preheat the oven to 350°F (175°C). Place the fries on a baking sheet. Heat for about 10 minutes. This keeps them crispy. Avoid using the microwave, as it makes them soggy. You can freeze these fries for later use. First, let them cool completely. Then, place them in a freezer-safe bag. Remove as much air as possible. They can last for up to three months. When ready to eat, bake from frozen at 425°F (220°C) for 20-25 minutes. Enjoy the crunch just like fresh! To make Garlic Parmesan Asparagus Fries, you start by preheating your oven to 425°F (220°C). Next, line a baking sheet with parchment paper. This helps with easy cleanup. Combine panko breadcrumbs, grated Parmesan cheese, minced garlic, garlic powder, sea salt, and black pepper in a shallow bowl. Mix them well. In another bowl, beat two eggs until they look frothy. Dip each asparagus spear into the eggs, letting the excess drip off. Roll them in the breadcrumb mix, ensuring they are coated evenly. Place the spears on the baking sheet in one layer. Drizzle olive oil on top. Bake for 15-20 minutes until crispy and golden. Finally, sprinkle fresh parsley on top for a nice finish. For the full recipe, check out the detailed instructions above. Yes, you can use frozen asparagus, but it may not be as crisp. Frozen asparagus tends to have more moisture. This can lead to soggy fries. If you use frozen asparagus, thaw and drain it well before coating. Pat it dry with a paper towel to remove excess water. This step helps keep the fries crispy when baked. If you need a substitute for Parmesan cheese, try nutritional yeast for a vegan option. It has a cheesy flavor and works well in this recipe. Grated Pecorino Romano offers a similar taste, though it is saltier. If you want a milder cheese, use grated mozzarella. Just remember, the flavor may change with these swaps, but they will still be tasty! This guide covers all you need for perfect Garlic Parmesan Asparagus Fries. We explored key ingredients, measurements, and nutrition. I provided step-by-step instructions to help you bake and serve. Plus, we shared tips for crispiness, mistakes to watch for, and fun garnishing ideas. In the end, try out variations like vegan or gluten-free. Proper storage can keep your fries fresh and tasty. With these insights, you can make delicious fries every time. Enjoy experimenting and sharing these yummy treats!](https://goldendishy.com/wp-content/uploads/2025/07/ccbce488-a3dc-4dce-b527-37d827ece95a-768x768.webp)

. Enjoy mixing and matching these ideas! To store leftover grilled vegetable skewers, let them cool first. Place them in an airtight container. You can keep them in the fridge for up to three days. If you want to keep them longer, freezing is a better choice. When you're ready to eat leftovers, you have a few options for reheating. You can use the microwave for quick heat. Place the skewers on a plate and cover them with a damp paper towel. Heat for 30 seconds to 1 minute. You can also reheat them on the grill. This method helps keep the smoky flavor. Just grill them for about 5 minutes over low heat, turning occasionally. If you want to freeze grilled vegetable skewers, first remove the veggies from the skewers. Place the veggies in a single layer on a baking sheet. Freeze them for an hour, then transfer them to a freezer-safe bag. This way, they won't stick together. You can store them in the freezer for up to three months. When you're ready to use them, just thaw them overnight in the fridge. You can then reheat as mentioned above. Enjoy your flavorful grilled veggies anytime! For a full recipe, check out the vibrant grilled vegetable skewers. Yes, you can use frozen vegetables for skewers. However, fresh vegetables are better. Frozen veggies have more water. This can make them mushy when grilled. If you use frozen, thaw them first. Pat them dry to remove excess moisture. This helps keep them firm and tasty. You can tell the vegetables are done by looking at them. They should be tender and have nice grill marks. When a fork goes in easily, they are ready. Each vegetable cooks a bit differently. Zucchini and bell peppers may take less time than mushrooms. Keep an eye on them while grilling. Many dips go well with grilled vegetable skewers. Here are a few great options: - Hummus - Tzatziki - Garlic aioli - Ranch dip - Pesto Each dip adds a new flavor. You can mix and match to find what you love best. Enjoy exploring these tasty options! Grilling vegetable skewers is fun and easy. We covered tasty ingredients, from fresh veggies to zesty marinades. You learned step-by-step methods for marinating and grilling. I shared tips for the best grilling and how to achieve those perfect marks. Explore variations to suit your taste and consider storage tips for leftovers. Remember, this dish is adaptable. You can create a healthy meal that fits your style. Now, it’s your turn to fire up the grill and enjoy delicious skewers!](https://goldendishy.com/wp-content/uploads/2025/06/ba27ef34-bcc3-4460-8414-05014c8a22e5-768x768.webp)