
Garlic Parmesan Corn on the Cob Tasty Summer Side
. To start, you need to preheat your grill or oven. If you choose to grill, set it to medium-high heat. This will help create a nice char on the corn. If baking sounds better, preheat your oven to 400°F (200°C). Both methods work well, giving you tasty corn. Next, prepare the garlic butter mixture. In a mixing bowl, combine melted unsalted butter, minced garlic, smoked paprika, sea salt, and black pepper. Whisk this mix together until all the ingredients blend well. The aroma will fill your kitchen, making it hard to wait for the corn! Now, it’s time to coat the corn. Take each ear of corn and brush it with your garlic butter mix. Make sure to cover every kernel. This ensures each bite bursts with flavor. For grilling, place the corn on the grill grates. Rotate it every 2-3 minutes until charred and tender, about 10-12 minutes total. If baking, wrap the corn in aluminum foil and bake for 20-25 minutes, turning halfway. After cooking, sprinkle grated Parmesan cheese on top while it’s still hot. Optionally, drizzle with fresh lemon juice for added flavor. Finally, garnish your corn with chopped parsley for a bright finish. Enjoy your Garlic Parmesan Corn on the Cob! For a complete guide, check out the Full Recipe. Grilling corn on the cob can be fun and easy. First, soak the husked corn in water for 15 minutes before grilling. This helps keep the corn moist. When you're ready, heat your grill to medium-high. Place the corn directly on the grates. Rotate the corn every 2-3 minutes. This gives it even cooking and a nice char. In about 10-12 minutes, the corn will be bright and tender. For the best garlic flavor, use fresh garlic. Mince the cloves finely to release the oils. Mix it well with the melted butter before brushing it on the corn. If you want a stronger taste, let the garlic sit in the butter for a bit. This helps the flavors blend. You can also add a touch of garlic powder if you like more depth. If you prefer a bit of heat, add a pinch of cayenne pepper to your garlic butter. For those who enjoy a milder taste, skip the pepper entirely. You can also adjust the smoked paprika amount. Start with less, then taste as you go. Everyone has different spice levels, so make it your own. Remember, you can always add more spice, but you can’t take it out! For the full recipe, check out the Garlic Parmesan Corn on the Cob section. {{image_4}} To change up the flavor, you can add more spices. Try adding chili powder for heat. You can also mix in some Italian herbs, like oregano or basil. They give a fresh lift. If you love herbs, fresh cilantro is a great choice. Just chop it fine and add it to your garlic butter mix. This will make your corn taste even better! Parmesan is great, but other cheeses can work too. For a creamier taste, use feta cheese. It adds a nice tang. If you want something sharper, try aged cheddar. It gives a bold kick. You can even use vegan cheese if you prefer. Just make sure it melts well. Each cheese choice will give your corn a unique twist. Serving corn on the cob can be fun and playful. Try cutting the corn into smaller pieces for easy sharing. You can also serve it on skewers for a fun touch. Drizzle it with a spicy sauce for extra flavor. If you want a fancy look, sprinkle some microgreens on top. They add color and freshness. For the full recipe, check out the detailed steps to make this dish shine! After enjoying your Garlic Parmesan Corn on the Cob, you may have some left. It’s best to store it in an airtight container. Let the corn cool to room temperature first. Wrap each ear in plastic wrap or foil for extra protection. This keeps it fresh and tasty for later. Store the container in the fridge. It can last about 3 to 4 days. When you’re ready to enjoy the leftover corn, reheating it is simple. You can use the microwave, grill, or oven. For the microwave, place the corn on a plate and cover it with a damp paper towel. Heat in short bursts of 30 seconds. Check to see if it’s warm. If using the grill, wrap the corn in foil to avoid drying out. Heat for about 5 to 7 minutes. For the oven, preheat to 350°F (175°C) and bake wrapped corn for 10 to 15 minutes. Freezing is a great option if you want to save the corn for a long time. Husk the corn and cut the kernels off the cob if you prefer. Place the kernels in a freezer bag, removing as much air as possible. Label the bag with the date. You can also freeze whole cobs. Wrap each cob in plastic wrap and place it in a freezer bag. The corn can last up to 6 months in the freezer. When you’re ready to use it, thaw in the fridge overnight before reheating. You can pair Garlic Parmesan Corn on the Cob with many easy side dishes. Some great options include: - Grilled chicken or fish - Fresh salad with vinaigrette - Coleslaw for crunch - Roasted potatoes for heartiness - Tomato and mozzarella salad for freshness These sides complement the sweet, buttery flavor of the corn. They also create a colorful plate. Yes, you can make Garlic Parmesan Corn on the Cob in the oven. Preheat your oven to 400°F (200°C). Wrap the corn tightly in aluminum foil to keep it moist. Bake for 20-25 minutes. Turn the foil halfway through cooking. This method gives you tender corn, full of flavor. To prevent the corn from sticking to the grill, follow these tips: - Preheat the grill to medium-high heat. - Brush the grill grates with oil before placing the corn. - Make sure to coat the corn with the garlic butter mixture. This keeps it moist and adds flavor. - Rotate the corn every few minutes to avoid sticking. These steps help you achieve perfectly grilled corn every time. Enjoy your cooking! Making Garlic Parmesan Corn on the Cob is simple and fun. We covered the best ingredients, tools, and methods. Preheating is key, and the garlic butter really adds flavor. You learned grilling tips and how to customize with herbs or spices. Don't forget about storage and reheating for later. Enjoy your delicious corn, and share it with friends. Each bite can bring smiles, making it worth the effort. Now, get cooking!](https://goldendishy.com/wp-content/uploads/2025/07/bd43f489-c25e-441e-8123-0082a4d55c21.webp)
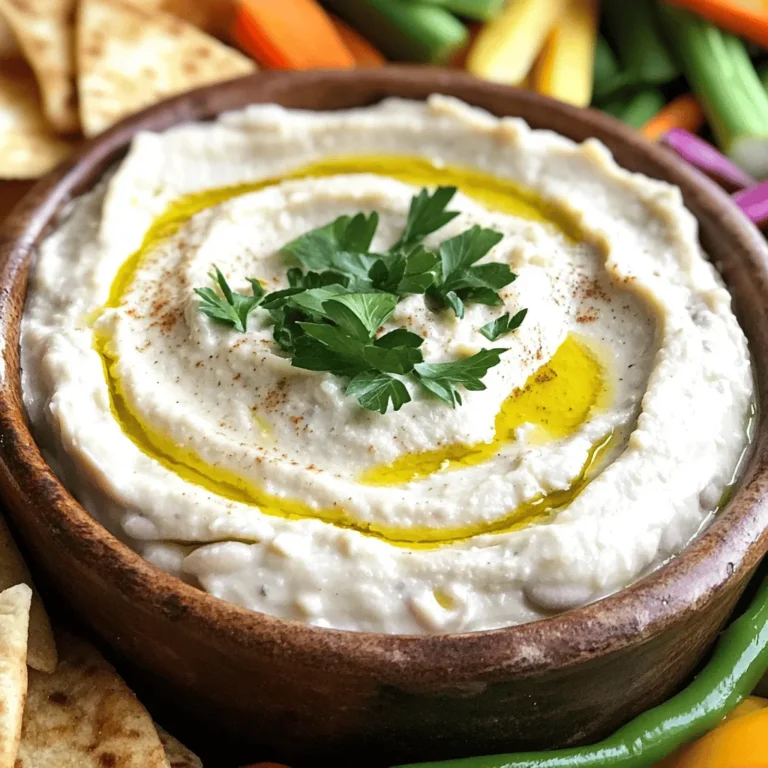
Looking for a fresh summer side that packs flavor? You’ve come to the right place! Garlic Parmesan Corn on the Cob is your answer for a crowd-pleaser at any cookout or family meal. In this post, I’ll share easy tips for picking the best corn, step-by-step instructions for cooking, and creative ways to enhance this tasty dish. Get ready to impress everyone at your next BBQ!
Ingredients
List of Ingredients
To make Garlic Parmesan Corn on the Cob, gather these simple items:
– 4 ears of fresh corn, husked
– 4 tablespoons unsalted butter, melted
– 3 cloves garlic, finely minced
– ½ cup freshly grated Parmesan cheese
– 1 teaspoon smoked paprika
– ½ teaspoon sea salt
– ¼ teaspoon freshly ground black pepper
– Fresh parsley, finely chopped for garnish
– 1 tablespoon fresh lemon juice (optional)
Special Tips for Selecting Corn
Choose corn that feels firm and heavy. The husks should be bright green and tight. Look for silk that is golden and moist. Fresh corn has a sweet scent. Avoid corn with dry or brown husks. Sweet corn is best for this recipe.
Recommended Tools and Equipment
You will need a few tools to make this dish:
– Grill or oven
– Mixing bowl
– Whisk
– Brush for applying butter
– Aluminum foil (if baking)
– Serving platter for presentation
These tools will make the cooking process easy and fun. For the best results, ensure your grill is clean and heated properly. The right tools help you create a dish that shines at any summer gathering.
Step-by-Step Instructions
Preheat Methods for Grilling or Baking
To start, you need to preheat your grill or oven. If you choose to grill, set it to medium-high heat. This will help create a nice char on the corn. If baking sounds better, preheat your oven to 400°F (200°C). Both methods work well, giving you tasty corn.
Preparing the Garlic Butter Mixture
Next, prepare the garlic butter mixture. In a mixing bowl, combine melted unsalted butter, minced garlic, smoked paprika, sea salt, and black pepper. Whisk this mix together until all the ingredients blend well. The aroma will fill your kitchen, making it hard to wait for the corn!
Coating the Corn with Flavor
Now, it’s time to coat the corn. Take each ear of corn and brush it with your garlic butter mix. Make sure to cover every kernel. This ensures each bite bursts with flavor. For grilling, place the corn on the grill grates. Rotate it every 2-3 minutes until charred and tender, about 10-12 minutes total. If baking, wrap the corn in aluminum foil and bake for 20-25 minutes, turning halfway. After cooking, sprinkle grated Parmesan cheese on top while it’s still hot. Optionally, drizzle with fresh lemon juice for added flavor. Finally, garnish your corn with chopped parsley for a bright finish. Enjoy your Garlic Parmesan Corn on the Cob!
Tips & Tricks
Best Grilling Techniques for Corn on the Cob
Grilling corn on the cob can be fun and easy. First, soak the husked corn in water for 15 minutes before grilling. This helps keep the corn moist. When you’re ready, heat your grill to medium-high. Place the corn directly on the grates. Rotate the corn every 2-3 minutes. This gives it even cooking and a nice char. In about 10-12 minutes, the corn will be bright and tender.
Enhancing the Garlic Flavor
For the best garlic flavor, use fresh garlic. Mince the cloves finely to release the oils. Mix it well with the melted butter before brushing it on the corn. If you want a stronger taste, let the garlic sit in the butter for a bit. This helps the flavors blend. You can also add a touch of garlic powder if you like more depth.
Adjusting Spice Levels to Taste
If you prefer a bit of heat, add a pinch of cayenne pepper to your garlic butter. For those who enjoy a milder taste, skip the pepper entirely. You can also adjust the smoked paprika amount. Start with less, then taste as you go. Everyone has different spice levels, so make it your own. Remember, you can always add more spice, but you can’t take it out!

Variations
Adding Spices or Herbs
To change up the flavor, you can add more spices. Try adding chili powder for heat. You can also mix in some Italian herbs, like oregano or basil. They give a fresh lift. If you love herbs, fresh cilantro is a great choice. Just chop it fine and add it to your garlic butter mix. This will make your corn taste even better!
Unique Cheese Alternatives
Parmesan is great, but other cheeses can work too. For a creamier taste, use feta cheese. It adds a nice tang. If you want something sharper, try aged cheddar. It gives a bold kick. You can even use vegan cheese if you prefer. Just make sure it melts well. Each cheese choice will give your corn a unique twist.
Creative Serving Suggestions
Serving corn on the cob can be fun and playful. Try cutting the corn into smaller pieces for easy sharing. You can also serve it on skewers for a fun touch. Drizzle it with a spicy sauce for extra flavor. If you want a fancy look, sprinkle some microgreens on top. They add color and freshness.
Storage Info
How to Store Leftover Corn
After enjoying your Garlic Parmesan Corn on the Cob, you may have some left. It’s best to store it in an airtight container. Let the corn cool to room temperature first. Wrap each ear in plastic wrap or foil for extra protection. This keeps it fresh and tasty for later. Store the container in the fridge. It can last about 3 to 4 days.
Reheating Tips
When you’re ready to enjoy the leftover corn, reheating it is simple. You can use the microwave, grill, or oven. For the microwave, place the corn on a plate and cover it with a damp paper towel. Heat in short bursts of 30 seconds. Check to see if it’s warm. If using the grill, wrap the corn in foil to avoid drying out. Heat for about 5 to 7 minutes. For the oven, preheat to 350°F (175°C) and bake wrapped corn for 10 to 15 minutes.
Freezing for Later Use
Freezing is a great option if you want to save the corn for a long time. Husk the corn and cut the kernels off the cob if you prefer. Place the kernels in a freezer bag, removing as much air as possible. Label the bag with the date. You can also freeze whole cobs. Wrap each cob in plastic wrap and place it in a freezer bag. The corn can last up to 6 months in the freezer. When you’re ready to use it, thaw in the fridge overnight before reheating.
FAQs
What are some easy side dishes to serve with Garlic Parmesan Corn on the Cob?
You can pair Garlic Parmesan Corn on the Cob with many easy side dishes. Some great options include:
– Grilled chicken or fish
– Fresh salad with vinaigrette
– Coleslaw for crunch
– Roasted potatoes for heartiness
– Tomato and mozzarella salad for freshness
These sides complement the sweet, buttery flavor of the corn. They also create a colorful plate.
Can I make Garlic Parmesan Corn on the Cob in the oven?
Yes, you can make Garlic Parmesan Corn on the Cob in the oven. Preheat your oven to 400°F (200°C). Wrap the corn tightly in aluminum foil to keep it moist. Bake for 20-25 minutes. Turn the foil halfway through cooking. This method gives you tender corn, full of flavor.
How do I prevent the corn from sticking to the grill?
To prevent the corn from sticking to the grill, follow these tips:
– Preheat the grill to medium-high heat.
– Brush the grill grates with oil before placing the corn.
– Make sure to coat the corn with the garlic butter mixture. This keeps it moist and adds flavor.
– Rotate the corn every few minutes to avoid sticking.
These steps help you achieve perfectly grilled corn every time. Enjoy your cooking!
Making Garlic Parmesan Corn on the Cob is simple and fun. We covered the best ingredients, tools, and methods. Preheating is key, and the garlic butter really adds flavor. You learned grilling tips and how to customize with herbs or spices. Don’t forget about storage and reheating for later.
Enjoy your delicious corn, and share it with friends. Each bite can bring smiles, making it worth the effort. Now, get cooking!
. To start, you need to preheat your grill or oven. If you choose to grill, set it to medium-high heat. This will help create a nice char on the corn. If baking sounds better, preheat your oven to 400°F (200°C). Both methods work well, giving you tasty corn. Next, prepare the garlic butter mixture. In a mixing bowl, combine melted unsalted butter, minced garlic, smoked paprika, sea salt, and black pepper. Whisk this mix together until all the ingredients blend well. The aroma will fill your kitchen, making it hard to wait for the corn! Now, it’s time to coat the corn. Take each ear of corn and brush it with your garlic butter mix. Make sure to cover every kernel. This ensures each bite bursts with flavor. For grilling, place the corn on the grill grates. Rotate it every 2-3 minutes until charred and tender, about 10-12 minutes total. If baking, wrap the corn in aluminum foil and bake for 20-25 minutes, turning halfway. After cooking, sprinkle grated Parmesan cheese on top while it’s still hot. Optionally, drizzle with fresh lemon juice for added flavor. Finally, garnish your corn with chopped parsley for a bright finish. Enjoy your Garlic Parmesan Corn on the Cob! For a complete guide, check out the Full Recipe. Grilling corn on the cob can be fun and easy. First, soak the husked corn in water for 15 minutes before grilling. This helps keep the corn moist. When you're ready, heat your grill to medium-high. Place the corn directly on the grates. Rotate the corn every 2-3 minutes. This gives it even cooking and a nice char. In about 10-12 minutes, the corn will be bright and tender. For the best garlic flavor, use fresh garlic. Mince the cloves finely to release the oils. Mix it well with the melted butter before brushing it on the corn. If you want a stronger taste, let the garlic sit in the butter for a bit. This helps the flavors blend. You can also add a touch of garlic powder if you like more depth. If you prefer a bit of heat, add a pinch of cayenne pepper to your garlic butter. For those who enjoy a milder taste, skip the pepper entirely. You can also adjust the smoked paprika amount. Start with less, then taste as you go. Everyone has different spice levels, so make it your own. Remember, you can always add more spice, but you can’t take it out! For the full recipe, check out the Garlic Parmesan Corn on the Cob section. {{image_4}} To change up the flavor, you can add more spices. Try adding chili powder for heat. You can also mix in some Italian herbs, like oregano or basil. They give a fresh lift. If you love herbs, fresh cilantro is a great choice. Just chop it fine and add it to your garlic butter mix. This will make your corn taste even better! Parmesan is great, but other cheeses can work too. For a creamier taste, use feta cheese. It adds a nice tang. If you want something sharper, try aged cheddar. It gives a bold kick. You can even use vegan cheese if you prefer. Just make sure it melts well. Each cheese choice will give your corn a unique twist. Serving corn on the cob can be fun and playful. Try cutting the corn into smaller pieces for easy sharing. You can also serve it on skewers for a fun touch. Drizzle it with a spicy sauce for extra flavor. If you want a fancy look, sprinkle some microgreens on top. They add color and freshness. For the full recipe, check out the detailed steps to make this dish shine! After enjoying your Garlic Parmesan Corn on the Cob, you may have some left. It’s best to store it in an airtight container. Let the corn cool to room temperature first. Wrap each ear in plastic wrap or foil for extra protection. This keeps it fresh and tasty for later. Store the container in the fridge. It can last about 3 to 4 days. When you’re ready to enjoy the leftover corn, reheating it is simple. You can use the microwave, grill, or oven. For the microwave, place the corn on a plate and cover it with a damp paper towel. Heat in short bursts of 30 seconds. Check to see if it’s warm. If using the grill, wrap the corn in foil to avoid drying out. Heat for about 5 to 7 minutes. For the oven, preheat to 350°F (175°C) and bake wrapped corn for 10 to 15 minutes. Freezing is a great option if you want to save the corn for a long time. Husk the corn and cut the kernels off the cob if you prefer. Place the kernels in a freezer bag, removing as much air as possible. Label the bag with the date. You can also freeze whole cobs. Wrap each cob in plastic wrap and place it in a freezer bag. The corn can last up to 6 months in the freezer. When you’re ready to use it, thaw in the fridge overnight before reheating. You can pair Garlic Parmesan Corn on the Cob with many easy side dishes. Some great options include: - Grilled chicken or fish - Fresh salad with vinaigrette - Coleslaw for crunch - Roasted potatoes for heartiness - Tomato and mozzarella salad for freshness These sides complement the sweet, buttery flavor of the corn. They also create a colorful plate. Yes, you can make Garlic Parmesan Corn on the Cob in the oven. Preheat your oven to 400°F (200°C). Wrap the corn tightly in aluminum foil to keep it moist. Bake for 20-25 minutes. Turn the foil halfway through cooking. This method gives you tender corn, full of flavor. To prevent the corn from sticking to the grill, follow these tips: - Preheat the grill to medium-high heat. - Brush the grill grates with oil before placing the corn. - Make sure to coat the corn with the garlic butter mixture. This keeps it moist and adds flavor. - Rotate the corn every few minutes to avoid sticking. These steps help you achieve perfectly grilled corn every time. Enjoy your cooking! Making Garlic Parmesan Corn on the Cob is simple and fun. We covered the best ingredients, tools, and methods. Preheating is key, and the garlic butter really adds flavor. You learned grilling tips and how to customize with herbs or spices. Don't forget about storage and reheating for later. Enjoy your delicious corn, and share it with friends. Each bite can bring smiles, making it worth the effort. Now, get cooking!](https://goldendishy.com/wp-content/uploads/2025/07/bd43f489-c25e-441e-8123-0082a4d55c21-300x300.webp)
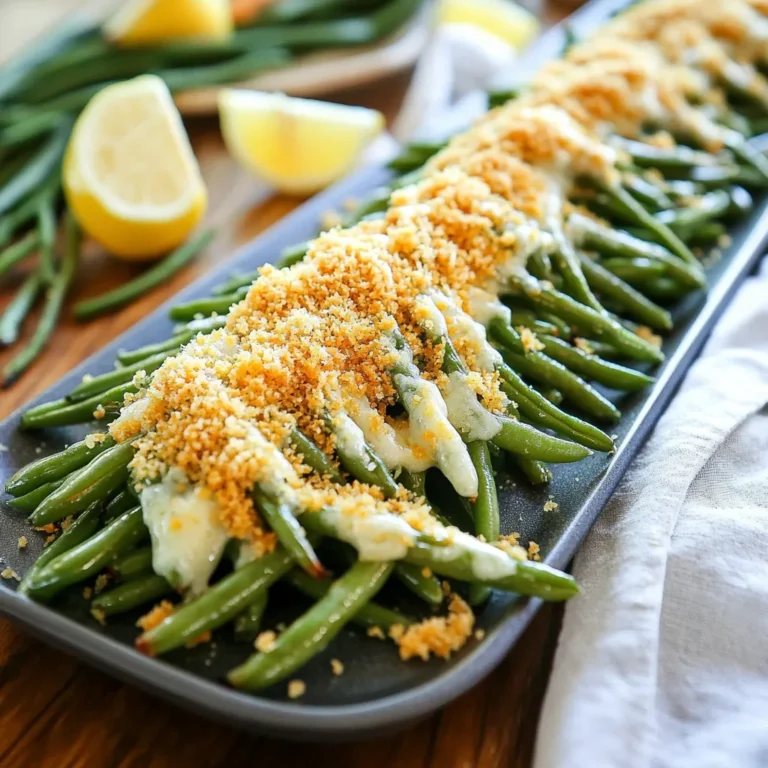
![Fresh corn is the star of this salad. Use about 3 cups of corn kernels, which equals around 4 ears of corn. To get the best flavor, choose corn that is sweet and crisp. You can also use frozen corn, but fresh offers a better taste and texture. This salad needs vibrant veggies for color and crunch: - 1 cup cherry tomatoes, halved - 1 red bell pepper, diced - 1/2 red onion, finely chopped - 1 jalapeño pepper, minced (remove seeds for less heat) - 1/4 cup fresh cilantro, chopped These veggies add freshness and a mix of flavors. The tomatoes bring sweetness, while the jalapeño offers a nice kick. The dressing ties everything together. Here’s what you need: - 1/4 cup freshly squeezed lime juice (about 2 limes) - 2 tablespoons extra virgin olive oil - 1 teaspoon ground cumin - Salt and black pepper to taste This zesty dressing balances the sweet corn and veggies. The lime juice adds brightness, while cumin gives depth. Check out the [Full Recipe] for detailed instructions on making this delicious Zesty Corn Salad! To start, you need fresh corn. If you have fresh corn, fill a large pot with water. Bring it to a rolling boil. Once it boils, add the corn cobs and blanch them for about 3 minutes. After that, take them out and let them cool. When cool, cut the kernels off the cobs with a sharp knife. If you want to use frozen corn, just thaw it and drain any extra liquid. In a big mixing bowl, combine the corn kernels with cherry tomatoes, red bell pepper, and red onion. Make sure to mix them well. This way, you spread the flavors evenly throughout the salad. Take a small mixing bowl to prepare the dressing. Whisk together freshly squeezed lime juice, olive oil, ground cumin, and some salt and black pepper. Mix until all the ingredients blend together well. This zesty dressing will bring everything to life. Now, drizzle the dressing over your mixed vegetables. Gently toss everything together so that all the ingredients get coated in the dressing. This step is key for flavor. Taste the salad and adjust the seasoning if needed. If you want more zing, add more lime juice or salt. For the best flavor, let the salad sit for at least 15 minutes before serving. This wait helps the flavors mix well. You can find the full recipe for Zesty Corn Salad with a Kick! to guide you through the steps. To enhance the taste of your zesty corn salad, let it rest. After mixing, cover it and chill for at least 15 minutes. This time allows the flavors to blend. The lime juice and spices soak into the corn and veggies. You will notice a big difference in taste. If you have more time, letting it sit for an hour is even better. You can swap some ingredients based on your taste. Don’t have fresh corn? Use canned or frozen corn instead. If you want a milder flavor, skip the jalapeño or use a bell pepper. You can also replace cilantro with parsley or green onions if you prefer. For a tangy twist, try lemon juice instead of lime juice. Get creative with what you have on hand! A good-looking salad makes it more fun to eat. Serve your corn salad in a bright bowl. Top it with extra cilantro leaves for color. Add lime wedges on the side for a fresh touch. For a fun idea, layer the salad in mason jars. This not only looks nice but makes serving easy. Plus, it’s perfect for picnics or gatherings. Check out the Full Recipe for more ideas to impress your guests! {{image_4}} You can add protein to your zesty corn salad for more flavor and nutrition. Grilled chicken or shrimp works great. You can also use black beans for a plant-based option. Just rinse and drain a can of beans. Mix them in with the veggies for a hearty meal. Feel free to play with the veggies. You can use cucumbers for a cool crunch. Avocado adds creaminess and healthy fats. Try adding radishes for a peppery bite, or corn peppers for more heat. Any colorful veggie will brighten your dish and add taste. Switch up the dressing to keep things fresh. Try adding honey for sweetness or garlic for a kick. A splash of balsamic vinegar can bring a lovely tang. If you're feeling adventurous, mix in some salsa or a dash of hot sauce for extra zest. Explore the full recipe for more ideas! You can store Zesty Corn Salad in the fridge. Place it in an airtight container. This keeps the flavors fresh and vibrant. Make sure to eat it within three to five days. If you notice any changes in smell or color, it’s best to toss it out. You can freeze this salad, but it’s not ideal. Freezing changes the texture of the corn and veggies. If you want to freeze it, pack it tightly in a freezer-safe container. It can last up to three months. When you’re ready to eat it, thaw it in the fridge overnight. Reheating is not recommended for Zesty Corn Salad. It’s best enjoyed cold or at room temperature. If you must warm it, do so gently in a pan over low heat. Avoid overheating to keep the veggies crisp and fresh. For a quick fix, serve it on top of warm grains or proteins for a tasty twist. Yes, you can use frozen corn in this recipe. Just thaw the corn and drain any extra liquid. Frozen corn saves time, and it still tastes great. It’s a good option if fresh corn is not available. Try it out for a quick fix! The Zesty Corn Salad can last about 3 to 5 days in the fridge. Make sure to store it in an airtight container. If the salad starts to look watery, give it a quick stir. It’s best to eat it fresh, but leftovers make a tasty snack. This salad pairs well with many dishes. You can serve it with grilled meats, tacos, or fish. It also makes a great side for barbecues or picnics. Try it alongside some tortilla chips for a fun twist! Yes, Zesty Corn Salad is gluten-free! All the ingredients are naturally free of gluten. You can enjoy it safely if you have gluten intolerance. This salad is a light and tasty choice for everyone. This blog post covered the key ingredients, steps, tips, and variations for Zesty Corn Salad. You can use fresh corn, mix in your favorite vegetables, and create a tasty dressing. Remember to store it properly for the best flavor. Feel free to experiment with ingredients to suit your taste. Whether you add protein or unique dressings, enjoy this salad your way. Make it a staple for meals or gatherings. Embrace the freshness and flavor of this salad, and get creative!](https://goldendishy.com/wp-content/uploads/2025/06/9c485b94-0626-453a-9168-3540dee7db81-768x768.webp)

![For the best peach avocado salsa, gather these fresh ingredients: - 2 ripe peaches, diced - 2 ripe avocados, peeled and diced - 1/2 medium red onion, finely chopped - 1 small jalapeño pepper, minced - 1/4 cup fresh cilantro leaves - Juice from 2 fresh limes - 1 tablespoon honey (optional) - Salt and freshly cracked black pepper Each ingredient brings its own flavor. Ripe peaches add sweetness, while avocados give creaminess. Red onion adds a sharp bite, and jalapeño provides heat. Cilantro brightens everything up, and lime juice gives freshness. Honey is optional, but it can enhance the sweetness if desired. This mix creates a vibrant salsa perfect for any occasion. When selecting your peaches, choose ones that yield slightly to pressure. They should be fragrant and free from bruises. For avocados, look for ones that are dark and firm but not rock hard. Freshness in these ingredients is key to a tasty dip. You can find the full recipe at the end of this section. Enjoy making this salsa! To make this peach avocado salsa, follow these simple steps. Each step brings you closer to a fresh and tasty dip. - Combine diced peaches and avocados Start by adding the diced peaches and avocados to a medium bowl. Use a spatula to mix them gently. Be careful not to mash the avocados. You want nice chunks for the perfect texture. - Add red onion and jalapeño Next, sprinkle in the finely chopped red onion and minced jalapeño. Mix them in lightly. This adds crunch and a little heat to the salsa. - Fold in cilantro gently Now, add the freshly chopped cilantro. Fold it into the mixture carefully. This keeps the avocados and peaches intact while adding a fresh flavor. - Squeeze lime juice and add honey Squeeze the juice from the limes over the salsa. This brightens the flavors. If you'd like a touch of sweetness, drizzle in the honey. Mix gently to coat everything evenly. - Season with salt and pepper Taste your salsa and season with salt and freshly cracked black pepper. Adjust according to your preference. Toss everything gently to combine the seasonings. - Let sit for flavor development For the best taste, let your salsa sit at room temperature for about 10 minutes. This allows the flavors to blend well together. If you want to see the full recipe, check out the [Full Recipe]. Enjoy making this vibrant, fresh dip! Choosing ripe peaches and avocados is key to a great salsa. Look for peaches that yield slightly to pressure. They should smell sweet and juicy. For avocados, pick ones that feel soft but not mushy. This ensures a creamy texture in your dip. Adjusting heat levels with jalapeño is easy. For less heat, remove the seeds and inner ribs. This part holds most of the spice. If you like it spicy, leave some seeds in. Start with a small amount and add more as needed. Enhancing sweetness with honey can balance the flavors. If your peaches aren't as sweet as you'd like, a tablespoon of honey works wonders. Mix it in gently so you don’t mash the fruit. This extra touch can make your salsa shine. Best pairings for your salsa include chips, grilled chicken, or fish. Tortilla chips add a nice crunch. For a healthy twist, serve it with grilled chicken or fish. The mild flavors of the salsa complement these dishes well. Presentation tips can help impress your guests. Serve the salsa in a rustic bowl. Top it with extra cilantro leaves for a fresh look. A colorful spread makes your table inviting and fun. You can even add lime wedges on the side for a pop of color. For the full recipe, check out the Peach Avocado Salsa section above. {{image_4}} You can get creative with your salsa by switching up ingredients. - Using mango instead of peaches: Mango adds a sweet twist. It gives a tropical flair to your salsa. Simply replace diced peaches with diced mango in equal amounts. - Adding diced bell peppers for crunch: For extra texture, you can add bell peppers. Diced red, yellow, or green peppers work well. They will add a nice crunch and color to your dish. - Incorporating garlic for additional flavor: If you love garlic, try adding a clove of minced garlic. It enhances the flavor profile and gives your salsa a savory kick. Making simple changes can fit different diets. - Making it vegan-friendly: This salsa is already vegan! Use natural sweeteners like agave instead of honey for a completely plant-based option. - Gluten-free serving options: All ingredients are gluten-free. Serve with gluten-free tortilla chips or fresh veggies. This makes it a great snack for everyone. For more details on making this delicious dip, check out the Full Recipe. To keep your peach avocado salsa fresh, place it in an airtight container. This helps prevent air exposure. It is best to refrigerate it right away. The cool temperature slows down spoilage. You can store it in the fridge for 2 to 3 days. After that, the avocados may brown and change in texture. If you notice browning, you can mix in a bit of lime juice to refresh it. Freezing salsa can be a great way to save extra. To freeze it effectively, put the salsa in a freezer-safe bag. Make sure to remove as much air as possible. This helps prevent freezer burn. You can freeze it for up to 3 months. When you want to use it, take it out and thaw in the fridge overnight. Once thawed, the texture may change slightly. It's still safe to eat and can be used in cooked dishes, like tacos or soups. For the best taste, try to use thawed salsa within a week. Peach avocado salsa shines with many dishes. It pairs wonderfully with tortilla chips, making it a great snack. You can also use it to top grilled chicken or fish for a fresh twist. It adds a burst of flavor to tacos or quesadillas too. This salsa can elevate any summer barbecue or picnic, making your meal feel bright and fun. Homemade peach avocado salsa stays fresh in the fridge for about three days. Store it in an airtight container to keep it from browning. After this time, the flavors may fade, and the texture can change. Always check for any off smells before eating. If it looks or smells funny, it’s best to toss it. Yes, you can easily adjust the spice in your salsa. If you want it milder, remove the seeds from the jalapeño. You can also skip the jalapeño entirely for a sweet salsa. For more heat, add extra minced jalapeño or even some crushed red pepper. Taste as you go to find your perfect balance. Making Peach Avocado Salsa is simple and fun. We covered fresh ingredients, step-by-step prep, and useful tips. Plus, we explored tasty variations and smart storage options. This salsa enhances any dish, from chips to seafood. Remember, you can change ingredients to match your taste. Enjoy sharing this bright, flavorful mix at your next meal. With a few tweaks, your salsa can shine every time.](https://goldendishy.com/wp-content/uploads/2025/06/096320e8-25bc-4efd-9183-2f1d952cbb9e-768x768.webp)