
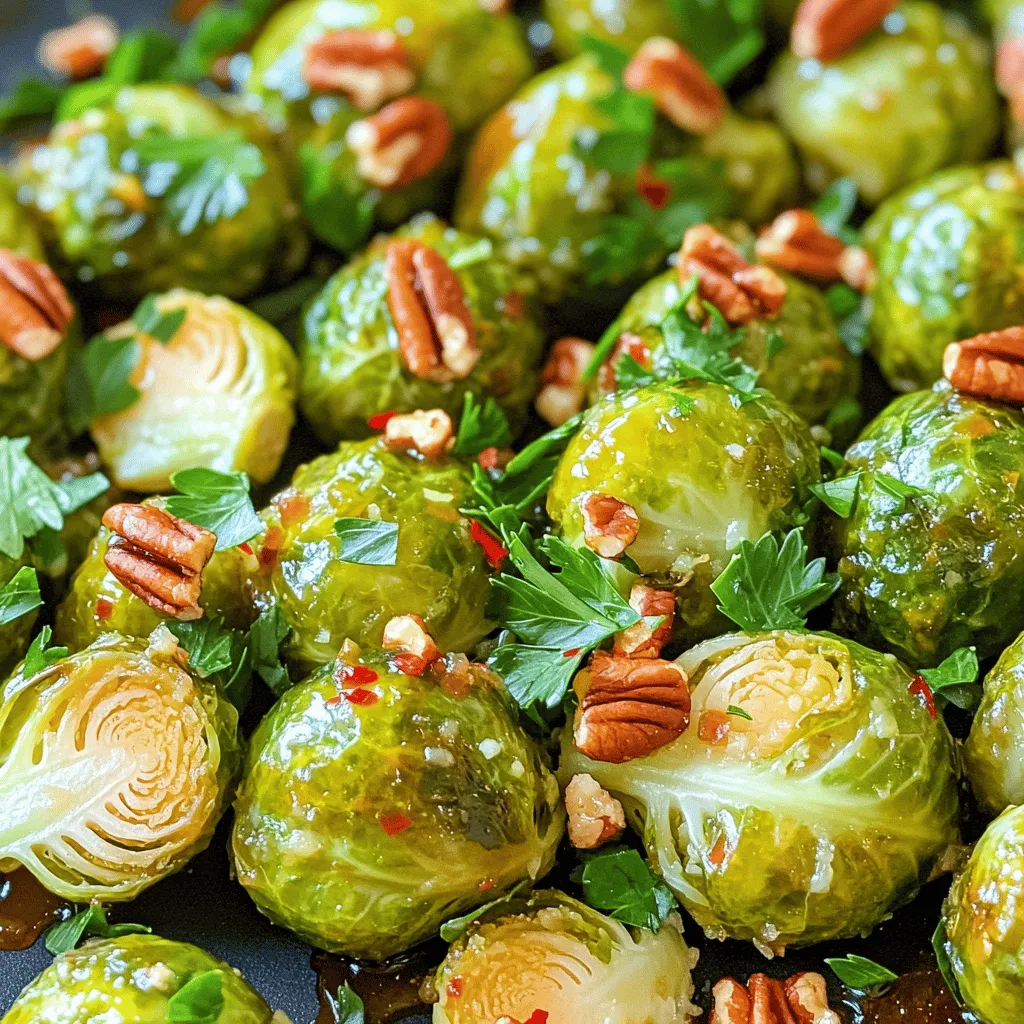
Maple Dijon Roasted Brussels Flavorful and Simple Dish

If you crave a dish that balances sweet and savory, you’re in for a treat! My Maple Dijon Roasted Brussels are easy to make and packed with flavor. In this guide, I’ll walk you through each step, from selecting the right ingredients to achieving that perfect roast. Say goodbye to boring veggies and hello to a side that everyone will love. Let’s dive into this simple yet delicious recipe!You will enjoy the mix of sweet maple syrup and sharp Dijon mustard. It gives the Brussels sprouts a unique flavor that makes them shine.
Essential Ingredients List
To make this dish, you need the following:
– 1.5 pounds Brussels sprouts, cleaned, trimmed, and halved
– 3 tablespoons extra virgin olive oil
– 2 tablespoons pure maple syrup
– 1 tablespoon Dijon mustard
– 2 cloves garlic, finely minced
– Salt and freshly cracked black pepper, to taste
– ¼ teaspoon red pepper flakes (optional, for a spicy kick)
– ¼ cup chopped pecans (optional, for a delightful crunch)
– Fresh parsley, chopped (for vibrant garnish)
These ingredients come together for a flavorful and exciting dish.
Optional Add-ins for Extra Flavor
You can add a few things to boost the taste. Consider using:
– Lemon zest for brightness
– Balsamic vinegar for tang
– Parmesan cheese for richness
These optional items allow you to customize the dish to your liking. They can make your Maple Dijon Roasted Brussels even more special.
Step-by-Step Instructions
Preparation Steps
First, gather your ingredients. You need 1.5 pounds of Brussels sprouts, cleaned and halved. Next, measure out 3 tablespoons of extra virgin olive oil, 2 tablespoons of pure maple syrup, and 1 tablespoon of Dijon mustard. Don’t forget 2 cloves of finely minced garlic and salt and pepper to taste. If you like spice, add ¼ teaspoon of red pepper flakes. Lastly, have ¼ cup of chopped pecans ready for crunch and some fresh parsley for garnish.
Roasting the Brussels Sprouts
Start by preheating your oven to 400°F (200°C). Line a baking sheet with parchment paper. This helps with easy cleanup. In a large bowl, mix the olive oil, maple syrup, Dijon mustard, minced garlic, salt, and black pepper. Whisk until it’s smooth. Toss the halved Brussels sprouts in the bowl. Make sure they are all well-coated in the tasty mix. Spread the sprouts on the lined baking sheet. If you want, sprinkle the pecans on top for added texture. Roast them for 20 to 25 minutes. Remember to stir them halfway through. They should be golden brown and soft when done.
Garnishing and Serving Suggestions
After roasting, take the baking sheet out of the oven. Let the Brussels cool for a few minutes. Just before you serve them, chop some fresh parsley and sprinkle it on top. This adds a nice touch of color and flavor. Maple Dijon Roasted Brussels are great as a side dish. Pair them with your favorite protein or grain. Enjoy the sweet and tangy taste!
Tips & Tricks
How to Achieve Perfectly Roasted Brussels
To get the best Brussels sprouts, start with fresh ones. Look for firm and bright green sprouts. Trim the ends and cut them in half. This helps them cook evenly. Spread them out on the baking sheet. Avoid crowding, as this leads to steaming instead of roasting. Stir them halfway through cooking for a nice, even brown.
Flavor Enhancements
Maple syrup and Dijon mustard create a sweet and tangy mix. You can add more flavors to boost your dish. Try fresh lemon juice for a zesty kick. If you like heat, add more red pepper flakes. Toasted pecans give a nice crunch. Fresh herbs like thyme or rosemary can add depth too.
Equipment Recommendations
Using the right tools makes cooking easier. A sharp knife helps you cut the Brussels sprouts neatly. A large mixing bowl allows you to combine ingredients well. A whisk helps mix the maple-Dijon sauce smoothly. A sturdy baking sheet lined with parchment makes cleanup simple. Remember, each tool plays a role in your dish’s success.
Variations
Different Sweeteners to Use
You can switch up the sweetener in this recipe. Instead of maple syrup, try honey or agave nectar. Both add a sweet touch. If you want a deeper flavor, use brown sugar or coconut sugar. Each option gives a unique taste to the Brussels sprouts.
Alternative Flavor Profiles
Want to change the flavor? Try using balsamic vinegar instead of Dijon mustard. It adds a tangy twist. You could also mix in some soy sauce for a savory kick. If you love spice, add some chili powder or cayenne pepper to the mix. These changes will give your dish a different vibe.
Seasonal Ingredient Swaps
Seasonal ingredients can enhance your dish. In fall, add roasted pumpkin or butternut squash for extra flavor. In winter, toss in some sliced apples or pears for a sweet touch. During spring, try adding fresh herbs like thyme or dill. Each season brings new tastes to explore.
Storage Info
How to Store Leftovers
After you enjoy your Maple Dijon Roasted Brussels sprouts, store any leftovers in an airtight container. Make sure to let them cool down first. Keep the container in the fridge. They will stay fresh for about three to four days. This dish stays tasty, but it’s best to eat it soon.
Reheating Instructions
To reheat your Brussels sprouts, use the oven for the best taste. Preheat your oven to 350°F (175°C). Spread the sprouts on a baking sheet and bake for about 10 minutes. If you like them warm but not soggy, avoid the microwave. It can make them mushy.
Freezing for Later Use
You can freeze these Brussels sprouts if you want to save some for later. First, let them cool completely. Then, place them in a freezer bag or container. Make sure to remove as much air as possible. They can be frozen for up to three months. When you’re ready to eat them, thaw in the fridge overnight before reheating. Enjoy the deliciousness again!
FAQs
Can I use frozen Brussels sprouts?
Yes, you can use frozen Brussels sprouts. Just remember to thaw them first. Pat them dry before cooking. This helps them roast better. Frozen sprouts may take longer to cook. Keep an eye on them as they roast.
What can I serve with Maple Dijon Roasted Brussels?
These Brussels sprouts pair well with many dishes. Try serving them with roasted chicken or grilled salmon. They also go great with quinoa or wild rice. For a fun twist, add them to a fall salad. The sweet and tangy flavor shines next to savory meals.
How do I make this recipe vegan?
Making this recipe vegan is easy! Simply swap honey or maple syrup for agave syrup. Use plant-based oil instead of extra virgin olive oil. This keeps the dish 100% vegan while still tasty.
This article explored the best way to prepare Maple Dijon Roasted Brussels sprouts. We discussed key ingredients, step-by-step instructions, and tips for perfect roasting. You learned about variations, storage methods, and answered common questions.
Roasted Brussels sprouts can uplift any meal with their rich taste. Don’t be afraid to try new flavors and swaps for different meals. Enjoy your cooking!

![- 1 pound boneless, skinless chicken breasts, cut into 1-inch cubes - 1/4 cup fresh basil leaves, finely chopped - Zest from 2 lemons (about 2 tablespoons) - 3 tablespoons freshly squeezed lemon juice The chicken breast serves as a great base. It’s lean, tender, and perfect for grilling. Fresh basil adds a bright, herbal note. The lemon zest and juice provide a refreshing tang that makes this dish stand out. - 2 tablespoons extra virgin olive oil - 2 cloves garlic, finely minced - 1 teaspoon honey (optional, for a touch of sweetness) Olive oil keeps the chicken moist and helps the flavors blend. Garlic adds depth and aroma, while honey can balance the tart lemon if you want a hint of sweetness. - Salt and freshly ground black pepper to taste - Wooden or metal skewers Salt and pepper are essential for enhancing flavors. If you use wooden skewers, soak them in water for 30 minutes. This prevents burning during grilling. For the Full Recipe, check the detailed instructions along with cooking tips. You’ll need these ingredients to create a fantastic summer delight. To start, mix the marinade ingredients in a bowl. Combine: - 1/4 cup fresh basil leaves, finely chopped - Zest from 2 lemons (about 2 tablespoons) - 3 tablespoons freshly squeezed lemon juice - 2 tablespoons extra virgin olive oil - 2 cloves garlic, finely minced - 1 teaspoon honey (optional) - Salt and pepper to taste Whisk these together until they blend well. This step builds flavor. The lemon and basil create a bright, fresh taste that makes the chicken sing. Marination is key for juicy chicken. It helps the meat soak up the marinade's flavors. Once you prepare the marinade, add the cubed chicken to the bowl. Make sure each piece is coated. Cover the bowl tightly with plastic wrap. Let the chicken marinate in the fridge for at least 30 minutes. For best results, aim for 1-2 hours. This allows the chicken to become tender and flavorful. While the chicken marinates, preheat your grill or grill pan over medium-high heat. A hot grill helps create a nice sear on the chicken. Once the chicken is ready, thread the cubes onto skewers. Leave small gaps between pieces for even cooking. Place the skewers on the grill. Cook them for about 10-12 minutes, turning them often. To ensure the chicken is done, use a meat thermometer. The internal temperature should reach 165°F. After grilling, let the skewers rest for a few minutes. This helps keep the chicken moist. For the full recipe, check the section above. Enjoy making your lemon basil chicken skewers! To get juicy chicken, monitor the grill's temperature. Aim for medium-high heat. This helps cook the chicken quickly while keeping it tender. Use a meat thermometer to check the inside. The chicken should reach 165°F. Avoid over-charring by turning the skewers. Rotate them every few minutes for even cooking. If you see dark spots, move the skewers to a cooler part of the grill. This way, the chicken cooks well without burning. You can add more spices and herbs to the marinade. Consider using oregano or thyme for extra zest. A pinch of red pepper flakes can give it a nice kick. Just be careful not to overpower the lemon and basil. For marinating, let the chicken soak for at least 30 minutes. If you have time, marinate it for a few hours. The longer it sits, the more flavor it absorbs. This step makes a big difference in taste. For plating, arrange the skewers on a wooden board or a nice platter. Adding fresh basil leaves and lemon wedges makes it look vibrant. This adds a pop of color and gives a hint of what’s inside. Pair the skewers with side dishes like grilled vegetables or a fresh salad. You can also serve them with rice or quinoa for a filling meal. These sides enhance the overall experience of your lemon basil chicken skewers. Check the Full Recipe for more ideas! {{image_4}} You can change things up with lemon basil chicken skewers. Try adding vegetable skewers. Bell peppers, zucchini, and cherry tomatoes make great choices. They add color and crunch. If you want to swap proteins, shrimp is a tasty option. Shrimp cooks fast and absorbs flavors well. Just marinate them the same way as chicken. Dipping sauces can take your skewers to new heights. A simple garlic aioli pairs well with the fresh flavors. You can also try tzatziki for a cool and creamy contrast. For a spicy kick, sriracha or a sweet chili sauce is perfect. These sauces work with the lemon and basil, enhancing each bite. If you need gluten-free options, check your sauces and marinades. Most of the ingredients are safe, but read labels. For vegan alternatives, use tofu or tempeh instead of chicken. Marinate them just like the chicken for the best taste. You can still enjoy the bright lemon and basil flavors in a plant-based version. For the full recipe, check the [Full Recipe]. Refrigeration Guidelines After cooking, allow the chicken skewers to cool. Place them in an airtight container. Refrigerate within two hours. The chicken can stay fresh for up to four days. Always check for any signs of spoilage before eating. Freezing Tips If you want to keep them longer, freezing is a great option. Wrap the skewers tightly in plastic wrap. Then, place them in a freezer bag. They can last for up to three months in the freezer. When ready to use, thaw them in the fridge overnight before reheating. Best Methods The best way to reheat your skewers is in the oven. Preheat it to 350°F (175°C). Place the skewers on a baking tray for about 10 to 15 minutes. This method helps keep the chicken juicy. You can also reheat them on the grill for a nice char. Maintaining Flavor and Texture To maintain the flavor, add a splash of water or broth while reheating. Cover the skewers with foil to keep moisture in. This prevents the chicken from drying out and keeps it tasty. How Long Can They Last? When stored properly, cooked lemon basil chicken skewers can last for about four days in the fridge. If frozen, they can last up to three months without losing quality. Signs of Spoilage Always check for signs of spoilage. If the chicken smells off or has a slimy texture, it's best to toss it. Color change can also indicate spoilage. Trust your senses; when in doubt, throw it out. If you want to swap chicken, many tasty options exist. You can use: - Turkey breast: It has a mild flavor like chicken. - Tofu: Great for a plant-based option. - Shrimp: Cooks fast and absorbs flavors well. - Pork tenderloin: Offers a different texture and taste. Each of these options works well with the lemon and basil marinade. Adjust cooking times based on the protein you choose. Yes! Preparing the marinade ahead saves time. Here are some tips: - Mix all marinade ingredients in a bowl. - Store it in a sealed container in the fridge for up to 2 days. - When ready, add your chicken and let it soak up those flavors. Make sure to mix well before using. This keeps the flavors fresh and vibrant. To make sure your chicken is safe to eat, use a meat thermometer. Here’s how: - Insert the thermometer into the thickest part of the chicken. - Look for a temperature of 165°F. This means it’s fully cooked. - If you don't have a thermometer, cut a piece open. The meat should be white, not pink. Using a thermometer helps you avoid undercooked chicken, keeping your meal safe and tasty. You now know how to make delicious grilled chicken skewers. Start with fresh chicken, herbs, and a tasty marinade. Marinade time is key for flavor. Grilling tips help you serve juicy chicken every time. You can try different add-ins or sauces for variety. Store leftovers properly to keep them fresh. This recipe is simple yet satisfying, perfect for meals anytime. Enjoy creating your perfect skewers!](https://goldendishy.com/wp-content/uploads/2025/06/c554147d-c949-48f7-8e40-7e32e563b89e-768x768.webp)

![- 2 boneless, skinless chicken breasts - 1 cup buttermilk - 1 cup all-purpose flour - 1 teaspoon baking powder - 1 teaspoon smoked paprika - 1/2 teaspoon garlic powder - 1/2 teaspoon cayenne pepper - Salt and freshly ground black pepper, to taste - 4 ready-made waffles (or homemade) - 2 tablespoons honey - Maple syrup, for drizzling - Fresh parsley, chopped, for garnish In this easy chicken and waffles recipe, you start with two boneless, skinless chicken breasts. Soak them in one cup of buttermilk. This step makes the chicken juicy and tender. Next, prepare the breading mix. You need one cup of all-purpose flour, one teaspoon of baking powder, one teaspoon of smoked paprika, half a teaspoon of garlic powder, and half a teaspoon of cayenne pepper. Don’t forget to add salt and pepper to taste. For the waffles, you can use four ready-made waffles or make your own. To finish, you will need two tablespoons of honey and maple syrup for drizzling. Chop some fresh parsley for garnish. This dish combines sweet and savory flavors, making it a favorite for many. Check out the Full Recipe to see how to put it all together. - Immerse chicken in buttermilk. - Cover and refrigerate. Start by taking two boneless, skinless chicken breasts. Place them in a bowl and pour in one cup of buttermilk. Make sure the chicken is fully coated. Cover the bowl with plastic wrap and set it in the fridge. Let it sit for at least one hour, or overnight for the best flavor. The buttermilk helps tenderize the chicken and adds a nice tang. - Combine flour and spices. - Mix to create a uniform dry mixture. Next, grab a shallow dish. In it, combine one cup of all-purpose flour with one teaspoon of baking powder, one teaspoon of smoked paprika, half a teaspoon of garlic powder, and half a teaspoon of cayenne pepper. Add salt and black pepper to taste. Mix well until everything is even. This blend will give your chicken a delicious crust. - Dredge marinated chicken in flour mixture. - Shake off excess flour. After marinating, take the chicken out of the fridge. Let the extra buttermilk drip off. Now, dredge each piece in the flour mixture. Make sure to coat both sides well. Once coated, shake off any excess flour. This step is key for achieving a crispy texture. - Heat oil in a skillet. - Fry chicken until golden-brown. In a large skillet, heat about half an inch of oil over medium-high heat. Wait until the oil is shimmering. Carefully place the coated chicken breasts into the skillet. Fry each piece for about 5-7 minutes on each side. They should turn a beautiful golden-brown color. Check the internal temperature; it should reach 165°F. Once cooked, transfer the chicken to a plate lined with paper towels to soak up excess oil. - Toast waffles according to instructions. While the chicken fries, it’s time to warm the waffles. You can use ready-made waffles or make your own if you prefer. Just toast them according to the package instructions until they are crispy and heated through. This will balance the hot chicken nicely. - Layer waffle and chicken. - Drizzle with honey and maple syrup. To assemble, take a warm waffle and place it on a serving plate. Top it with a piece of the golden fried chicken. Now, for the fun part! Drizzle honey generously over the chicken. Then, add a touch of maple syrup according to your taste. This sweet and savory combo makes every bite a delight. - Ensure oil is hot before frying. Hot oil makes the chicken crispy. - Don’t overcrowd the skillet. This helps keep the oil hot and even. - Stack chicken slightly off-center. This adds height and looks appealing. - Garnish with parsley and drizzle syrup. It gives color and extra flavor. - Consider brining chicken overnight. This makes it juicier and more flavorful. - Experiment with different spices. Try herbs or blends for new tastes. For a detailed guide, check out the Full Recipe. {{image_4}} You can switch things up with grilled chicken instead of fried. Grilled chicken has a nice smoky flavor. Plus, it's a lighter option. I love using chicken thighs for this dish. They are more juicy and tender than breasts. Thighs also add great flavor to the meal. For the waffles, try adding flavors like cinnamon or vanilla. These will give your dish a fun twist. You can also make mini waffles. They are perfect for a bite-sized treat. Kids love them, and they are easy to share. If you want to change the sweet element, try agave syrup instead of honey. It’s a nice alternative for a sweeter touch. You can also use a fruit compote. Fresh berries or peaches work great and add a fruity burst. These options make your chicken and waffles even more special. For the full recipe, check out the ingredients and steps above! After you savor your chicken and waffles, store any leftovers in an airtight container. This keeps the food fresh and safe. The dish is best consumed within 2 days. If you wait too long, the taste and texture will suffer. You can freeze the cooked chicken and waffles for later. Be sure to store them separately. This way, the waffles do not get soggy. When you are ready to eat, reheat the chicken and waffles in the oven for best results. This helps keep everything crispy and tasty. When it's time to enjoy leftovers, use an oven or air fryer to reheat the chicken. This method preserves the crispy coating. Avoid using a microwave, as it can make the chicken chewy and wet. Keeping the texture nice is key to enjoying your meal again. To make homemade waffles, start with a simple batter. Mix together: - 1 cup all-purpose flour - 1 tablespoon sugar - 1 teaspoon baking powder - 1/2 teaspoon salt - 1 cup milk - 1 large egg - 2 tablespoons melted butter Combine all the dry ingredients in one bowl. In another bowl, whisk the wet ingredients. Mix them together until just combined. Cook in a preheated waffle maker for about 5 minutes until golden brown. You can also use my [Full Recipe] for a quick option with ready-made waffles. Yes! You can explore using turkey or even tofu for a vegetarian option. Turkey breast works well as a leaner choice. For tofu, press it to remove excess moisture, then marinate like the chicken. This adds great flavor and keeps it moist. To get crispy chicken, keep the oil hot. Heat it to about 350°F before frying. This helps form a crust. Don't overcrowd the skillet; fry in batches if needed. Cook until golden brown, about 5-7 minutes per side. Yes, meal prepping is easy! You can marinate the chicken in advance. Also, cook and freeze the chicken separately from the waffles. Store in airtight containers. This meal stays tasty for up to two days in the fridge. You can spice up your chicken with different seasonings. Try adding more cayenne pepper or smoked paprika for heat. Top your waffles with fresh fruit or whipped cream. Maple syrup adds sweetness, but feel free to experiment! For sides, think about fresh fruit or a light salad. Sliced strawberries or mixed berries add a nice touch. A simple green salad can balance the dish’s richness. You can also serve it with sweet potato fries for a fun twist. You learned how to make a tasty chicken and waffles dish. We covered marinating chicken, preparing breading, and frying until golden-brown. You also saw tips for storage and variations. Don't be afraid to try different spices or use grilled chicken. This dish is fun and delicious. Enjoy making it and sharing with friends!](https://goldendishy.com/wp-content/uploads/2025/06/c6fcab88-53c4-4cda-8439-7edbb7c77c72-768x768.webp)