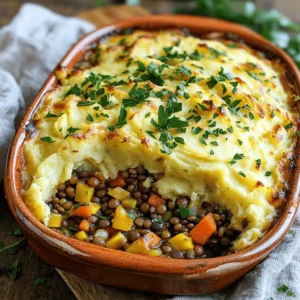
Vegan Lentil Shepherd’s Pie Hearty Comfort Meal

If you’re craving a warm, filling dish that’s both hearty and healthy, look no further. My Vegan Lentil Shepherd’s Pie is the perfect comfort food, packed with flavor and nutrients. In this post, I’ll share easy steps, essential tips, and tasty variations. You’ll learn how to make this dish from scratch, ensuring everyone at your table enjoys a satisfying meal. Ready to dive into this delicious recipe? Let’s get cooking!
Ingredients
Essential Ingredients for Vegan Lentil Shepherd’s Pie
To make a tasty Vegan Lentil Shepherd’s Pie, you need the following key items:
– 1 cup green or brown lentils, thoroughly rinsed
– 2 cups vegetable broth
– 1 medium onion, finely diced
– 2 carrots, finely diced
– 2 celery stalks, finely diced
– 3 cloves garlic, minced
– 1 cup frozen peas
– 1 tablespoon tomato paste
– 1 teaspoon dried thyme
– 1 teaspoon dried rosemary
– 2 tablespoons soy sauce
– 2 tablespoons olive oil
– Salt and pepper to taste
– 4 large potatoes, peeled and cut into cubes
– 1/4 cup coconut milk (or your choice of non-dairy milk)
These ingredients work together to create a warm and hearty meal that feels like a big hug. The lentils give it a nice protein boost, while the vegetables add great flavor and texture.
Optional Ingredients for Added Flavor
You can enhance your Vegan Lentil Shepherd’s Pie with these optional items:
– 2 tablespoons nutritional yeast (for a cheesy flavor)
– Fresh parsley, chopped, for garnish
Adding nutritional yeast gives a savory twist to the mashed potatoes. The parsley not only brightens the dish but also adds a fresh touch. Feel free to mix in any veggies you love, like corn or mushrooms, to make it your own.
Step-by-Step Instructions
Cooking the Lentils
To start, gather your lentils and vegetable broth. Rinse the lentils under cold water. In a medium pot, combine the rinsed lentils with the vegetable broth. Bring this mixture to a boil. Once boiling, lower the heat and let it simmer for about 25 to 30 minutes. You want the lentils to be tender but not mushy. After cooking, drain any extra liquid and set the lentils aside.
Sautéing the Vegetables
Next, take a large skillet and heat the olive oil over medium heat. Add the diced onion, carrots, and celery to the skillet. Sauté these vegetables for about 5 to 7 minutes. You want them to become tender and fragrant. Add the minced garlic and stir for another minute. This step builds a lovely base for your filling.
Combining the Filling Ingredients
Now it’s time to bring everything together. Add the cooked lentils to your skillet. Stir in the tomato paste, dried thyme, dried rosemary, soy sauce, and frozen peas. Season with salt and pepper to taste. Cook this mixture for another 5 minutes. This allows all the flavors to blend nicely.
Preparing the Mashed Potatoes
While your filling cooks, you can prepare the mashed potatoes. Place the cubed potatoes in a large pot of salted water. Boil them for about 15 to 20 minutes. Check that they are tender when pierced with a fork. Drain the potatoes and return them to the pot. Add the coconut milk and any nutritional yeast if you are using it. Mash the potatoes until they are smooth and creamy.
Assembling the Pie
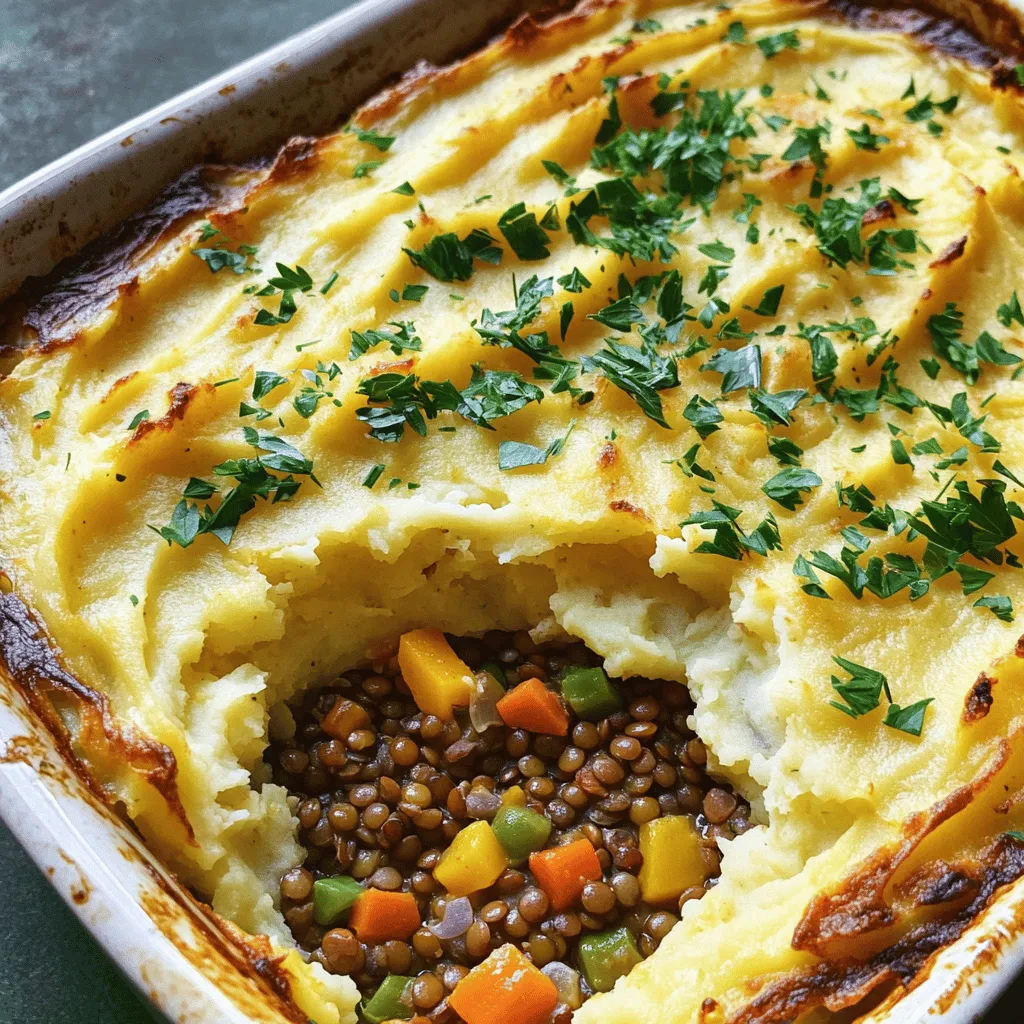
Preheat your oven to 400°F (200°C). Grab a baking dish and spread your hearty lentil and vegetable mixture evenly across the bottom. Use a spatula to spoon the creamy mashed potatoes over the filling. Make sure to cover the entire filling with the potatoes.
Baking the Pie
Now, place your assembled shepherd’s pie in the oven. Bake it for 25 to 30 minutes. You want the top to become golden brown and slightly crispy. This gives a nice texture contrast to the creamy potatoes.
Once it’s done baking, let it cool for a few minutes. You can garnish it with freshly chopped parsley for added color and flavor. Enjoy your Vegan Lentil Shepherd’s Pie!
Tips & Tricks
How to Make the Perfect Mashed Potatoes
To make creamy mashed potatoes, start with the right potatoes. I prefer starchy ones, like Russets or Yukon Golds. Cut them into even cubes for uniform cooking. Boil them in salted water until they are fork-tender. Drain them well to avoid watery mash. Add coconut milk for a creamy texture. For extra flavor, mix in nutritional yeast. Mash until smooth, but don’t over-mix. A few lumps can add character.
Suggestions for Cooking Lentils
Cooking lentils is easy, but timing matters. Use green or brown lentils for this dish. Rinse them well before cooking to remove any dirt. Boil them in vegetable broth for added flavor. Cook until tender, about 25-30 minutes. You want them soft but not mushy. Drain any excess liquid to keep the filling from becoming soggy.
Enhancing Flavors and Textures
To boost flavors, add herbs like thyme and rosemary. Fresh herbs can make a big difference. You can also sauté the garlic slightly longer for a deeper taste. Mix in frozen peas at the end for sweetness and color. Don’t forget to season your lentil mix with salt and pepper. A splash of soy sauce can add a savory punch. For a bit of crunch, top with crispy breadcrumbs or nuts before baking. Enjoy the layers of flavor in every bite.

Variations
Different Protein Options
You can switch up the protein in this dish. Instead of lentils, try black beans or chickpeas. Both add a nice texture and flavor. If you want a meatier feel, use textured vegetable protein (TVP). Just rehydrate it with broth before mixing it in. You’ll still get a hearty meal with these options.
Alternative Vegetable Choices
Feel free to mix in other veggies. Sweet potatoes, mushrooms, or bell peppers work well. You can also use frozen mixed veggies for convenience. Just make sure to sauté them until tender for the best flavor. This way, you can create a unique version every time you cook.
Gluten-Free Modifications
To make this dish gluten-free, replace soy sauce with tamari. You can also use gluten-free breadcrumbs for a crispy top layer. If you prefer a different base, try cauliflower mash instead of potatoes. These small changes can help you enjoy this dish without gluten.
Storage Information
How to Store Leftovers
After you enjoy your Vegan Lentil Shepherd’s Pie, store leftovers in an airtight container. Make sure the pie has cooled down to room temperature. This will help keep the flavors fresh. Place the container in the fridge. It will stay good for up to four days.
Reheating Instructions
To reheat, take out the serving you want. You can use the oven or microwave. If using the oven, preheat it to 350°F (175°C). Place the portion in a baking dish and cover it with foil. Heat for about 20 minutes, or until warm. If using the microwave, heat for 2-3 minutes or until hot. Stir halfway through for even heating.
Freezing for Future Meals
If you want to save the pie for later, you can freeze it. Let it cool down completely before freezing. Wrap the pie tightly with plastic wrap, then cover it with aluminum foil. This method helps prevent freezer burn. It can last up to three months in the freezer. When ready to eat, thaw it in the fridge overnight, then reheat following the steps above.
FAQs
Can I make Vegan Lentil Shepherd’s Pie ahead of time?
Yes, you can make this pie ahead of time. Prepare the filling and mashed potatoes separately. Store them in the fridge for up to two days. When you are ready to eat, assemble and bake the pie. This makes it easy to serve a warm meal without much fuss.
How long does Vegan Lentil Shepherd’s Pie last in the fridge?
Vegan Lentil Shepherd’s Pie lasts about three to five days in the fridge. Store it in an airtight container. Make sure to cool the pie before sealing it. This keeps it fresh and tasty for later meals.
Is this recipe customizable for different dietary needs?
Absolutely! This recipe is very flexible. You can swap lentils for beans if you prefer. Use different vegetables based on what you have on hand. For a gluten-free version, choose gluten-free soy sauce or tamari. You can also skip the coconut milk for a nut-free option.
In this article, we explored how to make Vegan Lentil Shepherd’s Pie. We covered key ingredients, cooking steps, and helpful tips for great results. I shared variations and storage advice to keep your pie fresh.
Try this recipe to delight your taste buds. It’s easy to customize. I hope you enjoy it as much as I do. Cook with confidence and make this dish your own!


. This blog post covered how to make Parmesan Herb Crusted Tilapia. You learned about key ingredients like tilapia, herbs, and panko for a crunchy topping. I shared simple steps for prep, coating, and baking. Tips for flavor and variations help you personalize the dish. Knowing the right storage and reheating methods keeps leftovers tasty. Enjoy creating this dish with fresh herbs and your favorite flavors. Cooking can be fun and rewarding!](https://goldendishy.com/wp-content/uploads/2025/08/d7b754dc-0283-4cf5-9e7a-95472ebc1437-768x768.webp)
![To make a Spicy Chickpea Buddha Bowl, you need the following main ingredients: - 1 can (15 oz) chickpeas, drained and rinsed - 2 tablespoons olive oil - 1 tablespoon smoked paprika - 1 teaspoon ground cumin - 1/2 teaspoon cayenne pepper (adjust for spiciness) - Salt and black pepper, to taste - 1 medium sweet potato, peeled and diced - 1 cup quinoa, rinsed - 2 cups vegetable broth (or water) - 1 cup fresh spinach, roughly chopped - 1/2 cup cherry tomatoes, halved - 1 ripe avocado, sliced - 1/4 cup tahini - 2 tablespoons fresh lemon juice - Fresh cilantro leaves for garnish These ingredients blend well to give you a burst of flavor. The chickpeas add protein, while the sweet potato brings sweetness. Quinoa provides a hearty base, and the veggies add freshness. You can enhance your bowl with these optional toppings: - Feta cheese, crumbled - Pumpkin seeds or sunflower seeds - Fresh herbs like parsley or basil - Sliced radishes for crunch - Hot sauce for extra heat These toppings let you customize each bowl. They add flavor, texture, and nutrition. This Buddha bowl offers great health perks: - Chickpeas are high in protein and fiber. - Sweet potatoes are rich in vitamins A and C. - Quinoa is a complete protein and gluten-free. - Spinach packs iron and antioxidants. - Avocado provides healthy fats for heart health. Together, these ingredients create a balanced meal. You get energy, nutrients, and delicious flavors. For the full recipe, click here: [Full Recipe]. Start by preheating your oven to 400°F (200°C). In a bowl, mix the drained chickpeas with olive oil, smoked paprika, ground cumin, cayenne pepper, salt, and black pepper. Toss until every chickpea gets the spice mix. Spread them out on a baking sheet in a single layer. Roast them for 20-25 minutes. Shake the pan halfway through to make sure they cook evenly. While the chickpeas roast, take a separate baking sheet for the sweet potatoes. Toss the diced sweet potato in olive oil. Season with salt and black pepper. Place the sweet potatoes in the oven alongside the chickpeas. Roast for about 25-30 minutes. Stir them once to help them caramelize and soften. Next, rinse the quinoa under cold water. In a medium pot, combine the rinsed quinoa with vegetable broth or water. Bring it to a boil on high heat. Once it boils, lower the heat, cover the pot, and let it simmer for 15 minutes. When done, the quinoa should be fluffy and all the liquid absorbed. Remove it from heat and let it sit for 5 minutes. Fluff it gently with a fork. For the tahini dressing, whisk together tahini, fresh lemon juice, and a few tablespoons of water in a small bowl. Keep whisking until smooth. Adjust the water to make it drizzle easily. Season with salt to taste. To assemble, take a serving bowl and add a generous scoop of fluffy quinoa as the base. Next, layer on the roasted sweet potatoes, crispy chickpeas, chopped spinach, halved cherry tomatoes, and slices of avocado. Make it colorful for a beautiful presentation! Drizzle your tahini dressing over the assembled bowls. Let it cascade down the ingredients for a lovely effect. Top it off with fresh cilantro leaves. Serve right away and enjoy the vibrant flavors of this wholesome meal! For the full recipe, check out the detailed instructions above. You can make this bowl your own. Try different grains like brown rice or farro. Add more veggies like bell peppers or carrots for color and crunch. If you love heat, add jalapeños or chili flakes. You can swap chickpeas for black beans for a different taste. Enjoy your personal twist on this spicy chickpea Buddha bowl. The cooking time can change based on your oven. If your oven runs hot, check the chickpeas and sweet potatoes early. You want them crispy but not burnt. If you prefer softer veggies, roast them longer. Just keep an eye on them to avoid overcooking. Adjusting the time helps you get the best texture. Serve this bowl warm for the best taste. Pair it with a crisp green salad for balance. You can also add a dollop of yogurt or a sprinkle of feta cheese for creaminess. This bowl is perfect for meal prep. Just store each element separately. When ready to eat, combine them for a quick, healthy meal. You can find the full recipe here: [Full Recipe]. {{image_4}} This dish is naturally vegan and gluten-free. Chickpeas, quinoa, and veggies make it great for all. You don’t need to change the recipe to fit these diets. Just enjoy! You can switch out chickpeas for black beans or lentils. Try brown rice instead of quinoa. Sweet potatoes can be replaced with butternut squash. Each swap brings a new flavor. Use seasonal veggies for freshness. In spring, add asparagus or peas. In summer, use zucchini or bell peppers. In fall, try roasted Brussels sprouts or pumpkin. In winter, root veggies shine. These changes keep your Buddha bowl exciting. Check the full recipe for more ideas. To keep your Spicy Chickpea Buddha Bowl fresh, place leftovers in an airtight container. Make sure it cools to room temperature before sealing. Store it in the fridge for up to three days. The flavors will meld, making it even tastier the next day! When you're ready to enjoy your leftovers, you can reheat them in a few ways. The microwave works well for quick meals. Heat in short bursts, stirring in between. If you prefer, you can also use a skillet over medium heat. Add a splash of water to keep it moist while you warm it up. If you want to save some for later, freezing is a great option. Place the chickpeas and sweet potatoes in a freezer-safe bag. Keep the quinoa and fresh veggies separate. They freeze best when stored this way. You can freeze the chickpeas and sweet potatoes for up to three months. Just thaw in the fridge overnight before reheating. Enjoy your meal anytime, even when you're busy! For the full recipe, check out [Full Recipe]. Chickpeas are packed with protein and fiber. They help you feel full longer. They also contain essential vitamins and minerals. Eating chickpeas can boost heart health and aid digestion. They may help regulate blood sugar levels too. Plus, they are versatile and fit in many dishes. Yes, you can make parts of the Spicy Chickpea Buddha Bowl ahead of time. You can roast the chickpeas and sweet potatoes a day before. Store them in airtight containers in the fridge. You can also cook the quinoa in advance. Just reheat it when you are ready to assemble the bowl. If you don’t have tahini, try using almond butter or sunflower seed butter. You can also make a quick dressing with yogurt or avocado. Each option brings a unique flavor to the bowl. Feel free to experiment and find what you like best! To change the spice level, adjust the cayenne pepper amount in the recipe. If you prefer it milder, use less or skip it entirely. For more heat, add extra cayenne or some hot sauce. Taste as you go to find your perfect balance. Absolutely! You can include any veggies you love. Roasted broccoli, bell peppers, or zucchini work well. Fresh ingredients like cucumber or radishes add crunch. Mix and match to create your ideal bowl. The more colors, the better it looks and tastes! The Spicy Chickpea Buddha Bowl packs flavor and nutrition. We explored key ingredients, step-by-step prep, and tips for easy customizations. You can adjust the heat, swap ingredients, or even try new seasonal veggies. In the end, this meal is fun to make and eat. It supports your health and keeps well, too. Dive into your own bowl and enjoy the amazing taste and benefits!](https://goldendishy.com/wp-content/uploads/2025/06/fbd17ced-051b-409f-8c76-69a7b070695a-768x768.webp)
![To make a tasty Chicken Zoodle Soup, gather these fresh ingredients: - 2 medium zucchinis, spiralized into noodles (zoodles) - 1 pound boneless, skinless chicken breast, diced into bite-sized pieces - 4 cups low-sodium chicken broth - 1 medium onion, finely chopped - 2 cloves garlic, minced - 2 medium carrots, peeled and sliced into thin rounds - 1 celery stalk, diced into small pieces - 1 teaspoon dried thyme - 1 teaspoon dried oregano - 1 tablespoon extra virgin olive oil - Salt and freshly ground black pepper to taste - Fresh parsley, finely chopped (for garnish) You can also add optional toppings like grated cheese or a squeeze of lemon for extra flavor. Using fresh herbs adds a bright touch to your bowl. Each ingredient plays a role, from the chicken's protein to the zoodles' crunch. For the full recipe, check out the detailed steps to create this comforting dish. To make Chicken Zoodle Soup, start by preparing your zoodles. You can use a spiralizer to turn the zucchinis into long, thin noodles. If you don’t have a spiralizer, a vegetable peeler works too. Just slice the zucchini into thin strips. Next, chop your vegetables. Finely chop the onion and mince the garlic. Peel the carrots and slice them into thin rounds. Finally, dice the celery into small pieces. This will help the veggies cook evenly. Now, it’s time to cook the chicken and vegetables. In a large pot, heat one tablespoon of extra virgin olive oil over medium heat. When hot, add the chopped onion and minced garlic. Stir for about 2 minutes until they smell great. Then, add the sliced carrots and diced celery. Cook for 5 to 7 minutes until they soften. After the veggies soften, add the diced chicken to the pot. Sprinkle in one teaspoon each of dried thyme and oregano, along with salt and pepper to taste. Cook for another 5 to 7 minutes until the chicken is no longer pink. Then, pour in the low-sodium chicken broth. Turn the heat up to bring it to a boil. Once it boils, lower the heat and let it simmer for about 10 minutes. This allows all the flavors to blend well. Now comes the fun part! When your soup has simmered, it’s time to add the zoodles. Stir them into the broth and cook for an additional 3 to 5 minutes. You want them tender but still a bit firm, so check them often. After cooking, taste the soup. If it needs more flavor, add more salt or pepper to your liking. Finally, ladle the hot soup into bowls. Use fresh parsley to garnish each bowl for a pop of color. This step adds a fresh touch to your comforting meal. For the full recipe, make sure to check out the complete instructions. Enjoy your delicious Chicken Zoodle Soup! - How to make the best zoodles Start with firm zucchinis. Use a spiralizer to cut them into thin noodles. This gives the best texture. Avoid wet zucchinis; they can turn soggy. If needed, salt the zoodles and let them sit for 15 minutes to draw out moisture. Rinse and pat them dry before cooking. - Perfecting the soup flavor Use low-sodium chicken broth for a balanced taste. Fresh herbs like thyme and oregano add depth. Sauté your onions and garlic well to build a strong base flavor. Taste the soup as it cooks, adjusting salt and pepper for the perfect bite. - Avoiding mushy zucchini noodles Add zoodles towards the end of cooking. They only need 3 to 5 minutes to soften. Overcooking makes them mushy and less appealing. Keep them slightly firm for the best texture in your soup. - Ideal serving dishes Use warm, deep bowls to enhance the cozy feel of your soup. The depth keeps the soup hot longer. If you like, serve with a side of crusty bread or a light salad. - Accompaniments like bread or salad Crusty bread pairs well with this soup. It’s perfect for dipping. A fresh side salad can add crunch and flavor to your meal. Choose greens like spinach or arugula for a nice contrast. - Garnishing techniques for presentation Finish your soup with a sprinkle of fresh parsley. This adds color and freshness. A slice of lemon on the side can brighten the flavors, too. For a fun twist, add a few chili flakes for heat. For the complete method, check out the Full Recipe. {{image_4}} You can switch up the chicken for many options. Try turkey, tofu, or chickpeas for a plant-based meal. Each brings its own taste and texture to the soup. For those who want low-carb or dairy-free options, use vegetable broth instead of chicken broth. You can also replace the chicken with cauliflower or mushrooms. These choices keep the soup hearty and tasty. Want to add more veggies? Toss in spinach, bell peppers, or green beans. They add color and crunch to your bowl. To add spice and kick, consider cayenne pepper or red pepper flakes. Just a pinch can warm up your soup without being too hot. Herbs can change the flavor based on the season. In winter, use rosemary or sage. In summer, fresh basil and cilantro brighten the dish. You can also incorporate noodles or pasta for a different twist. Whole wheat pasta or rice noodles work well. They make the soup even more filling. For the full recipe, check out the details above. Enjoy experimenting with your Chicken Zoodle Soup! To keep your Chicken Zoodle Soup fresh, store it in the fridge. Use an airtight container. Make sure the soup cools first. This helps prevent condensation. You can freeze the soup if you want to store it longer. Use freezer-safe bags or containers. Leave some space at the top for expansion. To reheat, warm it on the stove over low heat. Stir often to avoid burning. You can also use the microwave. Heat in short bursts, stirring in between. In the fridge, your soup lasts about three to four days. If you freeze it, it can last up to three months. Just remember to label the containers with the date. Look for signs of spoilage. If the soup smells sour or has mold, it’s time to toss it. Always trust your senses; they guide you well. What are zoodles and how can they be made? Zoodles are zucchini noodles. You can make them by spiralizing zucchinis. Use a spiralizer or a peeler for thin strips. They are a great, low-carb alternative to pasta. Can I make Chicken Zoodle Soup ahead of time? Yes, you can make the soup ahead. Store it in the fridge for up to three days. Just add the zoodles when you're ready to eat. This keeps them fresh and firm. How do I prevent zoodles from becoming soggy? To keep zoodles from getting soggy, add them at the end of cooking. Only cook them for a few minutes. This way, they stay crisp and tasty. Can I use rotisserie chicken for this recipe? Absolutely! Rotisserie chicken saves time. Just shred or cube the chicken and add it to the soup. It adds a nice flavor boost, too. Is it possible to make this in a slow cooker? Yes, you can use a slow cooker. Cook the chicken and veggies on low for 4-6 hours. Add zoodles in the last 15 minutes to keep them tender. How do I make the soup gluten-free? To make the soup gluten-free, use gluten-free chicken broth. Ensure all added spices are also gluten-free. This way, everyone can enjoy your delicious Chicken Zoodle Soup. For a full recipe, check out the [Full Recipe]. You now have a clear guide to making Chicken Zoodle Soup. We covered the key ingredients, preparation steps, and cooking instructions. I shared useful tips to keep your zoodles from turning mushy and ways to enhance the flavor. Remember, you can customize your soup with ingredient swaps to fit your needs. Store leftovers properly to enjoy later. Cooking doesn’t have to be complicated. Experiment and have fun with this recipe. Your kitchen can be a place of creativity and health. Enjoy your tasty, homemade soup!](https://goldendishy.com/wp-content/uploads/2025/06/e4db2e18-4a3d-4a81-8032-e96fb997d624-768x768.webp)
![- 2 cups cooked rice (white or brown) - 1 pound boneless, skinless chicken breasts, diced - 2 cups broccoli florets (fresh or frozen) - 1 can (10.5 oz) cream of mushroom soup (or any creamy soup of your choice) - 1 cup shredded cheddar cheese, divided - 1/2 cup milk - 1 teaspoon garlic powder - 1/2 teaspoon onion powder - 1 teaspoon dried thyme - Salt and pepper to taste - 1/2 cup breadcrumbs (optional, for topping) - 2 tablespoons olive oil I love using fresh ingredients when I make this casserole. The chicken gives it protein. Broccoli adds a nice crunch and color. You can use frozen broccoli if fresh isn’t available. It works just as well! I recommend using cream of mushroom soup for a rich flavor. You can swap it with any creamy soup you enjoy. The cheddar cheese is key for that melty goodness on top. Split the cheese; half goes in the mix, and half stays for the topping. For seasoning, garlic powder and dried thyme bring out the best taste. Adjust salt and pepper to fit your palate. If you want a crunchy top, add breadcrumbs for texture. Drizzle olive oil to keep it all moist and flavorful. This combination makes a cozy, tasty meal. You’ll love how easy it is to prepare. Check the [Full Recipe] for all the steps to make this dish shine! First, preheat your oven to 350°F (175°C). This step is key. A hot oven helps your casserole cook evenly. While it heats, prepare your baking dish. Grease a 9x13-inch dish with olive oil or cooking spray. This prevents sticking and makes for easy cleanup. Next, we cook the chicken. In a large skillet, heat 2 tablespoons of olive oil over medium heat. Once the oil is hot, add the diced chicken. Season the chicken with 1 teaspoon of garlic powder, 1/2 teaspoon of onion powder, 1 teaspoon of dried thyme, and salt and pepper to taste. Sauté it for about 5-7 minutes. Stir the chicken often to ensure even cooking. You want it to be fully cooked and lightly browned. In a large mixing bowl, combine your cooked rice, steamed broccoli florets, a can of cream of mushroom soup, and 1/2 cup of milk. Add half of your shredded cheddar cheese too. Mix these ingredients well until the mixture looks creamy. This step is important. A well-mixed casserole ensures every bite is full of flavor. Once your chicken is cooked, add it to the rice and broccoli mixture. Stir gently to combine everything evenly. Now, it’s time to bake. Spread the chicken and rice mixture in your greased baking dish. Sprinkle the remaining cheddar cheese over the top. If you want a crunchy topping, add 1/2 cup of breadcrumbs. Cover the dish tightly with aluminum foil. This keeps moisture in while baking. Place it in the preheated oven and bake for 25 minutes. After that, carefully remove the foil. Bake for an additional 10-15 minutes. You want the top to be golden brown and the cheese to be bubbling. When it's done, let the casserole rest for about 5 minutes. This helps the layers set before you serve. To make your chicken tender and moist, start with good-quality chicken. Sauté the diced chicken in olive oil over medium heat. Season it well with garlic powder, onion powder, thyme, salt, and pepper. Cook until it is no longer pink. This usually takes about 5-7 minutes. Stir it often for even cooking. For casserole success, preheat your oven to 350°F (175°C) before baking. Cover the dish with foil for the first part of baking. This keeps the dish moist. Remove the foil for the last 10-15 minutes to brown the cheese and breadcrumbs. For an appealing look, garnish your casserole with fresh parsley or chives. This adds a bright color and fresh flavor. You can also use individual ramekins for serving. This makes it easy to serve and adds a cozy touch to your table. Store leftovers in an airtight container in the fridge. They will last up to 3-4 days. If you want to freeze the casserole, wrap it tightly in foil or plastic wrap. It can last up to 3 months in the freezer. When reheating, you have two options: the microwave or the oven. For the microwave, heat in short bursts to avoid drying it out. Stir occasionally to heat evenly. For oven reheating, cover with foil and bake at 350°F (175°C) for about 20 minutes, or until heated through. {{image_4}} For a gluten-free option, swap the cream of mushroom soup with a gluten-free brand. You can also use gluten-free breadcrumbs or skip them altogether. For a low-fat version, cut back on cheese and milk. Use low-fat milk and just half the cheese. This keeps the dish tasty while reducing calories. You can change the flavor by adding different veggies. Carrots and bell peppers work great. They add color and crunch too! If you want a cheese twist, try mozzarella or pepper jack for a spicy kick. Each cheese brings its own unique taste, making each casserole a new experience. Using leftover rotisserie chicken is a smart time-saver. Just shred it and mix it in. For rice, consider quinoa or cauliflower rice for a low-carb option. Cauliflower rice is light and absorbs flavors well. It’s a great way to sneak in more veggies into your meal. Feel free to get creative. This dish is versatile, and you can tailor it to your taste! Chicken Broccoli Rice Casserole shines on its own, but you can enhance your meal with sides. Here are some tasty options: - Garlic Bread: Crisp and buttery, it pairs well with the creamy casserole. - Steamed Vegetables: Lightly steamed carrots or green beans add color and crunch. - Simple Salad: A fresh garden salad with lettuce, tomatoes, and cucumbers balances the rich flavors. For a quick salad, mix leafy greens with olive oil and lemon juice. This adds a refreshing touch to your meal. To complete your dinner, consider drinks that match the flavors of the casserole: - White Wine: A chilled Chardonnay or Sauvignon Blanc complements the dish well. - Sparkling Water: For a non-alcoholic option, sparkling water with lemon is refreshing. For kids, serve some apple juice or lemonade. These drinks are fun and pair nicely with the casserole's flavors. How long does it take to cook chicken in the casserole? It takes about 5 to 7 minutes to cook the chicken in the skillet. You want it cooked through and lightly browned. This step is key for flavor. Once you add the chicken to the casserole, it will bake for about 35 minutes. This helps all the flavors blend well. Can I prepare this dish ahead and refrigerate it? Yes, you can prepare the casserole ahead of time. Just mix all the ingredients as usual. Then, cover it and place it in the fridge. It’s best to bake it within 24 hours for best taste. What can I use instead of cream of mushroom soup? If you don’t have cream of mushroom soup, you can use cream of chicken soup. You can also make a homemade creamy base using sour cream or Greek yogurt mixed with milk. This keeps the dish rich and smooth. How do I store leftovers? To store leftovers, let the casserole cool first. Then, place it in an airtight container. It will stay fresh in the fridge for up to 3 days. Make sure to reheat only the portion you plan to eat. Can I freeze Chicken Broccoli Rice Casserole for future meals? Yes, you can freeze the casserole. Just cover it tightly with plastic wrap or foil. It will last in the freezer for up to 2 months. When ready to eat, thaw it in the fridge overnight before baking. For more details, check out the [Full Recipe]. It’s a great way to ensure you have all the steps at hand! In this article, we explored the key ingredients for Chicken Broccoli Rice Casserole and shared easy steps to make it. You learned about cooking tips, variations, and serving suggestions to enhance your meal. Remember, this dish is not only tasty but also nutritious. Try different ingredients to suit your taste or dietary needs. Enjoy creating this delicious casserole and share it with your family. You’ll love how simple and fun it is to prepare!](https://goldendishy.com/wp-content/uploads/2025/07/8f73cfa4-d8c9-44a2-908a-c2367089e61b-768x768.webp)

. First, preheat your oven to 400°F (200°C). This step is key for even roasting. Gather your ingredients. You should have baby carrots, honey, olive oil, garlic, thyme, and lemon juice ready. In a large bowl, combine the honey, olive oil, minced garlic, and thyme. Add a good pinch of salt and pepper. Next, squeeze in the lemon juice. Whisk the mixture well until it is smooth. This glaze will give your carrots a sweet and savory flavor. Now, it's time to coat the carrots. Add them to your bowl with the glaze. Toss them gently until they are well coated. Line a baking sheet with parchment paper for easy cleanup. Spread the carrots out in a single layer, avoiding crowding. Place the baking sheet in the preheated oven. Roast the carrots for 25-30 minutes. Halfway through, toss the carrots again for even cooking. They should become tender and caramelized. Once done, let them cool for a few minutes. If you like, drizzle some extra glaze over the top for added flavor. Finally, garnish with fresh parsley before serving. This adds a pop of color and freshness. If you want the full recipe, check it out [Full Recipe]. To ensure your carrots roast perfectly, choose fresh carrots. Baby carrots work well, but regular ones are great too. If using regular carrots, slice them into sticks for even cooking. Spread the carrots out in a single layer on the baking sheet. This step keeps them from steaming and helps them caramelize nicely. Toss them halfway through cooking for even browning. For a great glaze, mix the honey, olive oil, garlic, and thyme well. The oil helps the honey coat the carrots. If your glaze feels too thick, add a splash of water or lemon juice. This can help thin it out and ensure it coats the carrots evenly. Remember, a smooth glaze means more flavor in every bite! To make your dish pop, use a nice platter. Once the carrots are roasted, transfer them carefully. Drizzle with extra honey for shine. Sprinkle fresh parsley or thyme over the top for color. This simple touch makes your dish look gourmet. Enjoy serving them at your next meal! For the full recipe, check out the details above. {{image_4}} You can easily change this dish by adding other vegetables. Try sweet potatoes or parsnips. They roast well and add new flavors. Just cut them to a similar size as the carrots. This helps them cook evenly. If you want to switch up the sweet taste, use maple syrup or agave. Both give a nice flavor and work well with the garlic. You can use the same amount as honey. Just mix it well with the other ingredients. Adding spices can boost the taste of your honey garlic roasted carrots. You might try a pinch of cumin or chili powder for warmth. Fresh herbs like rosemary or dill can also add a bright note. Experiment with what you love! Each change can make this dish new and exciting. You can find the full recipe to guide you through these variations. To store leftover honey garlic roasted carrots, first let them cool down. Use an airtight container to keep them fresh. If you have a lot, divide them into smaller portions. Place the container in the fridge. They will stay good for about 3 to 5 days. Keeping them sealed helps avoid drying out. When you're ready to enjoy the leftovers, preheat your oven to 350°F (175°C). Spread the carrots on a baking sheet. You can drizzle a little olive oil for extra moisture. Heat them for about 10 to 15 minutes, or until they feel warm. You can also use a microwave if you're in a hurry. Just cover them with a damp paper towel and heat in 30-second bursts. If you want to keep the carrots longer, freezing is a great option. First, let the carrots cool completely. Spread them in a single layer on a baking sheet. Freeze them for about 1 hour. This step prevents them from sticking together. After that, transfer the carrots to freezer bags. Remove as much air as possible before sealing. They can last for up to 3 months in the freezer. To eat, thaw them in the fridge overnight before reheating. For more details, check the Full Recipe. Yes, you can use frozen carrots. However, fresh carrots will taste better. Frozen carrots may lose some crunch. If you use them, roast them longer to ensure they cook fully. Just remember to thaw them before roasting for the best results. Honey garlic roasted carrots pair well with many dishes. You can serve them with grilled chicken, beef, or fish. They also taste great with rice or quinoa. Try them with a fresh salad for a balanced meal. Their sweet and savory flavor adds depth to any plate. You can make this dish ahead of time. Prepare the honey garlic glaze and coat the carrots. Store them in the fridge for up to 24 hours. When ready to serve, just roast them in the oven. This saves time and still gives you that amazing flavor. For the full recipe, check out the complete instructions above. We explored the key ingredients and steps to make honey garlic roasted carrots. You learned how to mix the glaze, roast the carrots, and personalize the dish. We also discussed useful tips for perfect roasting and presentation. Lastly, we covered variations and storage tips to keep your dish fresh. Use this guide to make a tasty meal. Enjoy these carrots with your loved ones for a delightful experience.](https://goldendishy.com/wp-content/uploads/2025/06/04a56f10-aefe-4807-b100-2b1e29675843-768x768.webp)