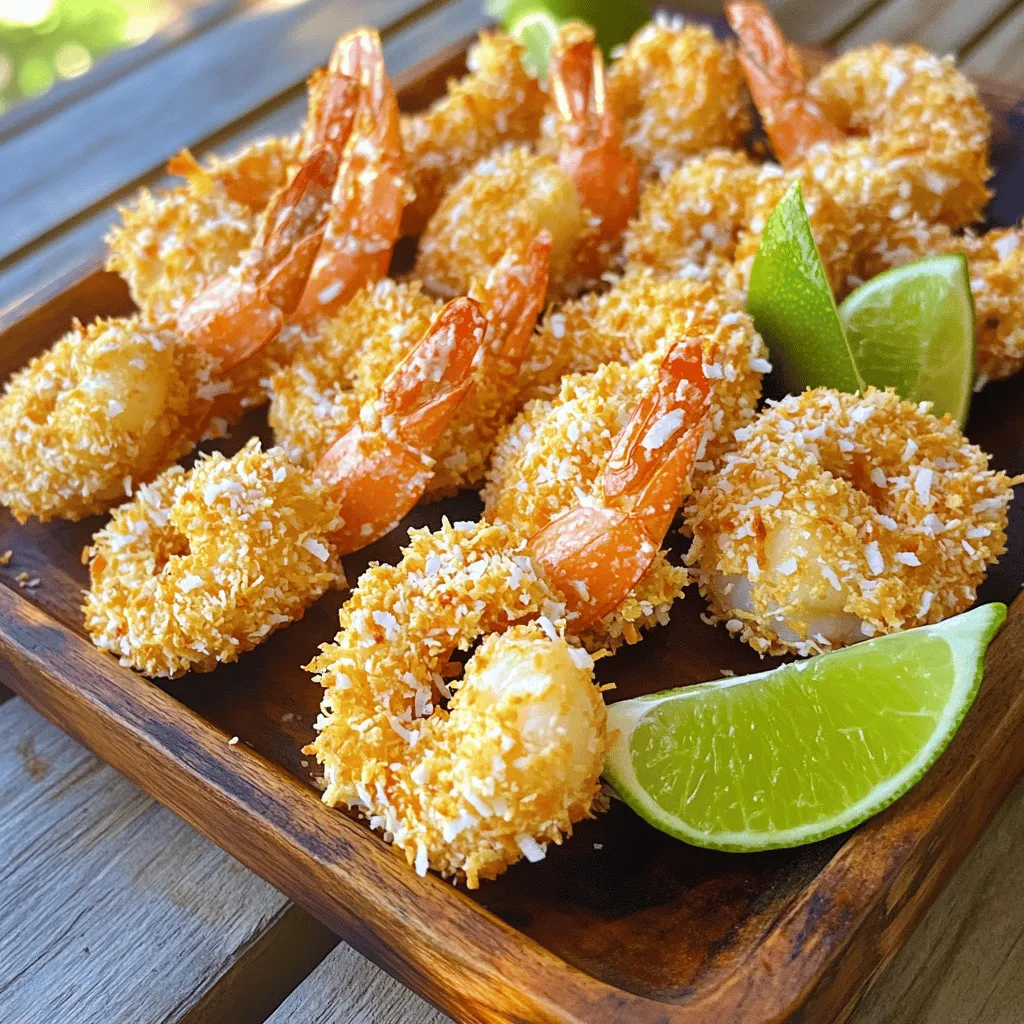
Crispy Coconut Shrimp Simple and Tasty Recipe
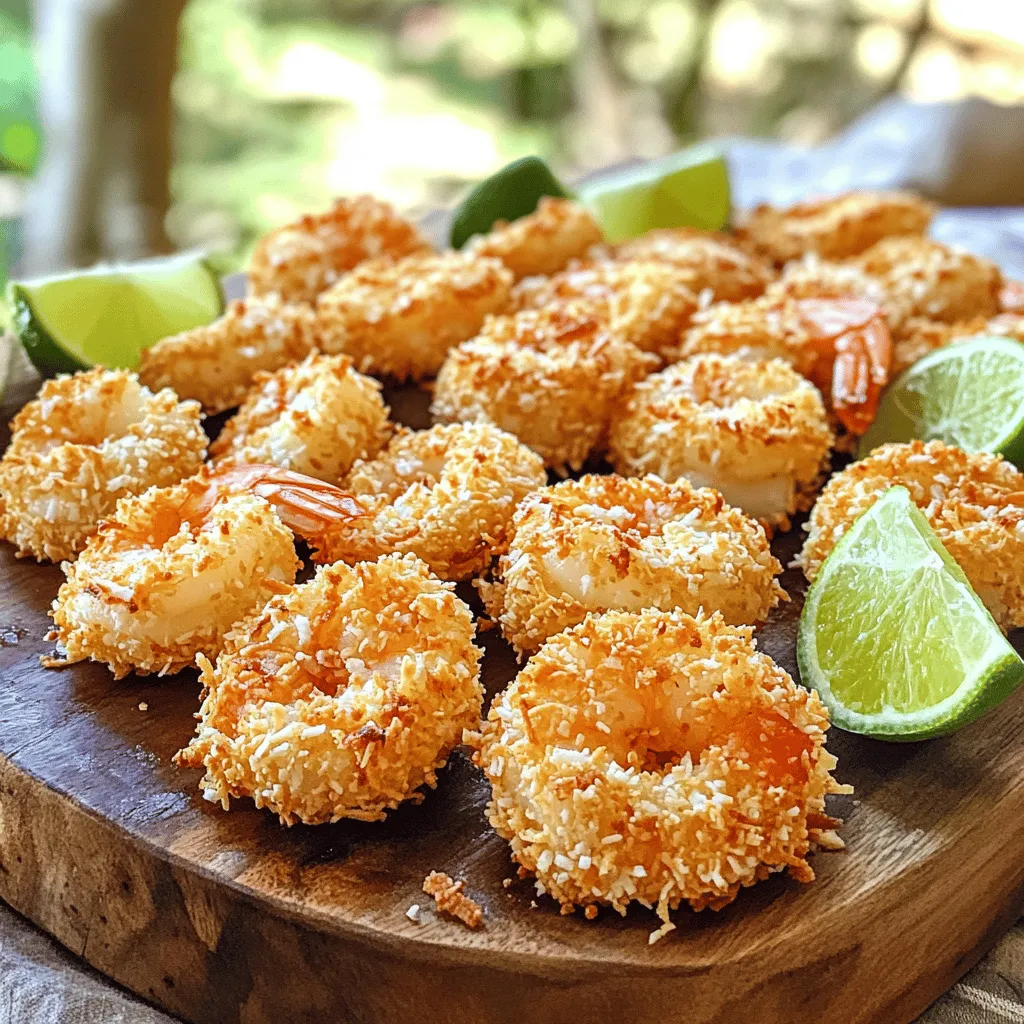
If you’re craving a dish that’s both crispy and full of flavor, look no further! This crispy coconut shrimp recipe is simple, tasty, and sure to impress. With juicy shrimp coated in coconut and panko, it makes a delightful appetizer or main dish. I’ll guide you through each step to achieve that perfect crunch. So grab your apron and let’s dive into this mouthwatering treat that will have everyone coming back for more!
Ingredients
List of Essential Ingredients
– 1 pound large shrimp, peeled and deveined
– 1 cup all-purpose flour
– 2 large eggs, beaten
– 1 cup unsweetened shredded coconut
– 1 cup panko breadcrumbs
Seasonings
– 1 teaspoon garlic powder
– 1 teaspoon paprika
– ½ teaspoon salt
– ½ teaspoon black pepper
Cooking Essentials
– Vegetable oil, for frying
– Fresh lime wedges, for serving
You need fresh, quality shrimp for this recipe. Choose large shrimp that are peeled and deveined. This saves time and makes cooking easier.
Next, gather your dry ingredients. All-purpose flour helps create a nice base. The eggs act as a binder. They stick the coating to the shrimp. Coconut adds sweetness and texture. Panko breadcrumbs give the shrimp an extra crunch.
Seasonings are key. Garlic powder and paprika add flavor. Salt and black pepper enhance the taste. Mix these well with the flour for an even coat.
Finally, you will need vegetable oil for frying. It should be hot enough to crisp the shrimp. Fresh lime wedges add a zesty touch when served.
Step-by-Step Instructions
Preparing the Shrimp
Rinse the shrimp under cold water. This helps clean them and removes any grit. After rinsing, pat them dry with a paper towel. Dry shrimp help the coating stick better. Remember, moisture can ruin the crunch.
Setting Up the Dredging Station
You need three shallow bowls for the breading. In the first bowl, mix the all-purpose flour with garlic powder, paprika, salt, and black pepper. In the second bowl, pour in the beaten eggs. In the third bowl, combine the shredded coconut and panko breadcrumbs. Mix them well for an even coating.
Breading the Shrimp
Take each shrimp and dredge it in the flour mix first. Shake off any extra flour. This step is key for a good base. Next, dip it in the beaten eggs. Let the extra egg drip off to avoid sogginess. Finally, roll the shrimp in the coconut-panko mix. Press gently to ensure it sticks well. This creates a nice, crunchy layer.
Cooking the Shrimp
Heat about half an inch of vegetable oil in a large skillet over medium heat. To check if the oil is hot enough, drop a small piece of the coconut mix in. If it sizzles right away, you are ready. Carefully add the breaded shrimp in batches. Don’t overcrowd the skillet, as this lowers the oil temperature. Cook for 2-3 minutes on each side until they turn a golden brown.
Draining and Serving
Once cooked, use a slotted spoon to lift the shrimp out of the oil. Place them on a plate lined with paper towels. This step helps absorb any extra oil. Serve the crispy coconut shrimp warm. Fresh lime wedges add a nice zesty touch.
Tips & Tricks
Achieving the Perfect Crispy Texture
To get that perfect crispy texture, you need to pay attention to the frying temperature. Heat your oil to about 350°F. This hot oil will help the shrimp fry fast and stay crispy. If the oil is too cold, the shrimp will soak up oil and become soggy.
Drying the shrimp thoroughly is key. After rinsing, pat them dry with paper towels. Moisture will ruin your crispy coating. The drier the shrimp, the better the crunch!
Serving Suggestions
You can serve crispy coconut shrimp with a variety of dips. Sweet chili sauce works well. It adds a nice kick! You can also try a tangy lime aioli. This pairs perfectly with the coconut flavor.
For side dishes, think light and fresh. A simple cucumber salad or a fruit salsa can balance the dish. You could also serve it with rice. Coconut rice is a nice touch!
Common Mistakes to Avoid
One common mistake is overcrowding the skillet. If you add too many shrimp at once, they will steam instead of fry. Always fry in small batches for the best results.
Another mistake is not allowing the shrimp to drain properly. After frying, place them on paper towels to absorb excess oil. This step keeps them crispy and tasty!
Variations
Different Coating Options
You can change up the crunch by using different coatings. Instead of panko, try using crushed cornflakes or crushed nuts. Almonds or cashews can add a great twist. You can also mix breadcrumbs with spices for extra flavor. Each choice gives the shrimp a unique texture and taste.
Flavor Infusions
Want to spice things up? Add herbs and spices to the batter. Try a pinch of cayenne for heat or a bit of curry powder for warmth. Fresh herbs like cilantro or parsley can also be mixed in. These additions will create a brighter flavor and make your shrimp stand out.
Dietary Adaptations
If you need gluten-free options, you can easily adapt this recipe. Use almond flour or coconut flour instead of regular flour. For the breadcrumbs, look for gluten-free panko or use crushed rice crackers. These swaps keep the recipe tasty while catering to dietary needs.
Storage Info
How to Store Leftover Coconut Shrimp
To keep your leftover coconut shrimp tasty, first, let them cool down. Place the shrimp in an airtight container. If you plan to eat them soon, store them in the fridge. They will stay fresh for up to three days. For longer storage, freeze them. Wrap each shrimp in plastic wrap and put them in a freezer bag. This way, they can last for up to three months.
Reheating Tips
When it’s time to enjoy your leftover shrimp, you want them crispy again. The best way to reheat them is in the oven. Preheat your oven to 375°F (190°C). Spread the shrimp on a baking sheet in a single layer. Bake for 10 to 12 minutes, flipping halfway. This method brings back the crunch without making them soggy.
Shelf Life
Coconut shrimp has a good shelf life. When stored correctly in the fridge, it lasts about three days. If frozen, it can stay fresh for three months. Always check for any off smells or changes in texture before eating. If it looks or smells bad, toss it out. Enjoy your crispy coconut shrimp while they are fresh!
FAQs
What is the best way to make coconut shrimp crispy?
To make coconut shrimp crispy, the key is in the coating. Use panko breadcrumbs for crunch. Ensure your shrimp are dry before breading. This helps the coating stick well. Fry them in hot oil. The oil should be about 350°F. If the shrimp are crowded in the pan, they won’t get crispy. Fry in small batches for the best results.
Can I bake crispy coconut shrimp instead of frying?
Yes, you can bake coconut shrimp! Preheat your oven to 425°F. Line a baking sheet with parchment paper for easy cleanup. Arrange the breaded shrimp in a single layer, leaving space between each one. Spray them lightly with cooking oil. Bake for about 15-20 minutes, flipping halfway through. This method gives you a healthier option with less oil.
What are some dipping sauces for coconut shrimp?
You can enhance your coconut shrimp with various dipping sauces. Here are some tasty options:
– Sweet chili sauce for a spicy kick
– Mango salsa for a fruity burst
– Spicy mayo for an extra creamy dip
– Honey mustard for a tangy flavor
Is coconut shrimp gluten-free?
Coconut shrimp can be gluten-free! Use gluten-free flour and gluten-free panko breadcrumbs. Always check labels to ensure there are no hidden gluten ingredients. This way, everyone can enjoy this tasty dish without worry.
How can I tell when the shrimp is done frying?
Perfectly cooked shrimp turn golden brown and crispy. They usually take about 2-3 minutes per side. The shrimp should curl slightly when done. If you cut one open, it should look opaque and not translucent. This means they are safe to eat and ready to serve.
You now have all the steps and tips to make coconut shrimp. We covered the key ingredients, specific cooking methods, and common mistakes to avoid. Remember to keep your shrimp dry for that perfect crispy texture and explore different flavors in your coatings. With the right dips and sides, your dish will shine. Enjoy your cooking, and don’t hesitate to experiment and make it your own!

![Creating Peach and Basil Flatbread is simple and fun. Here’s what you need: - Pre-made flatbread or naan - Ripe peaches - Fresh mozzarella cheese - Fresh basil leaves - Olive oil - Balsamic glaze (optional) - Salt and pepper - Red pepper flakes (optional) Each ingredient adds its own flair. The flatbread or naan forms a sturdy base. Ripe peaches bring sweetness. Fresh mozzarella melts beautifully, creating a rich layer. Fresh basil adds a burst of flavor that ties everything together. Olive oil enhances the taste and helps with crispness. Balsamic glaze can heighten the sweet and tangy notes. Remember to season with salt and pepper for balance. If you like some heat, sprinkle red pepper flakes on top. This mix of ingredients makes for a delightful summer treat. You can find the full recipe to guide you through the steps. 1. Preheat your oven to 425°F (220°C). This helps the flatbread bake evenly. 2. Line a baking sheet with parchment paper. This keeps the flatbread from sticking. Place your flatbread or naan on the lined sheet. 3. Brush the flatbread with olive oil using a spoon or brush. This adds flavor and helps it crisp up. 4. Spread the shredded mozzarella cheese evenly over the flatbread. This creates a creamy base. 5. Layer the thinly sliced peaches on top of the cheese. Make sure each slice is well-placed for the best taste. 6. Season with salt, pepper, and red pepper flakes if you like some heat. This adds extra flavor. 1. Bake the flatbread in the oven for 10-12 minutes. Keep an eye on it until the cheese melts and bubbles. 2. Watch for the cheese to brown lightly. This gives the flatbread a nice, toasty flavor. 1. After baking, take the flatbread out of the oven. Sprinkle the torn basil leaves on top while it's hot. This brings out the fresh aroma. 2. If you want, drizzle balsamic glaze over the flatbread for extra flavor. This adds a sweet and tangy twist. 3. Let the flatbread cool for a couple of minutes. Then slice it up for sharing or enjoying by yourself. This method makes a Peach and Basil Flatbread that bursts with flavor, perfect for summer. For the complete recipe, check [Full Recipe]. - Selecting ripe peaches for the best flavor Choose peaches that feel slightly soft but are not mushy. Look for a rich color, usually yellow or orange, indicating ripeness. The aroma should be sweet and fragrant. These factors ensure your flatbread bursts with juicy flavor. - Cheese melting tips for a creamy texture Use fresh mozzarella for the best melt. Shred it yourself for a creamier texture. Spread the cheese evenly on the flatbread, ensuring each bite has that gooey goodness. Bake until bubbly and golden for added richness. - Seasoning tricks for additional flavor enhancement Season your flatbread with salt and pepper. Add red pepper flakes for a spicy kick if you like heat. A drizzle of balsamic glaze at the end gives a sweet tang. These little touches elevate the dish. - Best sides or drinks to pair with the dish Serve with a fresh green salad or a cool cucumber salad. A chilled white wine or sparkling water pairs nicely. These sides balance the sweetness of the peaches and the creaminess of the cheese. - Presentation tips to impress guests Use a wooden board or a large platter for serving. Garnish with extra basil leaves for color. A small bowl of balsamic glaze on the side invites guests to add more if they wish. This presentation makes the dish even more tempting. For the full recipe, you can check out the details above. Enjoy creating your Peach and Basil Flatbread! {{image_4}} You can change the cheese to create new flavors. Goat cheese adds a tangy taste. Feta cheese brings a salty bite. Both pair well with peaches. You can also add proteins to make it heartier. Prosciutto gives a nice savory touch. Grilled chicken adds a juicy element. Both options enhance the flatbread's flavor. Try different toppings to switch things up. Arugula adds peppery notes. Toasted nuts give a crunchy texture. Both add depth and interest to each bite. You can also explore different herbs. Mint offers a refreshing twist, while thyme adds warmth. Each herb changes the flatbread's character, making it unique. For the full recipe, check the details above to get started on this delightful dish! To keep your Peach and Basil Flatbread fresh, store leftovers in the fridge. Wrap the flatbread in plastic wrap or foil. This helps to prevent it from drying out. You can also place it in an airtight container for extra protection. The flatbread lasts for about 2 to 3 days in the fridge. After that, the quality may decline. When reheating, the oven works best for keeping that crispy texture. Preheat your oven to 350°F (175°C). Place the flatbread directly on the oven rack or on a baking sheet. Heat for about 5 to 8 minutes until warm. If you use a microwave, the flatbread may become soggy. To maintain crispness, heat it in short bursts and check often. Enjoy your flatbread just like it was fresh from the oven! How do I know when the peaches are ripe enough? Look for peaches that are slightly soft to the touch. The color should be a warm golden hue. A sweet aroma is a good sign of ripeness too. If they feel hard, give them a few more days at room temperature. Can I use frozen flatbread or naan for this recipe? Yes, you can use frozen flatbread or naan. Just thaw them first. You may need to adjust baking time. Keep an eye on the cheese to avoid burning. What can I substitute for mozzarella cheese? If you don’t have mozzarella, try goat cheese or feta. They add a tangy flavor. You can also use provolone for a similar texture. How do I make this flatbread in advance? You can prepare the flatbread up to the baking step. Assemble it and store it in the fridge. Bake it when you are ready to serve. This keeps the flatbread fresh and tasty. For the best results, use it within a day. In this blog post, we explored how to make delicious Peach and Basil Flatbread. I shared key ingredients, easy steps, and tips for the best results. Remember to use ripe peaches and choose your cheese wisely. You can even mix in proteins or herbs for unique flavors. Storing leftovers properly keeps them fresh. With easy reheating tips, you can enjoy your flatbread again. Try this recipe for a tasty treat and impress your friends and family! Happy cooking!](https://goldendishy.com/wp-content/uploads/2025/07/1088bccc-4c8b-4254-a72a-0cec77bef739-768x768.webp)

![- 2 cups cooked chicken breast, shredded - 1 ripe avocado, mashed until smooth - 1/4 cup smooth Greek yogurt - 1 tablespoon freshly squeezed lemon juice - 1/4 cup red onion, finely chopped - 1/2 cup cherry tomatoes, halved - 1/4 cup celery, finely diced - 1/4 teaspoon garlic powder - Salt and freshly ground black pepper to taste - Fresh cilantro or parsley, chopped, for garnish The ingredients in creamy avocado chicken salad make it tasty and healthy. The chicken provides protein, while avocado adds healthy fats. Greek yogurt makes it creamy without extra calories. Fresh veggies like tomatoes and celery give a nice crunch. Using fresh ingredients is key. This brings out the best flavors. You can adjust the amounts based on what you like. For example, add more tomatoes if you love them. Don’t forget the seasoning! Salt and pepper enhance the taste. Fresh herbs like cilantro or parsley top it off perfectly. They add color and flavor. I recommend checking the full recipe for detailed steps. Enjoy making this delicious dish! - Combine mashed avocado, Greek yogurt, and lemon juice in a bowl. - Mix until smooth using a fork or whisk. To make the creamy dressing, start with a ripe avocado. Mash it in a bowl until it is smooth. Next, add 1/4 cup of Greek yogurt. This adds creaminess and protein. Then, squeeze in 1 tablespoon of lemon juice. This will brighten the flavor. Mix these three ingredients well with a fork or whisk. You want a creamy and smooth texture. This creamy dressing is the base of your salad and full of healthy fats. - Add shredded chicken to the avocado mixture. - Stir thoroughly to coat the chicken evenly. Now it’s time to add in the chicken. Use 2 cups of cooked chicken breast, shredded. You can use leftover chicken or rotisserie chicken for ease. Add the chicken to the creamy dressing. Stir well so every piece of chicken is coated. This adds protein and makes the salad filling. The creamy dressing brings all the flavors together. - Gently fold in red onion, cherry tomatoes, and celery. - Season with garlic powder, salt, and black pepper to taste. Next, let’s add some crunch and color. Gently fold in 1/4 cup of finely chopped red onion, 1/2 cup of halved cherry tomatoes, and 1/4 cup of diced celery. These veggies add freshness and texture. Now, season your salad. Add a pinch of garlic powder, salt, and freshly ground black pepper. Taste it and adjust the seasoning as needed. Mix gently so you don’t break the veggies. Now, your creamy avocado chicken salad is ready to serve! Check out the Full Recipe for more details. - Look for avocados that yield slightly to pressure. - Check the color; ripe avocados usually have a darker skin. Selecting the perfect avocado is key for your creamy avocado chicken salad. When you gently press the avocado, it should give a bit. This tells you it is ripe and ready to use. A darker skin tone often means ripeness, but don't rely on color alone. Always feel for that slight softness! - Use rotisserie chicken for convenience. - Ensure chicken is fully cooked; internal temperature should reach 165°F (75°C). Cooking the chicken can take time, but using rotisserie chicken saves you effort. It offers great flavor and saves cooking time. If you cook your own chicken, make sure to check the internal temperature. It needs to reach 165°F (75°C) to be safe to eat. - Serve in individual bowls, atop lettuce leaves, or in a wrap. - Consider a lemon wedge on the side for added flavor. Serving your salad can be fun! You can use individual bowls or place it on crisp lettuce leaves. If you want a wrap, that works too. A lemon wedge on the side brightens the meal and adds a zesty kick. For the full experience, try the [Full Recipe]. Enjoy your tasty and healthy choice! {{image_4}} You can make your creamy avocado chicken salad even better by adding fruits. Diced apples or grapes bring a nice sweetness. They also add a nice crunch. If you want a tropical twist, try adding mango. Its juicy flavor blends well with creamy avocado. Not in the mood for chicken? You can easily swap it out. Canned tuna or chickpeas work well for a vegetarian option. Both of these options add protein and flavor. If you love seafood, consider using grilled shrimp. It adds a fresh, light taste to the salad. Want to spice things up? Adding spices can really boost the flavor. Try cumin or smoked paprika for a warm kick. If you like heat, toss in some jalapeños. These will give your salad a spicy edge that keeps it exciting. Feel free to get creative with your mix-ins! Each variation gives you a new twist on this delicious dish. Check out the Full Recipe for more ideas. Store your creamy avocado chicken salad in an airtight container in the refrigerator. It will stay fresh for up to 2 days. I suggest enjoying it right after you make it. However, if you keep the ingredients separate, it can last a little longer. This way, you keep the textures nice. Do not freeze the salad. Avocado gets mushy when frozen. If you want to prepare ahead, consider freezing the chicken on its own. This will keep it fresh and ready for your salad. Prep your ingredients ahead of time. Store them separately to mix later. This salad is a great option for busy weeks. You can have a tasty meal ready in minutes! For the full recipe, check out the detailed instructions above. Typically lasts for about 2 days when stored properly. I recommend using an airtight container. This helps keep your salad fresh and tasty. After two days, the avocado may brown and lose its creamy texture. Yes, but it’s best to combine the ingredients just before serving to maintain freshness. If you prepare it early, store the salad components separately. This way, the avocado stays bright and creamy. Great with whole-grain bread, crackers, or a side of fruit. I love serving it on toast for a hearty lunch. Pairing it with fresh fruit offers a nice, sweet contrast. You can also use it as a filling in wraps for a tasty twist. For the full recipe, check out the detailed steps above. This creamy avocado chicken salad is easy to make and full of flavor. We covered the main ingredients, steps, and tips to perfect it. You learned how to mix chicken with creamy dressing and fresh veggies. Remember to store leftovers properly for the best taste. Enjoy this salad as a quick meal or snack. Feel free to customize with your favorite ingredients. With these simple tips, you can create a dish that is both healthy and delicious.](https://goldendishy.com/wp-content/uploads/2025/06/50306de2-9119-4a0c-8cb7-3da0c4c0a2a4-768x768.webp)