Chicken Fajita Stuffed Avocados Flavorful and Healthy Meal
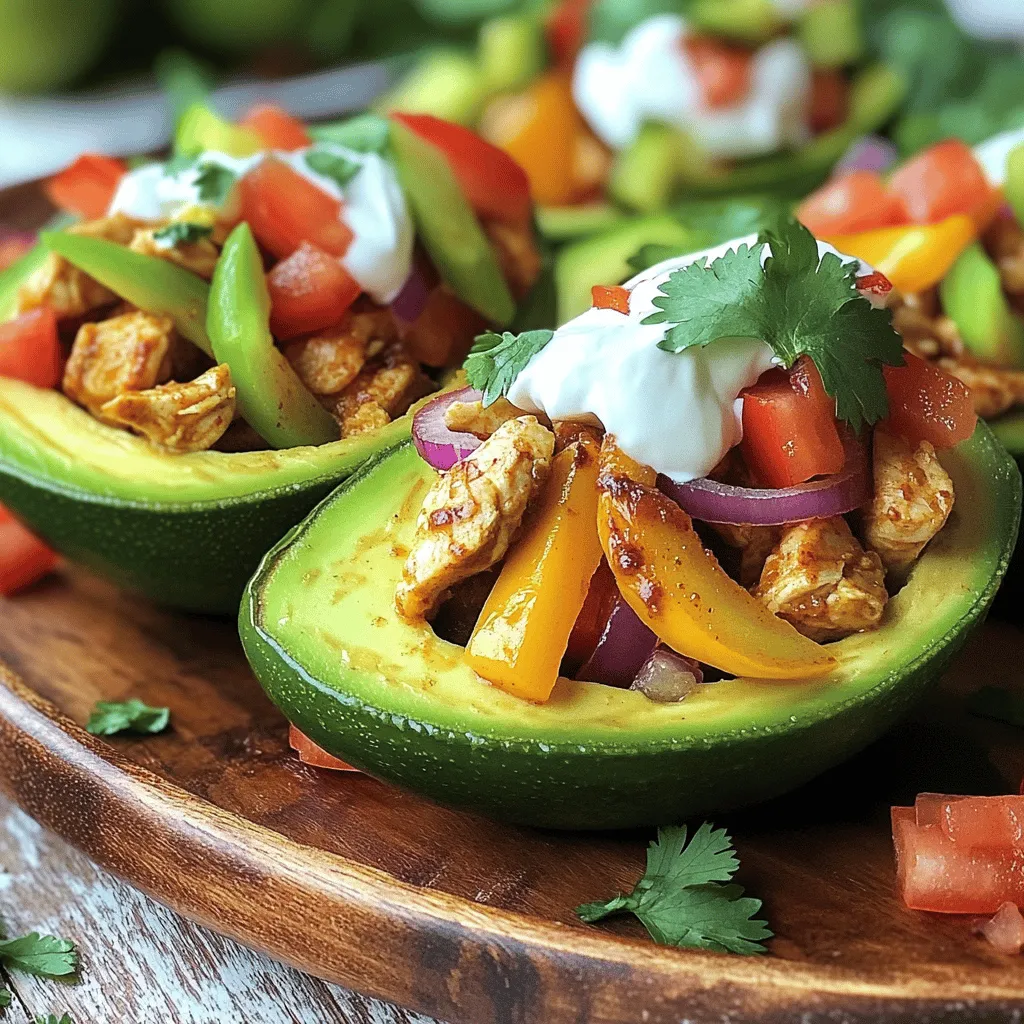
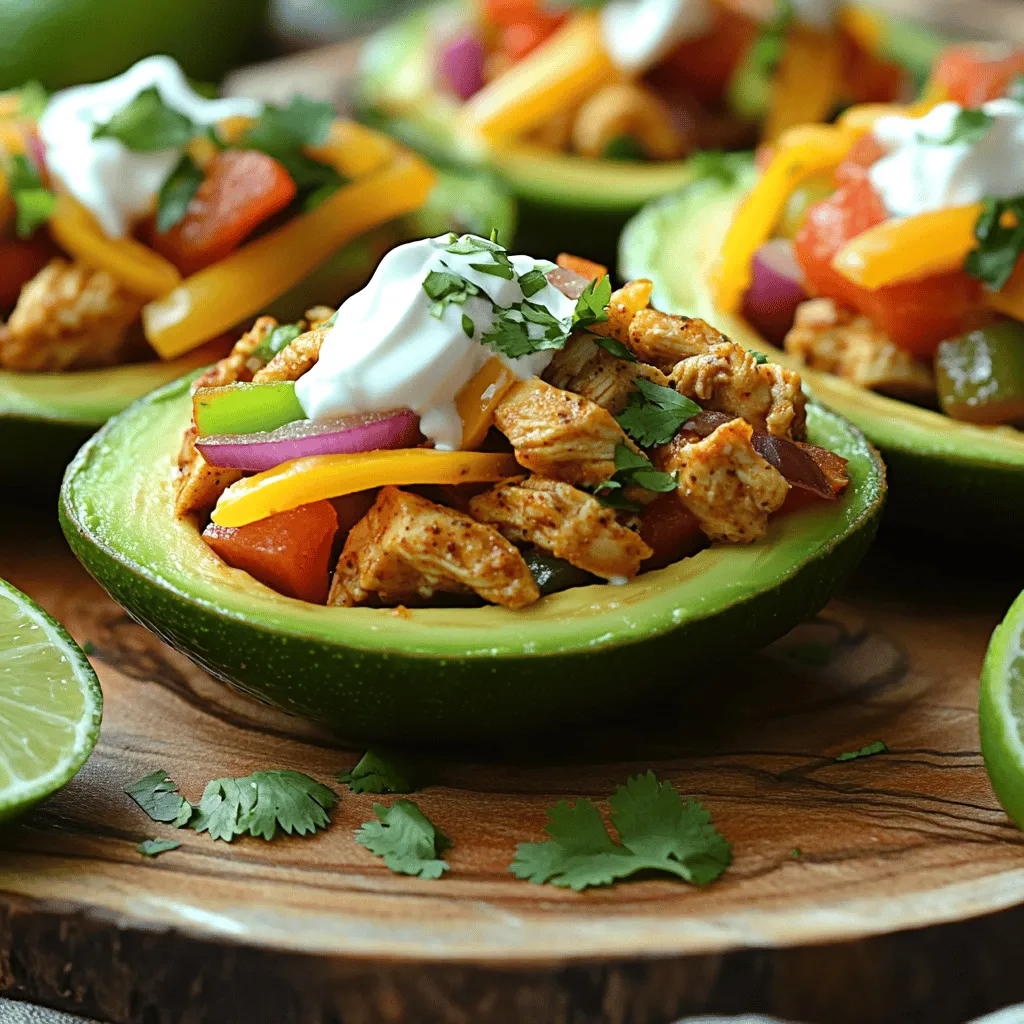
If you’re craving a tasty and healthy meal, Chicken Fajita Stuffed Avocados are the answer. This dish combines creamy avocados with seasoned chicken and fresh veggies, making it both delicious and nutritious. You’ll enjoy every bite of this colorful and fun meal. Whether you need a quick dinner or a fun lunch, I’ll show you how to make it easy and enjoyable. Let’s dive into the flavorful world of stuffed avocados!
Ingredients
Main Ingredients
– 2 ripe avocados
– 1 lb chicken breast, diced
– 1 bell pepper, sliced
– 1 small red onion, sliced
Seasoning and Toppings
– 2 tablespoons olive oil
– 1 tablespoon chili powder
– 1 teaspoon ground cumin
– 1 teaspoon garlic powder
– Salt and pepper to taste
– 1 cup fresh cilantro, chopped
– Juice of 1 lime
– Optional toppings: diced tomatoes, shredded cheese, sour cream
For these chicken fajita stuffed avocados, you need fresh, simple ingredients. Start with two ripe avocados. Look for ones that yield slightly when you press them. Next, choose one pound of chicken breast. Dice it into small pieces for even cooking. A bell pepper adds color and crunch. You can use any color you like. Lastly, slice one small red onion for that sweet flavor.
In terms of seasoning, you’ll need olive oil for cooking. Two tablespoons will do the job. Chili powder adds a nice kick, while ground cumin and garlic powder bring warmth. Don’t forget salt and pepper to taste. Fresh cilantro adds brightness and flavor. The juice of one lime will enhance everything and give it a fresh twist.
Optional toppings like diced tomatoes, shredded cheese, and sour cream can elevate your dish. They add extra flavor and a nice look.
Step-by-Step Instructions
Cooking Chicken and Vegetables
– Heat olive oil in a skillet over medium heat until it shimmers.
– Cook the diced chicken with chili powder, cumin, garlic powder, salt, and pepper. Cook for 6-7 minutes until fully cooked.
– Add the sliced bell pepper and onion. Cook for another 3-4 minutes until they soften but stay crisp.
Preparing the Avocados
– Halve the avocados and carefully remove the pit.
– Scoop out a bit of flesh from each half to make room for the filling.
Assembling the Dish
– Fill each avocado half with the warm chicken fajita mixture.
– Add optional toppings like diced tomatoes, shredded cheese, or sour cream for extra flavor.
This dish is fresh, healthy, and fun to eat.Enjoy making this colorful meal!
Tips & Tricks
Cooking Tips
– Ensure chicken is fully cooked before removing it from heat. This keeps the chicken safe to eat. It should be white inside, with no pink.
– Adjust seasoning to taste. Everyone’s preference is different, so feel free to add more chili powder or salt if you like a kick.
Presentation Tips
– Serve on a decorative platter. A colorful plate makes your dish pop and adds to the meal’s appeal.
– Drizzle with lime juice and sprinkle cilantro on top. This adds fresh flavor and a burst of color to your beautiful avocados.
These small steps make a big difference in how your Chicken Fajita Stuffed Avocados look and taste. Enjoy making this dish a feast for the eyes and the palate!
Variations
Different Proteins
You can swap chicken for shrimp or beef. Shrimp cooks quickly and adds a nice flavor. Beef gives a heartier taste. If you prefer a vegetarian option, try plant-based proteins. Tofu or tempeh works great in this dish. Just season them well to match the fajita flavor.
Flavor Enhancements
Want to take your dish up a notch? Add spices like chipotle or smoked paprika. They bring warmth and depth to the meal. You can also mix in extra veggies like corn or black beans. These not only add flavor but also increase the nutrition. Don’t hesitate to get creative! You can even add a bit of lime zest for a fresh twist.
Storage Info
Refrigeration Tips
To keep your Chicken Fajita Stuffed Avocados fresh, store the filling and avocados separately. This helps maintain texture and flavor. Use airtight containers for the chicken mixture. It keeps the filling moist and tasty. Avocados brown quickly, so keep them whole until you’re ready to eat.
Reheating Instructions
When you want to enjoy leftovers, reheat the chicken filling. You can use a skillet or microwave. Heat it until it’s warm, but don’t overcook it. Avoid reheating the avocados. They taste best when fresh. Prepare new avocado halves as needed. Enjoy each bite for the best flavor!
FAQs
Can I make Chicken Fajita Stuffed Avocados ahead of time?
Yes, you can prepare the chicken mixture ahead of time. Cook the chicken and veggies, then let them cool. Store this mix in the fridge for up to two days. When you are ready to eat, just fill the avocados and add toppings. This makes it easy for quick meals!
What can I substitute for avocado if I’m allergic?
If you are allergic to avocado, try using cucumber boats or zucchini halves. These options add crunch and a fresh taste. You can also use bell pepper halves as a tasty base. Both choices will hold the filling well.
How do I know when the avocados are ripe enough to use?
Ripe avocados feel slightly soft when you press them gently. The skin should be dark green or almost black. If it feels hard, it is not ripe yet. If it feels mushy, it may be overripe. Look for that sweet spot of softness!
– What sides pair well with Chicken Fajita Stuffed Avocados?
– Rice: Seasoned rice or cilantro lime rice adds a nice touch.
– Beans: Black beans or refried beans complement the flavors well.
– Salad: A fresh green salad with lime dressing brightens the meal.
– Chips: Serve with tortilla chips for a crunchy contrast.
This blog post covered how to make Chicken Fajita Stuffed Avocados. We explored the key ingredients, from ripe avocados to seasoned chicken. I shared step-by-step instructions for cooking and assembling the dish. You also learned tips for a tasty presentation and variations, such as using different proteins.
In closing, these stuffed avocados are a fun, healthy meal. Enjoy your cooking and feel free to get creative with your flavors!


![To make crispy air fryer chicken wings, you need the right ingredients. Here’s what you’ll need: - 2 pounds of chicken wings - 1 tablespoon baking powder - 1 teaspoon garlic powder - 1 teaspoon onion powder - 1 teaspoon smoked paprika - 1 teaspoon salt - ½ teaspoon black pepper - ½ teaspoon cayenne pepper (optional, for heat) - 2 tablespoons olive oil These ingredients help create a crunchy skin and juicy meat. The spice mix is key to adding flavor. The baking powder helps crisp the skin. Garlic and onion powders give a savory kick. Smoked paprika adds a touch of smokiness. The salt enhances all the flavors. Black pepper brings a mild heat, while cayenne adds more spice if you like it hot. You can add a few optional touches to enhance your dish. Fresh parsley, finely chopped, looks great as a garnish. It adds color and freshness to the wings. As for dipping sauces, ranch or blue cheese dressing pairs perfectly with these wings. You can also try hot sauce for an extra kick! For the full recipe, check out the main article. Start by preheating your air fryer to 400°F (200°C). This step is key for crispy wings. Make sure the fryer is empty and clean. Let it heat up while you prepare the chicken. Rinse 2 pounds of chicken wings under cold water. Pat them dry with paper towels. Dry wings help get that nice crunch. In a bowl, mix these spices: - 1 tablespoon baking powder - 1 teaspoon garlic powder - 1 teaspoon onion powder - 1 teaspoon smoked paprika - 1 teaspoon salt - ½ teaspoon black pepper - ½ teaspoon cayenne pepper (optional for heat) After mixing, add the wings to the bowl. Drizzle with 2 tablespoons of olive oil. Toss well so every wing gets coated. You want flavor in every bite! Carefully place the wings in the air fryer basket in a single layer. Avoid crowding them. This allows air to circulate and crisp them up. Cook for 25-30 minutes. Flip the wings halfway through for even cooking. Look for a golden-brown color and crispy texture. After cooking, let the wings rest for a few minutes. This keeps them juicy. Finally, garnish with fresh parsley and serve with ranch or blue cheese dressing. Enjoy your crispy air fryer chicken wings! You can find the full recipe above. To make your wings extra crispy, start with dry wings. Pat them well with paper towels. The baking powder helps create crunch. It pulls moisture away and makes the skin crisp. Air fry at 400°F (200°C) for the best results. Flip them halfway through to ensure even cooking. If you want more crunch, give them a quick broil after cooking. One mistake is overcrowding the air fryer basket. This stops air from flowing around the wings. Cook in batches if needed. Another error is not drying the wings enough. Wet wings lead to soggy skin. Lastly, avoid using too much oil. A little goes a long way. The oil helps the spices stick and adds flavor without making them greasy. Use a good air fryer that heats evenly. A basket-style air fryer works well. You’ll need mixing bowls for seasoning the wings. A set of measuring spoons is also handy for accuracy. Finally, have a good pair of tongs for flipping the wings safely. A meat thermometer can help check if they are cooked through. For the full recipe, be sure to check the linked instructions. {{image_4}} You can easily change the flavor of your wings. To make Buffalo wings, toss them in hot sauce before serving. For BBQ wings, add your favorite BBQ sauce after cooking. You can even mix flavors! Try garlic parmesan by adding garlic powder and parmesan cheese. Each variation brings a new taste to your plate. Wing sizes can change the cooking time. For small wings, cook for 20-25 minutes. Medium wings need about 25-30 minutes. Large wings may take 30-35 minutes. Always check for doneness. The internal temperature should reach 165°F (74°C). This ensures safe and tasty wings. If you don't have an air fryer, you can bake or fry wings. To bake, set your oven to 425°F (220°C) and cook wings for 40-45 minutes. Flip them halfway. For frying, heat oil to 350°F (175°C) and fry wings for 8-10 minutes. Each method offers its own delicious crunch. For the complete recipe, check out the [Full Recipe]. After enjoying your crispy air fryer chicken wings, you may have some left. To keep them fresh, place the wings in an airtight container. This helps keep moisture out. Store them in the fridge for up to three days. If you want to keep them longer, consider freezing them. To reheat your wings, the air fryer is best. Preheat it to 375°F (190°C). Place the wings in the basket in a single layer. Heat them for 5 to 10 minutes. This method helps keep the wings crispy. You can also use an oven, but the air fryer works wonders for crispiness. If you freeze your wings, they can last for up to three months. Place the cooled wings in a freezer-safe bag. Remove as much air as possible before sealing. When you want to eat them, thaw the wings overnight in the fridge. Then, reheat them in the air fryer for a crispy finish. This is a great way to enjoy your crispy air fryer chicken wings later. For the full recipe, check out the complete guide! To get crispy wings, start with dry wings. Use paper towels to remove excess moisture. Baking powder is your secret weapon! It helps make the skin crisp. Coat the wings evenly with the spice mix. Arrange them in a single layer in the air fryer. Don’t overcrowd them; air needs to flow. Flip the wings halfway through cooking for even crispiness. Keep an eye on them for a nice golden color. Yes, you can use frozen chicken wings! Just remember to thaw them first. You can leave them in the fridge overnight or run them under cold water. After thawing, pat them dry. Then, follow the same steps in the Full Recipe. Cooking time may be a bit longer, so check for doneness. When serving crispy wings, ranch and blue cheese dressings are classic choices. They add creaminess and balance the spice. You can also try honey mustard for sweetness or hot sauce for extra heat. Experiment with different sauces to find your favorite match! In this post, we explored how to make crispy air fryer chicken wings. We covered essential ingredients, step-by-step instructions, and helpful tips. You can experiment with flavors like buffalo and BBQ, too. Remember to store leftovers properly and reheat safely for the best taste. Enjoy your tasty wings and share them with friends or family. Now, you have all the tools to make crispy wings at home whenever you want. Happy cooking!](https://goldendishy.com/wp-content/uploads/2025/06/40ff0ca3-8982-419f-b213-91fbe0dabedd-768x768.webp)

![- 6 large eggs - 1/2 cup milk - 1 cup mixed bell peppers, diced - 1/2 cup onion, diced - 1 cup fresh spinach, chopped - 1/2 cup shredded cheese - 1/2 teaspoon garlic powder - 1/2 teaspoon salt - 1/4 teaspoon black pepper - Optional add-ins Egg muffins are simple to make. You can mix and match your favorite ingredients. The basic recipe is a great start, but you can add other items too. Here are some optional add-ins to consider: - Cooked turkey sausage, crumbled - Diced ham - Zucchini, grated - Mushrooms, sliced When you pick your veggies, choose fresh ones. Fresh ingredients add more flavor and nutrients. You can use any cheese you like. Cheddar and mozzarella work well. Don't forget to season your mix! The garlic powder, salt, and pepper enhance the taste. - Muffin tin - Mixing bowl - Whisk These tools are key for making your egg muffins. A muffin tin helps shape them perfectly. A mixing bowl allows you to combine your ingredients easily. A whisk mixes the eggs and milk until smooth. These items make the process quick and fun. With the right tools, you can whip up a tasty breakfast in no time. For the full recipe, check the detailed instructions in the next section. - Preheat the oven to 350°F (175°C). - Grease the muffin tin with cooking spray or olive oil. - In a large bowl, whisk together eggs and milk until smooth. - Add diced bell peppers, onion, spinach, and shredded cheese. - Sprinkle in garlic powder, salt, and black pepper. - If you like, fold in cooked turkey sausage or ham. Stir until mixed well. - Carefully pour the mixture into muffin cups, filling each about 3/4 full. - Place the muffin tin in the oven and bake for 18-20 minutes. - The muffins are done when they puff up and feel firm. - To check doneness, insert a toothpick. If it comes out clean, they are ready. - Let the muffins cool in the tin for a few minutes. - Gently remove them by running a knife around the edges. - Serve warm or store in an airtight container in the fridge for up to 5 days. For the full recipe, visit the Sunny Morning Egg Muffins section. To bake your egg muffins perfectly, set your oven to 350°F (175°C). Bake for 18 to 20 minutes. The muffins should rise and be firm in the center. To check for doneness, use a toothpick. If it comes out clean, they are ready! Enjoy these muffins warm for the best taste. They pair well with fresh fruit or yogurt. For a fun touch, arrange them on a bright platter. You can add fresh herbs like parsley for color. Avoid overfilling the muffin tins; fill them only about 3/4 full. This helps them puff up nicely. Also, grease the muffin tin well. If you skip this step, the muffins may stick and break apart. {{image_4}} You can mix and match your favorite veggies and cheeses for these egg muffins. Try using: - Broccoli florets - Zucchini, diced - Mushrooms, sliced - Feta cheese - Goat cheese Adding spices can bring your muffins to life. Consider: - Paprika for warmth - Cumin for a twist - Fresh herbs like basil or oregano Making these muffins gluten-free is easy. Just ensure you check your ingredients, like the milk and any add-ins. Use gluten-free sausage or skip the meat entirely. For a dairy-free version, try these tips: - Use almond or oat milk instead of regular milk. - Choose dairy-free cheese or leave it out altogether. Using seasonal veggies makes your muffins fresh and tasty. In spring, add asparagus. In summer, toss in tomatoes and corn. Fall is perfect for butternut squash and kale. You can also create holiday-themed muffins. Think of adding: - Spinach and feta for a festive green touch in December. - Pumpkin puree and spices for a cozy autumn flavor. To keep your egg muffins fresh, store them in an airtight container. Place the muffins in the fridge within two hours of cooking. These muffins stay tasty for up to 5 days. If you want them to last longer, consider freezing them. To freeze your muffins, let them cool completely. Then, wrap each muffin in plastic wrap. Place the wrapped muffins in a freezer-safe bag or container. They can stay in the freezer for up to three months. When you're ready to enjoy, take one out and reheat it. You can use the microwave for about 30 seconds or the oven at 350°F for 10-15 minutes. This way, your muffins taste fresh and delicious every time! Yes, you can make these egg muffins ahead of time. They store well in the fridge for up to five days. Just cool them first and keep them in an airtight container. This way, you can grab a muffin for breakfast on busy mornings. If you need a milk substitute, you can use non-dairy milk. Almond milk or oat milk works great. You can also use water or chicken broth for a different flavor. Each option will still keep your muffins moist and tasty. Customization is easy! You can change the veggies, cheeses, or meats you use. Add mushrooms, zucchini, or kale for more greens. Try feta or pepper jack cheese for a flavor twist. You can even add herbs like dill or cilantro for extra taste. These muffins are perfect for meal prep. They are easy to make in bulk and freeze well. Just bake a big batch, cool them, and store in the freezer. Reheat them in the microwave or oven whenever you want a quick meal. To check if your muffins are done, insert a toothpick in the center. If it comes out clean, they are ready. The muffins should puff up and feel firm. If they jiggle too much, give them a few more minutes to bake. Sunny Morning Egg Muffins are easy and fun to make. They are perfect for busy mornings. The ingredients come together quickly, and you can customize them to fit your taste. Ingredients summary: - 6 large eggs - 1/2 cup milk - 1 cup mixed bell peppers, diced - 1/2 cup onion, diced - 1 cup fresh spinach, chopped - 1/2 cup shredded cheese - 1/2 teaspoon garlic powder - 1/2 teaspoon salt - 1/4 teaspoon black pepper - Optional: 1/4 cup cooked turkey sausage or diced ham Brief cooking process recap: 1. Preheat your oven to 350°F (175°C). 2. Whisk eggs and milk in a bowl. 3. Mix in diced veggies, cheese, and spices. 4. Fill greased muffin tins with the mixture. 5. Bake for 18-20 minutes until puffed and firm. 6. Cool slightly before removing from the tin. This recipe makes 12 muffins, perfect for meal prep or sharing. Enjoy them warm or store for later! For the full recipe, check the [Full Recipe]. This blog post shared how to make easy and tasty egg muffins. You learned about the ingredients, kitchen tools, and step-by-step instructions. We discussed tips for perfect muffins and explored fun variations. Don't forget about storage info for leftovers and answers to common questions. These muffins are great for any meal. They are simple to customize and perfect for any diet. Now, get cooking and enjoy your delicious egg muffins!](https://goldendishy.com/wp-content/uploads/2025/06/04b743eb-2b91-42b7-82a4-c7d87238309b-768x768.webp)
![- 4 large eggs - 1 ripe avocado, mashed - 2 tablespoons Greek yogurt - 1 tablespoon Dijon mustard - 1 small red onion, finely chopped - 1 celery stalk, finely chopped - 1 tablespoon fresh lemon juice - 1 tablespoon fresh dill, chopped (or 1 teaspoon dried dill) - Salt and pepper to taste Gather these simple ingredients for a creamy and flavorful dish. The eggs provide protein, while the avocado brings richness. Greek yogurt adds a tangy creaminess that makes this salad stand out. Don't forget the Dijon mustard for a zesty kick. The red onion and celery add crunch and flavor. The fresh lemon juice brightens the dish and keeps it fresh. Dill offers a wonderful herbal note that complements the other flavors. For the full recipe, you can check out my detailed guide on making Avocado Egg Salad. This dish is not just easy but also very satisfying. Enjoy the blend of textures and tastes in every bite! - Place eggs in a saucepan with cold water. - Bring to a boil, then simmer for 9-12 minutes. Boiling eggs is simple. The cold water helps cook them evenly. If you like your yolks soft, aim for 9 minutes. For firmer yolks, 12 minutes works best. - Transfer to a bowl of ice water. - Peel under running water. After boiling, cool the eggs fast. The ice water stops the cooking. Let them sit for about 5-7 minutes. When peeling, run the eggs under water. This helps the shell come off easily. - Combine mashed avocado, Greek yogurt, Dijon mustard, and lemon juice. In a mixing bowl, mash the ripe avocado. Add Greek yogurt for creaminess, Dijon mustard for kick, and lemon juice for zest. Mix until smooth and creamy. - Add chopped eggs, onion, celery, and dill. - Fold gently to combine. Now, add the chopped eggs, onion, celery, and dill to the avocado mix. Use a spatula to fold everything together. Be gentle so the eggs stay in chunks. That’s how you get the perfect texture. For the full recipe, check out the details above! To make the best Avocado Egg Salad, start with the eggs. For a soft yolk, boil for 9 minutes. For a firm yolk, go for 12 minutes. Timing is key! After boiling, cool the eggs quickly. An ice bath is great for this. It stops the eggs from cooking further and makes peeling easy. For that rich and creamy texture, I use Greek yogurt instead of mayo. Greek yogurt adds protein and a tangy taste. If you want even more creaminess, check your avocado. A perfectly ripe avocado will give a smooth texture. If it's too firm, let it ripen a bit. Spice it up! A pinch of paprika or a dash of cayenne can add a kick. Fresh herbs can also change the game. Try adding dill, parsley, or chives for a flavor boost. Each herb brings a unique taste and aroma that makes this dish shine. These tips will help you create a delicious Avocado Egg Salad. For the complete recipe, check the [Full Recipe]. Enjoy your cooking! {{image_4}} You can easily swap ingredients to fit your diet. To make it vegan, use chickpeas instead of eggs. Just mash them up and mix well. They provide a nice texture and protein. For a lighter option, substitute Greek yogurt with low-fat yogurt. This keeps the salad creamy while cutting down on calories. Want to spice things up? Try adding diced bell peppers. They add crunch and a pop of color. You can also sprinkle in spices like paprika or garlic powder. These enhance the flavor and give your salad a unique twist. Experimenting with different herbs can also elevate your dish. How you serve this salad makes a big difference. You can spread it on toast or crackers for a quick snack. It also works great as a filling for sandwiches or wraps. This makes it perfect for lunch or picnics. You can even serve it in lettuce leaves for a light meal. Each option offers a new way to enjoy your creamy, flavorful dish. For the full recipe, check out Avocado Egg Salad with a Zesty Twist. To keep your avocado egg salad fresh, store it in the fridge. Use an airtight container to prevent air from spoiling the ingredients. This salad stays good for about 2-3 days. After that, the avocado may brown, and the flavor might fade. Always check for any off smells or changes in texture before eating leftovers. Freezing avocado egg salad is not recommended. The texture of avocado changes when frozen. If you freeze it, it may become mushy once thawed. Instead, prepare only what you need. If you have to freeze it, use an airtight container. This will help protect it from freezer burn. This salad is best served cold. If you must reheat it, do so gently. Use a microwave on low power for a short time. Stir it frequently to help maintain its texture. However, I suggest enjoying it cold for the best flavor and creaminess. If you want to mix things up, serve it on toasted bread or in a wrap. Enjoy the zesty taste! Yes, you can make Avocado Egg Salad ahead of time. It tastes even better after chilling. To prepare in advance, follow these tips: - Cook and cool the eggs, then chop them. - Mix the avocado, yogurt, mustard, and lemon juice. - Combine right before serving to keep the eggs fresh. - Store in an airtight container in the fridge for up to 24 hours. If you want creaminess, here are some substitutes: - Sour cream for a tangy flavor. - Silken tofu if you prefer a vegan option. - Cream cheese for a rich texture. Each option will change the taste a bit, so choose what you like best. To check if your avocado is ripe, look for these signs: - The skin should be dark green or black. - Gently press the avocado; it should yield slightly. - If it feels hard, it’s not ripe yet. Choose avocados that feel soft but not too mushy for the best results. Yes, store-bought mayonnaise works well in this recipe. Use it if you prefer a classic taste. Here’s how: - Replace Greek yogurt with an equal amount of mayo. - Mix it with the avocado and mustard for a creamy blend. This will give your egg salad a rich flavor. To make Avocado Egg Salad fit dietary needs, try these suggestions: - For nut-free, just stick to the original recipe. - For lactose-free, use a dairy-free yogurt or mayo. - For vegan, swap eggs with mashed chickpeas for protein. These options keep your dish tasty and inclusive. In this blog post, I shared a simple recipe for Avocado Egg Salad. We reviewed key ingredients, including eggs, avocado, and Greek yogurt. You learned steps to boil and mix the ingredients perfectly. I also offered tips for adding flavor and making dietary swaps. This dish is fun, healthy, and easy to make. Try it your way and enjoy the flavors! Whether you eat it in a wrap or on toast, it will be a hit. Prepare it fresh or store leftovers; you won't regret it.](https://goldendishy.com/wp-content/uploads/2025/06/e93c3c70-9342-49f9-9c4a-33a1a85bd889-768x768.webp)