7. Classic Beef Stroganoff Delicious Comfort Food Recipe

Looking for a taste of comfort? You’re in the right place! This classic beef stroganoff recipe brings rich flavors and warm memories to your table. With tender beef, savory mushrooms, and creamy sauce, it’s a dish that never fails to impress. Whether you’re a beginner or a seasoned cook, I’ll guide you step-by-step to create a comforting meal that your family will love. Let’s get cooking!
Ingredients
Main Ingredients for Beef Stroganoff
– 1 lb beef sirloin, thinly sliced
– 2 tablespoons olive oil
– 1 medium onion, finely chopped
– 2 cloves garlic, minced
– 8 oz mushrooms, sliced (cremini or button)
– 2 tablespoons all-purpose flour
– 2 cups low-sodium beef broth
The main ingredients are all about balance. The beef sirloin gives the dish its rich flavor. The olive oil adds a nice sheen and depth to the meat. Onions and garlic bring sweetness and warmth. Mushrooms add a savory touch and texture. Flour thickens the sauce to a creamy finish, while beef broth forms the base.
Additional Ingredients
– 1 tablespoon Worcestershire sauce
– 1 teaspoon Dijon mustard
– 1 cup sour cream
– Salt and pepper to taste
– Fresh parsley, chopped (for garnish)
These extra ingredients elevate the dish. Worcestershire sauce gives a hint of umami. Dijon mustard adds a subtle kick. Sour cream finishes the sauce with creaminess. Salt and pepper enhance all the flavors, while parsley brightens the plate.
Serving Suggestions
– Cooked egg noodles or rice (for serving)
– Store leftovers in an airtight container
Egg noodles or rice are classic choices to serve with Beef Stroganoff. They soak up the sauce well. For leftovers, store them in an airtight container in the fridge. This way, you keep the flavors intact for another meal.
Step-by-Step Instructions
Step 1: Brown the Beef
First, heat 2 tablespoons of olive oil in a large skillet. Make sure the oil is hot before adding the beef. Add 1 pound of thinly sliced beef sirloin. Season it well with salt and pepper. Cook the beef for about 3-4 minutes. You want it to be a nice brown color. This step adds flavor. Once browned, transfer the beef to a plate and set it aside.
Step 2: Sauté the Aromatics
In the same skillet, add 1 medium finely chopped onion. Cook it for about 2-3 minutes until it turns translucent. Then, add 2 cloves of minced garlic. Stir it for a minute. Next, add 8 ounces of sliced mushrooms. Cook them for about 5 minutes. The mushrooms should be tender and have released their juices. This will enhance the dish’s flavor.
Steps 3-7: Creating the Sauce and Serving
Now, sprinkle 2 tablespoons of all-purpose flour over the mushroom mixture. Stir well to coat everything. This helps cook off the raw taste of flour. Gradually pour in 2 cups of low-sodium beef broth while stirring. Add 1 tablespoon of Worcestershire sauce and 1 teaspoon of Dijon mustard. Mix until everything is combined. Let it simmer gently to thicken.
Next, reduce the heat to medium. Return the browned beef to the skillet. Let it simmer in the sauce for about 5 minutes. Then, stir in 1 cup of sour cream. Mix until the sauce is creamy. Taste it and adjust salt and pepper as needed.
For the side, cook egg noodles or rice according to package directions. Drain and keep warm.
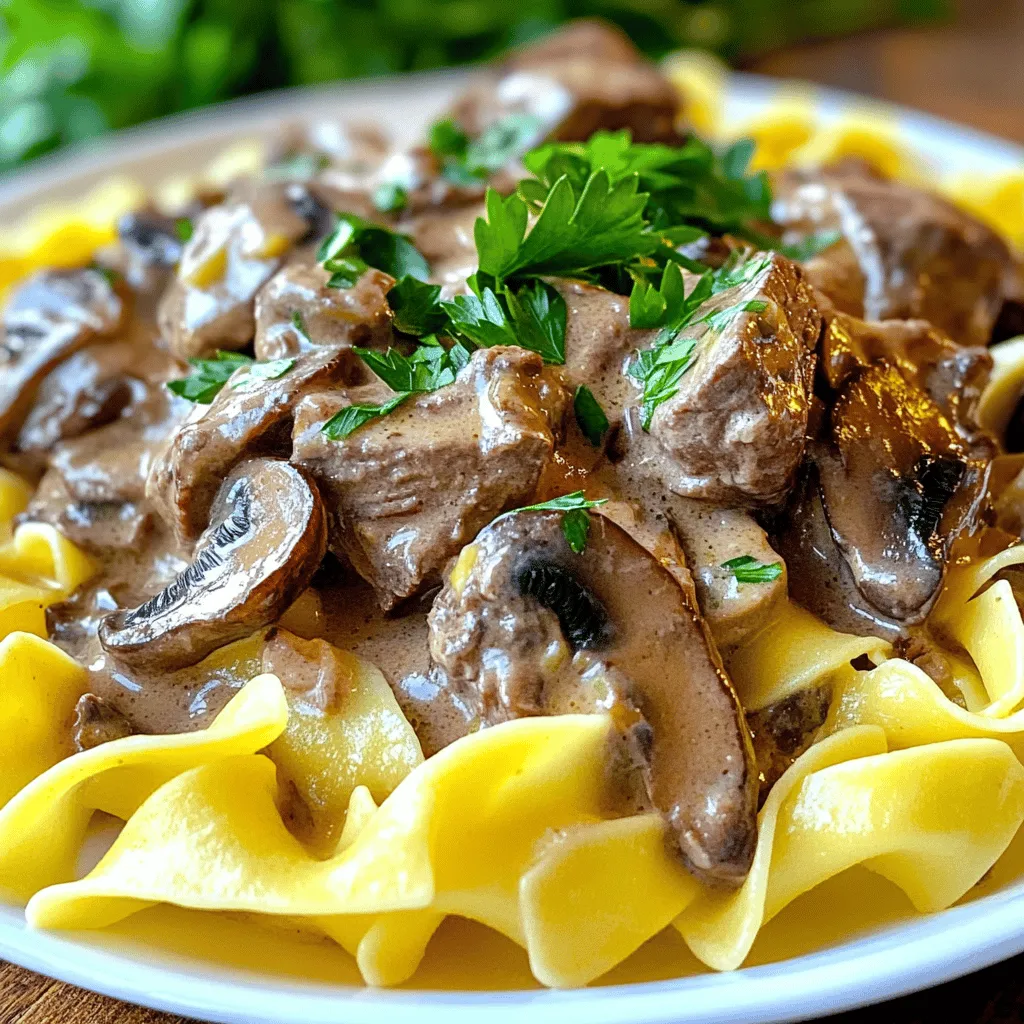
To serve, place egg noodles or rice on each plate. Spoon the beef stroganoff mixture over the top. Garnish with fresh chopped parsley for a nice finish. This makes the dish look great and taste even better.
Tips & Tricks
Perfecting Your Beef Stroganoff
To make your beef stroganoff shine, avoid overcooking the beef. Cook it just until it’s browned. This keeps the meat tender. Next, to achieve that creamy sauce, add sour cream off the heat. This prevents it from curdling. Stir it in gently for a smooth finish.
Enhancements to the Recipe
You can add some spices for extra flavor. Try a pinch of paprika or a dash of nutmeg. For a twist, add some fresh thyme or dill. They bring a nice aroma. As for garnishes, consider using fresh parsley or chives. They add color and freshness to your dish.
Cooking Tools & Equipment
Use a heavy skillet for even cooking. A non-stick pan can help prevent sticking. Make sure to have a good wooden spoon for mixing. It helps combine all the ingredients well. Accurate measuring cups and spoons are key too. They ensure you get the right amounts for each ingredient.
This information should help you create the best beef stroganoff.Enjoy your cooking!

Variations
Alternative Proteins
You can use chicken or pork instead of beef for Beef Stroganoff. Thinly slice chicken breast or pork tenderloin for a tasty twist. Cook them the same way as the beef, and you’ll enjoy a new flavor. If you want a vegetarian option, try using mushrooms, tofu, or lentils. These ingredients can create a rich, hearty dish without meat.
Gluten-Free Adaptations
If you need a gluten-free recipe, there are easy flour substitutes. Use cornstarch, rice flour, or almond flour instead of regular flour. Just mix the substitute with a little water before adding it to your sauce. This will help keep the sauce smooth. You can also check your beef broth for gluten-free options. Cook the dish with the same steps, and you’ll get a great meal.
Flavor Variations
You can add different vegetables to your Beef Stroganoff for extra taste. Try bell peppers, spinach, or peas to brighten the dish. You can also experiment with unique ingredients like mustard, soy sauce, or even a splash of white wine. These can change the flavor profile and make your dish stand out. Don’t be afraid to explore different sauces to find your perfect mix.
Storage Info
Storing Leftovers
To store leftover Beef Stroganoff, let it cool first. Place it in an airtight container. You can keep it in the fridge for up to three days. For longer storage, freeze it in a freezer-safe container. It can last up to three months in the freezer.
Reheating Tips
When you’re ready to eat your leftovers, reheat them gently. Use a skillet over low heat. Stir often to prevent sticking. If the sauce gets too thick, add a splash of beef broth or water to adjust the consistency. This keeps it creamy and delicious.
Meal Prep Suggestions
To make busy days easier, you can prepare Beef Stroganoff in advance. Cook a big batch and store it in portions. Freeze these portions for quick meals later. Just thaw in the fridge overnight before reheating. This saves time and effort while still giving you great comfort food.
FAQs
What is the best beef to use for Beef Stroganoff?
For a tasty Beef Stroganoff, I recommend using beef sirloin or tenderloin. These cuts are soft and cook quickly. Flank steak is another option, but it can be chewier. Always slice the beef thinly against the grain for the best results. This helps it stay tender when cooked.
Can I make Beef Stroganoff ahead of time?
Yes, you can prepare Beef Stroganoff ahead of time. Cook the dish completely, then let it cool. Store it in an airtight container in the fridge for up to three days. When ready to eat, simply reheat on the stove over low heat. You may need to add a splash of broth to keep it moist.
How do I make Beef Stroganoff less rich?
To lighten Beef Stroganoff, you can use low-fat sour cream instead of regular sour cream. You can also reduce the amount of beef broth or use plain Greek yogurt. This keeps the flavor while cutting some fat. Lastly, skip the butter or oil when cooking.
Is Beef Stroganoff suitable for freezing?
Yes, Beef Stroganoff freezes well. Let it cool completely, then place it in a freezer-safe container. It can stay in the freezer for up to three months. To thaw, move it to the fridge overnight. Reheat gently on the stove when ready to serve.
Can I add vegetables to Beef Stroganoff?
Absolutely! You can add vegetables like peas, bell peppers, or spinach for extra flavor and nutrition. Just sauté them with the onions and mushrooms. This will add color and make the dish more balanced. Feel free to mix and match your favorite veggies!
Beef Stroganoff is a hearty dish with rich flavors. We covered key ingredients, from beef sirloin to sour cream. I shared step-by-step cooking tips for a creamy sauce and serving ideas. You learned how to avoid common mistakes and enhance the meal with different flavors. For storage, you now know how to keep leftovers fresh and reheat properly. This recipe is adaptable, allowing for many variations to suit your taste. Enjoy preparing and sharing this comforting meal with others!


![To make maple glazed butternut squash, you’ll need the following items: - 1 medium butternut squash, peeled and cut into 1-inch cubes - 3 tablespoons pure maple syrup - 2 tablespoons extra virgin olive oil - 1 teaspoon ground cinnamon - 1/2 teaspoon freshly grated nutmeg - 1/4 teaspoon cayenne pepper (optional, for a kick) - Sea salt and freshly cracked black pepper, to taste - 1/4 cup pecans, roughly chopped (for garnish) - Fresh parsley, finely chopped (for garnish) When cooking, measuring accurately is key. Use dry measuring cups for solid items like squash and nuts. For liquids, use a liquid measuring cup. Always level off dry ingredients with a straight edge. This step ensures you get the right amount for best results. You can swap ingredients based on your needs. If you prefer a sweeter taste, try honey instead of maple syrup. For a nut-free option, skip the pecans or use seeds like pumpkin seeds. Always check for allergies, especially with nuts and spices. To make maple glazed butternut squash, start by gathering your ingredients. You'll need: - 1 medium butternut squash, peeled and cut into 1-inch cubes - 3 tablespoons pure maple syrup - 2 tablespoons extra virgin olive oil - 1 teaspoon ground cinnamon - 1/2 teaspoon freshly grated nutmeg - 1/4 teaspoon cayenne pepper (optional) - Sea salt and freshly cracked black pepper, to taste - 1/4 cup pecans, roughly chopped (for garnish) - Fresh parsley, finely chopped (for garnish) First, preheat your oven to 400°F (200°C). This step is key for good roasting. Next, peel and cube the butternut squash. Place the cubes in a large bowl. Drizzle the olive oil and maple syrup over the squash. Then, sprinkle the ground cinnamon, nutmeg, cayenne, sea salt, and black pepper. Toss gently until all the pieces are well coated. Now, it's time to roast your squash. Line a baking sheet with parchment paper. This helps prevent sticking and makes cleanup easy. Spread the coated squash in a single layer on the sheet. Place the baking sheet in the oven. Roast the squash for 25-30 minutes. About halfway through the cooking time, stir the squash. This ensures all sides caramelize and cook evenly. When the squash is fork-tender and has a nice golden color, it's done. Remove it from the oven and let it cool for 2-3 minutes. To get that perfect caramelization, watch your cooking time closely. Stirring halfway through helps. The key is to spread the squash out evenly. If it's too crowded, it will steam instead of roast. You can also adjust the maple syrup for sweetness. A little extra can help with caramelization. If you like a kick, add the cayenne pepper. It balances the sweet and savory flavors beautifully. Once cooked, transfer the squash to a serving dish. Top with chopped pecans and parsley for a fresh touch. This dish is sure to impress! For the complete recipe, check out the [Full Recipe]. When making maple glazed butternut squash, avoid cutting the squash too small. Smaller pieces cook too fast and can burn. Also, don’t skip the olive oil. It helps the squash caramelize and adds flavor. Overcrowding the baking sheet is another mistake. Leave space between the cubes to ensure even cooking. To boost the flavor, add a splash of balsamic vinegar before roasting. This adds depth to the sweetness. Try different spices, too. A pinch of smoked paprika can give a nice twist. For a savory touch, mix in garlic powder or fresh garlic. These will elevate your dish. Use a sturdy baking sheet lined with parchment paper. This helps with easy cleanup and prevents sticking. A large mixing bowl is great for tossing the squash and spices. If you have one, a vegetable peeler makes peeling the squash quick and easy. For a perfect roast, an oven thermometer ensures your oven is at the right temperature. For the full recipe, refer to the above instructions. {{image_4}} You can make this dish even better by adding other veggies. Try sweet potatoes for a richer flavor. Carrots add sweetness and color, while red onions bring a slight bite. Just cut them into similar sizes as the squash. Toss them in the same maple glaze for a yummy blend. You’ll create a colorful and flavorful dish that everyone will love. Want to change the taste? You can use different spices. Try ginger for a warm kick. If you like it spicy, add more cayenne pepper. You can also use smoked paprika for a smoky flavor. Experiment with herbs like thyme or rosemary. Just remember to keep it balanced, so no single flavor overpowers the dish. This recipe is naturally vegan and gluten-free. You can enjoy it without worry. If you want to add protein, try chickpeas. They pair well with the flavors and add a nice crunch. For those who need low-carb options, skip the maple syrup and use a sugar substitute. It’s easy to adapt this dish to fit your needs. For the full recipe, check out the detailed instructions above. To keep your maple glazed butternut squash fresh, store it in an airtight container. Let the squash cool down after cooking. Then, place it in the fridge. It will stay fresh for about 3 to 5 days. If you want to keep it longer, consider freezing. Reheat your butternut squash in the oven for the best results. Preheat your oven to 350°F (175°C). Spread the squash on a baking sheet. Heat it for about 10-15 minutes or until warm. You can also use the microwave. Place it in a microwave-safe dish and cover it. Heat in short bursts, checking to avoid overcooking. Freezing is a great way to save this dish for later. First, let the squash cool completely. Then, spread it on a baking sheet in a single layer. Freeze it for about 1-2 hours until firm. Once frozen, transfer the squash to a freezer-safe bag or container. It can last for up to 3 months in the freezer. When ready to eat, thaw overnight in the fridge before reheating. For more details, check the Full Recipe. Yes, you can prepare this dish ahead of time. Cook the butternut squash and let it cool. Store it in an airtight container in the fridge. You can make it up to two days in advance. When you're ready to eat, just reheat it in the oven or microwave. This makes it great for meal prep. Maple glazed butternut squash lasts about 3 to 5 days in the fridge. Make sure it’s in a sealed container. Check for any signs of spoilage before eating. If it looks or smells off, it’s best to toss it. Freshness is key for enjoying this tasty dish. You can pair this dish with many foods. It goes well with roasted chicken or turkey. You can also serve it with quinoa or brown rice for a healthy meal. For a vegetarian option, pair it with a bean salad. The sweet and savory flavors work well with many sides. For more details on how to whip up this incredible dish, check out the Full Recipe. This guide walked you through each step of making Maple Glazed Butternut Squash. We covered ingredients, how to prepare, cook, and store your dish. I shared tips to avoid mistakes and ideas for adding your own twist. Remember, the key to perfect caramelization is patience. Enjoy experimenting with flavors and variations. This dish can be a crowd-pleaser and is easy to adapt. I hope you feel ready to try it out. Enjoy your cooking!](https://goldendishy.com/wp-content/uploads/2025/07/e9e7eb41-1a1b-4d7a-9d20-35ffe8b1aa92-768x768.webp)


![- 1 lb boneless, skinless chicken breast - Soy sauce, honey, rice vinegar, sesame oil - Fresh garlic and ginger The main stars of this dish are the chicken and the sauce. Start with 1 pound of boneless, skinless chicken breast. Cut it into 1-inch cubes for even cooking. You’ll also need soy sauce for that salty umami flavor. Honey adds sweetness, while rice vinegar gives a nice tang. Don't forget the sesame oil, which adds a rich, nutty taste. Fresh garlic and ginger bring a wonderful aroma and flavor to the mix. - Red and green bell peppers - Zucchini - Scallions and sesame seeds for garnish Adding vegetables makes your skewers colorful and tasty. Use red and green bell peppers cut into 1-inch squares. They add crunch and sweetness. Sliced zucchini rounds are great for texture and taste. For garnish, sprinkle chopped scallions and sesame seeds on top. They add a nice pop of flavor and look pretty, too. - Wooden skewers or metal skewers - Cornstarch for sauce thickening You will need skewers to hold all the goodness together. If you choose wooden skewers, soak them in water for about 30 minutes. This helps prevent burning on the grill. Metal skewers are a great option too. For the teriyaki sauce, you will use cornstarch mixed with water to make it thick and glossy. This will give your chicken a beautiful glaze. For the full recipe, check the section above on how to bring these ingredients together into a delightful dish. To start, gather your marinade ingredients. In a bowl, mix the soy sauce, honey, rice vinegar, sesame oil, minced garlic, and grated ginger. Whisk until everything blends well. Add the chicken breast cubes, making sure they are well coated. Cover the bowl with plastic wrap. Place it in the fridge for at least 30 minutes. For a stronger flavor, marinate for up to 2 hours. This step is key to juicy, flavorful chicken. If you use wooden skewers, soak them in water for at least 30 minutes. This helps stop them from burning. While the skewers soak, preheat your grill or grill pan to medium-high heat. A hot grill will give your skewers those perfect grill marks and lock in the flavors. After marinating, take the chicken out of the fridge. Start threading the marinated chicken onto the skewers. Alternate with pieces of red and green bell peppers and zucchini slices. Leave small gaps between each piece for even cooking. Now, place the skewers on the hot grill. Grill them for about 10 to 12 minutes. Turn them occasionally to ensure even cooking. The chicken should reach an internal temperature of 165°F. You’ll know they are done when they have beautiful grill marks and smell amazing. For the best flavor, marinate the chicken for at least 30 minutes. If you have time, let it soak for up to 2 hours. This longer marinating time helps the chicken absorb all the tasty flavors. To boost the flavor even more, add a splash of orange juice or sprinkle some chili flakes into the marinade. These small changes can make a big difference. To get those nice grill marks, preheat your grill to medium-high heat. Once you place the skewers on, resist the urge to move them around too much. Let them cook for about 10-12 minutes. Flip them only when they lift easily from the grill. To know if the chicken is done, use a meat thermometer. The safe internal temperature for chicken is 165°F. This ensures your skewers are juicy and safe to eat. When serving your Chicken Teriyaki Skewers, make it look nice! Arrange them on a platter, maybe on a bed of fresh lettuce. You can also serve them with a small bowl of extra teriyaki sauce for dipping. For sides, consider steamed rice or a fresh salad. The colors of the skewers and the sides will create a beautiful meal. This makes it more fun to eat and share! {{image_4}} You can switch up the protein in your skewers. Shrimp works great, too. Just remember to cook shrimp for only 4-6 minutes. Tofu is another good choice. Use firm tofu and press it first to remove extra water. Then, cut it into cubes. Tofu takes about the same time as chicken to cook. For a plant-based twist, try a marinade with soy sauce, maple syrup, and garlic. It will give you great flavor without meat. You can make vegetable-only skewers with bell peppers, zucchini, mushrooms, and cherry tomatoes. These cook quickly and taste amazing on the grill. You can make your skewers even better with spices. Adding chili flakes or smoked paprika gives a nice kick. You can also try different sauces like peanut or hoisin sauce. Mix in veggies like onions or asparagus for more color and taste. These small changes can make your Chicken Teriyaki Skewers unique and fun. For the full recipe, check out the detailed instructions above. When you have leftover chicken teriyaki skewers, store them properly. Place the skewers in an airtight container. This helps keep them fresh. Refrigerate them within two hours of cooking. It’s best to eat them within three days. Use glass or plastic containers with tight lids. These containers prevent air from getting in. You can also wrap them in aluminum foil. Just make sure they are sealed well. This keeps your skewers moist and tasty. To reheat your skewers, use an oven or a stovetop. Both methods keep the chicken juicy. If using an oven, set it to 350°F. Place the skewers on a baking sheet. Heat for about 10 minutes. For stovetop reheating, use a non-stick pan. Add a splash of water to the pan. Cover it with a lid. This helps steam the skewers and keeps them moist. Avoid reheating them in the microwave. Microwaves can make the chicken dry. Instead, always check the internal temperature. It should reach 165°F for safe eating. If you want to freeze the chicken skewers, do it right after cooking. Let them cool completely first. Wrap each skewer in plastic wrap. Then place them in a freezer bag. This helps prevent freezer burn. To thaw, move the skewers to the fridge a day before you want to eat them. This keeps them safe and tasty. If you need to thaw them faster, use the microwave on the defrost setting. But make sure to cook them right away after. For the best results, enjoy your chicken teriyaki skewers fresh. But if you follow these steps, leftovers can still taste great! For the full recipe, check it out [Full Recipe]. To check if your Chicken Teriyaki Skewers are done, use a meat thermometer. The chicken should reach an internal temperature of 165°F (75°C). This step is key for food safety. If you don't have a thermometer, make sure the juice runs clear when you cut the chicken. No pink should show. Yes, you can make the teriyaki sauce ahead of time. Mix the ingredients and store it in the fridge. This makes your meal prep easier. You can also make a larger batch and freeze it. Just thaw it before use. This way, your meal cooks faster. Chicken Teriyaki Skewers pair well with many side dishes. You might try steamed rice or quinoa for a filling option. A fresh salad adds a nice crunch. You can also serve them with grilled vegetables for a colorful plate. These sides will enhance the flavors and balance the meal. Chicken Teriyaki skewers are easy and fun to make. You learned about key ingredients like chicken, vegetables, and sauce. I shared step-by-step instructions for marinating, preparing, and grilling. You also saw tips for perfecting your dish and some tasty variations. In the end, you can enjoy these skewers any way you like. With proper storage and reheating, leftovers can be just as delicious. I hope this guide helps you create a tasty meal that you will love!](https://goldendishy.com/wp-content/uploads/2025/07/34476f9e-f69f-487d-af01-da0dcfe0a0e7-768x768.webp)

