Spicy Chickpea Curry Flavorful and Easy to Make

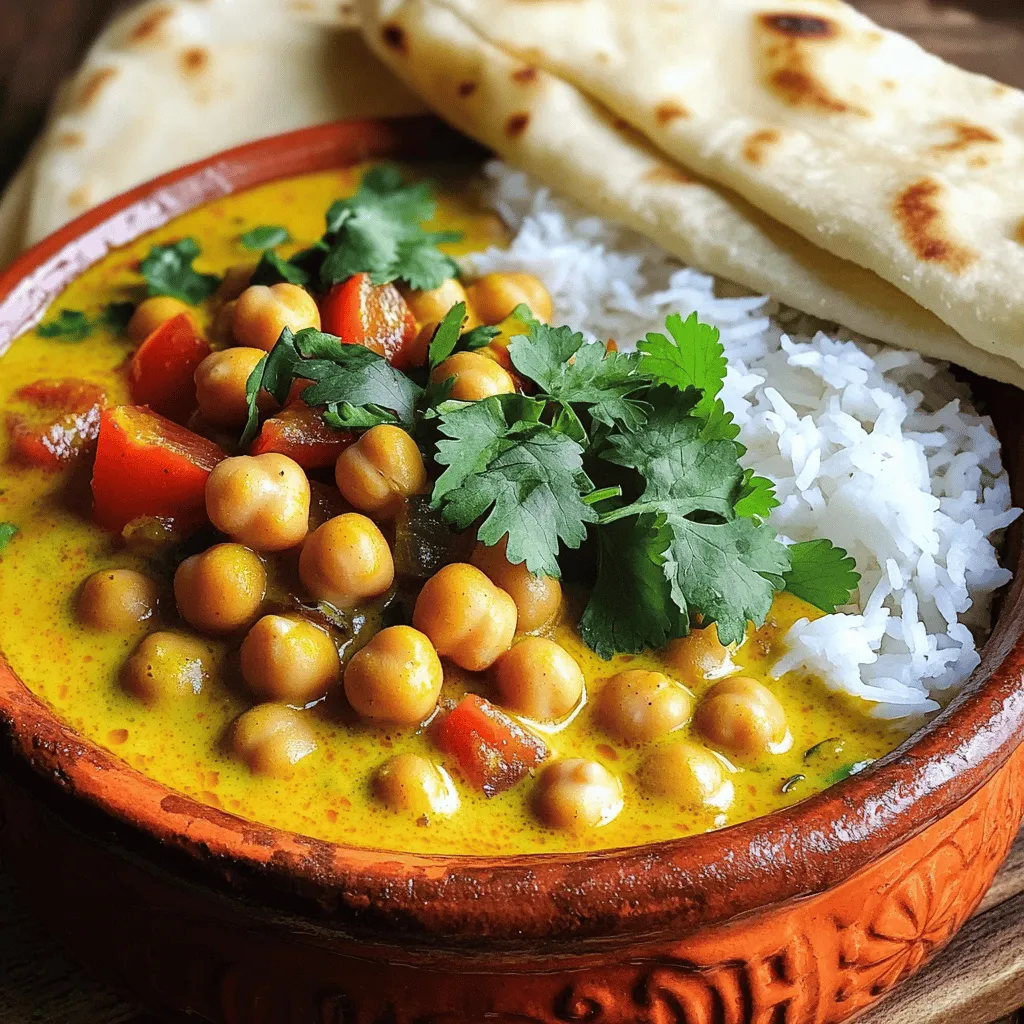
Are you ready to spice up your dinner routine? This Spicy Chickpea Curry is not only bursting with flavor but also super easy to make. In just a few simple steps, you can create a warm, hearty dish that your whole family will love. From the essential ingredients to cooking tips, I’ll guide you through making the best curry ever. Let’s dive into this delicious recipe that will have your taste buds dancing!
Ingredients
Essential Ingredients for Spicy Chickpea Curry
To make a tasty spicy chickpea curry, you need key ingredients. They form the base of the dish. Gather these items:
– 2 cans of chickpeas, rinsed and drained
– 1 large onion, finely chopped
– 4 cloves garlic, minced
– 1-inch piece fresh ginger, grated
– 1 can (14 oz) full-fat coconut milk
– 2 medium ripe tomatoes, diced
– 2 tablespoons curry powder
– 1 teaspoon ground cumin
– 1 teaspoon turmeric powder
– 1 teaspoon chili powder (adjust to taste)
– 2 tablespoons vegetable oil
– Salt to taste
– Fresh cilantro, roughly chopped, for garnish
– Cooked rice or warm naan for serving
These ingredients come together to create a rich and creamy curry. The chickpeas add protein and fiber, while the spices deliver warmth and flavor.
Optional Ingredients for Extra Flavor
You can enhance your curry by adding optional ingredients. These add depth and freshness. Consider these additions:
– 1 bell pepper, diced
– 1 cup spinach or kale, chopped
– 1 tablespoon lemon juice
– A handful of peas
These ingredients boost nutrition and flavor. They also make the dish more colorful and appealing.
Spice Substitutions and Alternatives
If you need to swap spices, you have options. Here are some alternatives:
– Use garam masala instead of curry powder for a different flavor.
– Try coriander powder in place of cumin for a milder taste.
– If you like heat, add cayenne pepper instead of chili powder.
These substitutions help you tailor the curry to your taste. Don’t be afraid to experiment with spices! You can create your own signature flavor.
Step-by-Step Instructions
Overview of Cooking Process
Making spicy chickpea curry is simple and fun. You start by cooking onion, garlic, and ginger. Then, you add spices and tomatoes. Finally, you mix in chickpeas and coconut milk. The whole process takes about 35 minutes.
Detailed Cooking Steps for Perfect Curry
1. In a large pot, heat 2 tablespoons of vegetable oil over medium heat until it shimmers.
2. Add the finely chopped onion and sauté for about 5-7 minutes. Wait until the onion is soft and clear.
3. Next, add 4 minced garlic cloves and 1-inch grated ginger. Cook for 2 minutes. You will smell the goodness!
4. Now, stir in 2 diced tomatoes, 2 tablespoons of curry powder, 1 teaspoon of cumin, 1 teaspoon of turmeric, and 1 teaspoon of chili powder. Cook for 3-4 minutes. This helps the tomatoes break down.
5. Add 2 cans of rinsed chickpeas and 1 can of coconut milk. Stir well to mix everything.
6. Bring the mix to a gentle simmer. Let it heat through, about 15-20 minutes. Stir often to avoid sticking.
7. Season with salt to taste. When the sauce thickens, it’s ready!
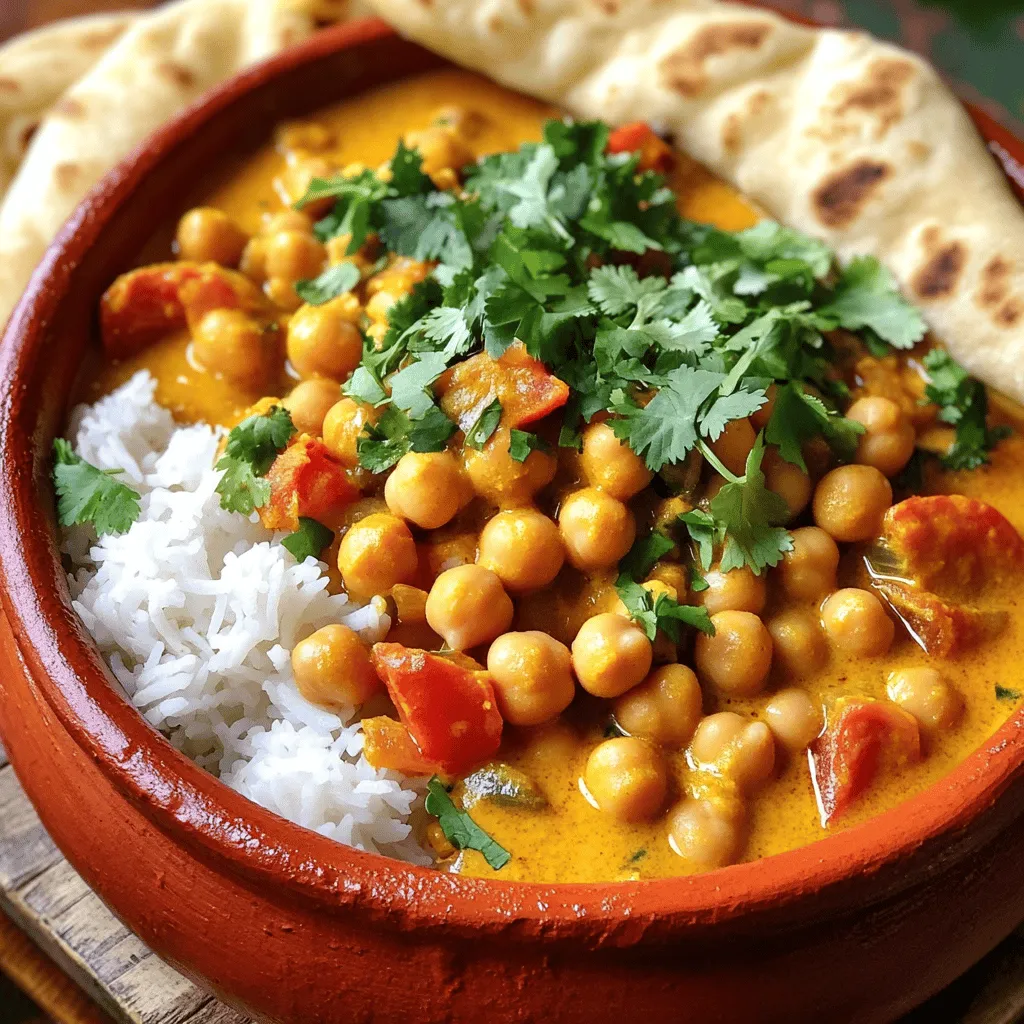
8. Remove from heat, and garnish with fresh cilantro. Serve hot with rice or naan.
Cooking Times and Temperature Tips
Cook the onions at medium heat. This helps them soften nicely. When simmering, keep it low to avoid burning. You want the curry to blend well, so patience is key. Enjoy the wonderful smells while it cooks!
Tips & Tricks
How to Achieve the Best Flavor
To make your spicy chickpea curry burst with flavor, focus on fresh ingredients. Use ripe tomatoes for sweetness and fresh ginger for heat. Sauté onions until they are soft and sweet, about 5-7 minutes. This step builds a strong base. Don’t rush the cooking time; let the spices bloom in the oil. This releases their full aroma and taste.
Common Mistakes to Avoid
One common mistake is adding salt too early. Salt can draw out moisture, which slows cooking. Wait until later to add salt for the best taste. Another mistake is not letting the curry simmer. Simmering helps the flavors meld together. If you skip this step, your dish may taste flat.
Garnishing Suggestions for Presentation
Garnish is key to a great dish. Use freshly chopped cilantro to add color and freshness. You can also add a squeeze of lime for a zesty kick. Serve your curry in a large bowl to showcase the vibrant colors. Pair it with rice shaped into small mounds or neatly folded naan. This makes your meal look inviting and delicious.

Variations
Vegan and Gluten-Free Adaptations
You can easily make this dish vegan and gluten-free. The spicy chickpea curry is already vegan. You use coconut milk for creaminess instead of dairy. This makes it rich and tasty. For gluten-free options, just check your curry powder and spices. Most are gluten-free, but it’s safe to verify.
Ingredient Variations for Different Flavors
Feel free to switch up some ingredients for new tastes. Add spinach or kale for a green boost. If you like heat, toss in diced jalapeños or more chili powder. Want a smoky flavor? Use smoked paprika instead of regular paprika. You can also add sweet potatoes or carrots for sweetness.
Regional Twists on Chickpea Curry
Different cultures have their own takes on chickpea curry. In India, you might find it with garam masala and coconut. The Middle East often adds lemon and tahini for zest. In North Africa, try adding saffron and raisins for a sweet touch. Explore these twists to find your favorite version!
Storage Info
How to Store Leftovers Properly
To keep your spicy chickpea curry fresh, let it cool first. Use an airtight container to store it. Make sure to refrigerate it within two hours. Properly stored, it lasts for 3 to 4 days.
Reheating Tips for Best Results
When you are ready to enjoy your leftovers, reheat them gently. Use a saucepan over medium heat. Stir often to heat evenly. You can also warm it in the microwave. Just cover the bowl to keep moisture in.
Freezing Spicy Chickpea Curry for Future Meals
Freezing is a great way to save your curry. Let it cool completely, then transfer it to freezer-safe containers. Label them with the date. This dish can stay in the freezer for up to 3 months. When you’re ready to eat, thaw it in the fridge overnight. Then reheat it as mentioned above. Enjoy this flavorful meal anytime!
FAQs
What Can I Serve with Spicy Chickpea Curry?
You can serve spicy chickpea curry with many tasty sides. Here are some great options:
– Fluffy cooked rice
– Warm naan bread
– Quinoa for a healthy twist
– A fresh green salad
– Roasted vegetables for crunch
These sides soak up the curry’s rich flavors. They also add texture and balance to your meal. You will love how they complement the dish!
Can I Use Dried Chickpeas Instead of Canned?
Yes, you can use dried chickpeas! They are tasty and nutritious. Here’s how to use them:
1. Soak the dried chickpeas overnight in water.
2. Drain and rinse them.
3. Cook them in boiling water for about 1 to 1.5 hours until soft.
Using dried chickpeas adds a deeper flavor and texture to your curry. Just remember to adjust cooking time in your recipe!
How to Make Spicy Chickpea Curry Less Spicy?
If you want to tone down the heat, try these tips:
– Reduce the chili powder in the recipe.
– Add extra coconut milk for creaminess.
– Mix in a little sugar or honey to balance the spice.
– Serve with yogurt, which cools down the flavors.
These steps help you enjoy the dish without too much heat!
This blog post covered how to make spicy chickpea curry from start to finish. We talked about key ingredients, options for more flavor, and spice swaps. I outlined each cooking step clearly, including tips on timing and temperature. We also shared tricks for great taste and ways to avoid common mistakes. Lastly, we discussed storage and answered common questions.
Enjoy creating your own delicious curry! With these insights, you can make it perfect every time.


![- 2 boneless, skinless chicken breasts, sliced into thin strips - 8 ounces of fettuccine pasta - 4 cloves of garlic, finely minced - 1 cup of heavy cream - 1 teaspoon of Italian seasoning blend - ½ teaspoon of red pepper flakes (optional, for heat) - ½ cup of freshly grated Parmesan cheese - Fresh parsley, finely chopped, for a vibrant garnish - 1 tablespoon of extra virgin olive oil - 1 cup of chicken broth - Salt and freshly cracked black pepper, to taste When I prepare Creamy Garlic Chicken Pasta, I focus on fresh ingredients. The chicken must be juicy, the garlic fragrant, and the cream rich. I love using fettuccine because it holds the sauce well. The heavy cream makes the dish smooth and creamy, while the garlic brings a lovely flavor. For seasoning, I often use an Italian blend. It gives warmth and depth to the dish. The red pepper flakes add a tiny kick, but you can skip them if you want a milder taste. Fresh parsley not only adds color but also a fresh taste. Grated Parmesan cheese is a must for that cheesy goodness. Gathering these ingredients helps me create a quick and tasty meal. It’s all about balance—rich cream, savory garlic, and hearty chicken come together perfectly. If you want to see the full process, check out the Full Recipe. Start with a large pot. Fill it with water and add salt. Bring the water to a rolling boil. Once boiling, add 8 ounces of fettuccine pasta. Cook the pasta for about 8-10 minutes until it is al dente. When it’s done, drain the pasta in a colander. Remember to save about ½ cup of the pasta water for later. Grab a large skillet and place it over medium-high heat. Pour in 1 tablespoon of olive oil and let it warm up. While the oil heats, season 2 sliced chicken breasts with salt and pepper. Add the chicken strips to the hot skillet in a single layer. Cook them for about 5-6 minutes until golden brown and fully cooked. Once cooked, take the chicken out and keep it warm on a plate. In the same skillet, lower the heat to medium. Add 4 cloves of minced garlic and sauté for 1-2 minutes. Keep an eye on the garlic; you don’t want it to burn. After the garlic is fragrant, pour in 1 cup of chicken broth. Let it come to a gentle simmer. Next, stir in 1 cup of heavy cream, 1 teaspoon of Italian seasoning, and red pepper flakes if you like some heat. Allow this mixture to simmer for about 3-4 minutes until it thickens. Now it’s time to combine everything. Add the cooked fettuccine and the chicken back into the skillet. Toss them gently until they are well coated in the creamy sauce. If the sauce seems too thick, slowly add some reserved pasta water until you reach your desired consistency. Finally, sprinkle in ½ cup of grated Parmesan cheese. Stir it until it melts and blends into the sauce. Taste and adjust seasoning with salt and pepper if needed. For the full experience, check the Full Recipe. To make the cream sauce just right, simmering is key. Simmering helps all the flavors blend well. It also thickens the sauce without burning it. Keep the heat low, and stir often. This way, you can avoid garlic burnout. Garlic can turn bitter if cooked too long. Sauté it just until it smells good and turns light gold. Adjusting your seasonings can elevate this dish. Taste as you go. If you want more flavor, add salt or pepper. You can also use homemade broth for a fresh taste. Store-bought broth works too, but watch for added salt. This can affect your dish's flavor. Always check the label to control the salt level. Plating your creamy garlic chicken pasta can make a big difference. Use shallow bowls for a nice look. Make sure to spread the chicken and sauce evenly. For garnish, sprinkle fresh parsley on top. You can also add more Parmesan for richness. A drizzle of olive oil adds a shiny touch. Your guests will love the look and taste! {{image_4}} You can easily boost the nutrition of your creamy garlic chicken pasta by adding vegetables. I love using fresh spinach or mushrooms for a tasty twist. Spinach wilts nicely, adding color and flavor. Mushrooms bring a rich, earthy taste. To cook these veggies, add them to the skillet right after you sauté the garlic. Stir them in for just a few minutes until they're tender. This way, they soak up the garlic flavor while keeping their crunch. Switching up your pasta can bring new life to this dish. You can use whole wheat or gluten-free pasta if you want healthier options. Different pasta shapes, like penne or rotini, also work well. Just remember, cooking times may change. Whole wheat pasta takes a bit longer, while gluten-free pasta cooks faster. Keep an eye on it, and taste for doneness. If you want to try something new, swap the chicken for shrimp or tofu. Shrimp is quick to cook and adds a nice seafood flavor. Just sauté it for about 3-4 minutes until it turns pink. Tofu is a great plant-based option. Cut it into cubes and sauté it until golden brown. Adjust the cooking times based on what you choose to ensure all proteins are cooked through. Feel free to get creative with your creamy garlic chicken pasta. With these variations, you can make it your own! For a full recipe, check out the [Full Recipe]. To keep your Creamy Garlic Chicken Pasta fresh, store it in the fridge. Place the pasta in an airtight container. This helps prevent it from drying out. Make sure to consume it within three to four days for the best taste. When reheating, use the stovetop for the best results. Add a splash of chicken broth or water to help revive the sauce. Heat over low to medium heat, stirring often. This avoids overcooking the chicken and pasta. If you prefer the microwave, use a microwave-safe dish. Cover it with a lid or a damp paper towel to keep moisture in. Heat it in short bursts, stirring in between. Yes, you can freeze Creamy Garlic Chicken Pasta! However, the cream sauce may change texture. To freeze, let it cool completely. Place it in a freezer-safe container and seal tightly. Use it within one to two months. When ready to eat, thaw it overnight in the fridge. Reheat gently on the stovetop, adding a bit more cream or broth to restore creaminess. Making Creamy Garlic Chicken Pasta is quick and easy! It takes about 10 minutes to prep and 20 minutes to cook. In total, you're looking at around 30 minutes. This dish is perfect for a weeknight meal when you want something tasty without spending hours in the kitchen. Yes, you can easily make this recipe dairy-free! For the cream, use coconut cream or cashew cream instead. Both give a nice texture. Instead of Parmesan cheese, try nutritional yeast or a dairy-free cheese. This way, you still get a creamy dish without any dairy! Creamy Garlic Chicken Pasta pairs well with many side dishes. A simple green salad with a lemon vinaigrette adds freshness. You can also serve garlic bread for a comforting touch. If you prefer vegetables, steamed broccoli or roasted asparagus work well too. These sides balance the richness of the pasta nicely. Absolutely! You can control the spice level by adjusting the red pepper flakes. If you want more heat, add more flakes. For a milder dish, you can skip them entirely. Feel free to experiment until you get the flavor just right for your taste buds. You learned how to make Creamy Garlic Chicken Pasta with key ingredients like chicken, garlic, and cream. We walked through each step, from cooking pasta to making a rich sauce. I shared tips for perfecting flavors, including optional veggie and protein swaps. Storing leftovers was also covered. Remember, this dish is versatile and easy to adapt. Explore your creativity in the kitchen! Enjoy your meal and share the joy of cooking with others.](https://goldendishy.com/wp-content/uploads/2025/06/75e46cf8-cdb7-4cdf-96b4-9ca11b1b9102-768x768.webp)


![For this vegan creamy pesto pasta, you will need: - 8 oz whole wheat pasta (spaghetti or fusilli) - 2 cups fresh basil leaves, packed - 1/4 cup pine nuts (or walnuts) - 2 tablespoons nutritional yeast - 3 cloves of garlic, minced - 1/2 cup raw cashews, soaked for 2 hours - 1/4 cup extra virgin olive oil - Juice of 1 fresh lemon - Salt and pepper, to taste - 1 cup cherry tomatoes, halved (for garnish) - Extra fresh basil leaves (for garnish) You can adjust the recipe to your taste. Here are some ideas: - Swap pine nuts for sunflower seeds for a nut-free option. - Add spinach or arugula for more greens. - Include red pepper flakes for spice. - Mix in cooked chickpeas for added protein. To get the best flavor, choose fresh basil that is vibrant and fragrant. Look for basil leaves without any yellow or brown spots. For nuts, check that they are fresh and not stale. Store nuts in an airtight container to keep them crunchy. If you can, buy from local sources to get the best quality. For a great flavor, toast the nuts lightly before using them in the pesto. This will bring out their natural oils and enhance the taste. You can find the full recipe in the earlier section. Enjoy your cooking! To start, fill a large pot with water. Add a good amount of salt to the water. Bring the water to a rolling boil over high heat. Once it boils, add 8 oz of whole wheat pasta. Cook the pasta according to the package instructions. It usually takes 8-10 minutes to become al dente. Before draining, reserve 1/2 cup of the starchy pasta water. Drain the pasta in a colander and set it aside. Next, grab a high-speed blender or food processor. Add 2 cups of fresh basil leaves, packed. Then, add 1/4 cup of pine nuts, or walnuts if you prefer. Toss in 2 tablespoons of nutritional yeast for a cheesy flavor. Add 3 cloves of minced garlic and 1/2 cup of soaked raw cashews. Pour in 1/4 cup of extra virgin olive oil and the juice of 1 lemon. Season with salt and pepper. Blend on high until smooth and creamy. If the pesto is too thick, add the reserved pasta water slowly until you reach the right texture. Now, return the drained pasta to the pot over low heat. Pour the creamy pesto sauce over the pasta. Gently toss the pasta in the sauce until all the strands are coated. If the pesto is still thick, stir in more reserved pasta water, 1 tablespoon at a time. Taste the pasta and adjust the seasoning as you like. You can add more salt, pepper, or lemon juice for a brighter flavor. To serve, divide the creamy pesto pasta into bowls. Top with halved cherry tomatoes for color and extra fresh basil leaves for garnish. Enjoy your delicious vegan creamy pesto pasta! For the full recipe, check back to the ingredients section. To make your vegan creamy pesto pasta smooth, you need the right balance. Soak the cashews for at least two hours. This softens them, making it easy to blend. When you blend, start with only a little water. You can add more later if needed. This helps you control the creaminess. If your pesto feels thick, just add the reserved pasta water slowly. This way, you can keep the right texture without losing flavor. One mistake is not seasoning enough. Always taste your pesto before serving. If it lacks flavor, add more salt, pepper, or lemon juice. Another common error is overcooking the pasta. Make sure to check the package time and cook until al dente. This way, the pasta stays firm and absorbs the sauce better. Lastly, don’t skip the nutritional yeast. It gives the dish a cheesy flavor that enhances the whole meal. To boost the taste of your vegan creamy pesto pasta, try adding fresh lemon zest. It brightens the dish and adds freshness. You can also mix in roasted cherry tomatoes or sautéed veggies. They add texture and extra flavor. If you want some heat, sprinkle in red pepper flakes for a spicy kick. Experiment with herbs too! Fresh parsley or arugula can create new flavor layers. For the full recipe, check out the detailed instructions above. {{image_4}} You can easily swap different pasta types in this recipe. Whole wheat pasta gives a nutty taste. However, you can use any pasta you like. Spaghetti and fusilli are great choices for this vegan creamy pesto. You may also try penne, farfalle, or even zoodles (zucchini noodles) for a fun twist. For a protein boost, add chickpeas or tofu. Chickpeas add a lovely texture and flavor. Just rinse and drain a can of chickpeas, then toss them in with the pasta and pesto. Tofu is another great option. Use firm tofu, cut it into cubes, and pan-fry until golden. Stir it into the pasta for a filling meal. If gluten-free is your goal, choose gluten-free pasta. Many brands offer options made from rice or quinoa. These pastas cook well and taste great in this dish. You can also use lentil pasta for an extra protein kick. Just follow the cooking instructions on the package for the best results. For the complete recipe, check out the [Full Recipe]. After enjoying your vegan creamy pesto pasta, store leftovers in an airtight container. Let the pasta cool down before sealing. This keeps the flavor fresh. In the fridge, it lasts up to three days. If you want to keep it longer, consider freezing. When reheating, use a skillet over low heat. Add a splash of water or vegetable broth to keep it moist. Stir gently until warm. You can also use the microwave, but cover the dish to avoid drying out the pasta. Heat in short bursts and stir in between. To freeze homemade pesto, scoop the sauce into ice cube trays. This way, you can take out just what you need later. Once frozen, pop the cubes into a zip-top bag and store in the freezer for up to three months. When ready to use, thaw in the fridge or add directly to hot pasta. This method keeps the flavor vibrant and fresh. Yes, you can make this recipe nut-free. Instead of cashews, use silken tofu. It gives a creamy texture without nuts. You can also skip the pine nuts or use seeds like sunflower seeds. They add a nice crunch and flavor. I recommend whole wheat pasta for this dish. Spaghetti and fusilli are great choices. They hold the creamy pesto well. You can also try gluten-free pasta if needed. Just cook it according to the package instructions for the best results. The creamy pesto sauce lasts 3 to 5 days in the fridge. Store it in an airtight container. If you see any browning, just stir it before using. You can also freeze it for up to 3 months. Just thaw it in the fridge before using. For the full recipe, check the earlier section. This blog post covered how to create a creamy pesto dish. We discussed key ingredients, cooking pasta, and making the sauce. I shared tips for texture and flavor, and we explored variations like using different pasta or adding protein. Finally, I offered advice on storing your leftovers. Keep these ideas in mind for a tasty meal any day. Enjoy your cooking and have fun with your flavors!](https://goldendishy.com/wp-content/uploads/2025/07/fd183fbf-2652-43f5-b73c-64ca9eb8edeb-768x768.webp)

