Looking for a healthy and tasty meal? You’re in the right place! This Spicy Chickpea Buddha Bowl packs bold flavors and great nutrition into one dish. I’ll guide you through easy steps to make it yourself. Whether you’re a busy parent or a meal prep pro, you’ll love customizing this bowl with fresh ingredients. Let’s dive into the recipe and unleash your inner chef!
Ingredients
Main Ingredients for Spicy Chickpea Buddha Bowl
To make a Spicy Chickpea Buddha Bowl, you need the following main ingredients:
– 1 can (15 oz) chickpeas, drained and rinsed
– 2 tablespoons olive oil
– 1 tablespoon smoked paprika
– 1 teaspoon ground cumin
– 1/2 teaspoon cayenne pepper (adjust for spiciness)
– Salt and black pepper, to taste
– 1 medium sweet potato, peeled and diced
– 1 cup quinoa, rinsed
– 2 cups vegetable broth (or water)
– 1 cup fresh spinach, roughly chopped
– 1/2 cup cherry tomatoes, halved
– 1 ripe avocado, sliced
– 1/4 cup tahini
– 2 tablespoons fresh lemon juice
– Fresh cilantro leaves for garnish
These ingredients blend well to give you a burst of flavor. The chickpeas add protein, while the sweet potato brings sweetness. Quinoa provides a hearty base, and the veggies add freshness.
Optional Toppings
You can enhance your bowl with these optional toppings:
– Feta cheese, crumbled
– Pumpkin seeds or sunflower seeds
– Fresh herbs like parsley or basil
– Sliced radishes for crunch
– Hot sauce for extra heat
These toppings let you customize each bowl. They add flavor, texture, and nutrition.
Nutritional Benefits
This Buddha bowl offers great health perks:
– Chickpeas are high in protein and fiber.
– Sweet potatoes are rich in vitamins A and C.
– Quinoa is a complete protein and gluten-free.
– Spinach packs iron and antioxidants.
– Avocado provides healthy fats for heart health.
Together, these ingredients create a balanced meal. You get energy, nutrients, and delicious flavors.
Step-by-Step Instructions
Preparing the Chickpeas
Start by preheating your oven to 400°F (200°C). In a bowl, mix the drained chickpeas with olive oil, smoked paprika, ground cumin, cayenne pepper, salt, and black pepper. Toss until every chickpea gets the spice mix. Spread them out on a baking sheet in a single layer. Roast them for 20-25 minutes. Shake the pan halfway through to make sure they cook evenly.
Roasting the Sweet Potatoes
While the chickpeas roast, take a separate baking sheet for the sweet potatoes. Toss the diced sweet potato in olive oil. Season with salt and black pepper. Place the sweet potatoes in the oven alongside the chickpeas. Roast for about 25-30 minutes. Stir them once to help them caramelize and soften.
Cooking the Quinoa
Next, rinse the quinoa under cold water. In a medium pot, combine the rinsed quinoa with vegetable broth or water. Bring it to a boil on high heat. Once it boils, lower the heat, cover the pot, and let it simmer for 15 minutes. When done, the quinoa should be fluffy and all the liquid absorbed. Remove it from heat and let it sit for 5 minutes. Fluff it gently with a fork.
Making the Tahini Dressing
For the tahini dressing, whisk together tahini, fresh lemon juice, and a few tablespoons of water in a small bowl. Keep whisking until smooth. Adjust the water to make it drizzle easily. Season with salt to taste.
Assembling the Buddha Bowl
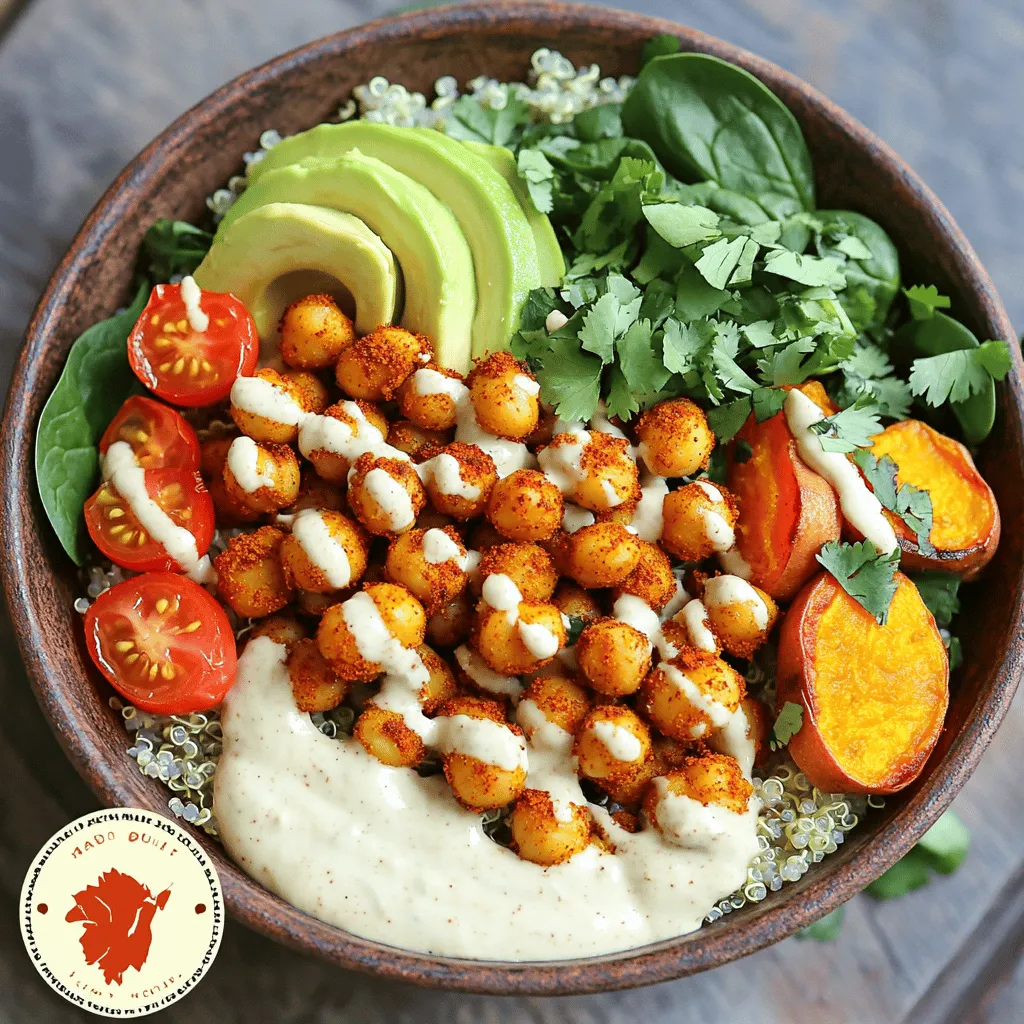
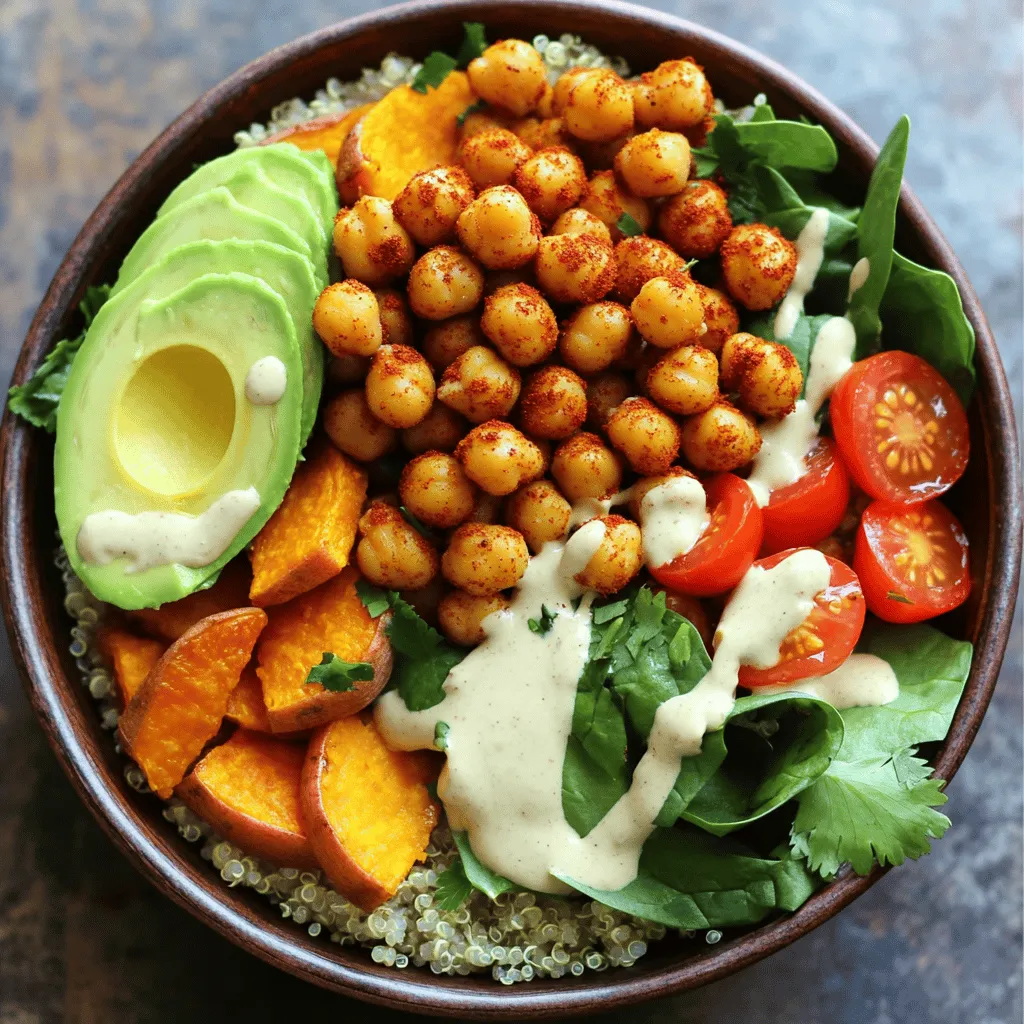
To assemble, take a serving bowl and add a generous scoop of fluffy quinoa as the base. Next, layer on the roasted sweet potatoes, crispy chickpeas, chopped spinach, halved cherry tomatoes, and slices of avocado. Make it colorful for a beautiful presentation!
Garnishing and Serving
Drizzle your tahini dressing over the assembled bowls. Let it cascade down the ingredients for a lovely effect. Top it off with fresh cilantro leaves. Serve right away and enjoy the vibrant flavors of this wholesome meal!
Tips & Tricks
Customization Ideas
You can make this bowl your own. Try different grains like brown rice or farro. Add more veggies like bell peppers or carrots for color and crunch. If you love heat, add jalapeños or chili flakes. You can swap chickpeas for black beans for a different taste. Enjoy your personal twist on this spicy chickpea Buddha bowl.
Cooking Time Adjustments
The cooking time can change based on your oven. If your oven runs hot, check the chickpeas and sweet potatoes early. You want them crispy but not burnt. If you prefer softer veggies, roast them longer. Just keep an eye on them to avoid overcooking. Adjusting the time helps you get the best texture.
Serving Suggestions
Serve this bowl warm for the best taste. Pair it with a crisp green salad for balance. You can also add a dollop of yogurt or a sprinkle of feta cheese for creaminess. This bowl is perfect for meal prep. Just store each element separately. When ready to eat, combine them for a quick, healthy meal.
Variations
Vegan and Gluten-Free Options
This dish is naturally vegan and gluten-free. Chickpeas, quinoa, and veggies make it great for all. You don’t need to change the recipe to fit these diets. Just enjoy!
Alternative Ingredients
You can switch out chickpeas for black beans or lentils. Try brown rice instead of quinoa. Sweet potatoes can be replaced with butternut squash. Each swap brings a new flavor.
Seasonal Variations
Use seasonal veggies for freshness. In spring, add asparagus or peas. In summer, use zucchini or bell peppers. In fall, try roasted Brussels sprouts or pumpkin. In winter, root veggies shine. These changes keep your Buddha bowl exciting.
Storage Info
How to Store Leftovers
To keep your Spicy Chickpea Buddha Bowl fresh, place leftovers in an airtight container. Make sure it cools to room temperature before sealing. Store it in the fridge for up to three days. The flavors will meld, making it even tastier the next day!
Reheating Instructions
When you’re ready to enjoy your leftovers, you can reheat them in a few ways. The microwave works well for quick meals. Heat in short bursts, stirring in between. If you prefer, you can also use a skillet over medium heat. Add a splash of water to keep it moist while you warm it up.
Freezing Guidelines
If you want to save some for later, freezing is a great option. Place the chickpeas and sweet potatoes in a freezer-safe bag. Keep the quinoa and fresh veggies separate. They freeze best when stored this way. You can freeze the chickpeas and sweet potatoes for up to three months. Just thaw in the fridge overnight before reheating. Enjoy your meal anytime, even when you’re busy!
FAQs
What are the health benefits of chickpeas?
Chickpeas are packed with protein and fiber. They help you feel full longer. They also contain essential vitamins and minerals. Eating chickpeas can boost heart health and aid digestion. They may help regulate blood sugar levels too. Plus, they are versatile and fit in many dishes.
Can I make this recipe in advance?
Yes, you can make parts of the Spicy Chickpea Buddha Bowl ahead of time. You can roast the chickpeas and sweet potatoes a day before. Store them in airtight containers in the fridge. You can also cook the quinoa in advance. Just reheat it when you are ready to assemble the bowl.
What can I substitute for tahini?
If you don’t have tahini, try using almond butter or sunflower seed butter. You can also make a quick dressing with yogurt or avocado. Each option brings a unique flavor to the bowl. Feel free to experiment and find what you like best!
How can I adjust the spiciness?
To change the spice level, adjust the cayenne pepper amount in the recipe. If you prefer it milder, use less or skip it entirely. For more heat, add extra cayenne or some hot sauce. Taste as you go to find your perfect balance.
Can I add other vegetables to the Buddha bowl?
Absolutely! You can include any veggies you love. Roasted broccoli, bell peppers, or zucchini work well. Fresh ingredients like cucumber or radishes add crunch. Mix and match to create your ideal bowl. The more colors, the better it looks and tastes!
The Spicy Chickpea Buddha Bowl packs flavor and nutrition. We explored key ingredients, step-by-step prep, and tips for easy customizations. You can adjust the heat, swap ingredients, or even try new seasonal veggies.
In the end, this meal is fun to make and eat. It supports your health and keeps well, too. Dive into your own bowl and enjoy the amazing taste and benefits!


