Simple Pasta Primavera Fresh and Flavorful Recipe

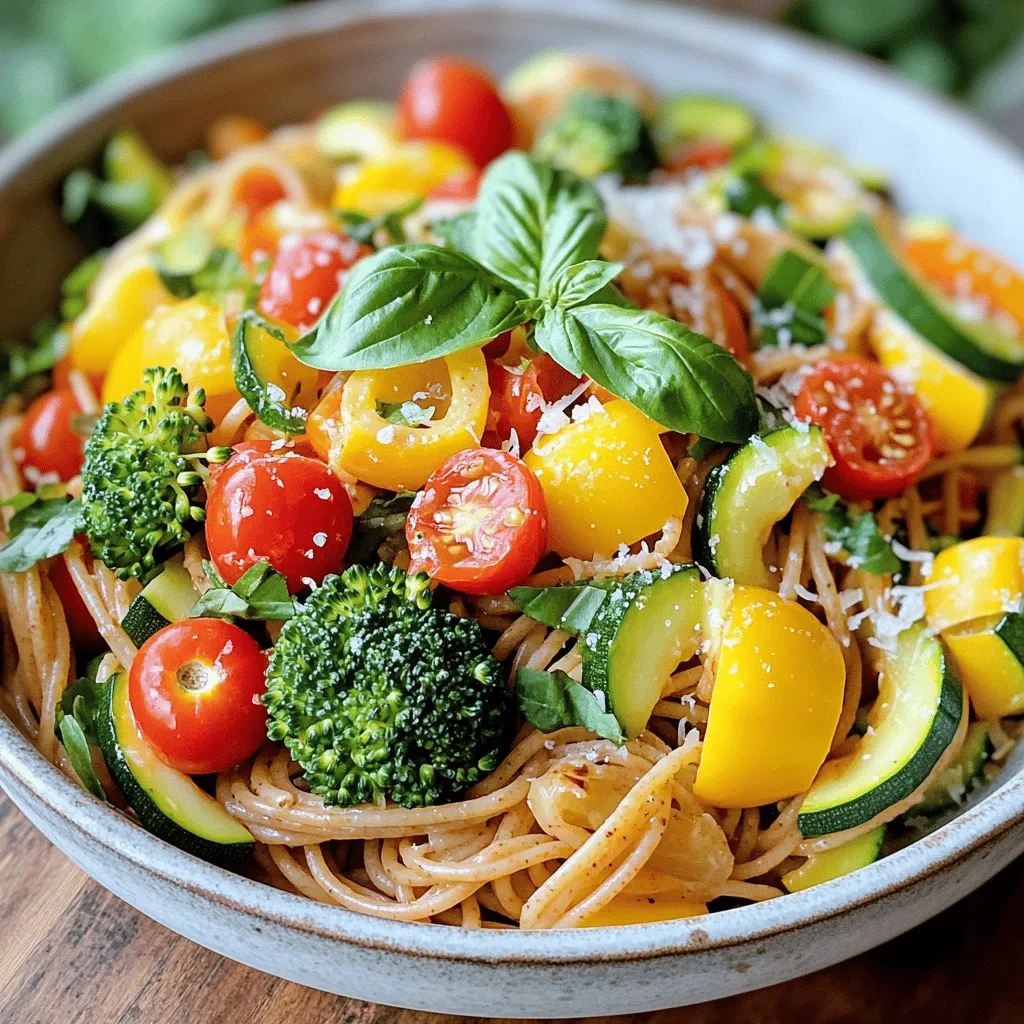
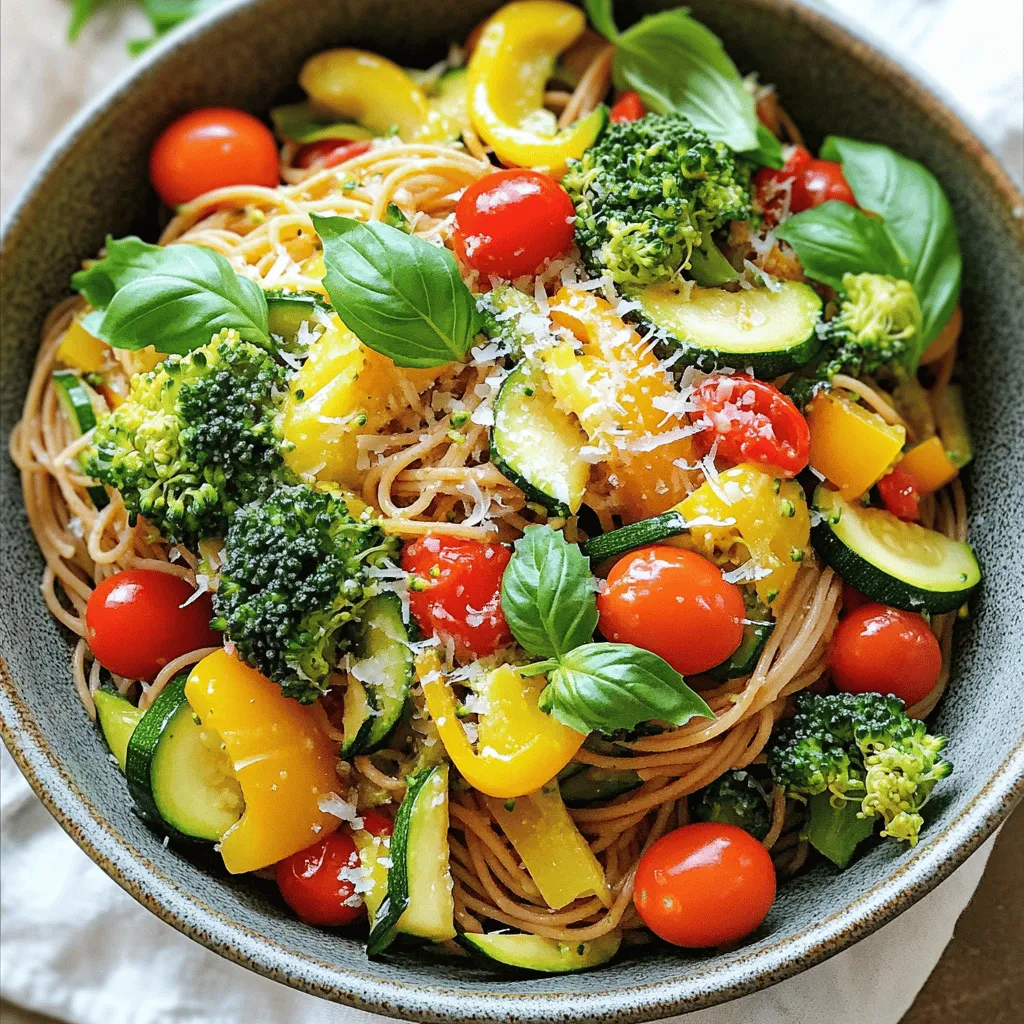
Looking for a quick and tasty meal? This Simple Pasta Primavera recipe brings fresh veggies together for a light, flavorful dish. With whole wheat pasta and seasonal ingredients, it’s not only healthy but also fun to customize. Whether you’re cooking for yourself or a crowd, this recipe will satisfy your hunger. Let’s dive into how to make this simple yet delicious plate of pasta that everyone will love!
Ingredients
List of Main Ingredients
– 8 oz whole wheat pasta
– 1 cup cherry tomatoes
– 1 medium zucchini
– 1 bell pepper
– 1 cup broccoli florets
– 2 cloves garlic
– 3 tablespoons extra virgin olive oil
– 1 teaspoon Italian seasoning blend
– Salt and freshly ground black pepper
– Fresh basil leaves
– Grated Parmesan cheese (optional)
When I create a meal, I focus on the ingredients. Fresh vegetables make all the difference. They add color and taste to your dish. Whole wheat pasta is also a great choice. It adds fiber and a nutty flavor. I love how it fills you up without feeling heavy.
Notes on Ingredient Quality
Always choose fresh vegetables for better flavor. Look for bright colors and firm textures. They should not have any soft spots. Fresh veggies also hold more nutrients. Whole wheat pasta offers more benefits than regular pasta. It keeps you full longer and has more vitamins. This makes your meal healthier and more satisfying.
Optional Ingredient Substitutions
If you need gluten-free options, try rice or corn pasta. These work well in this recipe. You can also swap vegetables based on the season. Use asparagus in spring or roasted squash in fall. This way, you can enjoy fresh tastes all year round.
Step-by-Step Instructions
Cooking the Pasta
To start, bring a large pot of salted water to a boil. The water should be bubbling hard. Add 8 oz of whole wheat pasta to the pot. Cook it according to the package instructions until it’s al dente. This means it should have a slight bite when you chew it. Before draining, save 1/2 cup of the pasta water in a bowl. This starchy water helps bind the sauce later. Drain the pasta in a colander, but don’t rinse it. Set the pasta aside and let it wait for the next steps.
Sautéing the Vegetables
Now, it’s time to sauté the veggies. Take a large skillet and heat 3 tablespoons of extra virgin olive oil over medium heat. When the oil is hot and shimmering, add 2 cloves of minced garlic. Sauté for about 30 seconds. You want the garlic fragrant but not browned. Next, toss in 1 medium zucchini, sliced into half-moons, 1 bell pepper cut into strips, and 1 cup of broccoli florets. Stir them often for 5-7 minutes. You want the veggies to be crisp-tender, keeping their bright colors.
Combining Ingredients
After the vegetables are cooked, it’s time to add flavor. Stir in 1 cup of halved cherry tomatoes and 1 teaspoon of Italian seasoning. Let this mix cook for 2-3 minutes. The tomatoes should soften a bit but not fall apart. Now, add the drained pasta to the skillet. Gradually mix in the reserved pasta water. Start with a little and add more as needed. You want a nice, saucy blend. Toss everything gently to coat the pasta and veggies evenly. Season with salt and freshly ground black pepper to your taste.
Tips & Tricks
Cooking Advice for Perfect Pasta Primavera
To make great pasta primavera, avoid overcooked pasta. Cook it just until it’s al dente. This keeps the pasta firm and tasty. Always check the package for cooking times.
Enhance flavors with garnishes. Fresh basil adds a nice touch. Consider a sprinkle of grated Parmesan cheese for richness. You can also drizzle a bit of olive oil on top. This makes your dish look and taste better.
Meal Prep and Quick Cooking
Preparing ingredients ahead of time helps save you from stress. Chop your vegetables the day before. Store them in the fridge in airtight containers. This way, you can whip up your meal quickly.
Using frozen vegetables is a great idea for convenience. They are just as nutritious as fresh ones. You can skip washing and chopping. Just toss them into the skillet when you’re ready to cook.
Pairing Suggestions
For side dishes, think of a simple salad. A light green salad works well. It adds freshness and crunch. You could also serve garlic bread on the side. It pairs nicely with the pasta.
For beverages, try a light white wine. A crisp Sauvignon Blanc goes well with the dish. If you prefer non-alcoholic options, sparkling water with lemon is refreshing.
For serving styles, use shallow bowls. This lets the vibrant colors shine. You might also drizzle a bit of olive oil on top. It adds flavor and makes the dish look fancy.

Variations
Seasonal Variations
You can change the vegetables based on the season. In spring, try asparagus or artichokes. Summer brings fresh corn or green beans. In fall, use squash or mushrooms. Winter is great for root veggies like carrots or turnips.
Adding proteins can also enhance your dish. Grilled chicken or shrimp pairs well with the veggies. Sauté the protein first, then set it aside. Combine it with the pasta and vegetables for a complete meal.
Vegetarian and Vegan Options
To make it plant-based, skip the Parmesan cheese. Use nutritional yeast for a cheesy flavor. It offers a nice umami punch.
For a creamy touch, blend soaked cashews with lemon juice and water. This mix gives a rich, creamy texture. You can also find dairy-free cheeses at stores. They work well for a vegan version.
Flavor Enhancements
Spices and herbs can bring new life to your dish. Try adding red pepper flakes for heat. Fresh herbs like thyme or parsley can brighten the flavors.
For a spicy version, mix in some chili oil. It adds a nice kick without overpowering the other tastes. You can also experiment with different seasoning blends to find your favorite.
Storage Info
Storing Leftover Pasta Primavera
To store your leftover pasta primavera, use an airtight container. This keeps the dish fresh longer. Make sure to let it cool down before sealing. In the fridge, it will last about 3 to 4 days. If you want to keep it longer, consider freezing.
Reheating Instructions
To reheat your pasta primavera, use a skillet or microwave. If using a skillet, add a splash of water to keep it moist. Heat on medium until warm. For the microwave, cover the bowl with a damp paper towel. This helps retain moisture. To keep the taste fresh, add a little olive oil or fresh herbs before serving.
Freezing Options
To freeze pasta primavera, let it cool completely first. Then, place it in a freezer-safe container. It can last up to 2 months in the freezer. When ready to eat, thaw it in the fridge overnight. For reheating, use a skillet or microwave, adding a splash of water to ensure it stays flavorful.
FAQs
How do you make Simple Pasta Primavera?
To make Simple Pasta Primavera, start by cooking the pasta. Boil salted water and add the pasta. Cook it until al dente. Save half a cup of pasta water before draining it. Next, heat olive oil in a skillet over medium heat. Add minced garlic and cook it for 30 seconds. Then, add zucchini, bell pepper, and broccoli. Sauté for 5-7 minutes until the veggies are crisp-tender. Stir in the halved cherry tomatoes and Italian seasoning. Cook for 2-3 more minutes. Finally, mix the pasta with the veggies. Use the reserved pasta water to adjust the sauce. Season with salt and pepper, then serve with fresh basil.
Can I use any pasta for this recipe?
You can use many pasta types for this dish. Whole wheat spaghetti or penne works best. These shapes hold the sauce and veggies well. You can also try gluten-free pasta if you want to avoid gluten. Other options include fusilli or farfalle, which add a fun shape. Just make sure to adjust cooking time according to the type of pasta you choose.
What are some ways to customize this recipe?
You can customize Pasta Primavera in many ways. Add your favorite vegetables like carrots or snap peas. Swap in proteins like grilled chicken or shrimp for a heartier meal. You can also use different herbs, such as oregano or parsley, for extra flavor. If you want a kick, try adding some red pepper flakes. Feel free to mix in your favorite cheese, too, for added richness.
Is Pasta Primavera healthy?
Pasta Primavera is a healthy dish. It has colorful vegetables that add vitamins and minerals. Whole wheat pasta offers fiber, which helps digestion. Olive oil provides healthy fats, while garlic adds flavor without extra calories. You can make it even healthier by using more veggies and less pasta. Overall, it’s a balanced meal that is both filling and nutritious.
This article covered how to make a delicious Pasta Primavera using fresh ingredients. I shared tips on selecting quality vegetables and suggested optional substitutions. You learned the steps to cook pasta perfectly and how to sauté veggies for the best flavor. The tips on meal prep and storage help you enjoy this dish anytime. Remember, you can customize it with seasonal veggies or proteins. Enjoy creating your own version of this tasty meal!


![- 2 packs of instant ramen noodles (discard the flavor packets) - 2 tablespoons vegetable oil - 1 small onion, thinly sliced - 3 cloves garlic, minced - 1 cup bell peppers (a mix of red, green, and yellow), julienned - 1 cup broccoli florets (washed and trimmed) - 1 medium carrot, peeled and julienned - 1 cup snap peas (trimmed) - 2 tablespoons soy sauce - 1 tablespoon sriracha (adjust to your spice preference) - 1 tablespoon sesame oil - 1 teaspoon ginger, freshly grated - Salt and pepper to taste - 2 green onions, finely chopped (for garnish) - Sesame seeds (for garnish) - Large pot for boiling noodles - Frying pan or wok - Colander for draining Using fresh ingredients makes a big difference in flavor. I love using colorful veggies. They not only taste great but also look amazing in the bowl. You can customize the vegetables based on what you have. If you want to use leftover veggies, go for it! For the equipment, a large pot is a must for cooking the noodles. A frying pan or a wok works well for stir-frying. They heat evenly, which helps cook everything fast. A colander is handy for draining the noodles after cooking. This recipe is all about speed and flavor. You can find the full recipe to follow the steps easily. Just gather your ingredients and equipment, and let’s get cooking! 1. First, fill a large pot with water and bring it to a boil. Make sure to use enough water to cover the noodles. 2. Once boiling, add the ramen noodles. Cook them according to the package instructions, usually around 3-4 minutes. 3. After cooking, drain the noodles in a colander. Shake off any extra water and set them aside for later. 1. In a large frying pan or wok, heat 2 tablespoons of vegetable oil over medium-high heat. Wait until the oil shimmers. 2. Add the thinly sliced onion. Sauté for about 2 minutes until the onion becomes soft and fragrant. 3. Next, stir in 3 cloves of minced garlic, 1 cup of julienned bell peppers, and 1 teaspoon of freshly grated ginger. Cook for 2-3 minutes until the peppers soften. 4. Now, add 1 cup of broccoli florets, 1 medium julienned carrot, and 1 cup of snap peas. Stir-fry for 3-4 minutes. The veggies should stay bright and slightly crisp. 1. Lower the heat to medium. Gently add the cooked ramen noodles to the pan. Toss everything together carefully. 2. Drizzle 2 tablespoons of soy sauce, 1 tablespoon of sriracha, and 1 tablespoon of sesame oil over the mixture. Toss again for about 2 minutes. Ensure everything gets heated through and coated well. 3. Season with salt and pepper to taste. Toss once more to mix the seasoning evenly. 4. Turn off the heat and serve your stir-fry. Garnish with finely chopped green onions and a sprinkle of sesame seeds. For the full recipe, have a look at the detailed instructions above. Enjoy your cooking! You can change the spice level to match your taste. Start with one tablespoon of sriracha. If you like more heat, add more sriracha gradually. You can also try other spicy options. Chili flakes or hot sauce work great too. For a crunchy veggie texture, add them at the right time. Start with onions and garlic, then add bell peppers. Next, include broccoli, carrots, and snap peas. This order keeps them crisp. Stir-fry each batch for about three minutes. Do not overcook them. Serving is key to making your dish pop. Use deep bowls to showcase the vibrant colors. A sprinkle of sesame seeds adds flair. You might also offer extra sriracha on the side. This lets guests spice it up as they like. {{image_4}} You can add protein to your spicy ramen noodle stir fry for extra flavor and nutrition. If you enjoy meat, try using: - Chicken: Cut into thin strips and cook until golden. - Shrimp: Toss in fresh or frozen shrimp that cooks quickly. For a vegetarian or vegan option, consider these protein sources: - Tofu: Press and cube it, then sauté until crispy. - Tempeh: Slice it thin and stir-fry for a nutty taste. If you want to switch things up, you have other noodle options. Try these: - Udon: Thick and chewy, they add a hearty touch. - Rice noodles: They cook quickly and have a nice texture. If you need a gluten-free choice, look for rice noodles or gluten-free ramen. Many brands offer tasty options that fit your diet. To make your dish even better, think about adding more spices and sauces. Here are some ideas: - Chili paste: If you want more heat, add a spoonful. - Garlic powder: A pinch can enhance the garlic flavor. You can also use homemade sauces for a unique twist. Try mixing soy sauce with lime juice or sesame oil with chili flakes for exciting new flavors. This is a great way to personalize your meal and impress your guests! For the full recipe, check out the [Full Recipe]. To keep your ramen stir fry fresh, store leftovers in an airtight container. Make sure the dish cools to room temperature before sealing. This practice helps prevent moisture and keeps it tasty. You can store it in the fridge for up to three days. When ready to enjoy your leftovers, you have two great options. You can use a microwave or a skillet. - Microwave: Place the stir fry in a microwave-safe bowl. Add a splash of water to keep it moist. Heat it for 1-2 minutes, stirring halfway through. - Skillet: Heat a small amount of oil in a skillet over medium heat. Add your stir fry and cook for about 3-5 minutes. Keep stirring to ensure even heating. Both methods work well, but the skillet can help revive the stir fry's original texture better. Enjoy your meal again without losing any flavor! For more delicious ideas, check out the Full Recipe. Yes, you can. Instant ramen noodles are great, but you can try others too. Here are some options: - Udon noodles: These are thick and chewy. They hold sauce well. - Rice noodles: They are light and gluten-free. Just soak them in hot water. - Soba noodles: These are made from buckwheat. They add a nutty taste. When using different noodles, adjust cooking times as needed. You can easily ramp up the heat in this dish. Here are some ideas: - Add more sriracha: Increase the amount to suit your taste. - Include red pepper flakes: Sprinkle these in while cooking for extra kick. - Use fresh chilies: Slice them thin and toss them in with the veggies. - Try spicy sesame oil: This adds flavor and heat in one step. Experiment with these options until you find your perfect spice level! Absolutely! This recipe is perfect for meal prep. Here are some tips: - Cook the noodles and veggies in advance. Store them separately. - Mix everything together just before eating for the best taste. - Store in airtight containers in the fridge for up to three days. Reheat in a skillet for great flavor. You can also add fresh toppings when serving. For the full recipe, check out the details. You can create a tasty spicy ramen noodle stir fry with simple steps and fresh ingredients. We covered the main ingredients and useful equipment needed for success. I shared tips for adjusting spice levels and achieving that perfect crunch in your stir-fry. Explore variations to customize your dish with proteins or alternative noodles. Remember to store leftovers properly and reheat them well. Enjoy your cooking adventures while making this vibrant and flavorful meal!](https://goldendishy.com/wp-content/uploads/2025/07/9da77702-1484-4444-86e3-cca5584db0f1-768x768.webp)
![To make this tasty dish, gather these main items: - 1 large head of cauliflower, cut into bite-sized florets - 5 cloves of garlic, skins left on - 3 tablespoons extra virgin olive oil, divided - 1/4 cup unsweetened almond milk (or your preferred milk) - 2 tablespoons butter (or a vegan alternative) - Salt and freshly ground black pepper, to taste These ingredients form the base of the mash. The cauliflower gives the dish its creamy texture. Roasting the garlic adds a rich flavor. You can change the recipe to suit your taste. Here are some ideas: - Swap almond milk for regular milk or cream for a richer flavor. - Use ghee instead of butter for a unique twist. - Add a pinch of nutmeg for warmth. - Incorporate herbs like thyme or rosemary for added depth. These options let you make the dish your own. Feel free to get creative! Garnishing makes the dish look appealing. Here are some great choices: - Fresh chives, finely chopped, for a pop of color - A drizzle of extra virgin olive oil for richness - A sprinkle of smoked paprika for a touch of spice These garnishes enhance the flavor and presentation. They make your Roasted Garlic Cauliflower Mash shine on the table. For the full recipe, check the earlier section. To start, I preheat my oven to 400°F (200°C). This temperature works best for roasting. Next, I take one large head of cauliflower and cut it into bite-sized florets. I love using fresh cauliflower for the best flavor. On a baking sheet, I place the florets and five unpeeled cloves of garlic. Then, I drizzle two tablespoons of extra virgin olive oil over them. I sprinkle salt and black pepper generously, then toss everything together. It helps the veggies get well-coated. I spread the cauliflower and garlic in a single layer. Now, I roast them for 25 to 30 minutes. Halfway through, I gently toss them to ensure they cook evenly. I look for a nice golden brown color and tender texture when they are done. Once roasted, I let the garlic cool for a few minutes before handling it. After cooling, I squeeze the softened garlic out of its skin. I put it into a large mixing bowl with the roasted cauliflower. Then, I add a quarter cup of unsweetened almond milk, two tablespoons of butter, and the last tablespoon of olive oil. I grab a hand mixer or an immersion blender to blend the mix. I blend until it turns smooth and creamy. If I want a chunkier mash, I blend just until combined. I make sure not to overmix, as it can change the texture. Once blended, I taste the mash. If it needs more flavor, I adjust with extra salt and pepper. I love a well-seasoned mash! Now, I transfer the cauliflower mash to a serving bowl. For a fun finishing touch, I sprinkle freshly chopped chives on top. This adds color and a nice flavor. To make it look fancy, I might drizzle a bit of olive oil on top. This mash is now ready to impress! Enjoy this easy and tasty dish from the [Full Recipe]. To make the best roasted garlic cauliflower mash, follow these tips. First, use a large head of cauliflower. This gives you enough to work with. Cut the florets into even sizes. This helps them cook at the same rate. Roasting adds flavor, so don’t rush it. Allow the cauliflower to become tender and golden. When blending, don’t overmix. A few pulses will give you a nice texture. If you want it creamier, add a splash more milk. Always taste as you go. Adjust salt and pepper to your liking for the best flavor. Having the right tools makes cooking easier. Here’s what I recommend: - Baking sheet for roasting - Large mixing bowl for combining ingredients - Immersion blender or hand mixer for smoothness - Measuring cups and spoons for precise amounts - Knife and cutting board for prep These tools help you work efficiently and make the process enjoyable. Watch out for these common mistakes. First, don’t skip the roasting step. Raw cauliflower will not have the same rich taste. Second, avoid using too much liquid. It can make your mash watery. If you prefer a thicker mash, add less almond milk. Finally, remember to season well. Under-seasoning can leave your mash bland. Always taste your dish before serving. This way, you ensure it is full of flavor. For the full recipe, check the details above. Enjoy making your roasted garlic cauliflower mash! {{image_4}} You can easily make this dish dairy-free. Use almond milk or coconut milk instead of regular milk. For a buttery flavor, swap butter for vegan butter or olive oil. This keeps the mash creamy and rich without dairy. Adding flavors can elevate your mash. Fresh herbs like thyme or rosemary add a lovely touch. You can also sprinkle in garlic powder for extra garlic flavor. If you enjoy cheese, mix in some grated Parmesan for a savory kick. Get creative with how you serve this mash! Use it as a base for grilled chicken or fish. You can also serve it as a side dish with roasted vegetables. Try topping it with sautéed mushrooms or crispy bacon bits for added flavor and texture. After enjoying your roasted garlic cauliflower mash, let it cool. Place it in an airtight container. Store it in the fridge for up to 4 days. This keeps the flavor fresh and the texture nice. If you have more leftovers, freezing is a great option. Put the mash in a freezer-safe bag or container. Make sure to remove excess air. It will last for about 3 months. Label the container with the date so you can keep track. When you're ready to enjoy the mash again, reheat it gently. You can use the microwave or a stovetop. If it seems dry, add a splash of almond milk or butter. Stir it well as you heat it. This keeps it creamy and delicious. Yes, you can make Roasted Garlic Cauliflower Mash ahead of time. Prepare the mash, then let it cool. Store it in an airtight container in the fridge for up to three days. When you’re ready to eat, simply reheat it on the stove or in the microwave. You may need to add a splash of milk to bring back the creamy texture. Yes, cauliflower mash is a low-carb alternative to mashed potatoes. A cup of cooked cauliflower has about 5 grams of carbs, while a cup of mashed potatoes has around 35 grams. This makes cauliflower mash a great choice if you want to cut carbs but still enjoy a creamy side dish. Roasted Garlic Cauliflower Mash pairs well with many dishes. You can serve it with roasted chicken, grilled steak, or pan-seared fish. It also complements sautéed vegetables or a fresh salad. For a hearty meal, try it with a rich mushroom gravy or a savory sauce. The mash's creamy texture and garlic flavor enhance any main dish beautifully. Roasted Garlic Cauliflower Mash is simple and tasty. We covered its key ingredients, from cauliflower to garlic. You can customize it with optional ingredients and garnishes for more flavor. The step-by-step instructions ensure a smooth texture every time. You now have tips to avoid common mistakes. Variations allow for dairy-free or unique flavors. Storing is easy, and leftovers can even be frozen. This mash is a great low-carb option. Try it with your favorite dishes for a perfect side.](https://goldendishy.com/wp-content/uploads/2025/07/e8f9d6da-9905-472e-90b5-76f2ba9b0789-768x768.webp)
