Are you in need of a quick and tasty dinner? This Simple Chicken Piccata recipe is your answer. With easy steps and fresh ingredients, you can impress your family in no time. Whether you’re cooking for one or a crowd, this meal won’t disappoint. Let’s dive in and make your weeknight dinners fun and delicious!
Ingredients
List of Ingredients
To make Simple Chicken Piccata, gather these fresh ingredients:
– 4 boneless, skinless chicken breasts
– Salt and freshly cracked black pepper, to taste
– 1/2 cup all-purpose flour, for dredging
– 4 tablespoons extra virgin olive oil
– 2 tablespoons unsalted butter
– 2 cloves garlic, finely minced
– 1 cup low-sodium chicken broth
– Juice of 1 large lemon (about 3-4 tablespoons)
– 2 tablespoons capers, thoroughly rinsed and drained
– Fresh parsley, finely chopped (for garnish)
Ingredient Substitutes
If you need to make swaps, here are some ideas:
– Use chicken thighs instead of breasts for a juicier dish.
– Swap all-purpose flour with gluten-free flour for a gluten-free option.
– Use vegetable broth instead of chicken broth for a vegetarian version.
– If you lack capers, try using chopped green olives for a similar taste.
– Lemon juice can be replaced with vinegar in a pinch, but it will change the flavor.
Tips for Selecting Fresh Ingredients
Choosing fresh ingredients makes a big difference. Here are my tips:
– Look for chicken breasts that are pink and firm with no bad smell.
– Always check the sell-by date on the packaging.
– Choose bright, unblemished lemons, as they will have the best juice.
– Capers should be plump and not dry; check the jar for freshness.
– Fresh parsley should be vibrant green and not wilted.
Using great ingredients raises your dish to a new level. Enjoy cooking this Simple Chicken Piccata!
Step-by-Step Instructions
Preparation Steps
1. Start by seasoning the chicken breasts. Use salt and pepper on both sides. This simple step brings out the chicken’s flavor.
2. Next, dredge the seasoned chicken in flour. Make sure to shake off any extra flour. This helps the chicken get a nice crust.
Cooking Process
1. Heat a large skillet over medium-high heat. Add 2 tablespoons of olive oil and let it warm up.
2. Carefully place the chicken in the skillet. Cook for 4-5 minutes on each side until golden brown. Check that the chicken is cooked through; it should reach 165°F.
3. Once done, take the chicken out and place it on a plate. Cover it with foil to keep it warm.
4. In the same skillet, add the remaining 2 tablespoons of olive oil and the butter. Let the butter melt, then add the minced garlic. Sauté for about 30 seconds.
5. Pour in the chicken broth and lemon juice. Use a wooden spoon to scrape the bottom of the skillet. This adds great flavor to the sauce.
6. Stir in the capers and let the sauce simmer for 2-3 minutes. This will help the sauce thicken.
7. Place the cooked chicken back in the skillet. Make sure each piece is coated in the sauce. Heat through for one more minute.
Final Touches
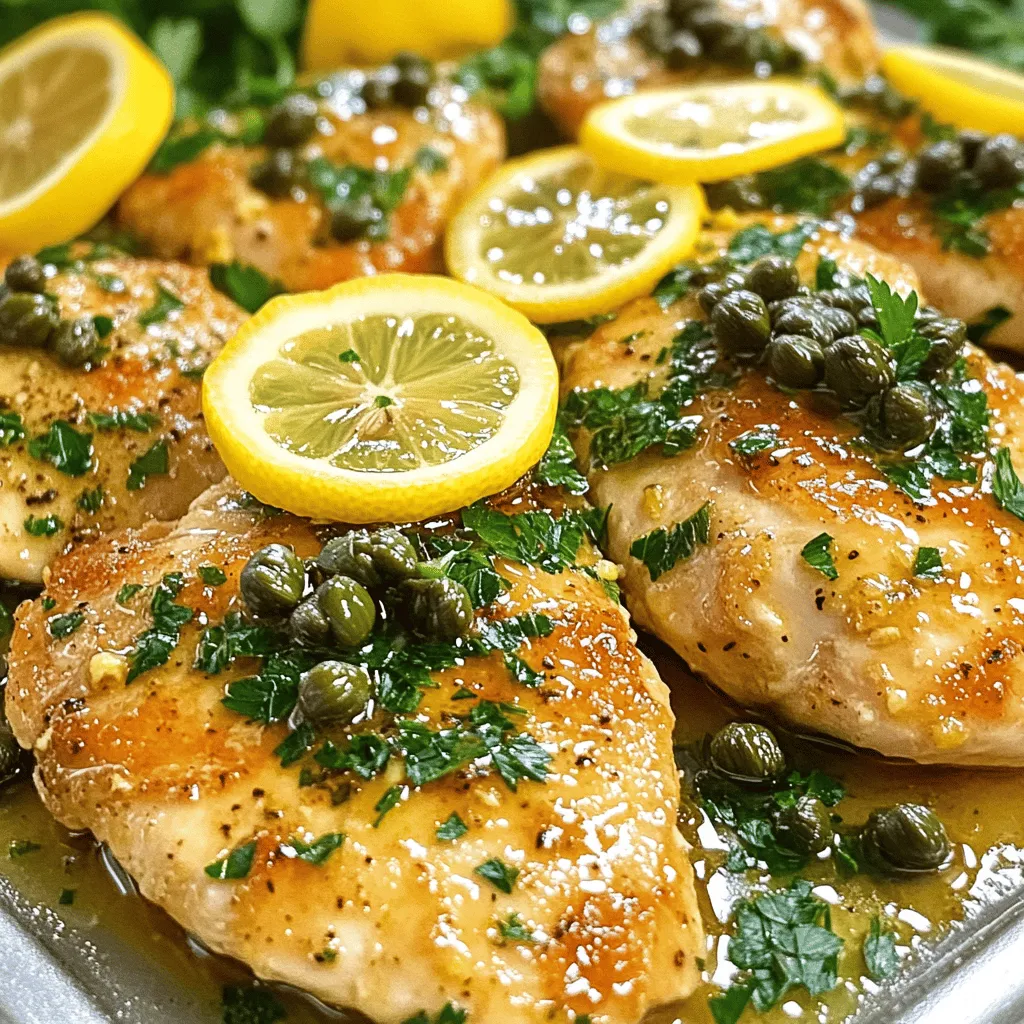
1. Remove the skillet from the heat. Garnish the chicken piccata with fresh parsley. This adds color and freshness.
2. For a great presentation, serve the chicken on a platter. Drizzle sauce over the top. Add lemon slices and more parsley if you like. This meal is sure to impress!
Tips & Tricks
Cooking Tips for Perfect Chicken Piccata
To make the best chicken piccata, focus on a few key steps. Start with fresh chicken breasts. They should be thick and firm. Season them well with salt and pepper before cooking. This simple step enhances the flavor. When you dredge the chicken in flour, shake off any extra. A light coat is perfect. This gives you a nice, golden crust. Cook the chicken in a hot skillet to get that perfect sear. Make sure not to overcrowd the pan. This keeps the heat high and helps it cook evenly.
How to Achieve the Best Sauce Consistency
The sauce should be bright and tangy. Use fresh lemon juice for the best taste. After cooking the chicken, deglaze the pan with broth and lemon juice. This step adds flavor and lifts those tasty bits from the pan. Let the sauce simmer for a few minutes to thicken. If it’s too thin, simmer longer. If it’s too thick, add a splash of broth. Stir in the capers at the end for a salty bite.
Recommended Kitchen Tools
You don’t need many tools to make chicken piccata. Here are some essentials:
– Large skillet
– Tongs
– Wooden spoon
– Meat mallet (for pounding the chicken)
– Measuring cups and spoons
These tools help streamline the cooking process. Each one plays a role in creating a delicious meal.

Variations
Alternative Ingredients for Chicken Piccata
You can easily swap some ingredients in chicken piccata. If you want a lighter dish, use chicken thighs instead of breasts. They stay juicy and add great flavor. For a gluten-free option, use almond flour instead of all-purpose flour. You can also try using vegetable broth instead of chicken broth for a vegetarian twist.
Different Cooking Methods
Chicken piccata is versatile in cooking methods. You can bake, grill, or pan-fry the chicken. If you bake it, cook at 375°F for about 25 minutes. For grilling, marinate the chicken in the lemon juice, then grill for about 6-8 minutes per side. Each method gives a different taste and texture.
Suggested Flavor Additions
Want to spice things up? Add some red pepper flakes to the sauce for heat. Fresh herbs like thyme or basil can enhance the flavor too. For a creamy version, mix in heavy cream or Greek yogurt. These additions can make your chicken piccata unique and exciting.
Storage Info
How to Store Leftover Chicken Piccata
Store leftover chicken piccata in an airtight container. Let it cool to room temperature first. Place it in the fridge for up to three days. Always label the container with the date. This helps you keep track of freshness.
Freezing Tips
You can freeze chicken piccata for longer storage. Use freezer-safe bags or containers. Make sure to remove as much air as possible before sealing. It will stay good for up to three months. When you’re ready to eat, thaw it in the fridge overnight.
Reheating Instructions
Reheat chicken piccata gently to keep it juicy. Use a skillet over low heat. Add a splash of chicken broth to keep it moist. You can also use the microwave. Heat it in short bursts, stirring in between. Always check the temperature reaches 165°F before serving.
FAQs
What is the best side dish for Chicken Piccata?
The best side dish for Chicken Piccata is something light and fresh. I recommend serving it with steamed vegetables. Broccoli, asparagus, or green beans work well. You can also pair it with pasta. A simple lemon garlic pasta complements the dish nicely.
Can I make Chicken Piccata ahead of time?
Yes, you can make Chicken Piccata ahead of time. Cook the chicken and sauce fully. Cool them down and store in the fridge. When ready to serve, reheat gently on the stove. Add a splash of broth to keep the sauce moist. This way, your meal stays flavorful and delicious.
How to make Chicken Piccata gluten-free?
To make Chicken Piccata gluten-free, swap the all-purpose flour for a gluten-free blend. Many brands offer great options that work well for dredging. Also, check your chicken broth for gluten-free labels. This small change lets everyone enjoy this tasty dish without worry.
In this post, I shared how to make Chicken Piccata, covering key ingredients, cooking steps, and storage tips. You learned about ingredient substitutes and how to pick fresh items. I also shared tips for the best cooking techniques and variations to try. My goal was to simplify this dish for everyone. Remember, cooking should be fun and tasty. You can now create a wonderful meal with confidence. Enjoy your Chicken Piccata journey!


