Sautéed Garlic Green Beans Simple and Tasty Dish

Looking for a simple side dish that packs a punch? You’ve found it! Sautéed garlic green beans are quick, tasty, and full of flavor. In this post, I’ll share easy steps, tips, and unique twists to elevate this classic recipe. Whether you’re new to cooking or a seasoned chef, these green beans will impress at any meal. Let’s dive in and make this mouthwatering dish together!
Ingredients
Fresh Green Beans
– 1 pound of fresh green beans, trimmed
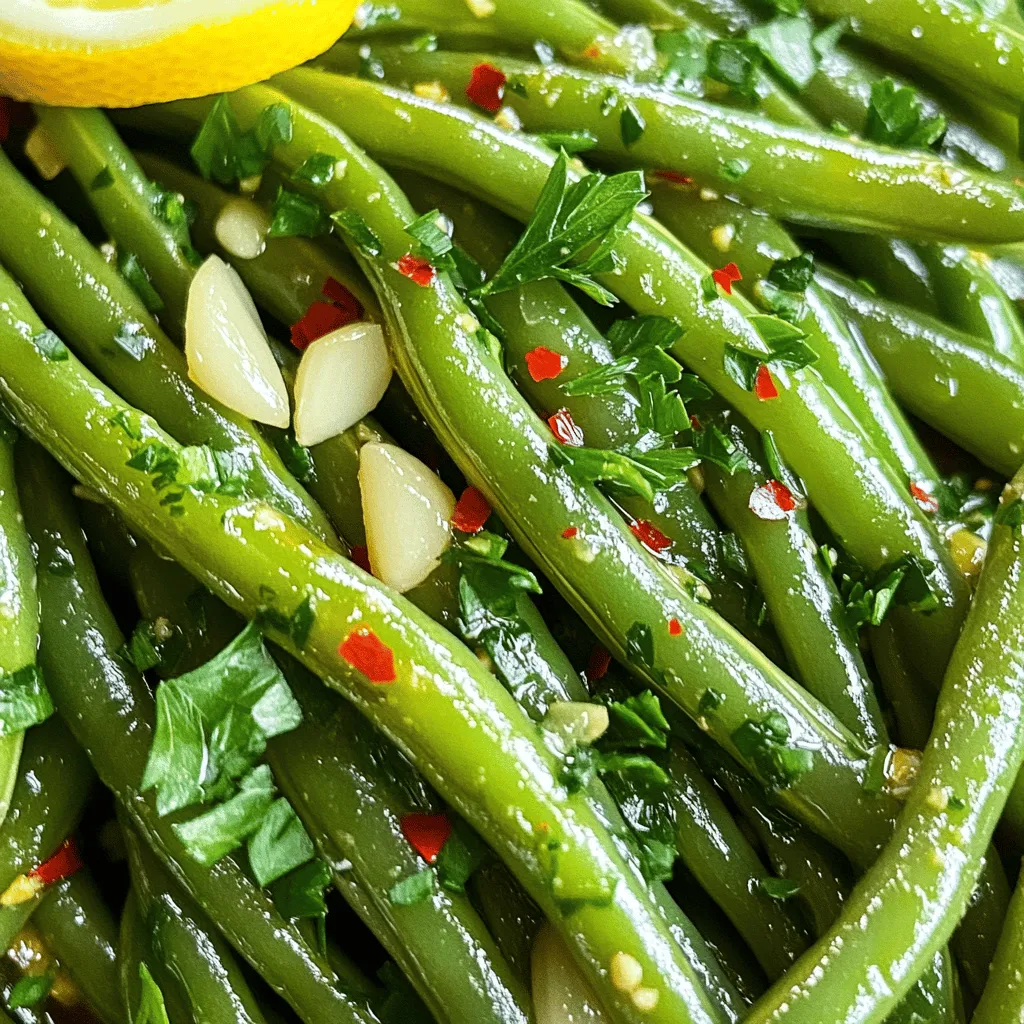
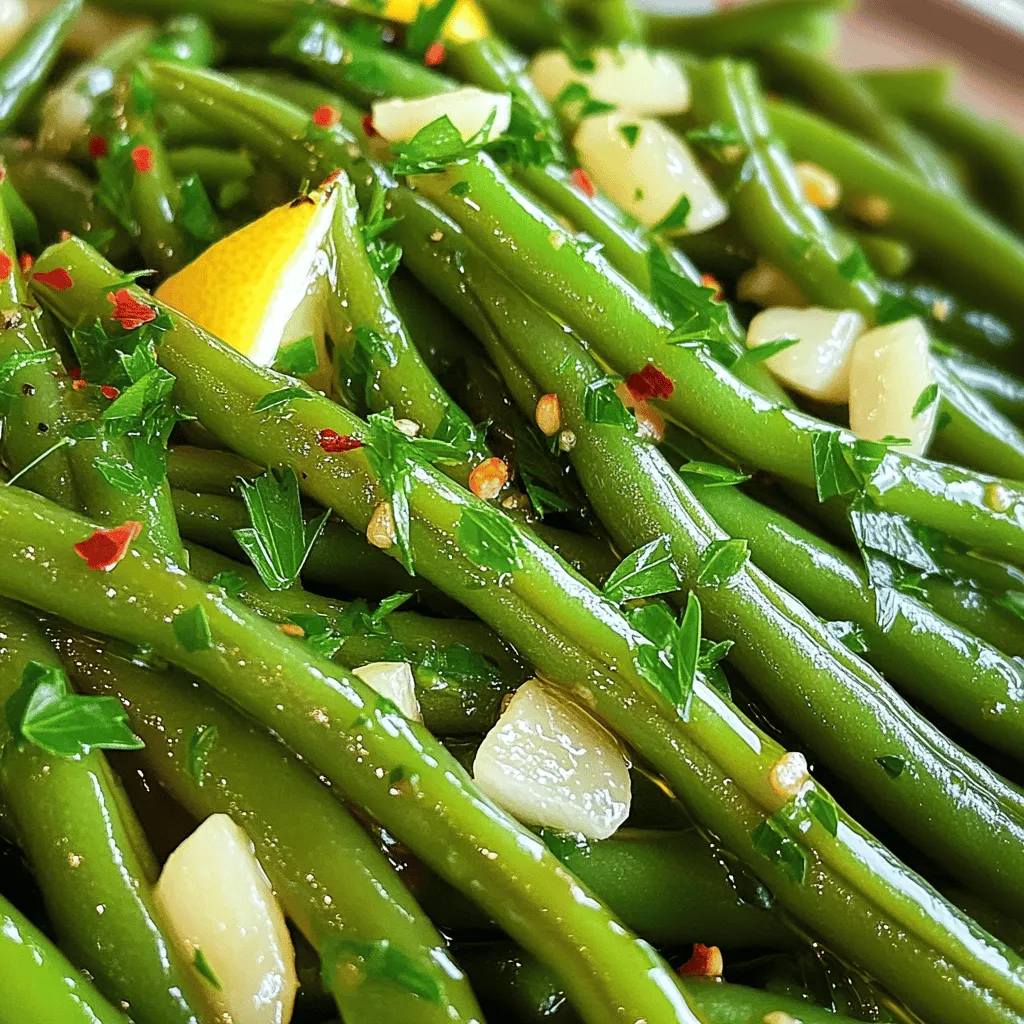
Fresh green beans are the star of this dish. They add a crisp texture and a bright green color. Look for beans that are firm and vibrant. Trim both ends before cooking to keep them neat.
Garlic and Aromatics
– 4 cloves of garlic, thinly sliced
Garlic brings a strong, rich flavor. Use fresh garlic for the best taste. Thinly slicing it helps release its oils and aroma.
Seasoning and Flavor Enhancers
– 2 tablespoons olive oil
– 1 tablespoon soy sauce
– 1 teaspoon red pepper flakes (optional, for a spicy kick)
– Salt and freshly ground black pepper, to taste
– Zest of 1 lemon
– 1 tablespoon fresh lemon juice
– Fresh parsley, chopped, for garnish
The olive oil gives a nice base for cooking. Soy sauce adds depth and saltiness. If you like heat, red pepper flakes are great! Lemon zest and juice brighten the dish. Parsley adds color and freshness.
Step-by-Step Instructions
Preparing the Green Beans
First, rinse the fresh green beans under cold water. This helps remove dirt and keeps them clean. Next, take a sharp knife and trim both ends of each bean. Make sure to cut just enough. After trimming, dry the beans with a clean kitchen towel. This step keeps your sauté from getting watery.
Sautéing the Garlic
Now, heat a large skillet over medium heat. Pour in two tablespoons of olive oil. Wait for the oil to shimmer slightly, but do not let it smoke. Carefully add the thinly sliced garlic to the hot oil. Sauté for about one minute while stirring. You want the garlic to smell good but stay pale. If it turns brown, it may taste bitter.
Cooking the Green Beans
Add the prepared green beans to the skillet, tossing them in the garlic oil. Stir gently to coat them well. Cook for about 5 to 7 minutes. You want the beans to be bright green and tender-crisp. If you like some heat, sprinkle in red pepper flakes in the last minute. When the beans are ready, drizzle soy sauce over them. Stir well and season with salt and black pepper to taste. Just before serving, add lemon zest and juice. Toss gently to mix. Finally, transfer the beans to a serving dish and garnish with fresh parsley.
Tips & Tricks
Preventing Burnt Garlic
To keep your garlic from burning, watch the heat. Use medium heat. Once the oil shimmers, add the garlic. Stir it often. You want it to smell great, not turn brown. If garlic burns, it tastes bitter. If you see it getting dark, take it off the heat right away.
Achieving Perfect Tender-Crisp Texture
For tender-crisp green beans, timing is key. Cook them for about 5-7 minutes. Stir them gently while they cook. They should be bright green and still slightly firm. If you want them softer, cook a minute or two more. Keep an eye on them; overcooking can make them mushy.
Enhancing Flavor with Lemon
Lemon adds a bright flavor to the dish. Use both the zest and juice for the best taste. Zest the lemon before juicing it. Add the zest and juice right before serving. This keeps the flavors fresh and lively. A little lemon can really wake up your green beans.
Try these tips for a delicious side dish.Enjoy your cooking!

Variations
Adding Protein (e.g., Chicken or Tofu)
You can make sautéed garlic green beans a full meal by adding protein. Chicken is a great choice. Simply slice cooked chicken and add it to the skillet during the last few minutes of cooking. This way, the flavors meld nicely. If you prefer a plant-based option, try tofu. Use firm tofu, cut it into cubes, and sauté it until golden before adding the green beans.
Spicy Sautéed Garlic Green Beans
If you love heat, spice up your green beans! You can add red pepper flakes, as mentioned in the recipe. For more heat, try adding sliced fresh chili peppers or a dash of hot sauce. These will give your dish an extra kick. Just remember to taste as you go. This way, you can control the spice level to match your liking.
Vegetarian and Vegan Options
This recipe is already vegetarian and vegan-friendly. You can keep it simple or add more veggies. Consider bell peppers, carrots, or snap peas for color and texture. You can also mix in cooked quinoa or rice for a hearty side dish. The options are endless! Just ensure that any added ingredients continue to enhance the dish without overpowering the green beans.
Storage Info
Storing Leftover Sautéed Green Beans
You can store leftover sautéed green beans in an airtight container. Keep them in the fridge for up to three days. Make sure they cool down first. This helps keep them fresh and tasty. If you want to enjoy them later, do not add any extra garnish.
Reheating Instructions
To reheat, use a skillet over medium heat. Add a splash of olive oil to keep them moist. Stir often for about three to five minutes. You can also use a microwave. Place them in a microwave-safe dish and cover it. Heat for one to two minutes, checking to avoid overcooking.
Freezing Sautéed Green Beans
Freezing sautéed green beans is easy. First, let them cool completely. Then, spread them on a baking sheet in a single layer. Freeze for about one hour. Once frozen, transfer them to a freezer bag. They can last up to three months. When ready to eat, thaw in the fridge and reheat as instructed.
FAQs
How to make sautéed garlic green beans sweeter?
To make sautéed garlic green beans sweeter, add a touch of honey or maple syrup. These natural sweeteners blend well with the garlic. You can also try adding a pinch of brown sugar while cooking. This will balance the savory and sweet flavors in the dish. For a different twist, mix in some sautéed onions for added sweetness. Caramelized onions create a rich, sweet taste that pairs nicely with green beans.
Can I use frozen green beans for this recipe?
Yes, you can use frozen green beans for this recipe. However, they may need a few extra minutes to cook. Start by thawing them in warm water before sautéing. This helps them cook evenly and prevents excess moisture in the pan. Keep in mind that frozen beans may not have the same crisp texture as fresh ones. If you want a firmer bite, try using fresh green beans for the best results.
What are the best tips for sautéing vegetables?
When sautéing vegetables, follow these tips for success:
– Use high heat: This helps to cook the veggies quickly, keeping them crisp.
– Don’t overcrowd the pan: Give each piece space to cook evenly.
– Stir often: This ensures even cooking and prevents burning.
– Add aromatics first: Sauté garlic, onion, or spices before adding the main vegetables to build flavor.
– Season as you go: Add salt and pepper at different stages for layered flavor.
These tips will help you master sautéing and make your dishes shine!
This blog covered how to make tasty sautéed garlic green beans. We explored fresh ingredients, step-by-step cooking, and helpful tips. You can add protein or spice for fun variations. Proper storage keeps leftovers fresh. Remember to check the FAQs for extra advice. With this guide, you can enjoy perfect green beans any time. Happy cooking!


![A classic Caesar salad has a few key components. First, you need fresh romaine lettuce. It adds a nice crunch. Next, croutons bring texture and flavor. You can buy them or make your own. Parmesan cheese gives a rich taste. The dressing is vital too. You need mayonnaise, Dijon mustard, and lemon juice. Garlic adds depth, while Worcestershire sauce is optional for extra flavor. Don't forget salt and pepper to enhance everything. You can add other ingredients to make your Caesar salad special. Grilled chicken or shrimp makes it a full meal. Avocado adds creaminess. For a twist, try capers or anchovies. They give a salty kick. Fresh herbs like parsley or basil can brighten the salad. These options let you customize your dish to your taste. If you're missing an ingredient, don’t worry! You can use Greek yogurt instead of mayonnaise for a lighter dressing. If you don’t have Dijon mustard, regular mustard works too. For cheese, try Pecorino Romano if you can't find Parmesan. If you're out of Worcestershire sauce, soy sauce can be a good substitute. These swaps keep your salad tasty and fresh. For the complete recipe, check out the Full Recipe. To start, you need to make the dressing. In a medium bowl, whisk together these ingredients: - 1/4 cup mayonnaise - 2 tablespoons Dijon mustard - 2 tablespoons fresh lemon juice - 1 teaspoon Worcestershire sauce (optional) - 1 clove garlic, minced - Salt and freshly cracked black pepper Mix until smooth and creamy. The dressing should have a nice tang from the lemon and mustard. Adjust the salt and pepper to your taste. If you like it zestier, add a bit more lemon juice. Next, grab a large bowl. Add the chopped romaine lettuce: - 1 large head of romaine lettuce, washed and chopped - A drizzle of olive oil Toss the lettuce gently to coat it with the oil. This step helps keep the leaves crisp. Now, pour the dressing over the lettuce and toss again. Make sure every leaf gets a good coating. Now, fold in the croutons and sprinkle: - 1 cup of croutons - 1/2 cup grated Parmesan cheese Be gentle here to keep the croutons crunchy. Taste the salad and adjust the seasoning if needed. Transfer the salad to a serving platter or individual bowls. For a nice touch, garnish with more Parmesan cheese and a sprinkle of black pepper. Serve it right away for the best crunch. If you want more ideas, try adding grilled chicken or shrimp for a heartier meal. Check out the Full Recipe for more tips! To get that perfect crunch, start with fresh romaine lettuce. Look for crisp, vibrant leaves. Wash them well, then chop them into bite-sized pieces. This helps each bite stay crunchy. Next, use good quality croutons. You can make your own by toasting bread with olive oil and garlic. This adds flavor and keeps them crunchy. Mix the croutons in just before serving. This way, they won’t get soggy. When applying dressing, less is more. Start with a small amount. Toss the salad gently to coat the leaves without bruising them. If the salad seems dry, add more dressing little by little. Always taste as you go. This lets you find the right balance for your flavor. Remember, the goal is to enhance the salad, not drown it. Taste is personal, so feel free to adjust. If you like it tangy, add more lemon juice or Dijon mustard. If you want it richer, add more Parmesan cheese. Salt and pepper are key too. A little extra can elevate the dish. Experiment with Worcestershire sauce for unique depth. This can give your salad a signature twist. {{image_4}} Adding grilled chicken or shrimp makes your Caesar salad hearty. Both options bring flavor and protein. For grilled chicken, season it with salt and pepper. Cook it until it is golden brown. Slice it thin and place it on top of your salad. For shrimp, sauté them in olive oil with garlic. Cook until they turn pink. Either choice takes your salad to the next level. If you want a veggie-packed salad, add more vegetables. Try diced bell peppers, cucumbers, or cherry tomatoes. These add crunch and freshness. You can also include roasted veggies like zucchini or asparagus for depth. This gives your Caesar salad a colorful twist. Each vegetable choice adds its own flavor, making it unique. Get creative with your ingredients for a fun twist. Consider adding avocado for creaminess. You can also sprinkle nuts like pine nuts or walnuts for crunch. Another option is to use different cheeses. Feta or blue cheese can change the flavor profile. Lastly, add a touch of hot sauce for some heat. Experimenting with these unique ingredients can make your Caesar salad exciting. For the full recipe, check out the [Full Recipe]. To keep your Classic Caesar Salad fresh, store it in the fridge. Place the salad in an airtight container. If you have leftover dressing, store it separately. This keeps the croutons crunchy and the lettuce crisp. Always add croutons just before serving. This way, they stay crunchy and not soggy. You can also wrap the lettuce in a damp paper towel. This helps the leaves stay fresh longer. When stored properly, Classic Caesar Salad lasts about 2 to 3 days. If the lettuce wilts or the croutons become soft, it’s best to toss it out. Always check for signs of spoilage before enjoying leftovers. A Caesar Salad stands out due to its unique dressing and ingredients. It typically includes romaine lettuce, croutons, and Parmesan cheese. The dressing is creamy, made with mayonnaise, mustard, lemon juice, garlic, and Worcestershire sauce. This mix gives the salad its rich flavor. The crunch of the croutons and the fresh lettuce create a delightful texture. Yes, you can make Caesar Dressing from scratch. It’s simple and rewarding. Just whisk together mayonnaise, Dijon mustard, lemon juice, garlic, and Worcestershire sauce. This homemade version tastes fresher than store-bought dressings. You can adjust flavors according to your taste. For a twist, add a bit of anchovy paste for a classic touch. Absolutely! A Caesar Salad can be made nut-free. Traditional recipes do not include nuts. Just focus on the core ingredients: romaine lettuce, croutons, and the creamy dressing. If you make your own croutons, ensure the bread you use is also nut-free. Everyone can enjoy this tasty salad without nuts. To make a Caesar Salad healthier, try these tips: - Use Greek yogurt instead of mayonnaise for the dressing. - Add more vegetables like cherry tomatoes or cucumbers for extra nutrients. - Use whole-grain croutons for more fiber. - Limit the cheese or use a lower-fat version. These changes keep the flavors while boosting the nutrition. You can find the full recipe for a Classic Caesar Salad here: Crispy Caesar Delight 🥗. This recipe guides you through making a fresh and flavorful salad that you will love. This blog post covers how to make a classic Caesar salad. We discussed key ingredients and tips for adding flavor. You learned how to prepare the dressing and toss the salad correctly. I shared storage info and answered common questions about Caesar salads. Keep experimenting with variations, whether adding protein or fresh veggies. Enjoy making your salad just right for you! Your perfect Caesar awaits.](https://goldendishy.com/wp-content/uploads/2025/06/57ecdae1-38df-4f5b-a4b6-710b22066cc6-768x768.webp)

![- 4 medium zucchinis, sliced into 1/2-inch thick rounds - 4 tablespoons extra virgin olive oil - 2 tablespoons freshly squeezed lemon juice - 1 teaspoon freshly grated lemon zest - 2 teaspoons dried oregano - 1 teaspoon garlic powder - 1 teaspoon sea salt - 1/2 teaspoon freshly cracked black pepper - 2 tablespoons fresh parsley, finely chopped (for garnish) You can use other oils for grilling. Avocado oil or sesame oil works well. If you have fresh herbs, use them instead of dried ones. Fresh oregano or basil adds great flavor. Adjust the amount based on your taste. When selecting zucchinis, look for ones that are firm and shiny. Avoid any that feel soft or have blemishes. Choose smaller zucchinis for a sweeter taste. Check for seasonal zucchinis in late summer. They are often at their best during this time. To make the marinade, start with a large bowl. Add the olive oil, lemon juice, and lemon zest. Next, sprinkle in the dried oregano, garlic powder, sea salt, and black pepper. Whisk everything together until mixed well. This blend of flavors makes your zucchini taste great. Marinating time is key. Let the zucchini sit in the marinade for 10 to 15 minutes. This helps the zucchini soak up the zesty flavors. Skipping this step means missing out on rich taste. First, preheat your grill to medium-high heat, about 400°F (200°C). A hot grill gives your zucchini nice grill marks and a smoky flavor. When ready, carefully place the marinated zucchini rounds on the grill. Cook them for 3 to 4 minutes on each side. Watch for tender slices with grill marks. This means they are perfectly grilled. When done, transfer the zucchini to a serving platter. Arrange them in a fan shape for a pretty look. For garnish, sprinkle fresh parsley on top. This adds a pop of color and a burst of flavor. You can also drizzle extra olive oil and sprinkle sea salt for extra taste. Enjoy your Lemon Herb Grilled Zucchini! For the complete recipe, check the [Full Recipe]. To avoid sticking on the grill, start with a clean grill. Oil the grates well before adding zucchini. This creates a non-stick surface. Use a paper towel dipped in oil to wipe the grates. For even cooking, cut zucchini into uniform pieces. I recommend 1/2-inch thick rounds. This size cooks well without burning. Grill over medium-high heat for best results. You can boost flavor with fresh herbs like basil or thyme. They add a nice twist. For a bit of heat, try red pepper flakes or sliced jalapeños. Both pair well with the lemony taste. The best grill types for zucchini are gas or charcoal grills. Both give great flavor and heat. A grill basket can help keep slices from falling through the grates. Use tongs for safe flipping. For a great grilling experience, have a spatula and a timer handy. These tools help track cooking time and make flipping easy. For the complete process, check the Full Recipe. {{image_4}} You can change the flavors of your grilled zucchini by trying different herbs and spices. Instead of oregano, use thyme or basil for a fresh twist. You can also add a pinch of red pepper flakes for a little heat. Mixing in some smoked paprika can give your dish a nice depth. Incorporating other citrus flavors makes the marinade even more fun. Try lime or orange juice instead of lemon. Both options add a unique taste that pairs well with zucchini. You can also mix lemon with lime for a zesty combo. Grilled zucchini pairs well with many other vegetables. Bell peppers, eggplant, and asparagus are great choices. You can slice them into similar sizes for even cooking. Cooking times vary, so keep an eye on your veggies. Zucchini takes about 3-4 minutes per side. Bell peppers need about 5-7 minutes, while eggplant may take up to 8 minutes. This way, you can enjoy a colorful mix on your plate. Grilled zucchini makes a tasty side dish for many meals. It pairs well with proteins like grilled chicken, fish, or steak. You can also serve it alongside grains like quinoa or couscous for a filling meal. For fun side dish ideas, try serving grilled zucchini with a yogurt sauce. A sprinkle of feta cheese or a handful of nuts can also add a nice touch. For more flavor, drizzle balsamic glaze over the top. For a complete guide to making this dish, check out the Full Recipe. To store leftover grilled zucchini, let it cool first. Place it in an airtight container. This keeps it fresh and prevents odors from mixing. You can store it in the fridge. It usually lasts for about 3 to 5 days. Reheating grilled zucchini can be tricky. The best method is to use a skillet. Heat the skillet over medium-low heat. Add a small drizzle of olive oil. Place the zucchini in the skillet. Cook it for about 2 to 3 minutes on each side. This keeps the texture nice and firm. You can also add it to pasta or salads for a tasty twist. Yes, you can freeze grilled zucchini! To do this, let it cool completely first. Then, arrange the slices in a single layer on a baking sheet. Freeze them for about 1 to 2 hours. Once frozen, transfer the slices to a freezer bag. Remove as much air as possible. Grilled zucchini can last for up to 3 months in the freezer. When ready to use, thaw it in the fridge overnight. You can also toss it directly into soups or stews. For the full recipe, check out the Lemon Herb Grilled Zucchini recipe. To cut zucchini for grilling, slice it into 1/2-inch thick rounds. This thickness helps the zucchini cook evenly and stay firm. You can also cut them into long strips if you prefer a different shape. Just ensure your slices are uniform. This way, they will grill at the same rate. For added flavor, you can cut the zucchini lengthwise and brush the cut sides with olive oil. Yes, you can prepare Lemon Herb Grilled Zucchini ahead of time. To do this, marinate the zucchini slices a few hours before grilling. You can store them in the fridge for up to 24 hours in the marinade. This will enhance the flavor. Just remember to grill them right before serving for the best taste and texture. If grilling later, store the grilled zucchini in an airtight container. Grilled zucchini is very healthy. It is low in calories and high in vitamins. Zucchini is a great source of vitamin C, which boosts your immune system. It also contains potassium, which helps with heart health. Plus, grilling keeps the zucchini's nutrients intact while adding a nice smoky flavor. Enjoy it as a side dish or in salads. You can find the full recipe in the main article. In this article, we covered the key ingredients for Lemon Herb Grilled Zucchini and preparation steps. You learned how to marinate, grill, and enhance flavors. I shared tips for choosing fresh zucchini and creative variations. Remember, fresh ingredients lead to the best taste. Enjoy experimenting with different herbs or vegetables. Grilled zucchini is not just simple but also healthy and tasty. Now, you are ready to impress at your next meal!](https://goldendishy.com/wp-content/uploads/2025/06/34b028ee-fd33-4782-b46e-eaef12af4b53-768x768.webp)

