Roasted Beet and Goat Cheese Salad Flavorful Delight
![- 4 medium-sized beets - 4 cups mixed greens - 1/2 cup goat cheese - 1/4 cup walnuts - 1/4 cup dried cranberries or pomegranate seeds - 1/4 cup extra virgin olive oil - 2 tablespoons balsamic vinegar - 1 teaspoon honey - Salt and pepper - Fresh parsley for garnish The ingredients in this salad make it a real treat. The beets bring a sweet earthiness. They roast beautifully, turning soft and tender. Mixed greens add a fresh crunch. Goat cheese offers creamy tanginess. Walnuts give a nice crunch and healthy fats. Dried cranberries or pomegranate seeds add a pop of sweetness. This salad is not just tasty; it is also healthy. Each serving has about: - Calories: 350 - Fats: 25g - Proteins: 8g - Carbohydrates: 30g By using wholesome ingredients, you create a dish that nourishes as well as delights. This salad contains common allergens: - Dairy (goat cheese) - Nuts (walnuts) Always check for allergies before serving. You can easily swap goat cheese and walnuts for alternatives if needed. To start, heat your oven to 400°F (200°C). Wrap each beet in aluminum foil. Make sure they are sealed tight so they steam well. Place the wrapped beets on a baking sheet. This will catch any drips. Roast the beets for about 45 minutes to 1 hour. They should be tender when pierced with a fork. Once done, take them out and let them cool. When they are cool enough, peel off the skins. You might want to wear gloves to keep your hands clean. For the dressing, gather these ingredients: - 1/4 cup extra virgin olive oil - 2 tablespoons balsamic vinegar - 1 teaspoon honey - Salt and pepper to taste In a small bowl, whisk the olive oil, balsamic vinegar, honey, and a pinch of salt and pepper. Taste it to see if you like the balance of flavors. Adjust the seasoning if needed. This dressing will add a nice tangy kick to your salad. Now it's time to put everything together. Slice the cooled beets into wedges or rounds. In a large bowl, combine the mixed greens, sliced beets, toasted walnuts, and dried cranberries or pomegranate seeds. Toss them gently to mix evenly. Drizzle some of the dressing over the salad and toss again, so all ingredients are coated. For presentation, transfer the salad to a nice serving platter or divide it into individual plates. Crumble the goat cheese over the top for a creamy texture. Drizzle a bit more dressing over the cheese. If you like, add fresh parsley for color and flavor. Follow the [Full Recipe] for detailed steps and measurements. Remember, a beautiful salad is always a joy to eat! Choosing the right beets Select firm, smooth beets. Look for small to medium sizes, as they roast better. Avoid any that feel soft or have spots. How to tell when beets are done Beets are ready when a fork easily pierces them. Depending on size, this takes 45 minutes to 1 hour at 400°F. Let them cool before peeling. Substitutions for balsamic vinegar If you want a twist, use red wine vinegar or apple cider vinegar. Both add a tasty zing without losing the salad's charm. Adding herbs to the dressing Fresh herbs like thyme or basil brighten the dressing. Chop them finely and mix in for added flavor. A little goes a long way. Ideal accompaniments This salad pairs well with crusty bread or a light soup. These sides enhance the meal without overpowering the main dish. Pairing with proteins for a meal Add grilled chicken or shrimp for a hearty option. If you're vegetarian, consider roasted chickpeas or tofu. Both options make it filling and delicious. For the full recipe, check out the [Full Recipe]. {{image_4}} You can make your salad heartier by adding proteins. Grilled chicken or shrimp works well. Simply cook the protein and slice it. Top your salad with it for extra flavor. If you want a vegetarian option, use tofu. Cube the tofu and sauté it until golden. This adds protein and a nice texture. Incorporating seasonal fruits or veggies can elevate your salad. In spring, try fresh strawberries or asparagus. In the fall, add diced apples or roasted squash. These ingredients not only taste great but also add color. Consider swapping nuts for crunch. Almonds, pecans, or sunflower seeds are all tasty options. For a vegan version, simply replace goat cheese. Use cashew cream or a vegan cheese. These alternatives still give you that creamy texture. You can also experiment with dressings. A lemon vinaigrette or tahini dressing adds a new twist. Both options keep the salad fresh while staying plant-based. For the full recipe, check out the complete guide above! To store leftovers, place the salad in an airtight container. This keeps it fresh and prevents the greens from wilting. You can add a paper towel to absorb excess moisture. Store it in the fridge for up to three days. Keep the dressing separate until serving. This helps maintain the salad's crunch. You cannot freeze the whole salad. Freezing changes the texture of the greens, making them mushy. However, you can freeze roasted beets. Place them in a freezer-safe bag and squeeze out the air. They will stay fresh for about three months. Thaw them in the fridge before using. Beets last about one to two weeks in the fridge. Keep them unpeeled in a cool, dark place. Mixed greens should be used within five days for best taste. Goat cheese stays fresh for about one week once opened. Keep it tightly wrapped to avoid drying out. Roasting beets is simple and rewarding. Here’s how: 1. Preheat your oven to 400°F (200°C). 2. Scrub each beet clean and trim off the tops and bottoms. 3. Wrap each beet in aluminum foil. This keeps them moist. 4. Place the wrapped beets on a baking sheet. 5. Roast for 45 minutes to 1 hour. They are done when a fork easily pierces them. 6. Let them cool, then peel off the skins. Wear gloves to avoid staining your hands. Roasting beets brings out their natural sweetness. It makes them tender and full of flavor. You can use them in salads, sandwiches, or as a side dish. You can get a head start on this salad! Here are some tips: - Roast the beets a day early. Store them in the fridge. They will stay fresh. - Prepare the dressing ahead of time. Keep it in a jar. Shake before use. - Wash and dry the mixed greens. Store them in a container with a paper towel to absorb moisture. Assemble the salad just before serving. This keeps it crisp and fresh. If you need an alternative to goat cheese, here are some creamy options: - Feta cheese adds a salty flavor and crumbly texture. - Cream cheese is soft and rich, perfect for spreading. - Ricotta cheese is light and fluffy, giving a mild taste. These substitutes work well in the salad. Choose one that you like best! For the full recipe, check out the Roasted Beet and Goat Cheese Salad. This blog shared a tasty beet salad recipe, from ingredients to storage tips. You learned how to roast beets and mix a great dressing. I also provided variations to suit different diets, plus storage advice. Keep experimenting with ingredients and enjoy the colorful flavors. Simple changes can make each meal unique. This salad is not just healthy; it's fun and versatile. Enjoy your cooking journey and impress your family and friends with this easy dish!](https://goldendishy.com/wp-content/uploads/2025/06/47a93f65-23b8-4270-bc0e-899490eb93a9.webp)
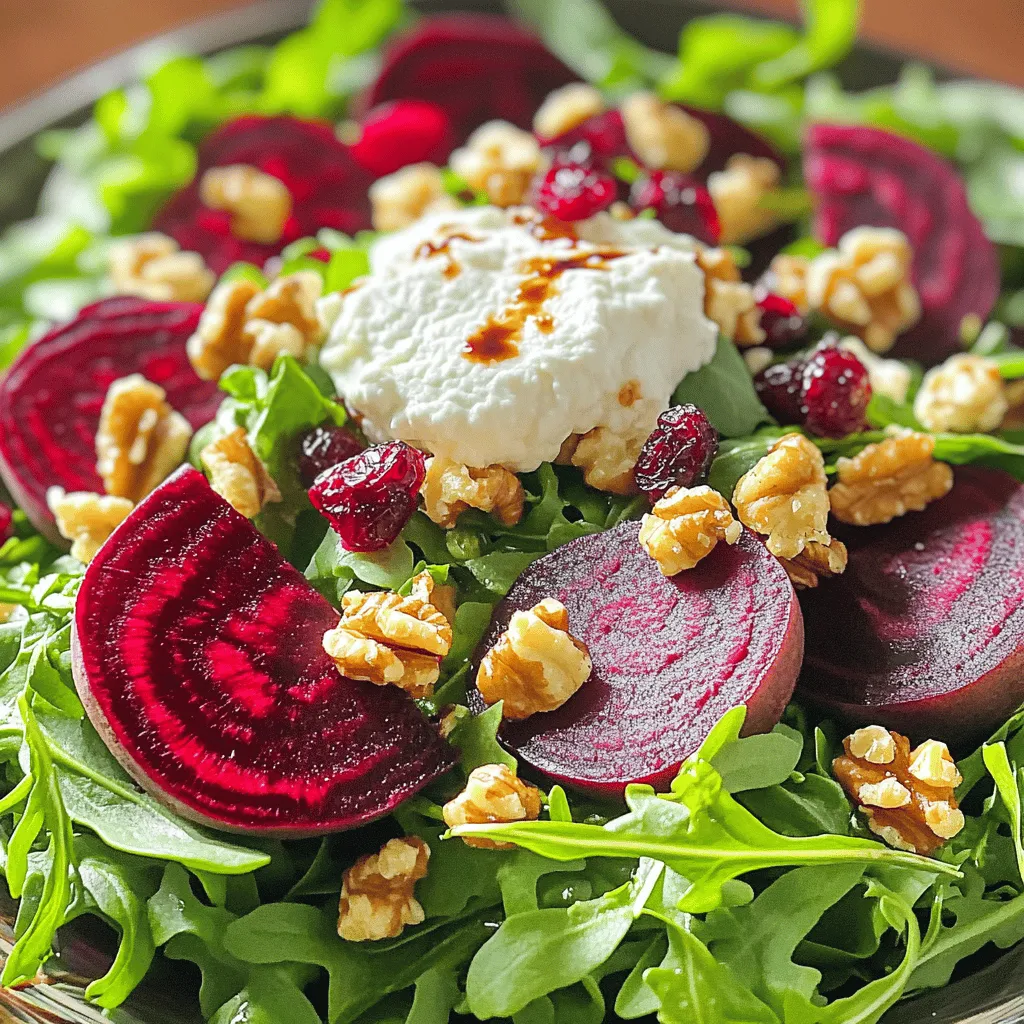
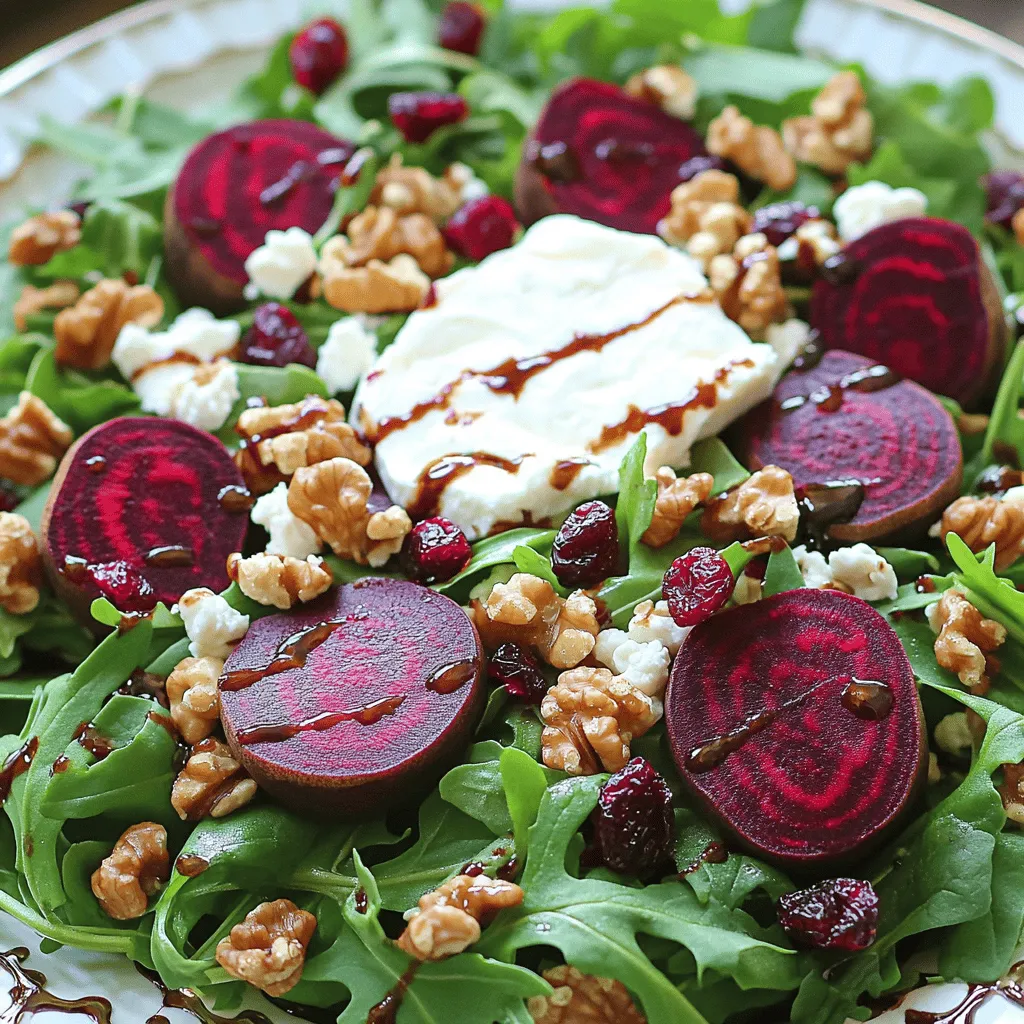
Get ready to indulge in a vibrant Roasted Beet and Goat Cheese Salad that’s bursting with flavor! This salad is a delightful mix of earthy beets, tangy goat cheese, and crunchy nuts. You’ll love how easy it is to make, and each bite offers a wonderful taste experience. In this post, I’ll guide you through the simple steps to create this colorful dish, perfect for any occasion. Let’s dive into the ingredients and get cooking!
Ingredients
List of Ingredients
– 4 medium-sized beets
– 4 cups mixed greens
– 1/2 cup goat cheese
– 1/4 cup walnuts
– 1/4 cup dried cranberries or pomegranate seeds
– 1/4 cup extra virgin olive oil
– 2 tablespoons balsamic vinegar
– 1 teaspoon honey
– Salt and pepper
– Fresh parsley for garnish
The ingredients in this salad make it a real treat. The beets bring a sweet earthiness. They roast beautifully, turning soft and tender. Mixed greens add a fresh crunch. Goat cheese offers creamy tanginess. Walnuts give a nice crunch and healthy fats. Dried cranberries or pomegranate seeds add a pop of sweetness.
Nutritional Information
This salad is not just tasty; it is also healthy. Each serving has about:
– Calories: 350
– Fats: 25g
– Proteins: 8g
– Carbohydrates: 30g
By using wholesome ingredients, you create a dish that nourishes as well as delights.
Allergens
This salad contains common allergens:
– Dairy (goat cheese)
– Nuts (walnuts)
Always check for allergies before serving. You can easily swap goat cheese and walnuts for alternatives if needed.
Step-by-Step Instructions
Roasting the Beets
To start, heat your oven to 400°F (200°C). Wrap each beet in aluminum foil. Make sure they are sealed tight so they steam well. Place the wrapped beets on a baking sheet. This will catch any drips. Roast the beets for about 45 minutes to 1 hour. They should be tender when pierced with a fork. Once done, take them out and let them cool. When they are cool enough, peel off the skins. You might want to wear gloves to keep your hands clean.
Preparing the Dressing
For the dressing, gather these ingredients:
– 1/4 cup extra virgin olive oil
– 2 tablespoons balsamic vinegar
– 1 teaspoon honey
– Salt and pepper to taste
In a small bowl, whisk the olive oil, balsamic vinegar, honey, and a pinch of salt and pepper. Taste it to see if you like the balance of flavors. Adjust the seasoning if needed. This dressing will add a nice tangy kick to your salad.
Assembling the Salad
Now it’s time to put everything together. Slice the cooled beets into wedges or rounds. In a large bowl, combine the mixed greens, sliced beets, toasted walnuts, and dried cranberries or pomegranate seeds. Toss them gently to mix evenly. Drizzle some of the dressing over the salad and toss again, so all ingredients are coated.
For presentation, transfer the salad to a nice serving platter or divide it into individual plates. Crumble the goat cheese over the top for a creamy texture. Drizzle a bit more dressing over the cheese. If you like, add fresh parsley for color and flavor.Remember, a beautiful salad is always a joy to eat!
Tips & Tricks
Perfecting the Roasting Process
Choosing the right beets
Select firm, smooth beets. Look for small to medium sizes, as they roast better. Avoid any that feel soft or have spots.
How to tell when beets are done
Beets are ready when a fork easily pierces them. Depending on size, this takes 45 minutes to 1 hour at 400°F. Let them cool before peeling.
Dressing Variations
Substitutions for balsamic vinegar
If you want a twist, use red wine vinegar or apple cider vinegar. Both add a tasty zing without losing the salad’s charm.
Adding herbs to the dressing
Fresh herbs like thyme or basil brighten the dressing. Chop them finely and mix in for added flavor. A little goes a long way.
Serving Suggestions
Ideal accompaniments
This salad pairs well with crusty bread or a light soup. These sides enhance the meal without overpowering the main dish.
Pairing with proteins for a meal
Add grilled chicken or shrimp for a hearty option. If you’re vegetarian, consider roasted chickpeas or tofu. Both options make it filling and delicious.

Variations
Adding Proteins
You can make your salad heartier by adding proteins. Grilled chicken or shrimp works well. Simply cook the protein and slice it. Top your salad with it for extra flavor. If you want a vegetarian option, use tofu. Cube the tofu and sauté it until golden. This adds protein and a nice texture.
Seasonal Ingredients
Incorporating seasonal fruits or veggies can elevate your salad. In spring, try fresh strawberries or asparagus. In the fall, add diced apples or roasted squash. These ingredients not only taste great but also add color. Consider swapping nuts for crunch. Almonds, pecans, or sunflower seeds are all tasty options.
Vegan Options
For a vegan version, simply replace goat cheese. Use cashew cream or a vegan cheese. These alternatives still give you that creamy texture. You can also experiment with dressings. A lemon vinaigrette or tahini dressing adds a new twist. Both options keep the salad fresh while staying plant-based.
Storage Info
Refrigeration
To store leftovers, place the salad in an airtight container. This keeps it fresh and prevents the greens from wilting. You can add a paper towel to absorb excess moisture. Store it in the fridge for up to three days. Keep the dressing separate until serving. This helps maintain the salad’s crunch.
Freezing Tips
You cannot freeze the whole salad. Freezing changes the texture of the greens, making them mushy. However, you can freeze roasted beets. Place them in a freezer-safe bag and squeeze out the air. They will stay fresh for about three months. Thaw them in the fridge before using.
Best Practices for Freshness
Beets last about one to two weeks in the fridge. Keep them unpeeled in a cool, dark place. Mixed greens should be used within five days for best taste. Goat cheese stays fresh for about one week once opened. Keep it tightly wrapped to avoid drying out.
FAQs
How do I roast beets?
Roasting beets is simple and rewarding. Here’s how:
1. Preheat your oven to 400°F (200°C).
2. Scrub each beet clean and trim off the tops and bottoms.
3. Wrap each beet in aluminum foil. This keeps them moist.
4. Place the wrapped beets on a baking sheet.
5. Roast for 45 minutes to 1 hour. They are done when a fork easily pierces them.
6. Let them cool, then peel off the skins. Wear gloves to avoid staining your hands.
Roasting beets brings out their natural sweetness. It makes them tender and full of flavor. You can use them in salads, sandwiches, or as a side dish.
Can I make the salad ahead of time?
You can get a head start on this salad! Here are some tips:
– Roast the beets a day early. Store them in the fridge. They will stay fresh.
– Prepare the dressing ahead of time. Keep it in a jar. Shake before use.
– Wash and dry the mixed greens. Store them in a container with a paper towel to absorb moisture.
Assemble the salad just before serving. This keeps it crisp and fresh.
What can I substitute for goat cheese?
If you need an alternative to goat cheese, here are some creamy options:
– Feta cheese adds a salty flavor and crumbly texture.
– Cream cheese is soft and rich, perfect for spreading.
– Ricotta cheese is light and fluffy, giving a mild taste.
These substitutes work well in the salad. Choose one that you like best!
This blog shared a tasty beet salad recipe, from ingredients to storage tips. You learned how to roast beets and mix a great dressing. I also provided variations to suit different diets, plus storage advice. Keep experimenting with ingredients and enjoy the colorful flavors. Simple changes can make each meal unique. This salad is not just healthy; it’s fun and versatile. Enjoy your cooking journey and impress your family and friends with this easy dish!
![- 4 medium-sized beets - 4 cups mixed greens - 1/2 cup goat cheese - 1/4 cup walnuts - 1/4 cup dried cranberries or pomegranate seeds - 1/4 cup extra virgin olive oil - 2 tablespoons balsamic vinegar - 1 teaspoon honey - Salt and pepper - Fresh parsley for garnish The ingredients in this salad make it a real treat. The beets bring a sweet earthiness. They roast beautifully, turning soft and tender. Mixed greens add a fresh crunch. Goat cheese offers creamy tanginess. Walnuts give a nice crunch and healthy fats. Dried cranberries or pomegranate seeds add a pop of sweetness. This salad is not just tasty; it is also healthy. Each serving has about: - Calories: 350 - Fats: 25g - Proteins: 8g - Carbohydrates: 30g By using wholesome ingredients, you create a dish that nourishes as well as delights. This salad contains common allergens: - Dairy (goat cheese) - Nuts (walnuts) Always check for allergies before serving. You can easily swap goat cheese and walnuts for alternatives if needed. To start, heat your oven to 400°F (200°C). Wrap each beet in aluminum foil. Make sure they are sealed tight so they steam well. Place the wrapped beets on a baking sheet. This will catch any drips. Roast the beets for about 45 minutes to 1 hour. They should be tender when pierced with a fork. Once done, take them out and let them cool. When they are cool enough, peel off the skins. You might want to wear gloves to keep your hands clean. For the dressing, gather these ingredients: - 1/4 cup extra virgin olive oil - 2 tablespoons balsamic vinegar - 1 teaspoon honey - Salt and pepper to taste In a small bowl, whisk the olive oil, balsamic vinegar, honey, and a pinch of salt and pepper. Taste it to see if you like the balance of flavors. Adjust the seasoning if needed. This dressing will add a nice tangy kick to your salad. Now it's time to put everything together. Slice the cooled beets into wedges or rounds. In a large bowl, combine the mixed greens, sliced beets, toasted walnuts, and dried cranberries or pomegranate seeds. Toss them gently to mix evenly. Drizzle some of the dressing over the salad and toss again, so all ingredients are coated. For presentation, transfer the salad to a nice serving platter or divide it into individual plates. Crumble the goat cheese over the top for a creamy texture. Drizzle a bit more dressing over the cheese. If you like, add fresh parsley for color and flavor. Follow the [Full Recipe] for detailed steps and measurements. Remember, a beautiful salad is always a joy to eat! Choosing the right beets Select firm, smooth beets. Look for small to medium sizes, as they roast better. Avoid any that feel soft or have spots. How to tell when beets are done Beets are ready when a fork easily pierces them. Depending on size, this takes 45 minutes to 1 hour at 400°F. Let them cool before peeling. Substitutions for balsamic vinegar If you want a twist, use red wine vinegar or apple cider vinegar. Both add a tasty zing without losing the salad's charm. Adding herbs to the dressing Fresh herbs like thyme or basil brighten the dressing. Chop them finely and mix in for added flavor. A little goes a long way. Ideal accompaniments This salad pairs well with crusty bread or a light soup. These sides enhance the meal without overpowering the main dish. Pairing with proteins for a meal Add grilled chicken or shrimp for a hearty option. If you're vegetarian, consider roasted chickpeas or tofu. Both options make it filling and delicious. For the full recipe, check out the [Full Recipe]. {{image_4}} You can make your salad heartier by adding proteins. Grilled chicken or shrimp works well. Simply cook the protein and slice it. Top your salad with it for extra flavor. If you want a vegetarian option, use tofu. Cube the tofu and sauté it until golden. This adds protein and a nice texture. Incorporating seasonal fruits or veggies can elevate your salad. In spring, try fresh strawberries or asparagus. In the fall, add diced apples or roasted squash. These ingredients not only taste great but also add color. Consider swapping nuts for crunch. Almonds, pecans, or sunflower seeds are all tasty options. For a vegan version, simply replace goat cheese. Use cashew cream or a vegan cheese. These alternatives still give you that creamy texture. You can also experiment with dressings. A lemon vinaigrette or tahini dressing adds a new twist. Both options keep the salad fresh while staying plant-based. For the full recipe, check out the complete guide above! To store leftovers, place the salad in an airtight container. This keeps it fresh and prevents the greens from wilting. You can add a paper towel to absorb excess moisture. Store it in the fridge for up to three days. Keep the dressing separate until serving. This helps maintain the salad's crunch. You cannot freeze the whole salad. Freezing changes the texture of the greens, making them mushy. However, you can freeze roasted beets. Place them in a freezer-safe bag and squeeze out the air. They will stay fresh for about three months. Thaw them in the fridge before using. Beets last about one to two weeks in the fridge. Keep them unpeeled in a cool, dark place. Mixed greens should be used within five days for best taste. Goat cheese stays fresh for about one week once opened. Keep it tightly wrapped to avoid drying out. Roasting beets is simple and rewarding. Here’s how: 1. Preheat your oven to 400°F (200°C). 2. Scrub each beet clean and trim off the tops and bottoms. 3. Wrap each beet in aluminum foil. This keeps them moist. 4. Place the wrapped beets on a baking sheet. 5. Roast for 45 minutes to 1 hour. They are done when a fork easily pierces them. 6. Let them cool, then peel off the skins. Wear gloves to avoid staining your hands. Roasting beets brings out their natural sweetness. It makes them tender and full of flavor. You can use them in salads, sandwiches, or as a side dish. You can get a head start on this salad! Here are some tips: - Roast the beets a day early. Store them in the fridge. They will stay fresh. - Prepare the dressing ahead of time. Keep it in a jar. Shake before use. - Wash and dry the mixed greens. Store them in a container with a paper towel to absorb moisture. Assemble the salad just before serving. This keeps it crisp and fresh. If you need an alternative to goat cheese, here are some creamy options: - Feta cheese adds a salty flavor and crumbly texture. - Cream cheese is soft and rich, perfect for spreading. - Ricotta cheese is light and fluffy, giving a mild taste. These substitutes work well in the salad. Choose one that you like best! For the full recipe, check out the Roasted Beet and Goat Cheese Salad. This blog shared a tasty beet salad recipe, from ingredients to storage tips. You learned how to roast beets and mix a great dressing. I also provided variations to suit different diets, plus storage advice. Keep experimenting with ingredients and enjoy the colorful flavors. Simple changes can make each meal unique. This salad is not just healthy; it's fun and versatile. Enjoy your cooking journey and impress your family and friends with this easy dish!](https://goldendishy.com/wp-content/uploads/2025/06/47a93f65-23b8-4270-bc0e-899490eb93a9-300x300.webp)


. - Combine 1 cup warm water, 2 ¼ teaspoons yeast, and 1 teaspoon sugar. - Let this sit for 5-10 minutes until it becomes frothy. This means the yeast is ready. - In a large bowl, mix 3 cups flour and 1 teaspoon salt. - Pour in the activated yeast mixture and 2 tablespoons olive oil. - Use your hands to mix until a sticky dough forms. - Place the dough on a floured surface and knead for about 5 minutes. - The goal is a smooth and elastic dough. - Lightly grease a bowl and place the kneaded dough inside. - Cover it with a kitchen towel and let it rise for 1 hour. - Once it doubles in size, gently punch it down to release air. - Roll the dough into a rectangle, about ½ inch thick. - Transfer it to a baking sheet, and score it into breadstick shapes. You can find the complete process in the Full Recipe. To make great breadsticks, check your dough's texture. The dough should feel smooth and soft. If it sticks to your fingers, it is too wet. If it pulls away cleanly, you’re on the right track. Knead it until it is elastic. This gives you that perfect bite. For the best results, preheat your oven to 425°F (220°C). This hot oven helps the breadsticks puff up and get golden. Line your baking sheet with parchment paper. This keeps your breadsticks from sticking and makes cleanup easy. Bake for 12-15 minutes. Watch for a golden brown color, that means they are ready! Want to spice things up? You can add extra flavors to your breadsticks. Try adding crushed red pepper for heat or fresh basil for a hint of sweetness. You can also use different cheeses. Cheddar or pepper jack can give you a fun twist. Mix and match to find your favorite! For the full recipe, check out the detailed steps. {{image_4}} You can change the cheese to make each batch unique. Try using cheddar for a sharp taste. Pepper jack adds a fun spicy kick. Mix and match cheeses to create your favorite flavor. Just remember, the more cheese, the better! If you want a vegan option, use plant-based cheese. There are many tasty brands available today. You can also make a garlic spread with olive oil and herbs instead of butter. This keeps the flavor rich while being dairy-free. Add fresh herbs to bring new life to your breadsticks. Chopped basil or thyme can add a lovely aroma. You can mix herbs into the dough or sprinkle them on top before baking. These small changes make a big difference. Try one of these variations next time you bake your cheesy garlic breadsticks using the Full Recipe! To store leftover breadsticks, let them cool completely first. Place them in an airtight container. This keeps them fresh. You can also wrap them in plastic wrap. Store them at room temperature for up to two days. If you want them to last longer, keep them in the fridge. Just remember, cold breadsticks can lose some of their warmth. Freezing is a great way to keep these breadsticks tasty for later. After they cool, wrap each breadstick in plastic wrap. Then, place them in a freezer bag. Make sure to remove as much air as possible. This helps avoid freezer burn. To reheat, take them out and let them thaw first. Then, bake them at 350°F (175°C) for about 10 minutes. They will taste fresh again! When stored properly, these breadsticks stay fresh for about two days at room temperature. In the fridge, they can last up to a week. If frozen, they can last for about three months. Just remember, the sooner you eat them, the better they will taste. For more details, check the Full Recipe. To make your breadsticks extra cheesy, you can add more cheese. Here are some tips: - Use a blend of mozzarella and cheddar for depth. - Sprinkle cheese on top before baking. - Add cheese to the dough for a cheesy base. - Mix in cream cheese with your garlic butter for a rich flavor. Each of these tips gives your breadsticks a gooey, cheesy texture. It enhances the flavor and makes every bite delightful. Yes, you can prepare these breadsticks ahead of time! Here’s how: - Make the dough and let it rise. - Shape the breadsticks and cover them with plastic wrap. - Store in the fridge for up to 24 hours. When you are ready, just take them out to rise a bit more and bake. This method saves time and allows you to enjoy fresh breadsticks without the fuss. Dipping sauces elevate your cheesy garlic breadsticks. Here are some great options: - Marinara sauce adds a classic touch. - Garlic butter enhances the garlic flavor. - Ranch dressing offers a creamy contrast. - Alfredo sauce gives a rich, cheesy dip. These dips not only complement the breadsticks but also add fun flavors to each bite. You can mix and match to find your perfect pairing! In this post, I shared how to make delicious cheesy garlic breadsticks. We covered essential ingredients, step-by-step instructions, and helpful tips. I also shared variations if you want something different. Now, you have the tools and knowledge to create your own. Enjoy these tasty treats with family or friends. Happy cooking!](https://goldendishy.com/wp-content/uploads/2025/06/f014268d-bdac-4f9e-9ca6-06fbafbccd76-768x768.webp)

![- 1 can refrigerated pizza dough - 4 tablespoons unsalted butter, melted - 4 cloves garlic, finely minced - 1 teaspoon dried oregano - 1 teaspoon dried parsley - 1/2 teaspoon sea salt - 1/4 teaspoon freshly cracked black pepper - Optional toppings: Grated Parmesan cheese To make these breadsticks, you need simple ingredients. The key is the pizza dough. It makes the process quick and easy. The butter and garlic blend perfectly to give a rich flavor. Oregano and parsley add freshness. Sea salt and black pepper enhance all the tastes. - Baking sheet - Parchment paper - Mixing bowl - Knife or pizza cutter - Measuring spoons You will need a few basic kitchen tools. A baking sheet and parchment paper help with easy cleanup. A mixing bowl mixes your garlic butter. A knife or pizza cutter cuts the dough into strips. Measuring spoons ensure you use the right amounts. Using the right ingredients and tools will make your garlic breadsticks tasty and fun to make. You can find the full recipe in the earlier section. Start by preheating your oven to 400°F (200°C). This ensures the oven is hot when you bake. Next, take your can of refrigerated pizza dough. On a clean, lightly floured surface, roll out the dough into a rectangle. Aim for a thickness of about 1/2 inch. A uniform thickness helps the breadsticks bake evenly. Now it’s time to cut the dough into strips. Use a sharp knife or pizza cutter for best results. Cut the dough into strips that are around 1-inch wide. This size is perfect for dipping. Make sure your cuts are even, as this will give you uniform breadsticks. In a small bowl, mix the melted butter with minced garlic, dried oregano, dried parsley, sea salt, and black pepper. Stir well until all the ingredients blend together. This garlic butter mixture adds tons of flavor. Make sure you coat each strip of dough evenly for the best taste. Line a baking sheet with parchment paper. Arrange the breadstick strips on the sheet, leaving about an inch of space between each one. This space allows them to bake evenly. Place the baking sheet in your preheated oven. Bake for 12-15 minutes, until the breadsticks turn golden brown. Keep an eye on them to avoid overbaking. When done, let them cool for a few minutes before serving. Enjoy your garlic breadsticks! For the complete recipe, check the Full Recipe section. To get that perfect breadstick texture, start with a hot oven. A preheated oven at 400°F (200°C) helps brown the breadsticks well. Place your baking sheet in the middle of the oven for even heat. Check them often as they bake. You want them golden brown, not burnt. Keep an eye on them during the last few minutes. If they look golden, they are ready. Overbaking can make them hard. So, watch closely! Adding herbs can boost the flavor of your breadsticks. Try mixing in fresh basil or thyme for a twist. If you like a spicy kick, add red pepper flakes to the garlic butter. You can also try mixing in some Italian seasoning or rosemary. Experimenting lets you find your favorite flavor. Use what you enjoy most! For a fun and creative way to serve your breadsticks, stand them upright in a tall glass. It looks nice and keeps them warm. You can also place them in a basket lined with a cloth. This adds a rustic touch. Pair your breadsticks with marinara sauce or garlic-infused olive oil for dipping. It makes each bite even better. Enjoy the flavors! {{image_4}} For a cheesy twist, you can stuff your breadsticks. First, roll out the pizza dough. Cut it into strips, about 1-inch wide. Place a small piece of cheese in the middle of each strip. Then, fold the dough over the cheese and pinch it to seal. Great cheese options include: - Mozzarella - Cheddar - Cream cheese These cheeses melt well and add a rich flavor. You can make garlic breadsticks even better by using fresh herbs. Try adding chopped basil or thyme to the garlic butter mix. This adds a bright flavor. You can also mix in a little lemon zest. It brightens up the taste even more. Combining flavors is easy. Use sun-dried tomatoes or olives in the dough. These give a unique twist to your breadsticks. If you want a vegan version, swap out the butter. You can use olive oil or vegan butter. Both give great flavor without dairy. Also, check your pizza dough. Some brands have dairy, so look for vegan options. Adjust your garlic butter mix to include your chosen fat. Enjoy the same delicious taste without any animal products. For the full recipe, check out the [Full Recipe]. To keep your leftover breadsticks fresh, follow these tips: - Refrigeration: Place the breadsticks in an airtight container. This helps keep them soft and tasty. They will last for up to three days in the fridge. - Freezing: For longer storage, freeze the breadsticks. Wrap them tightly in plastic wrap and then in foil. This prevents freezer burn. They can be frozen for up to three months. When you want to enjoy your breadsticks again, reheating is key. Here are two popular methods: - Oven Method: Preheat your oven to 350°F (175°C). Place the breadsticks on a baking sheet. Heat them for about 10 minutes. This will make them warm and crisp. - Microwave Method: If you need a quick fix, use the microwave. Place the breadsticks on a microwave-safe plate. Cover them with a damp paper towel. Heat for about 20-30 seconds. This keeps them soft but may not give the same crispness as the oven. Yes, you can use homemade pizza dough for these breadsticks. Just make sure your dough is soft and easy to roll out. If you choose to use a thicker dough, you may need to bake it a bit longer. Roll the dough to about 1/2 inch thick. This thickness helps the breadsticks cook evenly. Remember to season your garlic butter mixture well, as homemade dough can absorb flavors differently. To make gluten-free garlic breadsticks, use a gluten-free pizza dough mix. Many brands offer ready-made options. You can also make it from scratch with gluten-free flour. Make sure to follow the instructions on the package for best results. Add the same garlic butter mixture for great flavor. This way, everyone can enjoy tasty garlic breadsticks! Garlic breadsticks are great with many meals. They go well with pasta dishes, like spaghetti or fettuccine alfredo. You can also serve them with soups, like minestrone or tomato basil. For drinks, pair them with a light salad or a refreshing sparkling water. You can even enjoy them with a glass of red wine if you prefer. The flavors of garlic and herbs complement many dishes, making them a versatile side! You now know how to make easy garlic breadsticks from simple ingredients. With just a few steps, you can prepare delicious breadsticks that add flavor to any meal. Remember to experiment with toppings and herbs to create your own unique twist. Store any leftovers properly, or even freeze them for later. Enjoy baking these treats and sharing them with others. Your homemade garlic breadsticks will surely impress everyone!](https://goldendishy.com/wp-content/uploads/2025/07/3052f1a4-9d5f-43ae-ba15-9488150fef43-768x768.webp)

