No-Bake Chocolate Peanut Butter Bars Delicious Treat

- 1 cup creamy peanut butter - 1/2 cup honey or maple syrup - 1 cup rolled oats - 1/2 cup unsweetened shredded coconut - 1/2 cup chocolate chips - 1/2 teaspoon pure vanilla extract - 1/4 teaspoon fine sea salt You can replace honey with maple syrup for a vegan option. For gluten-free bars, use certified gluten-free oats. This keeps the recipe tasty and inclusive for all. When buying peanut butter, look for natural options. They have no added sugar or oils. For chocolate chips, choose high-quality brands. This affects the overall taste and texture. Good chocolate melts better and adds richness. To start, we need to heat the peanut butter and sweetener. Take a medium saucepan and add 1 cup of creamy peanut butter with 1/2 cup of honey or maple syrup. Heat this over low heat. Stir as you go. You want the mix to be smooth and combined. This usually takes about 3-4 minutes. Once it’s melted and smooth, remove the pan from the heat. Add 1/2 teaspoon of pure vanilla extract and 1/4 teaspoon of fine sea salt. Stir well to make sure these flavors mix in evenly. Next, we will mix our dry ingredients. In a large bowl, combine 1 cup of rolled oats, 1/2 cup of unsweetened shredded coconut, and 1/2 cup of chocolate chips. Give it a good stir. Make sure everything is evenly mixed. This step is key to getting the right texture in your bars. If you want, you can use a whisk for an even better mix. Now it’s time to bring everything together. Pour the warm peanut butter mixture over the dry mix. Use a spatula or wooden spoon to stir until all the oats and coconut are coated well. Prepare an 8x8-inch square baking dish by lining it with parchment paper. Leave some paper hanging over the sides. This will help you lift the bars out later. Transfer the mixture into the lined dish. Spread it evenly across the bottom. Press it down firmly with your hands or a spatula. Make sure it’s compact. This helps the bars hold their shape. Once pressed, sprinkle the remaining chocolate chips on top. Gently press them in so they stick. Cover the dish with plastic wrap and place it in the fridge for at least 2 hours. This will help the bars set. After they are firm, lift them out using the parchment. Cut them into squares or rectangles. Enjoy your delicious treat! For the full recipe, check out the details above. - Overheating the peanut butter: Heat it gently. If it gets too hot, it can lose flavor. Stir constantly until smooth, about 3-4 minutes. - Insufficiently pressing down the mixture: Press firmly to create a compact layer. This helps the bars stay together when cut. - Ideas for adding nuts or dried fruit: Try adding chopped walnuts or almonds for crunch. Dried cranberries or raisins can add sweetness and chewiness. Mix these in with the oats for even flavor. - Using different flavor extracts: Swap vanilla for almond or peppermint extract. This can change the whole taste profile. - Pairing with ice cream or yogurt: Serve these bars with a scoop of vanilla ice cream. The cold ice cream makes a nice contrast to the rich bars. You can also try them with yogurt for a creamy touch. - Creative presentations for gatherings: Cut the bars into fun shapes with cookie cutters. Drizzle melted chocolate on top for a fancy look. Arrange them on a colorful plate to impress guests. For the complete guide, check out the Full Recipe. {{image_4}} You can change these bars by adding protein powder. This makes them great for a post-workout snack. Use one scoop of your favorite protein powder. Mix it in with the oats and coconut. It will add a nice boost without changing much of the taste. Another option is to swap coconut for almond flour. This change makes the bars grain-free and nutty. Just use the same amount of almond flour as coconut. You will still enjoy that chewy texture, but with a twist. Try using dark chocolate instead of milk chocolate. Dark chocolate brings a richer taste. It also has less sugar, so it’s a healthier choice. You can enjoy a deeper chocolate flavor with this simple switch. Adding spices like cinnamon or nutmeg can enhance your bars. Just a pinch can make a big difference. These spices add warmth and a hint of comfort. Experiment with the amounts to find your favorite balance. If you need nut-free options, you can use sun butter. This alternative tastes great and keeps the bars creamy. Just swap peanut butter for sun butter at the same ratio. For low-sugar modifications, you can reduce the honey or maple syrup. You can also use a sugar substitute, like stevia or erythritol. This way, you can still enjoy a sweet treat without the extra sugar. For the complete instructions, check out the Full Recipe! To keep your no-bake chocolate peanut butter bars fresh, store them in the fridge. Wrap them tightly in plastic wrap or place them in an airtight container. This helps maintain their taste and texture. They can last up to one week in the fridge. For longer storage, you can freeze them. Cut the bars into squares and layer them in a freezer-safe container. They stay good for about three months in the freezer. Choose containers that are airtight and made of glass or plastic. Glass containers work best as they do not absorb smells. To prevent sticking, place parchment paper between layers of bars. This makes it easy to take out one bar without damaging others. You can also use wax paper for this purpose. For the best flavor, eat the bars within a week when stored in the fridge. Look for any unusual smells, discoloration, or a change in texture. If the bars feel dry or crumbly, they may not taste as good. Always check before enjoying your treat! No-bake chocolate peanut butter bars stay fresh for about one week in the fridge. For longer storage, you can freeze them. They last up to three months in the freezer. Just wrap them well in plastic wrap or foil. This keeps them safe from freezer burn. Yes, you can use crunchy peanut butter. It will change the texture. You will have little bits of peanuts nestled in the bars. This adds a nice crunch and extra flavor. The taste stays rich and creamy, too. If your bars are crumbly, try adding more peanut butter or honey. These ingredients help bind the mix together. You can also press the mixture more firmly into the pan. If all else fails, melt a bit more chocolate and mix it in. This can help hold everything together. In this post, we explored how to make delicious no-bake chocolate peanut butter bars. We discussed the key ingredients, possible substitutions, and tips for choosing the best quality items. You learned the step-by-step process for preparation, mixing, and assembling. Plus, we covered common mistakes, serving ideas, and variations. Remember, using natural ingredients makes a big difference in taste. Enjoy making these bars and sharing them! Following these tips will help you create a treat everyone will love. Happy cooking!

WANT TO SAVE THIS RECIPE?

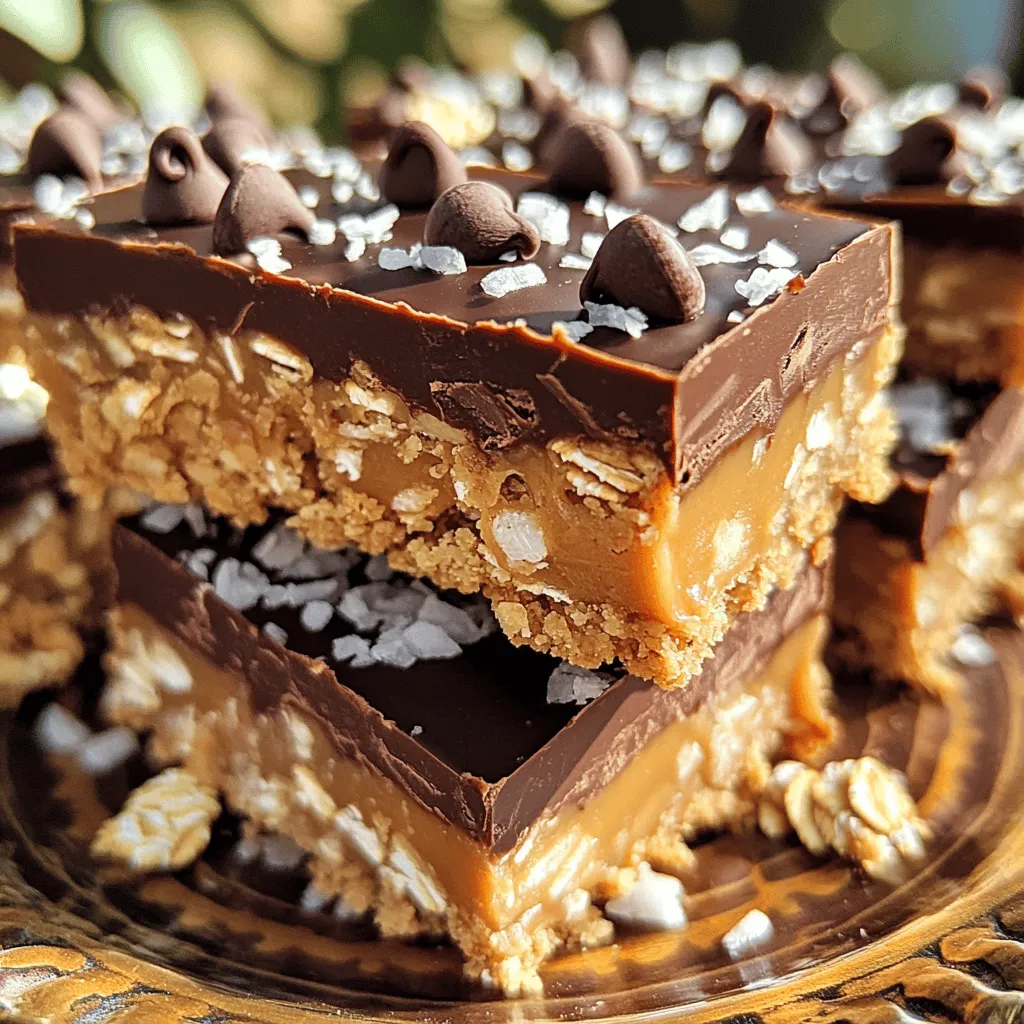
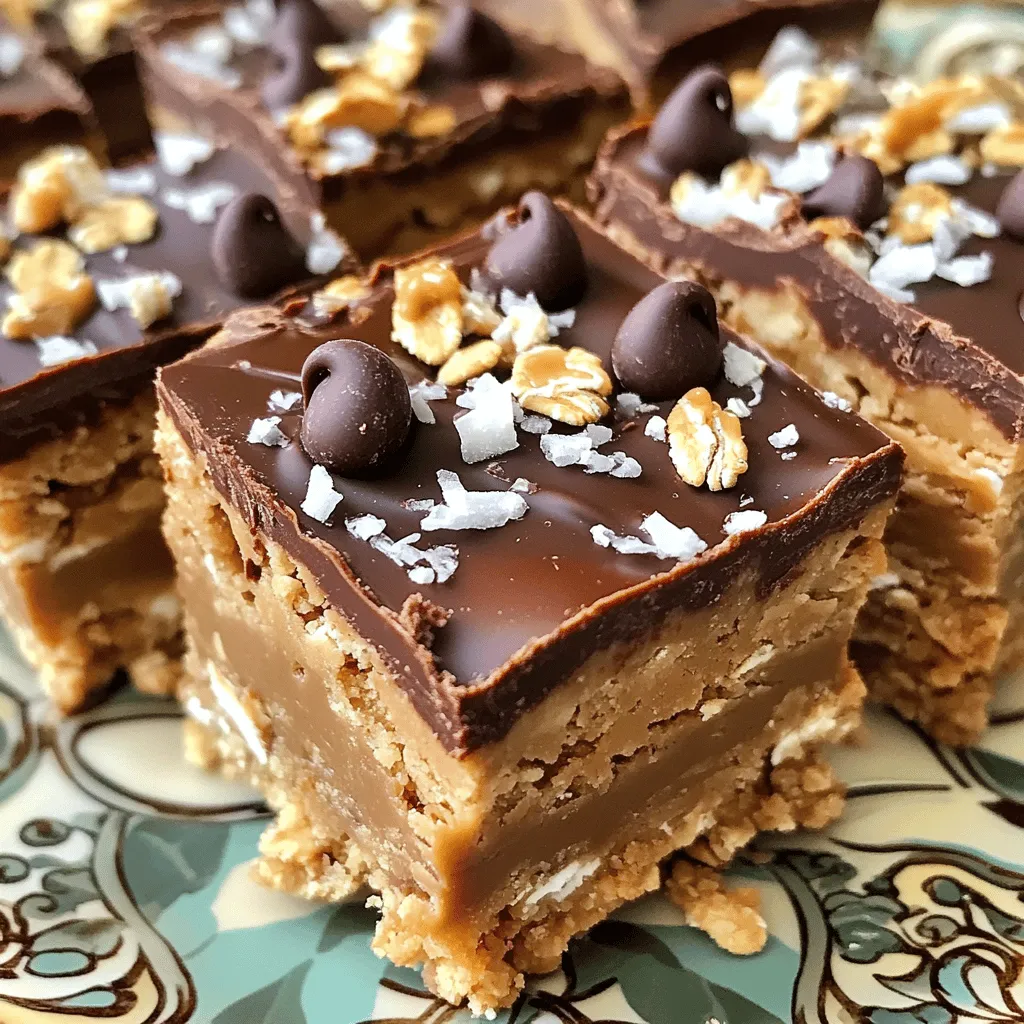
Craving something sweet and satisfying? My No-Bake Chocolate Peanut Butter Bars are the perfect treat! They require no baking, just simple ingredients like creamy peanut butter, honey, and chocolate chips. You can whip these bars together in minutes. Follow my step-by-step guide, and you’ll have a delicious snack ready to enjoy. Let’s dive into this easy recipe that you’ll want to make again and again!

Ingredients

List of Ingredients

– 1 cup creamy peanut butter

– 1/2 cup honey or maple syrup

– 1 cup rolled oats

– 1/2 cup unsweetened shredded coconut

– 1/2 cup chocolate chips

– 1/2 teaspoon pure vanilla extract

– 1/4 teaspoon fine sea salt

Ingredient Substitutions

You can replace honey with maple syrup for a vegan option. For gluten-free bars, use certified gluten-free oats. This keeps the recipe tasty and inclusive for all.

Tips on Choosing Quality Ingredients

When buying peanut butter, look for natural options. They have no added sugar or oils. For chocolate chips, choose high-quality brands. This affects the overall taste and texture. Good chocolate melts better and adds richness.

Step-by-Step Instructions

Preparation of Peanut Butter Mixture

To start, we need to heat the peanut butter and sweetener. Take a medium saucepan and add 1 cup of creamy peanut butter with 1/2 cup of honey or maple syrup. Heat this over low heat. Stir as you go. You want the mix to be smooth and combined. This usually takes about 3-4 minutes.

Once it’s melted and smooth, remove the pan from the heat. Add 1/2 teaspoon of pure vanilla extract and 1/4 teaspoon of fine sea salt. Stir well to make sure these flavors mix in evenly.

Combining Dry Ingredients

Next, we will mix our dry ingredients. In a large bowl, combine 1 cup of rolled oats, 1/2 cup of unsweetened shredded coconut, and 1/2 cup of chocolate chips. Give it a good stir. Make sure everything is evenly mixed. This step is key to getting the right texture in your bars. If you want, you can use a whisk for an even better mix.

Assembling the Bars

Now it’s time to bring everything together. Pour the warm peanut butter mixture over the dry mix. Use a spatula or wooden spoon to stir until all the oats and coconut are coated well.

Prepare an 8×8-inch square baking dish by lining it with parchment paper. Leave some paper hanging over the sides. This will help you lift the bars out later.

Transfer the mixture into the lined dish. Spread it evenly across the bottom. Press it down firmly with your hands or a spatula. Make sure it’s compact. This helps the bars hold their shape.

Once pressed, sprinkle the remaining chocolate chips on top. Gently press them in so they stick. Cover the dish with plastic wrap and place it in the fridge for at least 2 hours. This will help the bars set. After they are firm, lift them out using the parchment. Cut them into squares or rectangles. Enjoy your delicious treat! For the full recipe, check out the details above.

Tips & Tricks

Common Mistakes to Avoid

Overheating the peanut butter: Heat it gently. If it gets too hot, it can lose flavor. Stir constantly until smooth, about 3-4 minutes.

Insufficiently pressing down the mixture: Press firmly to create a compact layer. This helps the bars stay together when cut.

Enhancing Flavor and Texture

Ideas for adding nuts or dried fruit: Try adding chopped walnuts or almonds for crunch. Dried cranberries or raisins can add sweetness and chewiness. Mix these in with the oats for even flavor.

Using different flavor extracts: Swap vanilla for almond or peppermint extract. This can change the whole taste profile.

Serving Suggestions

Pairing with ice cream or yogurt: Serve these bars with a scoop of vanilla ice cream. The cold ice cream makes a nice contrast to the rich bars. You can also try them with yogurt for a creamy touch.

Creative presentations for gatherings: Cut the bars into fun shapes with cookie cutters. Drizzle melted chocolate on top for a fancy look. Arrange them on a colorful plate to impress guests.

For the complete guide, check out the Full Recipe.

Variations

Chocolate Peanut Butter Bars with Added Ingredients

You can change these bars by adding protein powder. This makes them great for a post-workout snack. Use one scoop of your favorite protein powder. Mix it in with the oats and coconut. It will add a nice boost without changing much of the taste.

Another option is to swap coconut for almond flour. This change makes the bars grain-free and nutty. Just use the same amount of almond flour as coconut. You will still enjoy that chewy texture, but with a twist.

Flavor Variations

Try using dark chocolate instead of milk chocolate. Dark chocolate brings a richer taste. It also has less sugar, so it’s a healthier choice. You can enjoy a deeper chocolate flavor with this simple switch.

Adding spices like cinnamon or nutmeg can enhance your bars. Just a pinch can make a big difference. These spices add warmth and a hint of comfort. Experiment with the amounts to find your favorite balance.

Dietary Variations

If you need nut-free options, you can use sun butter. This alternative tastes great and keeps the bars creamy. Just swap peanut butter for sun butter at the same ratio.

For low-sugar modifications, you can reduce the honey or maple syrup. You can also use a sugar substitute, like stevia or erythritol. This way, you can still enjoy a sweet treat without the extra sugar.

For the complete instructions, check out the Full Recipe!

Storage Info

Best Ways to Store No-Bake Bars

To keep your no-bake chocolate peanut butter bars fresh, store them in the fridge. Wrap them tightly in plastic wrap or place them in an airtight container. This helps maintain their taste and texture. They can last up to one week in the fridge. For longer storage, you can freeze them. Cut the bars into squares and layer them in a freezer-safe container. They stay good for about three months in the freezer.

Storage Containers

Choose containers that are airtight and made of glass or plastic. Glass containers work best as they do not absorb smells. To prevent sticking, place parchment paper between layers of bars. This makes it easy to take out one bar without damaging others. You can also use wax paper for this purpose.

Signs of Spoilage

For the best flavor, eat the bars within a week when stored in the fridge. Look for any unusual smells, discoloration, or a change in texture. If the bars feel dry or crumbly, they may not taste as good. Always check before enjoying your treat!

FAQs

How long do No-Bake Chocolate Peanut Butter Bars last?

No-bake chocolate peanut butter bars stay fresh for about one week in the fridge. For longer storage, you can freeze them. They last up to three months in the freezer. Just wrap them well in plastic wrap or foil. This keeps them safe from freezer burn.

Can I use crunchy peanut butter instead?

Yes, you can use crunchy peanut butter. It will change the texture. You will have little bits of peanuts nestled in the bars. This adds a nice crunch and extra flavor. The taste stays rich and creamy, too.

What can I do if my bars are too crumbly?

If your bars are crumbly, try adding more peanut butter or honey. These ingredients help bind the mix together. You can also press the mixture more firmly into the pan. If all else fails, melt a bit more chocolate and mix it in. This can help hold everything together.

In this post, we explored how to make delicious no-bake chocolate peanut butter bars. We discussed the key ingredients, possible substitutions, and tips for choosing the best quality items. You learned the step-by-step process for preparation, mixing, and assembling. Plus, we covered common mistakes, serving ideas, and variations. Remember, using natural ingredients makes a big difference in taste. Enjoy making these bars and sharing them! Following these tips will help you create a treat everyone will love. Happy cooking!

- 1 cup creamy peanut butter - 1/2 cup honey or maple syrup - 1 cup rolled oats - 1/2 cup unsweetened shredded coconut - 1/2 cup chocolate chips - 1/2 teaspoon pure vanilla extract - 1/4 teaspoon fine sea salt You can replace honey with maple syrup for a vegan option. For gluten-free bars, use certified gluten-free oats. This keeps the recipe tasty and inclusive for all. When buying peanut butter, look for natural options. They have no added sugar or oils. For chocolate chips, choose high-quality brands. This affects the overall taste and texture. Good chocolate melts better and adds richness. To start, we need to heat the peanut butter and sweetener. Take a medium saucepan and add 1 cup of creamy peanut butter with 1/2 cup of honey or maple syrup. Heat this over low heat. Stir as you go. You want the mix to be smooth and combined. This usually takes about 3-4 minutes. Once it’s melted and smooth, remove the pan from the heat. Add 1/2 teaspoon of pure vanilla extract and 1/4 teaspoon of fine sea salt. Stir well to make sure these flavors mix in evenly. Next, we will mix our dry ingredients. In a large bowl, combine 1 cup of rolled oats, 1/2 cup of unsweetened shredded coconut, and 1/2 cup of chocolate chips. Give it a good stir. Make sure everything is evenly mixed. This step is key to getting the right texture in your bars. If you want, you can use a whisk for an even better mix. Now it’s time to bring everything together. Pour the warm peanut butter mixture over the dry mix. Use a spatula or wooden spoon to stir until all the oats and coconut are coated well. Prepare an 8x8-inch square baking dish by lining it with parchment paper. Leave some paper hanging over the sides. This will help you lift the bars out later. Transfer the mixture into the lined dish. Spread it evenly across the bottom. Press it down firmly with your hands or a spatula. Make sure it’s compact. This helps the bars hold their shape. Once pressed, sprinkle the remaining chocolate chips on top. Gently press them in so they stick. Cover the dish with plastic wrap and place it in the fridge for at least 2 hours. This will help the bars set. After they are firm, lift them out using the parchment. Cut them into squares or rectangles. Enjoy your delicious treat! For the full recipe, check out the details above. - Overheating the peanut butter: Heat it gently. If it gets too hot, it can lose flavor. Stir constantly until smooth, about 3-4 minutes. - Insufficiently pressing down the mixture: Press firmly to create a compact layer. This helps the bars stay together when cut. - Ideas for adding nuts or dried fruit: Try adding chopped walnuts or almonds for crunch. Dried cranberries or raisins can add sweetness and chewiness. Mix these in with the oats for even flavor. - Using different flavor extracts: Swap vanilla for almond or peppermint extract. This can change the whole taste profile. - Pairing with ice cream or yogurt: Serve these bars with a scoop of vanilla ice cream. The cold ice cream makes a nice contrast to the rich bars. You can also try them with yogurt for a creamy touch. - Creative presentations for gatherings: Cut the bars into fun shapes with cookie cutters. Drizzle melted chocolate on top for a fancy look. Arrange them on a colorful plate to impress guests. For the complete guide, check out the Full Recipe. {{image_4}} You can change these bars by adding protein powder. This makes them great for a post-workout snack. Use one scoop of your favorite protein powder. Mix it in with the oats and coconut. It will add a nice boost without changing much of the taste. Another option is to swap coconut for almond flour. This change makes the bars grain-free and nutty. Just use the same amount of almond flour as coconut. You will still enjoy that chewy texture, but with a twist. Try using dark chocolate instead of milk chocolate. Dark chocolate brings a richer taste. It also has less sugar, so it’s a healthier choice. You can enjoy a deeper chocolate flavor with this simple switch. Adding spices like cinnamon or nutmeg can enhance your bars. Just a pinch can make a big difference. These spices add warmth and a hint of comfort. Experiment with the amounts to find your favorite balance. If you need nut-free options, you can use sun butter. This alternative tastes great and keeps the bars creamy. Just swap peanut butter for sun butter at the same ratio. For low-sugar modifications, you can reduce the honey or maple syrup. You can also use a sugar substitute, like stevia or erythritol. This way, you can still enjoy a sweet treat without the extra sugar. For the complete instructions, check out the Full Recipe! To keep your no-bake chocolate peanut butter bars fresh, store them in the fridge. Wrap them tightly in plastic wrap or place them in an airtight container. This helps maintain their taste and texture. They can last up to one week in the fridge. For longer storage, you can freeze them. Cut the bars into squares and layer them in a freezer-safe container. They stay good for about three months in the freezer. Choose containers that are airtight and made of glass or plastic. Glass containers work best as they do not absorb smells. To prevent sticking, place parchment paper between layers of bars. This makes it easy to take out one bar without damaging others. You can also use wax paper for this purpose. For the best flavor, eat the bars within a week when stored in the fridge. Look for any unusual smells, discoloration, or a change in texture. If the bars feel dry or crumbly, they may not taste as good. Always check before enjoying your treat! No-bake chocolate peanut butter bars stay fresh for about one week in the fridge. For longer storage, you can freeze them. They last up to three months in the freezer. Just wrap them well in plastic wrap or foil. This keeps them safe from freezer burn. Yes, you can use crunchy peanut butter. It will change the texture. You will have little bits of peanuts nestled in the bars. This adds a nice crunch and extra flavor. The taste stays rich and creamy, too. If your bars are crumbly, try adding more peanut butter or honey. These ingredients help bind the mix together. You can also press the mixture more firmly into the pan. If all else fails, melt a bit more chocolate and mix it in. This can help hold everything together. In this post, we explored how to make delicious no-bake chocolate peanut butter bars. We discussed the key ingredients, possible substitutions, and tips for choosing the best quality items. You learned the step-by-step process for preparation, mixing, and assembling. Plus, we covered common mistakes, serving ideas, and variations. Remember, using natural ingredients makes a big difference in taste. Enjoy making these bars and sharing them! Following these tips will help you create a treat everyone will love. Happy cooking!

No-Bake Chocolate Peanut Butter Bars

Indulge in these mouthwatering no-bake chocolate peanut butter bars that are simple to make and irresistibly delicious! With just a few ingredients like creamy peanut butter, rolled oats, and chocolate chips, you can whip up a treat in no time. Perfect for satisfying cravings or sharing with friends, these bars offer the ideal combination of flavor and texture. Click through now to explore the full recipe and enjoy a sweet treat today!

Ingredients
  

1 cup creamy peanut butter

1/2 cup honey or maple syrup (for a vegan option)

1 cup rolled oats

1/2 cup unsweetened shredded coconut

1/2 cup chocolate chips (dairy-free chocolate chips can be used if preferred)

1/2 teaspoon pure vanilla extract

1/4 teaspoon fine sea salt

Instructions
 

In a medium saucepan, gently heat the creamy peanut butter and your choice of honey or maple syrup over low heat. Stir continuously until the mixture is completely smooth and well blended—this should take about 3-4 minutes.

    Once melted and combined, remove the saucepan from the heat. Stir in the vanilla extract and fine sea salt, ensuring both are evenly distributed throughout the mixture.

      In a large mixing bowl, combine the rolled oats, unsweetened shredded coconut, and half of the chocolate chips. Mix well to ensure an even distribution of ingredients.

        Pour the warm peanut butter mixture over the oat and coconut blend. Stir with a spatula or wooden spoon until all dry ingredients are uniformly coated with the peanut butter mixture.

          Prepare an 8x8-inch square baking dish by lining it with parchment paper. Be sure to leave some overhang on the sides to facilitate easy lifting once the bars are set.

            Transfer the mixture into the lined baking dish, spreading it evenly. Use your hands or the back of a spatula to press it down firmly to create a compact layer.

              Sprinkle the remaining chocolate chips on top of the pressed mixture and gently press them in to ensure they stick well to the surface.

                Cover the baking dish with plastic wrap or a lid and place it in the refrigerator for a minimum of 2 hours, or until the bars become firm to the touch.

                  After the bars have hardened, use the parchment overhang to lift them out of the dish. Place on a cutting board and slice into squares or rectangles, as preferred.

                    Prep Time: 15 minutes | Total Time: 2 hours 15 minutes | Servings: 16 bars

                      - Presentation Tips: To elevate the visual appeal of your bars, arrange them neatly on a decorative plate. Drizzle a bit of extra melted chocolate on top for a luxurious touch and consider sprinkling a pinch of flaky sea salt over them to enhance the contrast of flavors. Enjoy as a delightful treat!

                        WANT TO SAVE THIS RECIPE?

                        Related Posts