Lemon Ricotta Pancakes Fluffy and Flavorful Breakfast

Start your day right with fluffy Lemon Ricotta Pancakes! These simple pancakes blend creamy ricotta and zesty lemons for a delicious breakfast. I’ll show you how to mix the batter just right, achieve the best texture, and even offer topping ideas that elevate your meal. Get ready to impress your family and enjoy mouthwatering pancakes that taste like sunshine! Let’s dive in and get cooking!
Ingredients
Key Components of Lemon Ricotta Pancakes
– Ricotta cheese and its role in texture
Ricotta cheese is key for these pancakes. It adds creaminess and helps them stay fluffy. The moisture in ricotta gives a light and tender bite. Using fresh ricotta makes a big difference in taste and texture.
– Importance of fresh lemons for flavor
Fresh lemons bring bright flavor to the pancakes. Their zest adds a fragrant aroma, while the juice gives a tangy zing. Always choose organic, fresh lemons for the best taste. Avoid bottled lemon juice; it lacks the vibrant flavor of fresh fruit.
– Optional toppings for serving
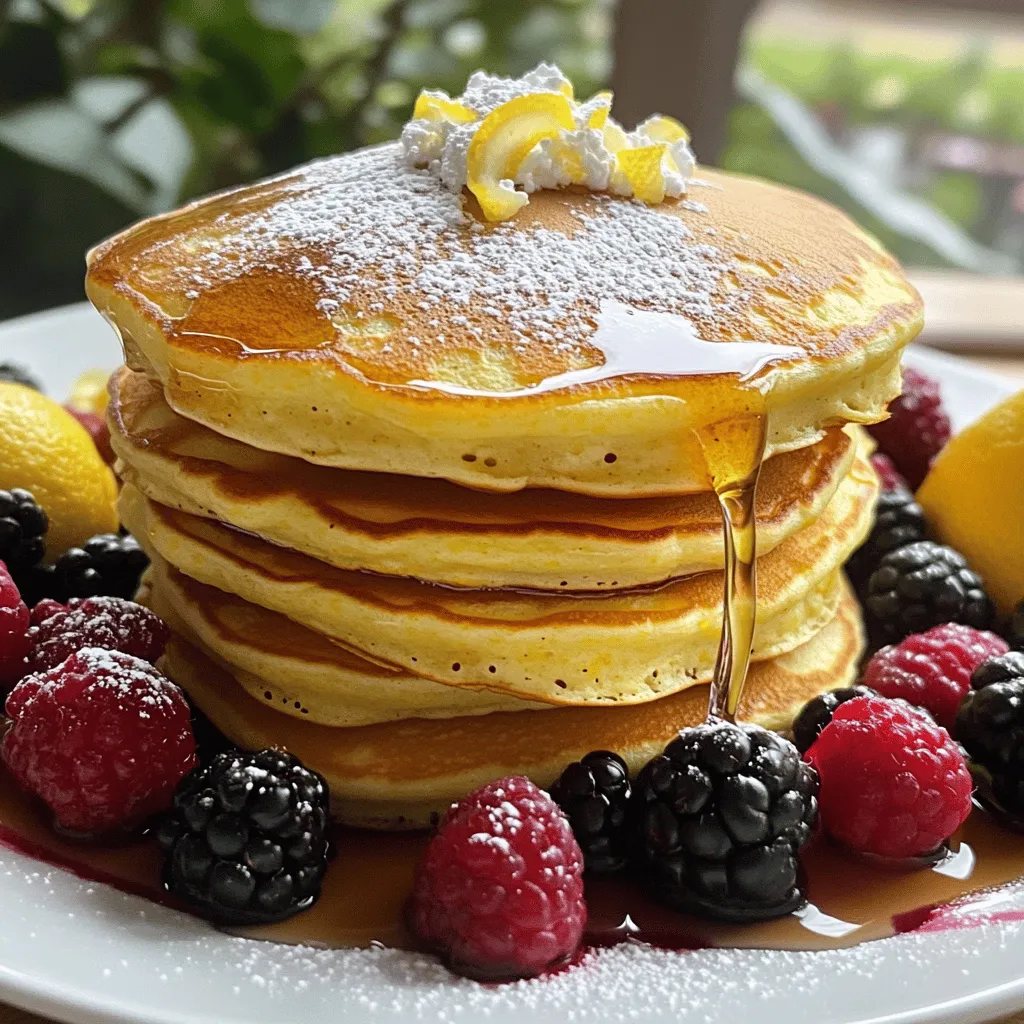
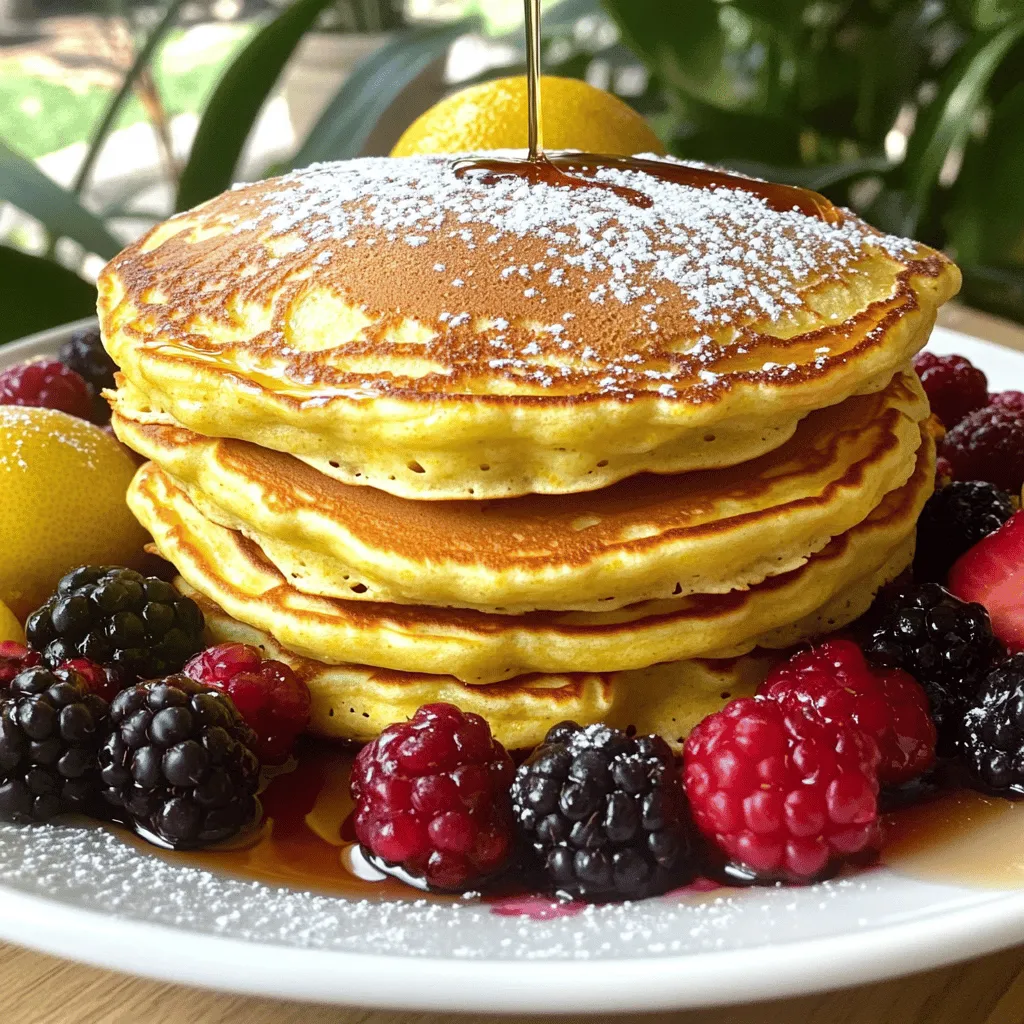
You can serve these pancakes with many toppings. Fresh berries like blueberries or strawberries add sweetness. Maple syrup drizzled on top enhances the flavor. For a special touch, try adding whipped cream or a sprinkle of powdered sugar.
Measurements and Quality
– Measuring ingredients accurately
Accurate measurements are crucial for perfect pancakes. Use a kitchen scale for the best results. When measuring flour, spoon it into your cup and level it off. This method ensures you don’t pack it down and make dense pancakes.
– Choosing high-quality ingredients for the best results
Always select high-quality ingredients for your pancakes. Fresh eggs, real vanilla extract, and high-fat ricotta cheese will elevate your dish. Investing in good ingredients pays off in flavor and texture. Using fresh, organic items can make your meal feel gourmet.
Step-by-Step Instructions
Preparation of Batter
Start by mixing the wet ingredients. In a medium bowl, whisk together the ricotta cheese, eggs, sugar, lemon zest, lemon juice, and vanilla extract. Make sure the mix is smooth and well combined. This step is key to getting that rich flavor and creamy texture.
Next, in a separate bowl, measure and combine the dry ingredients. Mix the flour, baking powder, baking soda, and salt. Stir them until they are evenly distributed. When you combine the dry and wet mixes, do it gently. Overmixing can lead to tough pancakes. It’s fine if the batter has some lumps; that helps keep them fluffy.
Cooking Method
Preheat a large non-stick skillet or griddle over medium heat. Make sure it’s hot enough. Lightly grease the surface with butter or oil. This will help the pancakes not stick.
Pour about 1/4 cup of batter onto the skillet for each pancake. Cook them until you see bubbles forming on the surface and the edges look set. This takes about 3-4 minutes. Once they are ready, gently flip the pancakes. Cook on this side until they turn golden brown, which takes about 2-3 minutes more.
As you finish each batch, keep the pancakes warm in a low-temperature oven, around 200°F. This way, they stay nice and hot while you cook the rest.
Serving Suggestions
Serve the pancakes warm. Top them with fresh berries like blueberries or strawberries. A generous drizzle of pure maple syrup adds sweetness.
For a beautiful presentation, stack the pancakes high on a plate. Lightly dust them with powdered sugar for a lovely finish. You might also add a few mint leaves for color. A side of lemon wedges can give an extra citrusy flair.Enjoy your cooking!
Tips & Tricks
Achieving the Perfect Texture
To get the best texture in your lemon ricotta pancakes, resting the batter is key. After mixing your batter, let it sit for about 10 minutes. This allows the flour to absorb moisture and helps make the pancakes fluffier.
Another vital tip is to not over-mix the batter. When combining the wet and dry ingredients, mix just until they come together. It’s okay if there are some lumps. Over-mixing can make your pancakes tough instead of light and airy.
Flavor Enhancements
You can enhance the flavor of these pancakes in fun ways. Try adding herbs like basil or mint for a fresh twist. Chopped nuts, like walnuts or almonds, can add a nice crunch.
Adjust the sweetness to fit your taste. If you prefer sweeter pancakes, add a bit more sugar. If you like it less sweet, reduce the sugar. You can also drizzle honey or maple syrup on top for added flavor.
Dietary Considerations
If you’re looking for gluten-free options, swap the all-purpose flour for a gluten-free blend. Many blends work well and keep the pancakes tasty.
For vegan adaptations, use a plant-based ricotta and replace the eggs with flaxseed meal or a banana. This way, you can still enjoy delicious pancakes while sticking to your dietary needs.

Variations
Add-Ins to Consider
You can make lemon ricotta pancakes even more fun by adding some extras. Chocolate chips are a great choice. They melt into the warm pancakes and add a sweet touch. Just fold in about 1/2 cup of chips into the batter.
Nuts also add a nice crunch. Chopped walnuts or pecans work well. Add about 1/4 cup to the batter for a nutty flavor.
Seasonal fruits can change how the pancakes taste. In spring, use fresh strawberries or blueberries. In summer, try peaches or raspberries. In fall, diced apples or pears can be a good fit. You can serve these fruits on top for a colorful and tasty pancake.
Alternative Serving Methods
Lemon ricotta pancakes shine in stacks. Stack three pancakes high, and drizzle with syrup. This makes an eye-catching and tasty dish.
You can also turn pancakes into sandwiches. Spread some ricotta cheese or cream cheese between two pancakes. Add fruit or honey for a sweet treat. This way, you get a fun twist on breakfast that is both filling and delicious.
Storage Info
Storing Leftovers
After enjoying your lemon ricotta pancakes, you may have some leftovers. To keep them fresh, stack the pancakes with parchment paper between each layer. Place the stack in an airtight container. Store it in the fridge for up to three days. If you want to save them longer, freeze the pancakes. Lay them in a single layer on a baking sheet first. Once frozen, transfer them to a freezer-safe bag. This way, they stay nice and fluffy for up to two months.
Reheating Tips
When it’s time to enjoy your pancakes again, reheating is easy. You can use the microwave, but be careful. Heat them in short bursts of 15 seconds. This helps prevent drying out. Another great method is to reheat them on a skillet. Use low heat and flip them after a minute. This warms them up nicely without losing moisture.
For serving suggestions, try adding fresh berries or a drizzle of maple syrup. This adds flavor and makes the pancakes look great again. You can also warm up some extra lemon juice or zest to drizzle on top for a fresh kick.
FAQs
Common Questions About Lemon Ricotta Pancakes
How do I know when the pancakes are done cooking?
You can tell the pancakes are done when bubbles form on the surface. The edges should look set and slightly dry. Flip them gently. Cook until they turn golden brown. This usually takes about 3-4 minutes on the first side and 2-3 minutes on the other.
Can I use low-fat ricotta cheese for this recipe?
Yes, you can use low-fat ricotta cheese. It will still give you a nice texture. However, keep in mind that it may not be as creamy as full-fat ricotta. The taste will still be delicious!
Ingredient Substitutions
What can I use instead of ricotta cheese?
If you don’t have ricotta, you can use cottage cheese. Blend it first to make it smooth. Cream cheese can also work, but it will change the flavor a bit. Greek yogurt can be a good option too. Just remember to adjust the liquid if needed.
Alternatives for lemon juice and zest
If you don’t have fresh lemons, use bottled lemon juice. It won’t have the same bright flavor but works in a pinch. For zest, you can use lemon extract. Just a few drops will do. It adds nice flavor without the zest.
Cooking Techniques
Can I make these pancakes in advance?
Yes, you can prepare the batter ahead of time. Store it in the fridge for up to 2 hours. This helps the flavors meld together. Just give it a gentle stir before cooking. You can also cook the pancakes and store them in the fridge.
What skillet is best for cooking pancakes?
A non-stick skillet or griddle is ideal for pancakes. It helps prevent sticking and ensures even cooking. Make sure it’s preheated well before adding the batter. This step is key for fluffy pancakes!
Lemon ricotta pancakes are a tasty way to start your day. Use fresh lemons and quality ricotta for the best flavor and texture. Remember to mix wet and dry ingredients gently for fluffy results. You can add fruit or nuts for fun variations, too. Don’t forget about storing leftovers and reheating tips to enjoy later. With these steps, you can create wonderful pancakes that impress everyone. Experiment and make this recipe your own, turning breakfast into a celebration. Happy cooking!


![To bake a delicious Raspberry Lemon Loaf, you need these key ingredients: - 1 ½ cups all-purpose flour - 1 teaspoon baking powder - ½ teaspoon baking soda - ¼ teaspoon salt - ½ cup unsalted butter, softened - 1 cup granulated sugar - 2 large eggs, at room temperature - 1 teaspoon pure vanilla extract - Zest of 1 lemon, finely grated - ½ cup freshly squeezed lemon juice - 1 cup fresh raspberries (or frozen, thawed, and drained) - ¼ cup powdered sugar for glazing - 1 tablespoon freshly squeezed lemon juice for glazing You can add extra flavor or texture with these options: - ½ cup chopped nuts, like walnuts or almonds - ½ teaspoon almond extract for a nutty taste - Lemon zest can be increased for a stronger flavor - A handful of blueberries can mix well with raspberries If you run out of an ingredient, here are some swaps: - Use coconut oil instead of butter for a dairy-free version - Applesauce can replace eggs for a vegan loaf - If you lack lemon juice, use lime juice instead - Whole wheat flour can stand in for all-purpose flour, but it may change the texture With these ingredients and options, you can customize your Raspberry Lemon Loaf to fit your taste! Start by preheating your oven to 350°F (175°C). Grab a 9x5 inch loaf pan. Grease it with butter and lightly dust it with flour. This will help the loaf come out easily. In a medium bowl, whisk together the following: - 1 ½ cups all-purpose flour - 1 teaspoon baking powder - ½ teaspoon baking soda - ¼ teaspoon salt Set this mixture aside for later use. This step ensures the leavening agents are evenly distributed. In a large mixing bowl, use an electric mixer to cream together: - ½ cup unsalted butter, softened - 1 cup granulated sugar Beat them for about 3-5 minutes. The mixture should turn light and fluffy. This helps air to blend into the butter. Now, add 2 large eggs one at a time. Mix well after each addition. Next, stir in: - 1 teaspoon pure vanilla extract - Zest of 1 lemon Make sure everything combines fully. This adds a nice flavor to your loaf. Slowly pour in ½ cup of freshly squeezed lemon juice. Mix gently until it blends well with the other wet ingredients. This step gives your loaf a bright, zesty taste. Gradually add the dry mixture to the wet mix. Stir gently until just combined. Be careful not to overmix. This keeps your loaf light and airy. Now, it’s time to add the fun part! Gently fold in 1 cup of fresh raspberries. If you use frozen ones, coat them lightly in flour. This helps them stay suspended in the batter. Pour the batter into your prepared loaf pan. Smooth the top with a spatula. Bake in the preheated oven for 50-60 minutes. Check for doneness by inserting a toothpick in the center. It should come out clean. Once baked, let the loaf cool in the pan for about 10 minutes. Then transfer it to a wire rack to cool completely. For glazing, mix together: - ¼ cup powdered sugar - 1 tablespoon freshly squeezed lemon juice Drizzle this glaze over the cooled loaf for a sweet finish. Slice the loaf into generous pieces. Enjoy the burst of raspberry and lemon flavors in every bite! You can serve it on pretty plates. Garnish with fresh raspberries and a sprinkle of lemon zest for an elegant touch. This loaf is perfect for breakfast or a sweet snack! For the Full Recipe, check out the detailed instructions. One big mistake is overmixing the batter. This can make the loaf tough. Mix until just combined for a light texture. Another mistake is not checking the oven temperature. An oven thermometer can help ensure accuracy. Also, if you forget to grease your pan, the loaf may stick. Always prepare your pan before pouring in the batter. For a soft and moist loaf, use room temperature ingredients. Cold butter or eggs can lead to uneven mixing. When folding in raspberries, do it gently. This helps keep them whole and prevents a mushy loaf. Make sure your oven is fully preheated. This ensures even baking and a perfect rise. To boost flavor, add more lemon zest. This can brighten the taste. You can also mix in a dash of almond extract for a unique twist. If you want a sweeter glaze, add more powdered sugar. For a touch of spice, a pinch of cinnamon can be delightful. Enjoy experimenting with flavors to find your perfect blend! {{image_4}} To make a gluten-free version, swap the all-purpose flour with a gluten-free blend. Use one that works well for baking. The texture may change slightly, but the taste will still shine. This version is just as delicious and perfect for those with gluten issues. For a vegan twist, replace the eggs with flax eggs. Mix one tablespoon of ground flaxseed with three tablespoons of water. Let it sit for five minutes. Use a plant-based butter instead of regular butter. This keeps the loaf moist and tasty while being dairy-free. You can switch out the raspberries for other fruits! Blueberries or strawberries work well. For a tropical touch, try diced pineapple or mango. Each fruit brings its own flavor, making your loaf unique. Experiment and find your favorite mix! For the full recipe, refer to the section above. After you bake your Raspberry Lemon Loaf, let it cool completely. Wrap it tightly in plastic wrap or foil. You can also place it in an airtight container. Store it at room temperature for up to three days. If you prefer, keep it in the fridge for about a week. This helps keep it fresh and moist. To freeze the loaf, first cool it completely. Then, slice it into even pieces. Wrap each slice in plastic wrap. Next, place the wrapped slices in a freezer-safe bag. You can freeze them for up to three months. When you’re ready to enjoy a slice, thaw it in the fridge overnight or let it sit at room temperature for a few hours. Reheating is simple. You can use a microwave or an oven. For the microwave, heat a slice for about 15-20 seconds. Check if it’s warm enough. If you use the oven, preheat it to 350°F (175°C). Place the slice on a baking sheet for about 5-10 minutes. This method keeps the loaf soft and tasty. Enjoy your Raspberry Lemon Loaf warm with a cup of tea or coffee! You can check if your loaf is done by inserting a toothpick in the center. If it comes out clean or with just a few crumbs, your loaf is ready. You can also look for a golden-brown crust and a slight spring back when you gently press the top. Yes, you can use frozen raspberries! Just make sure to thaw them and drain off any extra liquid. Toss them in some flour before folding them into the batter. This helps to keep them from sinking to the bottom while baking. If you don't have lemon juice, you can use lime juice or even apple cider vinegar. Both options will give a nice tang to your loaf. Just remember that the flavor will change slightly. The Raspberry Lemon Loaf will stay fresh for about 3-4 days at room temperature if stored in an airtight container. It also freezes well for up to 3 months. Just wrap it tightly before freezing. Absolutely! You can make the loaf a day or two ahead of time. Store it in an airtight container to keep it moist. You can also prepare the batter in advance and bake it later for a fresh treat. Be sure to check the [Full Recipe] for more tips! Here is the full recipe for Raspberry Lemon Dream Loaf. This treat is bright, sweet, and tangy. You will want to make it again and again. Ingredients: - 1 ½ cups all-purpose flour - 1 teaspoon baking powder - ½ teaspoon baking soda - ¼ teaspoon salt - ½ cup unsalted butter, softened to room temperature - 1 cup granulated sugar - 2 large eggs, at room temperature - 1 teaspoon pure vanilla extract - Zest of 1 lemon, finely grated - ½ cup freshly squeezed lemon juice - 1 cup fresh raspberries (or frozen raspberries, thawed and drained) - ¼ cup powdered sugar for glazing - 1 tablespoon freshly squeezed lemon juice for glazing This loaf serves about 10 people. Each slice has around 200 calories. You get a nice mix of carbs, fat, and protein. The fresh raspberries add fiber and vitamins, too. Slice the loaf into thick pieces. Each slice is perfect for a dessert or a snack. You can serve it on its own or with a cup of tea. The bright flavors make it a crowd-pleaser. For a fancy touch, add a few raspberries on top. Enjoy every bite! In this article, we explored the essential ingredients for a Raspberry Lemon Loaf, including optional add-ins and substitutions. I provided clear, step-by-step instructions to guide you from mixing to baking. We discussed tips for avoiding mistakes and achieving the right texture. You also learned about variations, storage methods, and answers to common questions. Now, with these insights, you can create a delicious loaf that suits your taste and needs. Enjoy baking and sharing this delightful treat!](https://goldendishy.com/wp-content/uploads/2025/07/83025fd5-21c0-4ee2-bbe4-d247d9a88122-768x768.webp)


![- Fresh strawberries - Vanilla sponge cake - Heavy whipping cream - Granulated sugar - Powdered sugar - Lemon juice - Fresh mint leaves - Alternative decoration options The main ingredients in this trifle are fresh strawberries, vanilla sponge cake, and heavy whipping cream. You will want ripe strawberries for the best taste. They add a sweet and juicy flavor. The vanilla sponge cake gives the trifle its light and fluffy base. You can use store-bought or homemade cake—whichever you prefer! For the cream, we use heavy whipping cream. It whips up nicely to form soft peaks. This cream adds richness and makes the trifle feel special. Next, we have some additional ingredients. Granulated sugar helps sweeten the strawberries. It helps bring out their natural juice. Powdered sugar sweetens the whipped cream while keeping it smooth. Lemon juice adds a nice touch of tartness and brightens the flavors. For garnishes, fresh mint leaves add a pop of color and freshness. You can also use extra strawberry slices for decoration. If you want to get creative, consider adding chocolate shavings or crushed cookies on top. These small touches can enhance the trifle's look and taste. For the full recipe, check out the details above! To start, we need to macerate the strawberries. This means we will make them sweeter and juicier. - Ingredients: - 4 cups fresh strawberries, hulled and sliced - 1/4 cup granulated sugar - 1 tablespoon lemon juice In a medium bowl, combine the sliced strawberries, sugar, and lemon juice. Toss them gently to coat. This step helps the strawberries release their juices. Let this sit for 15 to 20 minutes. You will see them get juicy and sweet. Next, let's prepare the whipped cream. This will add a light and fluffy layer to our trifle. - Ingredients: - 2 cups heavy whipping cream - 1/4 cup powdered sugar - 1 teaspoon vanilla extract In a large bowl, mix the heavy whipping cream, powdered sugar, and vanilla extract. Using an electric mixer, beat this mixture on medium-high speed. Keep mixing until soft peaks form, which takes about 3 to 5 minutes. Be careful not to over-whip. We want it to stay light and fluffy. Now comes the fun part: assembling the trifle! This is where our layers come together. 1. Start by placing a layer of sponge cake cubes at the bottom of your trifle bowl. Spread them evenly. 2. Next, add a generous layer of macerated strawberries on top of the sponge cake. Make sure to include those sweet juices. 3. Follow with a layer of the freshly whipped cream. Repeat the layering process with sponge cake, strawberries, and whipped cream until you reach the desired height. Usually, two to three layers work well. For the top layer, add a smooth layer of whipped cream. Decorate with fresh strawberry slices and a sprig of mint. Cover with plastic wrap and chill in the fridge for at least 2 hours. This chilling time makes the flavors blend well. And there you have it! Your Strawberry Shortcake Trifle is ready to impress. For the complete recipe, check out the Full Recipe. To make your trifle shine, pay close attention to the whipped cream. Avoid over-whipping it. Ideal whipped cream is light and fluffy. If you whip it too long, it can become grainy. Watch it closely as you mix. Next, ensure your sponge cake absorbs flavors. Let the cake soak up the strawberry juice. This step is key for a moist and tasty dessert. Layer each ingredient gently, so the flavors meld well together. Choose clear glass bowls or cups for serving. This choice highlights the beautiful layers. You can see the juicy strawberries and fluffy cream through the glass. It adds a nice touch to your table. For garnish, use fresh mint leaves. A sprig on top creates a pop of color. You can also add extra strawberry slices to the top. This makes your trifle look even more appealing. Chill your trifle for at least 2 hours. This time allows the flavors to mix well. The cake absorbs the strawberry juices, enriching the taste. When ready to serve, take it out of the fridge. Use a large spoon to scoop out servings. This method keeps the layers intact and makes each bite delightful. {{image_4}} You can mix things up with different fruits. Other berries like blueberries or raspberries work great. Their tartness adds a nice twist. You can also add complementary fruits like bananas. Bananas bring a creamy texture that pairs well with the other layers. Do you want to try something new with the cake? You can use flavored cakes. Chocolate or lemon cakes add a fun taste. If you need gluten-free options, there are many gluten-free cakes available. You can use sponge cake made from almond flour or coconut flour. These options keep the dessert light and fluffy. Not a fan of whipped cream? You can substitute it with yogurt. Greek yogurt gives a nice tang and is a bit healthier. If you're looking for dairy-free options, try coconut cream. It’s rich and creamy, making it a great choice for this trifle. Feel free to explore these variations to make the Strawberry Shortcake Trifle your own. For a full recipe, check out the [Full Recipe]. After making your strawberry shortcake trifle, store it in the fridge. Cover it with plastic wrap or a lid. This keeps it fresh and prevents it from absorbing other smells. It stays fresh for up to three days. The flavors will meld and deepen over time, making it even tastier. You can freeze your trifle for later enjoyment. However, it’s best to freeze layers separately. Wrap the sponge cake and strawberries tightly in plastic wrap. Place the whipped cream in an airtight container. This helps keep the taste and texture. When ready to serve, move the layers to the fridge to thaw overnight. Once thawed, layer them again for a fresh look. You can get creative with leftover trifle. Try blending the leftover cake and cream into a milkshake. You can also make parfaits with yogurt and fruit. If you have sponge cake left, warm it in the oven. This brings back some of its soft texture, making it perfect for new desserts. Use these ideas to enjoy your trifle in new and fun ways! The trifle needs to chill for at least 2 hours. This allows the flavors to mix well. Chilling also helps the sponge cake soak up the strawberry juices. For the best taste, I recommend leaving it in the fridge longer if you can. The longer it chills, the better it gets. Yes, you can make this dessert a day in advance. Just assemble the trifle and chill it. This way, you save time on the day of serving. If you prepare it early, the flavors will deepen and blend even more. Just make sure to cover it well to keep it fresh. If you want a lighter version, you can use whipped topping. You can also try Greek yogurt for a creamy texture. Another option is coconut cream for a dairy-free choice. These substitutes may change the flavor, but they can work well in a pinch. This dessert recipe shines through simple, fresh ingredients and easy steps. We explored how to prepare fresh strawberries, make light whipped cream, and assemble a delicious trifle. With tips on texture, presentation, and storage, you can create impressive layers in no time. Remember, variations are endless—try different fruits or cakes. Enjoy your trifle today and impress your friends with your skills. Happy layering!](https://goldendishy.com/wp-content/uploads/2025/07/6bc930bf-8069-41ce-85f7-a06b19a5b93e-768x768.webp)

