Lemon Herb Grilled Zucchini Tasty and Simple Recipe
![- 4 medium zucchinis, sliced into 1/2-inch thick rounds - 4 tablespoons extra virgin olive oil - 2 tablespoons freshly squeezed lemon juice - 1 teaspoon freshly grated lemon zest - 2 teaspoons dried oregano - 1 teaspoon garlic powder - 1 teaspoon sea salt - 1/2 teaspoon freshly cracked black pepper - 2 tablespoons fresh parsley, finely chopped (for garnish) You can use other oils for grilling. Avocado oil or sesame oil works well. If you have fresh herbs, use them instead of dried ones. Fresh oregano or basil adds great flavor. Adjust the amount based on your taste. When selecting zucchinis, look for ones that are firm and shiny. Avoid any that feel soft or have blemishes. Choose smaller zucchinis for a sweeter taste. Check for seasonal zucchinis in late summer. They are often at their best during this time. To make the marinade, start with a large bowl. Add the olive oil, lemon juice, and lemon zest. Next, sprinkle in the dried oregano, garlic powder, sea salt, and black pepper. Whisk everything together until mixed well. This blend of flavors makes your zucchini taste great. Marinating time is key. Let the zucchini sit in the marinade for 10 to 15 minutes. This helps the zucchini soak up the zesty flavors. Skipping this step means missing out on rich taste. First, preheat your grill to medium-high heat, about 400°F (200°C). A hot grill gives your zucchini nice grill marks and a smoky flavor. When ready, carefully place the marinated zucchini rounds on the grill. Cook them for 3 to 4 minutes on each side. Watch for tender slices with grill marks. This means they are perfectly grilled. When done, transfer the zucchini to a serving platter. Arrange them in a fan shape for a pretty look. For garnish, sprinkle fresh parsley on top. This adds a pop of color and a burst of flavor. You can also drizzle extra olive oil and sprinkle sea salt for extra taste. Enjoy your Lemon Herb Grilled Zucchini! For the complete recipe, check the [Full Recipe]. To avoid sticking on the grill, start with a clean grill. Oil the grates well before adding zucchini. This creates a non-stick surface. Use a paper towel dipped in oil to wipe the grates. For even cooking, cut zucchini into uniform pieces. I recommend 1/2-inch thick rounds. This size cooks well without burning. Grill over medium-high heat for best results. You can boost flavor with fresh herbs like basil or thyme. They add a nice twist. For a bit of heat, try red pepper flakes or sliced jalapeños. Both pair well with the lemony taste. The best grill types for zucchini are gas or charcoal grills. Both give great flavor and heat. A grill basket can help keep slices from falling through the grates. Use tongs for safe flipping. For a great grilling experience, have a spatula and a timer handy. These tools help track cooking time and make flipping easy. For the complete process, check the Full Recipe. {{image_4}} You can change the flavors of your grilled zucchini by trying different herbs and spices. Instead of oregano, use thyme or basil for a fresh twist. You can also add a pinch of red pepper flakes for a little heat. Mixing in some smoked paprika can give your dish a nice depth. Incorporating other citrus flavors makes the marinade even more fun. Try lime or orange juice instead of lemon. Both options add a unique taste that pairs well with zucchini. You can also mix lemon with lime for a zesty combo. Grilled zucchini pairs well with many other vegetables. Bell peppers, eggplant, and asparagus are great choices. You can slice them into similar sizes for even cooking. Cooking times vary, so keep an eye on your veggies. Zucchini takes about 3-4 minutes per side. Bell peppers need about 5-7 minutes, while eggplant may take up to 8 minutes. This way, you can enjoy a colorful mix on your plate. Grilled zucchini makes a tasty side dish for many meals. It pairs well with proteins like grilled chicken, fish, or steak. You can also serve it alongside grains like quinoa or couscous for a filling meal. For fun side dish ideas, try serving grilled zucchini with a yogurt sauce. A sprinkle of feta cheese or a handful of nuts can also add a nice touch. For more flavor, drizzle balsamic glaze over the top. For a complete guide to making this dish, check out the Full Recipe. To store leftover grilled zucchini, let it cool first. Place it in an airtight container. This keeps it fresh and prevents odors from mixing. You can store it in the fridge. It usually lasts for about 3 to 5 days. Reheating grilled zucchini can be tricky. The best method is to use a skillet. Heat the skillet over medium-low heat. Add a small drizzle of olive oil. Place the zucchini in the skillet. Cook it for about 2 to 3 minutes on each side. This keeps the texture nice and firm. You can also add it to pasta or salads for a tasty twist. Yes, you can freeze grilled zucchini! To do this, let it cool completely first. Then, arrange the slices in a single layer on a baking sheet. Freeze them for about 1 to 2 hours. Once frozen, transfer the slices to a freezer bag. Remove as much air as possible. Grilled zucchini can last for up to 3 months in the freezer. When ready to use, thaw it in the fridge overnight. You can also toss it directly into soups or stews. For the full recipe, check out the Lemon Herb Grilled Zucchini recipe. To cut zucchini for grilling, slice it into 1/2-inch thick rounds. This thickness helps the zucchini cook evenly and stay firm. You can also cut them into long strips if you prefer a different shape. Just ensure your slices are uniform. This way, they will grill at the same rate. For added flavor, you can cut the zucchini lengthwise and brush the cut sides with olive oil. Yes, you can prepare Lemon Herb Grilled Zucchini ahead of time. To do this, marinate the zucchini slices a few hours before grilling. You can store them in the fridge for up to 24 hours in the marinade. This will enhance the flavor. Just remember to grill them right before serving for the best taste and texture. If grilling later, store the grilled zucchini in an airtight container. Grilled zucchini is very healthy. It is low in calories and high in vitamins. Zucchini is a great source of vitamin C, which boosts your immune system. It also contains potassium, which helps with heart health. Plus, grilling keeps the zucchini's nutrients intact while adding a nice smoky flavor. Enjoy it as a side dish or in salads. You can find the full recipe in the main article. In this article, we covered the key ingredients for Lemon Herb Grilled Zucchini and preparation steps. You learned how to marinate, grill, and enhance flavors. I shared tips for choosing fresh zucchini and creative variations. Remember, fresh ingredients lead to the best taste. Enjoy experimenting with different herbs or vegetables. Grilled zucchini is not just simple but also healthy and tasty. Now, you are ready to impress at your next meal!](https://goldendishy.com/wp-content/uploads/2025/06/34b028ee-fd33-4782-b46e-eaef12af4b53.webp)
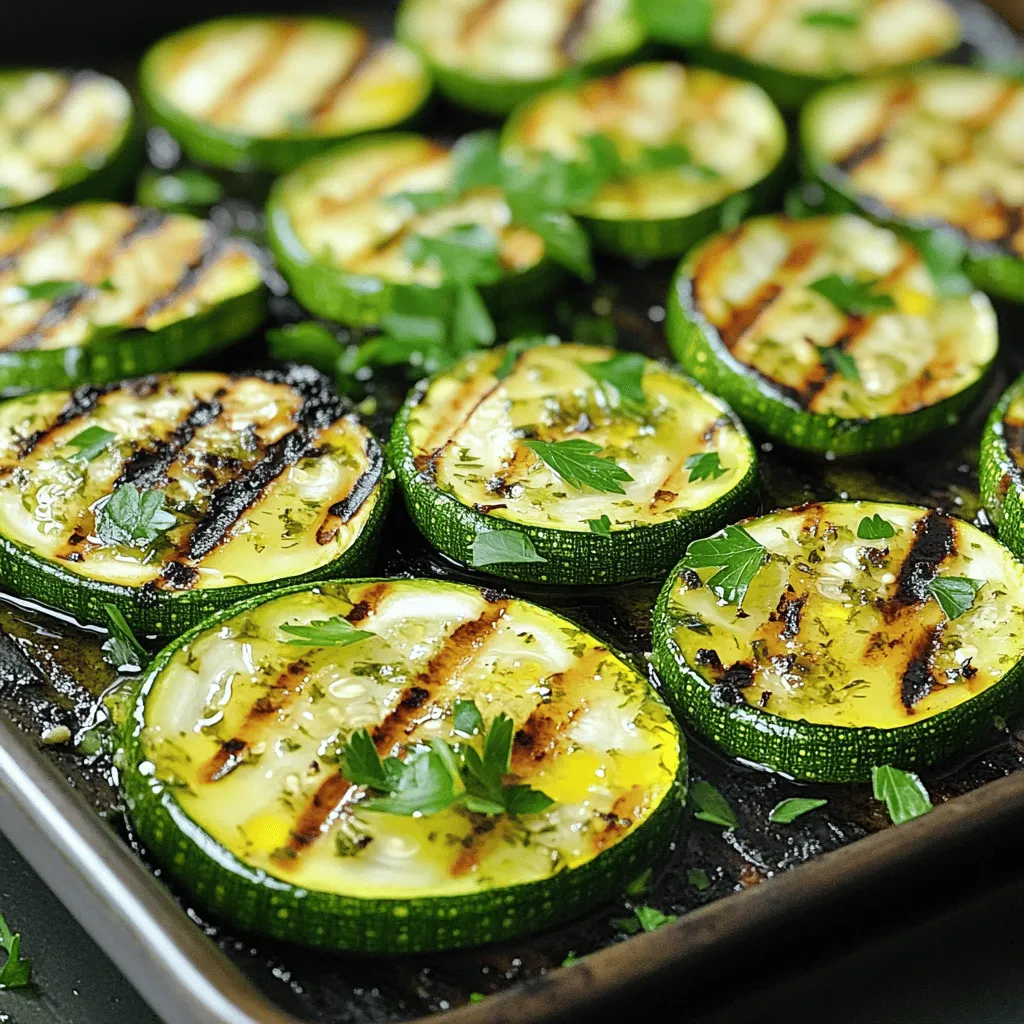
Looking for a fresh, tasty side dish? You’ll love my Lemon Herb Grilled Zucchini recipe! It’s simple to make and full of bright flavors. In this post, I’ll guide you through the ingredients, preparation, and grilling techniques. Whether you’re a beginner or a pro, I’ll share tips that will help you serve up perfectly grilled zucchini every time. Get ready to impress your guests with this delicious dish!
Ingredients
List of Ingredients
– 4 medium zucchinis, sliced into 1/2-inch thick rounds
– 4 tablespoons extra virgin olive oil
– 2 tablespoons freshly squeezed lemon juice
– 1 teaspoon freshly grated lemon zest
– 2 teaspoons dried oregano
– 1 teaspoon garlic powder
– 1 teaspoon sea salt
– 1/2 teaspoon freshly cracked black pepper
– 2 tablespoons fresh parsley, finely chopped (for garnish)
Ingredient Substitutions
You can use other oils for grilling. Avocado oil or sesame oil works well. If you have fresh herbs, use them instead of dried ones. Fresh oregano or basil adds great flavor. Adjust the amount based on your taste.
Tips for Choosing Fresh Zucchini
When selecting zucchinis, look for ones that are firm and shiny. Avoid any that feel soft or have blemishes. Choose smaller zucchinis for a sweeter taste. Check for seasonal zucchinis in late summer. They are often at their best during this time.
Step-by-Step Instructions
Preparing the Marinade
To make the marinade, start with a large bowl. Add the olive oil, lemon juice, and lemon zest. Next, sprinkle in the dried oregano, garlic powder, sea salt, and black pepper. Whisk everything together until mixed well. This blend of flavors makes your zucchini taste great.
Marinating time is key. Let the zucchini sit in the marinade for 10 to 15 minutes. This helps the zucchini soak up the zesty flavors. Skipping this step means missing out on rich taste.
Grilling the Zucchini
First, preheat your grill to medium-high heat, about 400°F (200°C). A hot grill gives your zucchini nice grill marks and a smoky flavor.
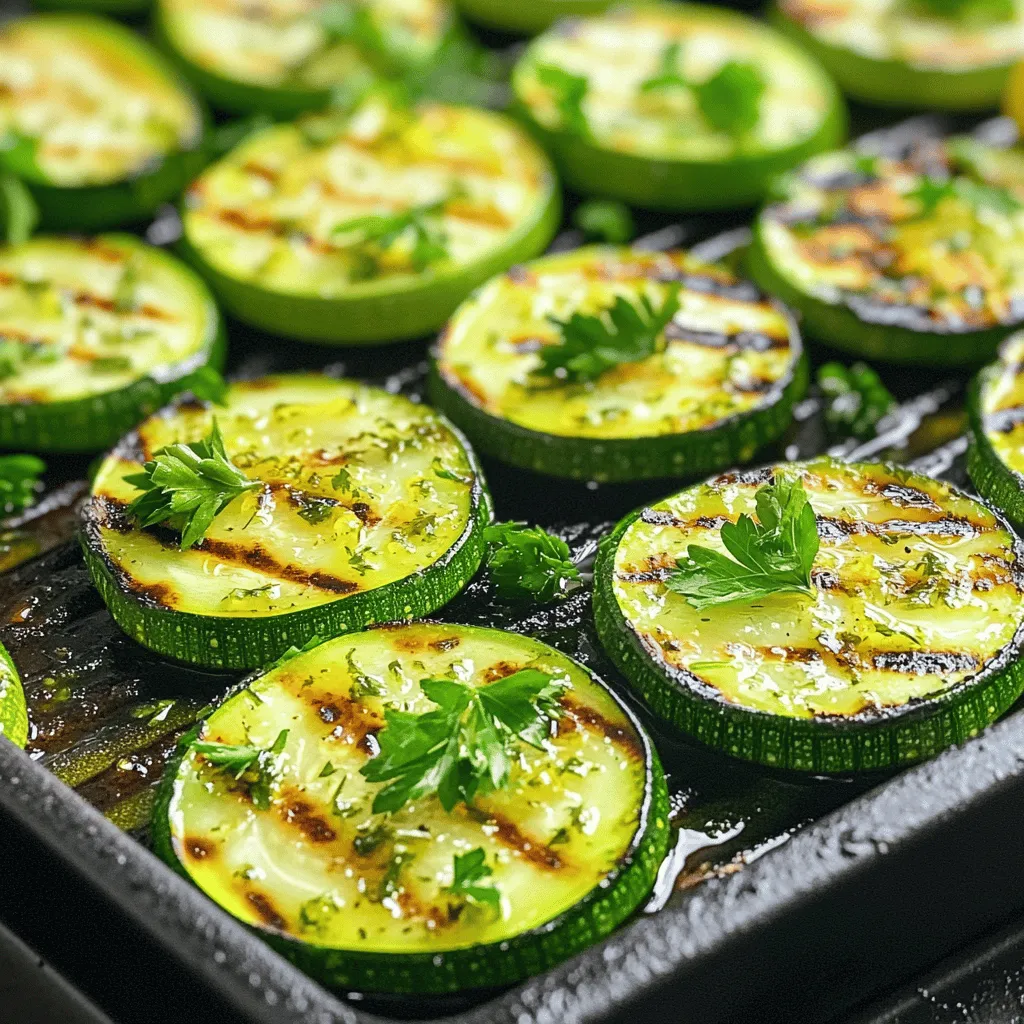
When ready, carefully place the marinated zucchini rounds on the grill. Cook them for 3 to 4 minutes on each side. Watch for tender slices with grill marks. This means they are perfectly grilled.
Serving Suggestions
When done, transfer the zucchini to a serving platter. Arrange them in a fan shape for a pretty look.
For garnish, sprinkle fresh parsley on top. This adds a pop of color and a burst of flavor. You can also drizzle extra olive oil and sprinkle sea salt for extra taste. Enjoy your Lemon Herb Grilled Zucchini!
Tips & Tricks
Grilling Techniques
To avoid sticking on the grill, start with a clean grill. Oil the grates well before adding zucchini. This creates a non-stick surface. Use a paper towel dipped in oil to wipe the grates.
For even cooking, cut zucchini into uniform pieces. I recommend 1/2-inch thick rounds. This size cooks well without burning. Grill over medium-high heat for best results.
Flavor Enhancements
You can boost flavor with fresh herbs like basil or thyme. They add a nice twist. For a bit of heat, try red pepper flakes or sliced jalapeños. Both pair well with the lemony taste.
Cooking Equipment Recommendations
The best grill types for zucchini are gas or charcoal grills. Both give great flavor and heat. A grill basket can help keep slices from falling through the grates. Use tongs for safe flipping.
For a great grilling experience, have a spatula and a timer handy. These tools help track cooking time and make flipping easy.
Variations
Different Marinade Ideas
You can change the flavors of your grilled zucchini by trying different herbs and spices. Instead of oregano, use thyme or basil for a fresh twist. You can also add a pinch of red pepper flakes for a little heat. Mixing in some smoked paprika can give your dish a nice depth.
Incorporating other citrus flavors makes the marinade even more fun. Try lime or orange juice instead of lemon. Both options add a unique taste that pairs well with zucchini. You can also mix lemon with lime for a zesty combo.
Other Vegetables to Grill
Grilled zucchini pairs well with many other vegetables. Bell peppers, eggplant, and asparagus are great choices. You can slice them into similar sizes for even cooking.
Cooking times vary, so keep an eye on your veggies. Zucchini takes about 3-4 minutes per side. Bell peppers need about 5-7 minutes, while eggplant may take up to 8 minutes. This way, you can enjoy a colorful mix on your plate.
Serving with Other Dishes
Grilled zucchini makes a tasty side dish for many meals. It pairs well with proteins like grilled chicken, fish, or steak. You can also serve it alongside grains like quinoa or couscous for a filling meal.
For fun side dish ideas, try serving grilled zucchini with a yogurt sauce. A sprinkle of feta cheese or a handful of nuts can also add a nice touch. For more flavor, drizzle balsamic glaze over the top.
Storage Info
How to Store Leftover Grilled Zucchini
To store leftover grilled zucchini, let it cool first. Place it in an airtight container. This keeps it fresh and prevents odors from mixing. You can store it in the fridge. It usually lasts for about 3 to 5 days.
Reheating Tips
Reheating grilled zucchini can be tricky. The best method is to use a skillet. Heat the skillet over medium-low heat. Add a small drizzle of olive oil. Place the zucchini in the skillet. Cook it for about 2 to 3 minutes on each side. This keeps the texture nice and firm. You can also add it to pasta or salads for a tasty twist.
Freezing Options
Yes, you can freeze grilled zucchini! To do this, let it cool completely first. Then, arrange the slices in a single layer on a baking sheet. Freeze them for about 1 to 2 hours. Once frozen, transfer the slices to a freezer bag. Remove as much air as possible. Grilled zucchini can last for up to 3 months in the freezer. When ready to use, thaw it in the fridge overnight. You can also toss it directly into soups or stews.
FAQs
What is the best way to cut zucchini for grilling?
To cut zucchini for grilling, slice it into 1/2-inch thick rounds. This thickness helps the zucchini cook evenly and stay firm. You can also cut them into long strips if you prefer a different shape. Just ensure your slices are uniform. This way, they will grill at the same rate. For added flavor, you can cut the zucchini lengthwise and brush the cut sides with olive oil.
Can I make Lemon Herb Grilled Zucchini ahead of time?
Yes, you can prepare Lemon Herb Grilled Zucchini ahead of time. To do this, marinate the zucchini slices a few hours before grilling. You can store them in the fridge for up to 24 hours in the marinade. This will enhance the flavor. Just remember to grill them right before serving for the best taste and texture. If grilling later, store the grilled zucchini in an airtight container.
Is grilled zucchini healthy?
Grilled zucchini is very healthy. It is low in calories and high in vitamins. Zucchini is a great source of vitamin C, which boosts your immune system. It also contains potassium, which helps with heart health. Plus, grilling keeps the zucchini’s nutrients intact while adding a nice smoky flavor. Enjoy it as a side dish or in salads.
In this article, we covered the key ingredients for Lemon Herb Grilled Zucchini and preparation steps. You learned how to marinate, grill, and enhance flavors. I shared tips for choosing fresh zucchini and creative variations. Remember, fresh ingredients lead to the best taste. Enjoy experimenting with different herbs or vegetables. Grilled zucchini is not just simple but also healthy and tasty. Now, you are ready to impress at your next meal!
![- 4 medium zucchinis, sliced into 1/2-inch thick rounds - 4 tablespoons extra virgin olive oil - 2 tablespoons freshly squeezed lemon juice - 1 teaspoon freshly grated lemon zest - 2 teaspoons dried oregano - 1 teaspoon garlic powder - 1 teaspoon sea salt - 1/2 teaspoon freshly cracked black pepper - 2 tablespoons fresh parsley, finely chopped (for garnish) You can use other oils for grilling. Avocado oil or sesame oil works well. If you have fresh herbs, use them instead of dried ones. Fresh oregano or basil adds great flavor. Adjust the amount based on your taste. When selecting zucchinis, look for ones that are firm and shiny. Avoid any that feel soft or have blemishes. Choose smaller zucchinis for a sweeter taste. Check for seasonal zucchinis in late summer. They are often at their best during this time. To make the marinade, start with a large bowl. Add the olive oil, lemon juice, and lemon zest. Next, sprinkle in the dried oregano, garlic powder, sea salt, and black pepper. Whisk everything together until mixed well. This blend of flavors makes your zucchini taste great. Marinating time is key. Let the zucchini sit in the marinade for 10 to 15 minutes. This helps the zucchini soak up the zesty flavors. Skipping this step means missing out on rich taste. First, preheat your grill to medium-high heat, about 400°F (200°C). A hot grill gives your zucchini nice grill marks and a smoky flavor. When ready, carefully place the marinated zucchini rounds on the grill. Cook them for 3 to 4 minutes on each side. Watch for tender slices with grill marks. This means they are perfectly grilled. When done, transfer the zucchini to a serving platter. Arrange them in a fan shape for a pretty look. For garnish, sprinkle fresh parsley on top. This adds a pop of color and a burst of flavor. You can also drizzle extra olive oil and sprinkle sea salt for extra taste. Enjoy your Lemon Herb Grilled Zucchini! For the complete recipe, check the [Full Recipe]. To avoid sticking on the grill, start with a clean grill. Oil the grates well before adding zucchini. This creates a non-stick surface. Use a paper towel dipped in oil to wipe the grates. For even cooking, cut zucchini into uniform pieces. I recommend 1/2-inch thick rounds. This size cooks well without burning. Grill over medium-high heat for best results. You can boost flavor with fresh herbs like basil or thyme. They add a nice twist. For a bit of heat, try red pepper flakes or sliced jalapeños. Both pair well with the lemony taste. The best grill types for zucchini are gas or charcoal grills. Both give great flavor and heat. A grill basket can help keep slices from falling through the grates. Use tongs for safe flipping. For a great grilling experience, have a spatula and a timer handy. These tools help track cooking time and make flipping easy. For the complete process, check the Full Recipe. {{image_4}} You can change the flavors of your grilled zucchini by trying different herbs and spices. Instead of oregano, use thyme or basil for a fresh twist. You can also add a pinch of red pepper flakes for a little heat. Mixing in some smoked paprika can give your dish a nice depth. Incorporating other citrus flavors makes the marinade even more fun. Try lime or orange juice instead of lemon. Both options add a unique taste that pairs well with zucchini. You can also mix lemon with lime for a zesty combo. Grilled zucchini pairs well with many other vegetables. Bell peppers, eggplant, and asparagus are great choices. You can slice them into similar sizes for even cooking. Cooking times vary, so keep an eye on your veggies. Zucchini takes about 3-4 minutes per side. Bell peppers need about 5-7 minutes, while eggplant may take up to 8 minutes. This way, you can enjoy a colorful mix on your plate. Grilled zucchini makes a tasty side dish for many meals. It pairs well with proteins like grilled chicken, fish, or steak. You can also serve it alongside grains like quinoa or couscous for a filling meal. For fun side dish ideas, try serving grilled zucchini with a yogurt sauce. A sprinkle of feta cheese or a handful of nuts can also add a nice touch. For more flavor, drizzle balsamic glaze over the top. For a complete guide to making this dish, check out the Full Recipe. To store leftover grilled zucchini, let it cool first. Place it in an airtight container. This keeps it fresh and prevents odors from mixing. You can store it in the fridge. It usually lasts for about 3 to 5 days. Reheating grilled zucchini can be tricky. The best method is to use a skillet. Heat the skillet over medium-low heat. Add a small drizzle of olive oil. Place the zucchini in the skillet. Cook it for about 2 to 3 minutes on each side. This keeps the texture nice and firm. You can also add it to pasta or salads for a tasty twist. Yes, you can freeze grilled zucchini! To do this, let it cool completely first. Then, arrange the slices in a single layer on a baking sheet. Freeze them for about 1 to 2 hours. Once frozen, transfer the slices to a freezer bag. Remove as much air as possible. Grilled zucchini can last for up to 3 months in the freezer. When ready to use, thaw it in the fridge overnight. You can also toss it directly into soups or stews. For the full recipe, check out the Lemon Herb Grilled Zucchini recipe. To cut zucchini for grilling, slice it into 1/2-inch thick rounds. This thickness helps the zucchini cook evenly and stay firm. You can also cut them into long strips if you prefer a different shape. Just ensure your slices are uniform. This way, they will grill at the same rate. For added flavor, you can cut the zucchini lengthwise and brush the cut sides with olive oil. Yes, you can prepare Lemon Herb Grilled Zucchini ahead of time. To do this, marinate the zucchini slices a few hours before grilling. You can store them in the fridge for up to 24 hours in the marinade. This will enhance the flavor. Just remember to grill them right before serving for the best taste and texture. If grilling later, store the grilled zucchini in an airtight container. Grilled zucchini is very healthy. It is low in calories and high in vitamins. Zucchini is a great source of vitamin C, which boosts your immune system. It also contains potassium, which helps with heart health. Plus, grilling keeps the zucchini's nutrients intact while adding a nice smoky flavor. Enjoy it as a side dish or in salads. You can find the full recipe in the main article. In this article, we covered the key ingredients for Lemon Herb Grilled Zucchini and preparation steps. You learned how to marinate, grill, and enhance flavors. I shared tips for choosing fresh zucchini and creative variations. Remember, fresh ingredients lead to the best taste. Enjoy experimenting with different herbs or vegetables. Grilled zucchini is not just simple but also healthy and tasty. Now, you are ready to impress at your next meal!](https://goldendishy.com/wp-content/uploads/2025/06/34b028ee-fd33-4782-b46e-eaef12af4b53-300x300.webp)

![- 1 lb ground chicken - 1 tablespoon olive oil - 1 red bell pepper, diced - 1 carrot, grated - 3 green onions, finely chopped - 2 cloves garlic, minced - 1 tablespoon fresh ginger, grated - 3 tablespoons low-sodium soy sauce - 1 tablespoon rice vinegar - 1 tablespoon sesame oil - 1 tablespoon honey - Salt and pepper to taste - 1 head of butter lettuce or iceberg lettuce, leaves carefully separated - Optional toppings: chopped almonds, fresh cilantro, shredded coconut I love cooking with ground chicken. It cooks fast and takes on great flavors. Olive oil helps to keep the chicken moist. Fresh vegetables add color and crunch to the wraps. I use red bell pepper, carrot, and green onions for taste and texture. Aromatics like garlic and ginger bring warmth and depth to the dish. They make the kitchen smell amazing while cooking. For the sauce, I mix low-sodium soy sauce, rice vinegar, sesame oil, and honey. This gives the wraps a sweet and savory kick. I prefer using butter or iceberg lettuce for the wraps. They provide a nice, crisp bite. You can also add toppings like chopped almonds or fresh cilantro. These add extra flavor and crunch. For a touch of sweetness, consider shredded coconut. For the full recipe, check out the details I provided earlier. Enjoy making these tasty, healthy chicken lettuce wraps! 1. Heating the Oil: Start by adding olive oil to a large skillet. Heat it over medium until it shimmers. 2. Cooking the Chicken: Add ground chicken to the skillet. Cook it for about 5-7 minutes, stirring often, until it turns brown. Break up any large clumps with a spatula. 3. Adding Aromatics: Stir in minced garlic and grated ginger. Sauté for 1-2 minutes until the garlic turns a light gold and the smell fills the kitchen. 4. Incorporating Vegetables: Toss in diced red bell pepper and grated carrot. Sauté for 3-4 minutes, or until the veggies soften nicely. 1. Whisking the Sauce Ingredients Together: In a small bowl, whisk together the soy sauce, rice vinegar, sesame oil, and honey. Mix until it's smooth. 2. Combining Sauce with Chicken and Veggies: Pour the sauce over the chicken and veggie mixture in the skillet. Stir well to coat everything. Cook for another 2-3 minutes until heated through. 3. Finishing with Green Onions: Remove the skillet from heat. Gently fold in chopped green onions for a fresh kick. 1. Spoon Chicken Filling into Lettuce Leaves: Take a lettuce leaf and spoon in a generous amount of the chicken mix. 2. Adding Optional Toppings for Extra Flavor: For added flavor, sprinkle chopped almonds, fresh cilantro, or shredded coconut on top. This method creates a fun and tasty meal that’s easy to make. For the full recipe, check the earlier section. To prevent the chicken from becoming dry, cook it over medium heat. Stir often and break up clumps. This helps it brown evenly and stay juicy. For chopping vegetables, use a sharp knife. Dice the red bell pepper and grate the carrot into thin pieces. This makes them blend well in the wraps and adds great texture. For plating, arrange the filled lettuce wraps on a colorful platter. Add some lime wedges and extra cilantro around them. This creates a vibrant look that is sure to impress. Ideal sides for your wraps include brown rice or a light salad. You could also serve a soy dipping sauce for added flavor. To make ahead, cook the chicken filling and store it in an airtight container. You can keep it in the fridge for up to three days. When reheating, use a microwave or a skillet. Heat it slowly to keep the chicken moist. Always check the temperature; it should be hot all the way through. For the [Full Recipe], follow the detailed steps for a delicious meal. {{image_4}} You can switch up the protein in your wraps. Turkey works well instead of chicken. Ground turkey has a similar taste and texture. If you want a plant-based option, use lentils or mushrooms. They add a nice, hearty feel to your dish. Ground beef or shrimp can also shine in these wraps. Just adjust your cooking time for each protein. Adding different sauces can change the whole meal. For a spicy kick, try adding sriracha or chili paste. You can also mix in some hot sauce for extra heat. If you like sweet flavors, swap honey for maple syrup or agave. Different vinegars can change the taste too. Try apple cider vinegar for a fruity twist or balsamic vinegar for a rich flavor. You can explore new veggies in your wraps. Bell peppers, carrots, and green onions are great, but don’t stop there! Try zucchini, shredded cabbage, or even corn. They add color and crunch. Adding spices like cumin or coriander can boost flavor. Fresh herbs, like basil or mint, can add a bright taste. The more you mix and match, the more fun your wraps will be! For the full recipe, check here. To keep your chicken filling fresh, store it in an airtight container. This will lock in flavor and moisture. Place the chicken in the fridge right after it cools. It can stay good for about 3 to 4 days. For the lettuce, wrap the leaves in a damp paper towel. Then, place them in a plastic bag. This helps keep them crisp and fresh for about 2 to 3 days. Yes, you can freeze the chicken filling! It’s best to freeze it in a sturdy container or bag. Make sure to remove as much air as possible. The filling can last up to 3 months in the freezer. When you’re ready to eat, thaw the chicken in the fridge overnight. Reheat it in a skillet over medium heat until hot. This keeps the flavor and texture nice. Cooked chicken can be safely stored in the fridge for 3 to 4 days. Always check for signs of spoilage before eating. If the chicken smells off or has a slimy texture, it’s best to throw it away. Freshness is key to enjoying your Healthy Chicken Lettuce Wraps. For the best taste, eat them as soon as possible! Enjoy the full recipe for more guidance on this dish. You can add heat in several ways. Use crushed red pepper flakes for a kick. Sriracha or chili sauce also works well. If you like fresh heat, add sliced jalapeños. For a smoky flavor, try smoked paprika. Adjust the amount based on your spice level. Each option adds a unique twist to your wraps. Yes, you can use regular soy sauce. However, it has more salt than low-sodium options. This will change the flavor, making it saltier. If you're watching your sodium intake, low-sodium is better. You might need to cut back on other salty ingredients too. Always taste as you go to avoid over-salting. Chicken lettuce wraps have many health benefits. Ground chicken is lean and high in protein. The fresh vegetables add vitamins and minerals. Lettuce is low in calories and high in fiber, which aids digestion. Using low-sodium soy sauce helps keep sodium levels in check. This meal is light yet filling, making it a great choice. To make the wraps vegan, swap ground chicken for plant-based meat. You can use lentils, chickpeas, or tofu as great options. Replace honey with maple syrup or agave for sweetness. Use tamari instead of soy sauce for a gluten-free option. With these changes, you can enjoy a tasty vegan version of the dish. For the complete recipe, check out the Full Recipe. Healthy chicken lettuce wraps are simple and tasty. We covered key ingredients like ground chicken, fresh veggies, and flavorful sauces. The step-by-step guide helps you cook and assemble them perfectly. Tips on meal prep and variations let you get creative. In the end, you can enjoy a delicious dish tailored to your taste. These wraps are healthy, fun, and easy to make. Make them for a light dinner or a snack! Enjoy your cooking adventure!](https://goldendishy.com/wp-content/uploads/2025/06/f37706c1-09e0-4508-86ce-50d139ffc9b7-768x768.webp)


![- 1 lb Brussels sprouts, cleaned and halved - 3 tablespoons extra virgin olive oil - 4 cloves garlic, finely minced - 1/2 cup freshly grated Parmesan cheese - Zest of 1 lemon - 1/2 teaspoon red pepper flakes (optional for heat) - Fresh parsley for garnish - Sea salt and freshly cracked black pepper When I make Garlic Parmesan Brussels sprouts, I always start with the basics. Fresh Brussels sprouts are key. I buy about a pound and clean them well. Halving them helps them cook evenly and adds texture. Next, I add extra virgin olive oil. It coats the sprouts and gives them a rich flavor. I use about three tablespoons. Garlic is a must. Four cloves of finely minced garlic bring a great kick to the dish. Parmesan cheese is what makes these sprouts shine. I use half a cup of freshly grated cheese. The cheese melts and creates a tasty crust when roasted. For extra brightness, I often add zest from one lemon. It lifts the flavors and adds a fresh note. If you like heat, a half teaspoon of red pepper flakes gives the dish a spicy kick. Lastly, I season with sea salt and freshly cracked black pepper. These simple seasonings enhance the flavor without overpowering it. Don't forget to garnish with fresh parsley for a pop of color. This combination of ingredients makes a flavorful side dish that everyone will love. For the full recipe, check out the details above. - Preheat oven to 400°F (200°C). - Prepare a baking sheet with parchment paper. First, you want to make your oven hot. This helps cook the Brussels sprouts fast. The parchment paper makes cleanup simple and helps them roast better. - Mix Brussels sprouts with olive oil, garlic, and seasonings. Take your cleaned and halved Brussels sprouts and put them in a big bowl. Add the olive oil, minced garlic, sea salt, and black pepper. Toss everything together. Make sure each sprout gets coated nicely. This mix gives them great flavor. - Spread Brussels sprouts on the baking sheet. - Roast for 20 minutes, stirring halfway through. Now, spread the Brussels sprouts out on the baking sheet. Keep them in a single layer to roast evenly. Set the timer for 20 minutes, but remember to stir them halfway. This helps them get golden and crispy all over. - Add Parmesan cheese and return to oven for additional 5-7 minutes. - Garnish with parsley before serving. After roasting, take them out and sprinkle the grated Parmesan cheese on top. You can also add lemon zest and red pepper flakes if you like some heat. Put them back in the oven for 5-7 minutes. This melts the cheese and makes it bubbly. Once done, take them out and garnish with parsley. Serve them warm for the best taste. For the full details, check the Full Recipe. To get great Brussels sprouts, keep them in a single layer. This helps them cook evenly. If you crowd them, they will steam instead of roast. Stir them halfway through cooking. This ensures every side gets that nice, crispy brown. Want to brighten the dish? Add lemon zest before serving. It gives a fresh taste that pairs well with the savory flavors. You can also try different cheeses. Parmesan is great, but Pecorino Romano adds a nice twist. One common mistake is overcrowding the baking sheet. This leads to uneven cooking. Also, watch your cooking time. Undercooking makes them tough, while overcooking turns them mushy. Follow the recipe closely for the best results. For the full recipe, check out the details above. {{image_4}} To switch up the taste, try using different cheeses. Pecorino Romano adds a salty, sharp flavor. It brings a new twist to the dish. If you want a vegan option, use nutritional yeast. It gives a cheesy flavor without dairy. Plus, it's packed with nutrients! Adding protein can make your dish heartier. Toss in crispy bacon or pancetta for a savory touch. Their rich flavor pairs well with the sprouts. You can also add cooked chicken pieces. This makes the dish more filling and satisfying. For a vegetarian option, substitute the cheese with vegan alternatives. There are many great cheese substitutes that melt well. Use plant-based oil for roasting instead of olive oil. This keeps the dish fully vegan while still being delicious. For the full recipe, check out Garlic Parmesan Brussels Sprouts Delight! Store your Garlic Parmesan Brussels Sprouts in an airtight container. Refrigerating them helps keep their flavor fresh. They are best eaten within 3-5 days for optimal taste and texture. To restore crispiness, reheat the sprouts in the oven. Set your oven to 350°F (175°C) and bake for about 10-15 minutes. If you're in a hurry, you can use the microwave. However, be aware that the texture may suffer a bit. You can freeze Brussels sprouts before roasting for long-term storage. This way, they maintain their flavor. To reheat, simply thaw them first, then roast as per the [Full Recipe]. This will help you enjoy them fresh and tasty! To make your Brussels sprouts crispy, follow these tips: - Use high heat: Roasting at 400°F (200°C) gives the best results. - Spread them out: Place Brussels sprouts in a single layer on your baking sheet. - Don’t overcrowd: Give them room to breathe, which helps them roast better. - Toss halfway: Stir them at the halfway point of roasting for even browning. - Add cheese last: Sprinkle Parmesan cheese towards the end of the cooking time so it melts but does not burn. Yes, you can prepare Brussels sprouts in advance. Here’s how: - Clean and cut: Clean and halve the Brussels sprouts the day before. - Store properly: Keep them in an airtight container in the fridge. - Roast fresh: When ready to eat, toss them with oil and seasonings, and roast right before serving. Garlic Parmesan Brussels sprouts go well with many dishes. Here are a few: - Roasted chicken: The savory flavors complement crispy chicken well. - Grilled steak: The rich flavors of steak pair nicely with the sprouts. - Pasta dishes: They add a fresh, crunchy element to creamy pastas. Yes, Brussels sprouts are very healthy! They are: - Low in calories: Great for weight management. - High in fiber: Good for digestion. - Rich in vitamins: They provide vitamin C, vitamin K, and folate. Plus, they have antioxidants that help your body fight disease. Yes, you can use frozen Brussels sprouts. Here are some tips: - Thaw first: Thaw them completely before cooking for even roasting. - Pat dry: Remove moisture with a paper towel to help them crisp up. - Adjust cooking time: You may need to roast them a bit longer to achieve the same crispiness. For the full recipe, check out Garlic Parmesan Brussels Sprouts Delight. Garlic Parmesan Brussels sprouts are simple to make and full of flavor. We covered essential ingredients like fresh Brussels sprouts, olive oil, and cheese. You learned step-by-step how to prepare, toss, and roast them. Plus, I shared tips for perfecting your dish and variations to keep it exciting. Remember, the key to great Brussels sprouts is even cooking and the right flavors. Take your time to enjoy this healthy side dish. You’ll love the taste and how easy it is to make!](https://goldendishy.com/wp-content/uploads/2025/05/a403e98b-d04b-46c1-bd99-9a315ef16e11-768x768.webp)