Get ready to fire up your grill with my Honey Sriracha Chicken Skewers! This recipe combines tender chicken thighs with a spicy-sweet marinade that will leave your taste buds dancing. Whether you’re hosting a summer barbecue or simply craving a flavorful weeknight meal, these skewers are perfect. I’ll guide you through each step, from choosing the right ingredients to grilling techniques. Let’s make your next outdoor cookout a tasty success!
Ingredients
Main Ingredients
– 1 lb boneless, skinless chicken thighs, cut into 1-inch pieces
– 1/4 cup honey
– 2 tablespoons Sriracha sauce
– 2 tablespoons soy sauce
– 1 tablespoon sesame oil
– 2 cloves garlic, minced
– 1 teaspoon fresh ginger, grated
– Salt and pepper, to taste
– 1 red bell pepper, cut into 1-inch pieces
– 1 yellow bell pepper, cut into 1-inch pieces
– 1 medium red onion, cut into chunks
– Wooden or metal skewers
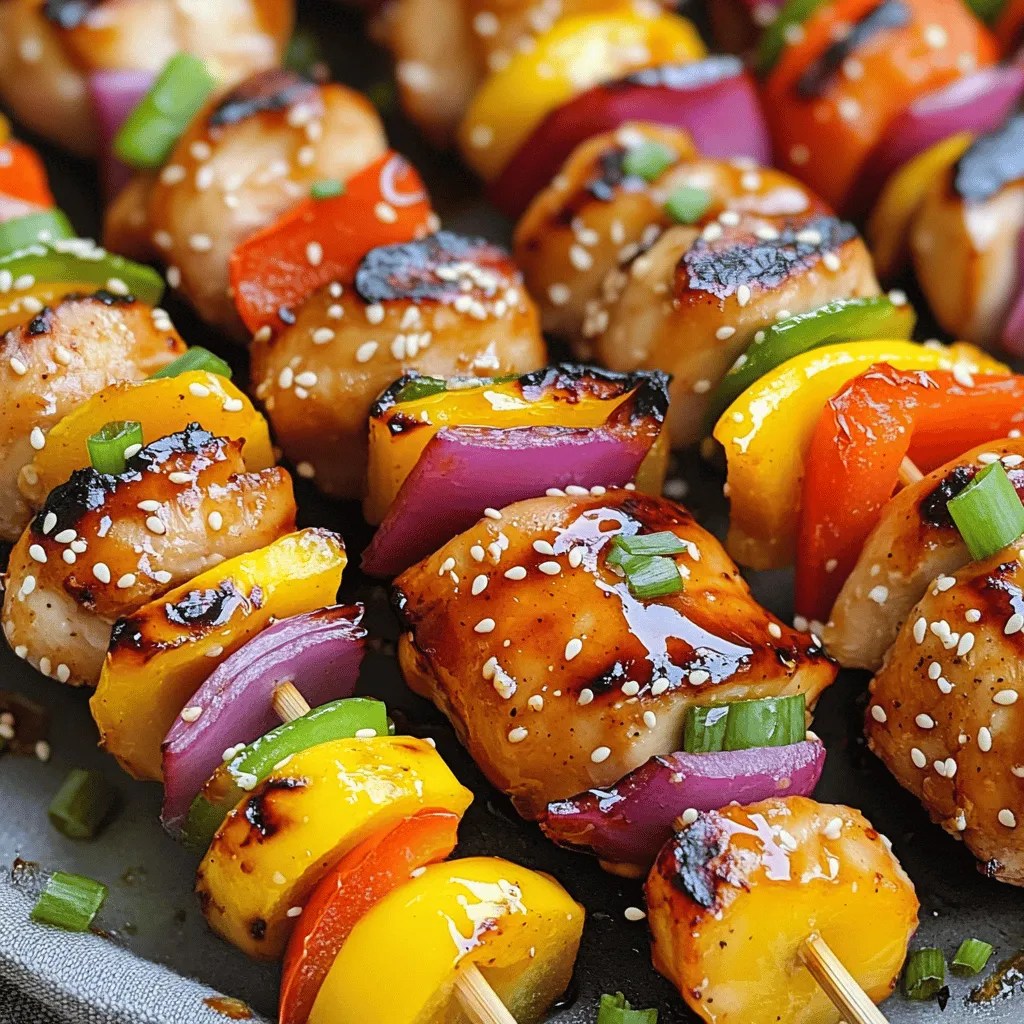
The chicken thighs make this dish juicy and flavorful. The honey gives a sweet touch, while the Sriracha brings the heat. Soy sauce adds depth, and sesame oil lends a nutty flavor. Garlic and ginger enhance the marinade, making it aromatic and fresh. The colorful bell peppers and onion not only taste great but also add visual appeal.
Optional Ingredients
– Sesame seeds for garnish
– Chopped scallions for serving
You can use sesame seeds or scallions to spruce up your dish. They add extra crunch and freshness. If you want to change things up, try adding pineapple or zucchini to your skewers. You can also swap chicken for shrimp or firm tofu for a different taste.
If you want to adjust the heat, add more or less Sriracha. You can mix in some fruit juice for a fruity twist. Make sure to check your pantry for alternatives, like honey substitutes or low-sodium soy sauce.
Step-by-Step Instructions
Marinating the Chicken
To start, you need to make the marinade. In a medium bowl, mix together the honey, Sriracha sauce, soy sauce, and sesame oil. Then, add the minced garlic, grated ginger, salt, and pepper. Whisk all the ingredients until they blend well. Next, add the chicken pieces and stir gently. Make sure every piece gets coated. Cover the bowl with plastic wrap and place it in the fridge. Let the chicken marinate for at least 30 minutes. For more flavor, you can leave it marinating for up to 2 hours.
Preparing the Skewers
If you use wooden skewers, soak them in water for at least 30 minutes. This step stops them from burning on the grill. While they soak, preheat your grill or grill pan to medium-high heat. When you are ready, take the marinated chicken out of the fridge. Start threading the chicken pieces onto the skewers. Alternate with chunks of red and yellow bell peppers and red onion. This adds color and flavor to your skewers.
Cooking the Skewers
Now it’s time to grill! Place the skewers carefully on your preheated grill. Grill them for about 10 to 12 minutes. Be sure to turn them every few minutes. This helps them cook evenly. You want the chicken to reach an internal temperature of 165°F (75°C). Look for nice grill marks on the chicken. During the last few minutes, brush the skewers with any leftover marinade. This adds a tasty glaze. Once done, take the skewers off the grill. Let them rest for a couple of minutes before serving.
Tips & Tricks
Perfecting Flavors
To make the best Honey Sriracha Chicken Skewers, you need balance. Sweetness from honey meets the heat of Sriracha. You can change the spice level by adding more or less Sriracha. I like to use fresh ingredients whenever possible. Fresh garlic and ginger make a big difference.
For marinating, let the chicken sit in the sauce for at least 30 minutes. If you have time, go for 2 hours. This helps the flavors soak in well.
Grilling Techniques
Use a reliable grill for even cooking. I prefer a gas grill because it heats up fast. If you use wooden skewers, soak them in water for 30 minutes. This stops them from burning. Avoid common mistakes like overcrowding the grill. Give each skewer space to cook properly. It helps to turn them every few minutes to get nice grill marks.
Serving Suggestions
To enhance your meal, pair these skewers with rice or a fresh salad. A cool dip like yogurt sauce works well too. As for drinks, iced tea or a light beer are great choices. For gatherings, serve the skewers on a nice platter. A sprinkle of sesame seeds and chopped scallions adds flair.

Variations
Alternative Proteins
You can change the proteins in this recipe. For a different taste, try pork or beef. Both meats work well with the honey Sriracha sauce. If you prefer vegetarian options, use firm tofu or tempeh. These options soak up flavors nicely. For seafood lovers, shrimp or salmon can be great choices. They cook quickly and pair well with the sauce.
Sauce Modifications
You can adjust the spice level to suit your taste. If you want less heat, use less Sriracha. For more heat, add extra Sriracha or some chili flakes. You can also add fruity components like pineapple or mango. This adds a sweet twist to the dish. Don’t be afraid to experiment with different sauces too. Try teriyaki or peanut sauce for a fresh take.
Serving Style Alternatives
Mix up the skewers by adding different vegetables. Zucchini, mushrooms, or cherry tomatoes can add flavor and color. You might also serve the skewers in wraps or sandwiches. Use lettuce or pita bread for a fun meal. Another idea is to use the skewers as a salad topping. Just slice them and place them on your favorite greens.
Storage Info
Storing Leftovers
To keep your Honey Sriracha Chicken Skewers fresh, store them in the fridge. Place leftovers in an airtight container. They stay good for up to three days. If you want to store them longer, freezing is a great option. Wrap the skewers in plastic wrap and then in foil. They can last for up to three months in the freezer.
When you are ready to eat, thaw the skewers in the fridge overnight. To reheat, place them in the oven at 350°F (175°C) for about 15 minutes. You can also use a microwave. Just make sure to cover them to prevent drying out.
Meal Prep Ideas
Meal prepping helps save time during busy weeks. You can marinate the chicken in advance. This makes cooking quick and easy. Portion out the skewers into individual servings. This way, you have ready-to-go meals. You can also use leftovers in stir-fries or salads. Shred the chicken and add it to a wrap for a tasty lunch.
Shelf Life of Ingredients
Fresh ingredients have a shorter shelf life than dried ones. Always check expiration dates on your sauces and oils. Honey and Sriracha last a long time, but garlic and ginger spoil faster. Look for signs of spoilage like mold or bad smells. If you buy bell peppers, use them within a week for the best flavor. Proper storage helps keep your ingredients fresh longer.
FAQs
How long do I need to marinate the chicken?
You should marinate the chicken for at least 30 minutes. This allows the chicken to soak up the flavors. If you have time, marinate it for up to 2 hours. This longer time gives a stronger taste and makes the chicken juicier. Just remember to keep it in the fridge while it marinates.
Can I use different types of skewers?
Yes, you can use either wooden or metal skewers. Wooden skewers are usually cheaper and easy to find. Just soak them in water for 30 minutes before grilling. This helps stop them from burning. Metal skewers are more durable and reusable. They also heat up quickly, helping to cook the food evenly.
What should I serve with Honey Sriracha Chicken Skewers?
You can serve these skewers with a variety of side dishes. Rice is a great option; it soaks up the sauce well. Grilled vegetables add color and flavor. A fresh salad can balance the heat too. For drinks, try iced tea or a light beer. They complement the sweet and spicy flavors nicely.
Can I cook these skewers in the oven?
Yes, you can cook the skewers in the oven. Preheat your oven to 400°F (200°C). Place the skewers on a baking sheet lined with foil. Bake them for about 15-20 minutes. Turn them halfway through to cook evenly. Check the chicken’s temperature; it should reach 165°F (75°C) for safety.
What if I don’t have Sriracha?
If you don’t have Sriracha, you can use other hot sauces. Look for sauces with a similar flavor profile. Hot chili sauce or a mix of chili powder and honey can work too. You can also try making your own by mixing red pepper flakes with a little vinegar and honey for a sweet heat.
In this blog post, we explored how to make delicious chicken skewers. We covered key ingredients, including chicken thighs and marinade components. I shared step-by-step instructions on marinating, preparing, and grilling your skewers for perfect flavor. We also discussed tips to enhance your dish and variations for different tastes.
Now, with this knowledge, you can create your own tasty skewers. Experiment with flavors and ingredients. Enjoy sharing your creations with family and friends!


