Looking for a fresh, flavorful dish that shines with summer vibes? This Grilled Peach Burrata Salad is the perfect choice! Juicy, sweet peaches meet creamy burrata cheese, all atop a bed of vibrant greens. With simple ingredients and quick steps, you can impress any crowd or enjoy a delightful meal alone. Let’s dive into this easy recipe that will elevate your summer dining experience!
Ingredients
List of Ingredients
– 2 ripe peaches, halved and pitted
– 1 tablespoon extra virgin olive oil
– Kosher salt and freshly cracked black pepper, to taste
– 4 cups fresh arugula or a mix of leafy greens
– 8 oz creamy burrata cheese
– ¼ cup toasted almonds, roughly chopped
– ¼ cup balsamic glaze
– Fresh basil leaves, for garnish
When you make this Grilled Peach Burrata Salad, you need just a few key ingredients. Each one plays a big role in the flavor and texture. The peaches bring sweetness, while the burrata adds creaminess. The arugula gives a nice peppery bite.
The toasted almonds add crunch, and the balsamic glaze ties everything together with a sweet tang. You can even add fresh basil leaves for a pop of color and taste. I love how simple ingredients can create such a beautiful dish.
Nutritional Information
– Calories: Approximately 300 per serving
– Fats: 22g
– Protein: 8g
– Carbohydrates: 20g
This salad is not just tasty; it also offers health benefits. Peaches are low in calories and high in vitamins A and C. They support eye health and boost your immune system. Arugula is rich in vitamins and minerals. It helps with digestion and adds fiber. Burrata is creamy and delicious, providing protein and healthy fats.
Almonds are good for your heart and give you energy. Overall, this dish is a great choice for a healthy meal or snack. You can enjoy this salad while knowing it’s good for you!
Step-by-Step Instructions
Preparation Steps
– Preheat grill or grill pan to medium-high heat.
– Brush peach halves with olive oil, salt, and pepper.
To start, I heat my grill or grill pan to medium-high heat. This helps the peaches caramelize nicely. While my grill heats up, I prepare the peaches. I cut them in half and remove the pit. Then, I brush the cut sides with olive oil. A sprinkle of salt and pepper adds a touch of flavor and enhances the natural sweetness of the peaches.
Grilling Instructions
– Grill peaches cut side down for 4-5 minutes.
– Remove and set aside to cool.
Next, I place the peaches cut side down on the grill. I let them cook for 4 to 5 minutes. I look for those beautiful grill marks, which mean they are ready. Once grilled, I carefully remove them and set them aside to cool. The grilling process brings out the peaches’ natural sugars, making them even sweeter.
Assembly Instructions
– Create a base of arugula in the serving bowl.
– Tear and place burrata on greens.
– Slice and arrange peaches around burrata.
– Add almonds and drizzle with balsamic glaze.
– Garnish with basil leaves.
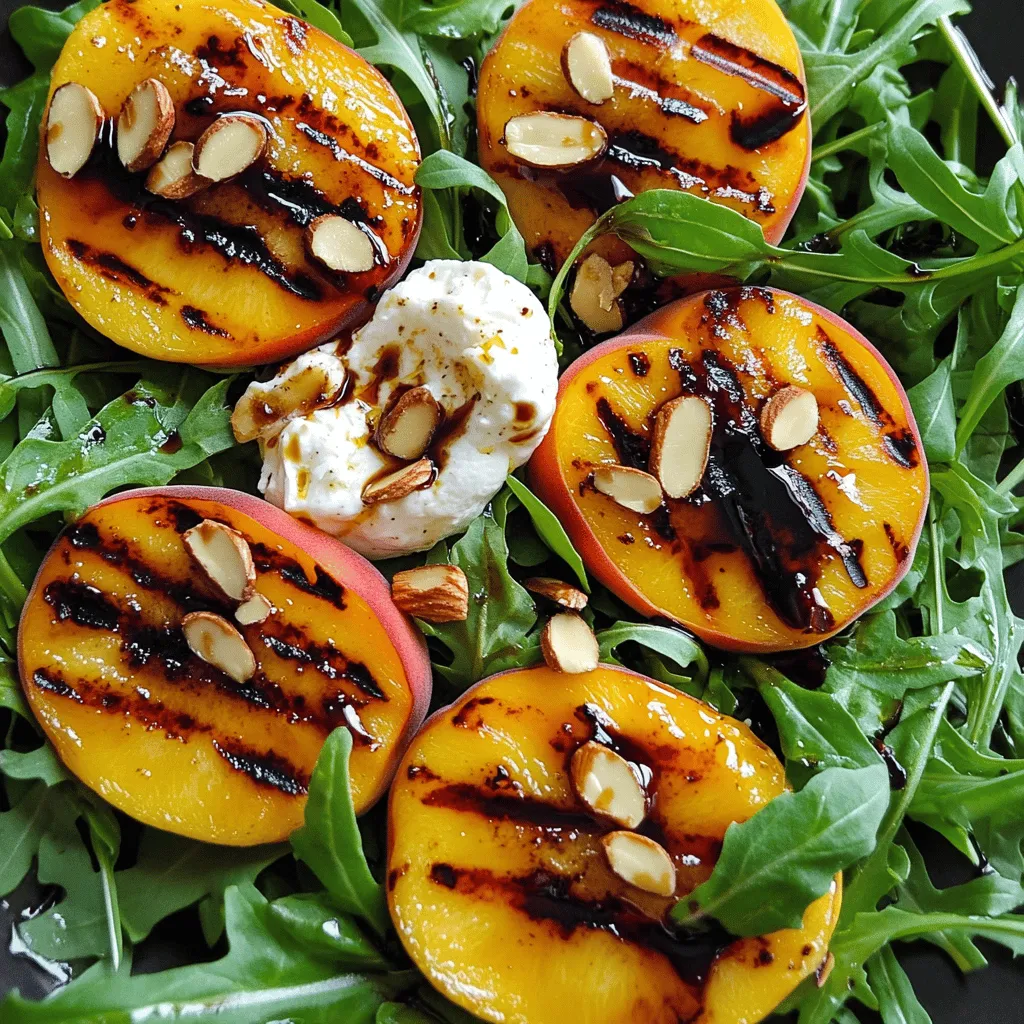
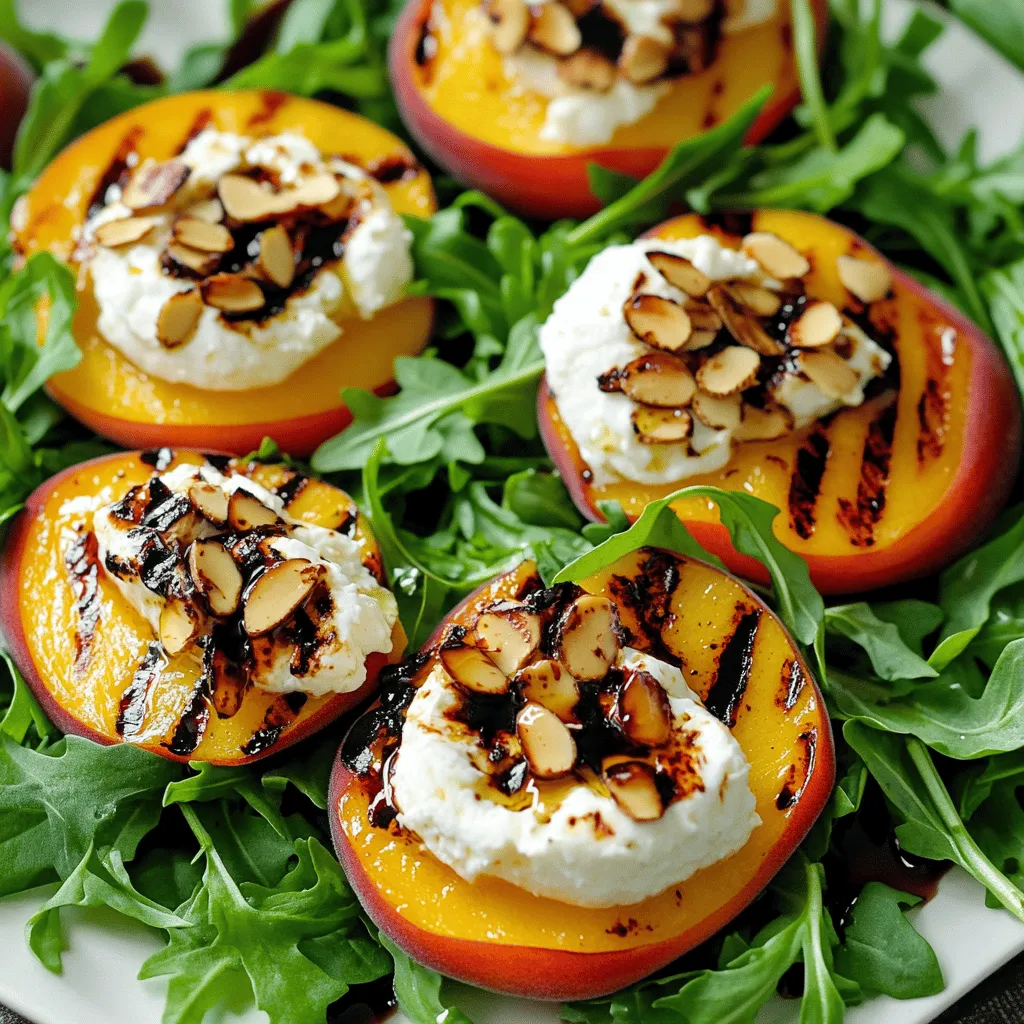
Now for the fun part—assembly! I take a large serving bowl and create a bright base of arugula. The fresh greens add a peppery bite. I then gently tear the burrata cheese into pieces, placing them on top of the greens. The creamy texture of burrata pairs perfectly with the grilled peaches.
Next, I slice the peaches into wedges and artfully arrange them around the burrata. I love the contrast of the warm peaches and the cool cheese. I then scatter toasted almonds over the salad. They add a nice crunch to each bite. Finally, I drizzle balsamic glaze all over the salad. This adds a sweet and tangy touch that ties all the flavors together. I finish with fresh basil leaves for color and aroma.
Tips & Tricks
Grilling Tips
To achieve perfect grill marks on your peaches, start with a clean grill. Preheat it to medium-high heat. Brush your peach halves with olive oil. This helps them avoid sticking and gives them a nice sear. Place the peaches cut side down. Let them cook for about 4-5 minutes without moving them. This ensures nice grill lines and caramelization.
If you don’t have a grill, you can use a griddle or stovetop pan. Heat it well and follow the same oiling and cooking steps. You can still get great flavor without a grill!
Flavor Enhancement
To boost the flavor of your grilled peaches, try adding some spices. A pinch of cinnamon can add warmth. Fresh thyme or rosemary adds a nice herbal touch. You can sprinkle these on before grilling.
If you need an alternative to balsamic glaze, try honey or maple syrup. Drizzle these over the salad for a sweet touch. A splash of lemon juice can also add brightness to the dish.
Presentation Tips
For a beautiful display, serve the salad on a large, shallow platter. This lets the colors pop. You can also use individual bowls for a personal touch. Drizzle extra balsamic glaze on the plate for added flair.
Garnishing is key! Use fresh basil leaves to add color and aroma. Consider adding edible flowers for an extra visual boost. These small touches make your salad stand out and look professional.
Variations
Ingredient Variations
You can change the salad by adding protein. Grilled chicken adds a nice, savory touch. Shrimp also works well, bringing a sweet flavor. If you want a plant-based option, try tofu.
For cheese, you can swap burrata for feta. Feta gives a nice salty kick. Goat cheese is another great choice. It brings creaminess and a tangy flavor.
Dressing Variations
You can also switch up the dressing. A honey vinaigrette adds sweetness and pairs well with peaches. A citrus dressing, made with lemon or lime, brightens the dish and adds zest.
If you want to make this salad vegan, skip the cheese. You can use a vegan cheese option or leave it out. A simple olive oil and vinegar mix works well too.
Seasonal Variations
In the summer, use fresh peaches. But when peaches are out of season, try nectarines. They have a similar taste and texture. Plums are another great choice, adding a sweet and juicy bite.
As the seasons change, adapt your salad to use what’s fresh. In fall, add roasted squash for warmth. In winter, try pomegranate seeds for a burst of color and flavor. Each season offers new ways to enjoy this salad.
Storage Info
Refrigeration Guidelines
To keep your grilled peach burrata salad fresh, store leftovers in a sealed container. This helps prevent drying and keeps flavors strong. You can store it in the fridge for up to three days. The peaches will soften, but they still taste great. The burrata may lose some creaminess but remains delicious.
Freezing Information
I do not recommend freezing the salad. The texture of peaches and burrata changes when frozen. If you must freeze, store only the grilled peaches. Wrap them in plastic and place in an airtight bag. When ready to use, thaw them in the fridge overnight.
Reassembly After Storage
To refresh your salad, take it out of the fridge and let it sit for a few minutes. This helps bring back the flavors. If the greens look wilted, consider adding fresh arugula. You can also drizzle a bit more balsamic glaze for added flavor. Gently mix the salad to combine the ingredients, then serve. This will make it look and taste great again.
FAQs
How can I make the salad ahead of time?
You can prep the salad in parts. Grill the peaches and store them in the fridge. You can also wash and dry the greens. Keep the burrata cheese wrapped until you’re ready to serve. Assemble everything just before you eat. This keeps the salad fresh and tasty.
What can I substitute for burrata cheese?
If you do not have burrata, try using fresh mozzarella. It has a similar creamy texture. Goat cheese is another good choice. It adds a tangy flavor that pairs well with peaches.
Can I make this salad gluten-free?
Yes, this salad is naturally gluten-free. All the ingredients listed are free from gluten. Just make sure any balsamic glaze you use is gluten-free. Some brands may add gluten, so check the label.
What herbs pair well with grilled peach burrata salad?
Fresh basil is a great choice for this salad. It adds a sweet and aromatic touch. Mint is another option that gives a refreshing flavor. You can also try arugula for a spicy kick. Use these herbs to boost the taste of your dish.
This blog post detailed a delicious grilled peach and burrata salad. We covered the ingredients, from juicy peaches to creamy burrata and flavorful arugula. You learned how to prepare, grill, and assemble this fresh dish easily. We also shared tips for grilling and creative variations. Remember, you can adapt this salad for every season, and it stores well for later use. Enjoy experimenting with flavors and presentations to make it your own. This salad is sure to impress at any meal!


