Fiesta Black Bean Corn Salad Easy Flavorful Dish

Looking for a quick and tasty dish? The Fiesta Black Bean Corn Salad is perfect for you! Packed with fresh ingredients, this vibrant recipe bursts with flavor and color. Plus, it’s easy to make and perfect for gatherings or meal prep. In this post, I’ll guide you through every step, ensuring you create a salad that impresses. Let’s get started on this delicious adventure!
Ingredients
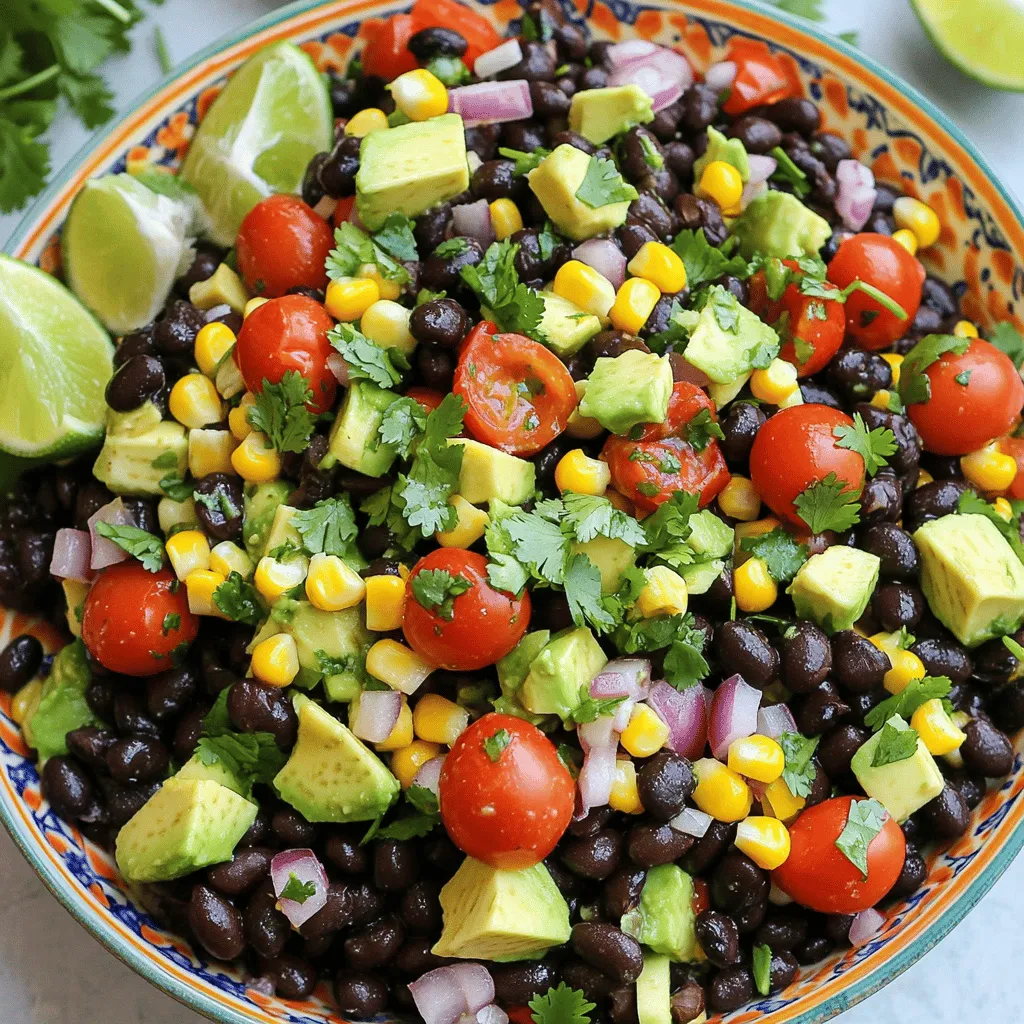
The Fiesta Black Bean Corn Salad shines with fresh and vibrant ingredients. You can make it in just 15 minutes. Here’s what you need:
– 1 can (15 oz) black beans, thoroughly rinsed and drained
– 1 cup corn kernels (fresh, frozen, or canned)
– 1 medium red bell pepper, diced
– 1 small red onion, finely chopped
– 1 cup cherry tomatoes, halved
– 1 ripe avocado, diced
– 1/4 cup fresh cilantro, chopped
– 2 tablespoons freshly squeezed lime juice
– 1 tablespoon olive oil
– 1 teaspoon ground cumin
– Salt and pepper to taste
These ingredients offer a mix of textures and flavors. The black beans provide protein, while corn adds sweetness. The red bell pepper and red onion add crunch and color. Juicy cherry tomatoes give freshness. The avocado adds creaminess, and cilantro brings a delightful herbal note.
Lime juice and olive oil create a zesty dressing, while cumin adds warmth. Make sure to use fresh ingredients for the best taste. This salad is perfect for gatherings and pairs well with grilled meats or as a standalone dish.
Step-by-Step Instructions
Preparing the Salad Base
– Combine black beans, corn, diced red bell pepper, red onion, and cherry tomatoes in a bowl.
– Toss ingredients gently for even distribution.
Start by grabbing a large mixing bowl. You want to make sure it has enough space for all your ingredients. First, add the black beans. Rinse them well before using to remove excess salt. Next, throw in the corn. You can use fresh, frozen, or canned corn based on what you have. Then, chop your red bell pepper into small, bite-sized pieces and add it.
Dice the red onion finely. This will add a nice bite to your salad. Finally, cut the cherry tomatoes in half to show off their juicy insides. Once all the ingredients are in the bowl, toss everything gently with your hands or a spoon. This helps mix the flavors without smashing anything.
Adding the Avocado and Cilantro
– Fold in diced avocado and chopped cilantro carefully.
– Ensure avocado pieces remain intact for texture.
Now it’s time for the avocado and cilantro. Cut the avocado into small cubes. Add it to the salad. Be gentle when folding it in. You want the pieces to stay whole for a nice texture. Next, chop the cilantro coarsely. Toss it in and fold everything together slowly. The cilantro will add a fresh taste that brightens up the whole dish.
Making the Dressing
– Whisk lime juice, olive oil, cumin, salt, and pepper in a small bowl.
– Emulsify the dressing for enhanced flavor.
For the dressing, grab a small bowl. Add the freshly squeezed lime juice. This gives the salad a zesty kick. Next, pour in the olive oil. It adds richness to the dressing. Then, add ground cumin, salt, and pepper. Whisk them together until the mixture looks smooth. This step is important. It helps the flavors blend well.
Combining the Salad and Dressing
– Drizzle dressing over the salad mixture and stir gently.
– Allow the salad to rest for 10-15 minutes before serving for flavor melding.
Finally, drizzle your dressing over the salad mixture. Stir gently to coat everything. You want each bite to be full of flavor. After mixing, let the salad sit for about 10-15 minutes. This resting time allows the flavors to meld beautifully. When ready, serve it in a vibrant bowl for a festive look. For a final touch, garnish with extra cilantro and lime wedges. Enjoy this delightful dish!
Tips & Tricks
How to Choose Ingredients
Choose the freshest ingredients for the best flavor. Look for shiny, firm black beans. If you use canned beans, rinse them well. For corn, fresh is great, but frozen or canned works too.
When picking avocados, find ones that yield slightly when pressed. This means they are ripe but not mushy. For tomatoes, select ones with rich color and a slight give. These will be juicy and sweet, perfect for your salad.
Serving Suggestions
For an attractive presentation, use a large, colorful bowl. This makes the salad pop. When serving, add a sprinkle of fresh cilantro on top. Place lime wedges on the side for guests to use. This adds a fun touch and invites interaction.
Enhancing Flavor
To boost the taste, try adding spices like chili powder or paprika. Fresh herbs like parsley or green onions can also brighten the dish. If you want a different dressing, swap lime juice for lemon juice. You could even add a splash of vinegar for a tangy kick.
These tips will help you create a vibrant and tasty Fiesta Black Bean Corn Salad that everyone will love.

Variations
Different Bean Options
You can switch black beans for kidney or pinto beans. I love using kidney beans. They add a nice texture and color. Pinto beans work well too. They have a creamy taste that blends smoothly with other ingredients. This simple swap keeps the salad fresh and interesting.
Added Proteins
If you want a protein boost, try adding grilled chicken, shrimp, or tofu. Grilled chicken gives a smoky flavor. Shrimp adds a sweet touch. Tofu is perfect for a plant-based option. Just dice or slice these proteins and mix them in. You will have a filling meal that satisfies your hunger.
Seasonal Ingredients
Incorporate seasonal veggies for added freshness and crunch. Think bell peppers, zucchini, or radishes. They not only enhance flavor but also bring beautiful colors. Adding seasonal ingredients makes your salad lively and tasty. You can even consider using fruits like mango or peach for a sweet twist. This keeps the dish vibrant and exciting.
Enjoy these variations to make your Fiesta Black Bean Corn Salad even more delightful!
Storage Info
Best Storage Practices
To keep your Fiesta Black Bean Corn Salad fresh, store leftovers in an airtight container. This prevents air from making the ingredients soggy. It is best to use glass or plastic containers with tight lids. This way, your salad stays flavorful and crisp.
Shelf Life
In the fridge, this salad lasts about 3 to 5 days. To enjoy the best taste and texture, eat it within the first 3 days. After that, the ingredients may start to break down. Always check for any off smells or changes in color before eating.
Freezing Tips
You can freeze this salad, but it’s not the best option. The texture of the beans and avocado can change when frozen. If you have a lot left, consider freezing the beans and corn separately. This way, you can use them later in other dishes. When defrosting, enjoy them in soups or casseroles for a tasty meal.
FAQs
Can I make Fiesta Black Bean Corn Salad ahead of time?
Yes, you can make this salad ahead of time. I suggest making it a few hours before serving. This allows the flavors to blend. Store the salad in the fridge to keep it fresh. Just remember to add the avocado right before serving. This way, it stays bright and green.
What can I substitute for lime juice?
If you’re out of lime juice, don’t worry! You can use lemon juice instead. It gives a similar tangy flavor. Another option is vinegar, like apple cider or red wine vinegar. Both will add a nice punch to the dressing.
Is Fiesta Black Bean Corn Salad vegan?
Yes, this salad is vegan! All the ingredients are plant-based. You can enjoy it without any animal products. It’s perfect for everyone, especially those who follow a vegan diet.
How do I adjust the spice level?
To adjust the spice level, start by adding less cumin. You can also skip adding hot sauce if you like it mild. If you prefer more heat, try adding diced jalapeños or chili powder. Taste as you go to find the perfect balance for you.
This blog post covered how to create a fresh and tasty Fiesta Black Bean Corn Salad. We discussed the ingredients, from black beans to ripe avocados, and shared step-by-step instructions for preparation. You learned tips for selecting fresh produce and suggestions for tasty variations. Remember, this salad is easy to make and perfect for sharing. Whether you enjoy it as is or customize it with added proteins, it will be a hit. Fresh ingredients make every bite satisfying. Enjoy your salad and impress your friends!


![- 1 pound fresh asparagus, trimmed - 3 tablespoons unsalted butter - 2 tablespoons freshly squeezed lemon juice - Zest of 1 lemon - 2 cloves garlic, finely minced Fresh asparagus is key to this dish. When you choose asparagus, look for bright green stalks that feel firm. The butter adds richness, while the lemon juice and zest bring a bright, zesty punch. Garlic gives a nice aroma and flavor, making the dish exciting. - Salt and freshly ground black pepper, to taste Salt and pepper enhance all the flavors. Use good-quality salt for the best taste. Freshly ground black pepper adds warmth and a bit of spice. - 1 tablespoon fresh parsley, finely chopped (for garnish) Fresh parsley adds color and freshness. You can also use lemon wedges for extra zing. They allow you to customize how much lemon flavor you want. These small touches make the dish look and taste even better. For the full recipe, check out the details above! Start by washing the fresh asparagus. Rinse it well under cool water to remove dirt. Next, trim the tough ends. You can snap them off or cut 1-2 inches from the bottom. This makes the asparagus more tender and easy to eat. In a large skillet, melt the unsalted butter over medium heat. Watch for the butter to bubble and foam; this means it is hot enough. Once it is ready, add the minced garlic. Cook the garlic for about 30 seconds and stir often. It should smell great but not turn brown. Brown garlic can taste bitter. Now, add the trimmed asparagus to the skillet. Toss it gently in the garlic butter. Make sure each piece gets coated well. Sauté the asparagus for 4-6 minutes. Turn it with tongs so it cooks evenly. You want it bright green and still a bit crisp. Once cooked, drizzle the lemon juice over the asparagus and sprinkle the zest on top. Season with salt and black pepper. Toss everything together to mix the flavors. Finally, transfer the asparagus to a serving dish. Garnish with chopped parsley for a lovely look. For the complete recipe, check the [Full Recipe]. To cook asparagus just right, start with fresh, vibrant stalks. Look for asparagus that is firm and bright green. Trim the ends, as they can be tough. When cooking, aim for a tender yet crisp texture. Sauté for 4 to 6 minutes. The color should become a vivid green. If you want to test doneness, simply pierce a stalk with a fork. It should be easy to pierce but still hold its shape. If you're out of any ingredients, don't worry! You can swap unsalted butter for olive oil. This will give a different flavor but still taste great. For lemon juice, you can use lime juice instead. If you lack fresh garlic, try garlic powder. Use half the amount, as it's stronger. Fresh parsley can be replaced with basil or cilantro for a fun twist. These substitutions keep the dish flavorful while using what you have. How you present your dish matters! Arrange the asparagus neatly on a white platter. This will highlight the bright green color. For a pop of color, add lemon wedges around the sides. This not only looks nice but also invites guests to add more lemon. You can sprinkle extra parsley on top for a fresh look. A simple, clean presentation makes your lemon butter asparagus look gourmet. {{image_4}} You can make Lemon Butter Asparagus a full meal by adding protein. Chicken or shrimp works well. For chicken, use thin strips and sauté them in the butter first. Cook until they turn golden brown. Then, add the asparagus and follow the recipe as usual. For shrimp, add them after the garlic. Cook until they turn pink, then toss in the asparagus. This adds flavor and makes it more filling. To spice things up, add red pepper flakes. Just a pinch can bring a nice kick. You can mix them in with the garlic for a burst of heat. If you love bold flavors, try adding lemon zest or herbs like thyme or basil. These add depth and make the dish more exciting. Feel free to mix in other seasonal vegetables. Cherry tomatoes, bell peppers, or snap peas all pair nicely with asparagus. Add them in the skillet after the garlic to keep them fresh. This not only enhances the taste but also boosts the nutrition of your dish. For the full recipe, check out the details above. After enjoying your Lemon Butter Asparagus, you might have some left. Store it in an airtight container. Keep it in the fridge for up to three days. The asparagus will stay fresh, but it may lose its crispness over time. To reheat, use a skillet over medium heat. Add a splash of water or a bit of butter. This helps keep the asparagus moist. Cook for about 3-4 minutes. Stir occasionally until warm. You can also use a microwave. Heat in 30-second bursts until hot. Freezing is a great option if you want to save this dish for later. Start by blanching the asparagus for 2-3 minutes in boiling water. Then, cool it quickly in ice water. Once cool, drain and pat dry. Place it in a freezer-safe bag, removing as much air as possible. It can stay frozen for up to three months. When you're ready to eat, thaw it in the fridge overnight before reheating. Yes, you can use frozen asparagus. It is a great option if fresh asparagus is not available. Just remember to thaw it first. Drain any excess water before cooking. You may need to adjust cooking time. Frozen asparagus cooks faster, so keep an eye on it. Aim for a tender yet crisp texture. Lemon Butter Asparagus pairs well with many dishes. Here are some ideas: - Grilled chicken - Pan-seared fish - Quinoa or rice - Pasta with olive oil - A fresh salad These options balance the flavors and add variety to your meal. Making lemon butter sauce is simple. Here’s how: 1. Melt butter in a pan over medium heat. 2. Add minced garlic and sauté until fragrant. 3. Stir in freshly squeezed lemon juice and zest. 4. Season with salt and pepper. This easy lemon butter sauce elevates many dishes, not just asparagus. For the full recipe, refer to the earlier sections. In this post, we covered everything you need for Lemon Butter Asparagus. I shared the fresh ingredients, pantry staples, and optional garnishes. We went through step-by-step instructions to prepare and cook each part. Tips and tricks helped you perfect your dish and suggested tasty variations. Finally, I gave you storage info and answered common questions. Embrace this dish, and enjoy your cooking adventure!](https://goldendishy.com/wp-content/uploads/2025/07/9c4cbd12-069a-483d-8240-a9afe0533cf0-768x768.webp)


![To make the best roasted garlic hummus, gather these key ingredients: - 1 can (15 oz) chickpeas, thoroughly drained and rinsed - 1/4 cup creamy tahini - 1/4 cup high-quality olive oil, plus extra for drizzling - 4 cloves of roasted garlic - 2 tablespoons freshly squeezed lemon juice - 1/2 teaspoon ground cumin - Sea salt, to taste - Water, as needed for desired consistency - Sweet paprika and finely chopped fresh parsley for garnish These ingredients create a rich and creamy dip that bursts with flavor. The roasted garlic adds a sweet, mellow taste that enhances the overall profile of the hummus. You can customize your hummus with these optional ingredients: - Spices like smoked paprika or cayenne for heat - Fresh herbs such as basil or cilantro for added freshness - A splash of balsamic vinegar for depth - Roasted red peppers for a sweet and smoky twist These additions can help you explore new flavors and keep your hummus exciting. Here’s a quick look at the health benefits of the main ingredients: - Chickpeas: High in protein and fiber, they help keep you full. - Tahini: Made from sesame seeds, it provides healthy fats and calcium. - Olive oil: A heart-healthy fat that can lower bad cholesterol levels. - Garlic: Known for its immune-boosting properties and flavor. - Lemon juice: Adds vitamin C and brightens the flavor. This hummus is not just tasty; it’s also packed with nutrients. You can enjoy it guilt-free as a snack or appetizer. For the complete recipe, check out the full recipe section. To roast garlic, first, preheat your oven to 400°F (200°C). Take your garlic cloves and wrap them in aluminum foil. Drizzle a little olive oil over the cloves before sealing the packet. Place the foil packet in the oven and roast for about 30-35 minutes. The garlic should turn soft and golden brown. After roasting, let it cool for a few minutes before you touch it. This step brings out the sweet, rich flavor of the garlic. In a food processor, add the following ingredients: - 1 can (15 oz) chickpeas, thoroughly drained and rinsed - 1/4 cup creamy tahini - 1/4 cup high-quality olive oil, plus extra for drizzling - 4 cloves of roasted garlic - 2 tablespoons freshly squeezed lemon juice - 1/2 teaspoon ground cumin - Sea salt, to taste Blend these ingredients until they become silky smooth. You may need to stop and scrape down the sides to ensure even mixing. This step creates a rich and creamy base for your hummus. If your hummus is too thick, add water a little at a time. Start with one tablespoon and blend again until you reach your preferred creamy texture. Taste your hummus and adjust the seasoning. You might want more sea salt, lemon juice, or roasted garlic to suit your taste. For the full recipe, refer to the provided instructions. Enjoy making this delicious dip! To make your hummus extra creamy, use dry chickpeas. Soak them overnight and cook until soft. This gives a smoother texture. If you use canned chickpeas, rinse them well. It helps remove some of the canning liquid, which can make hummus taste tinny. Always blend your mixture well. Stop and scrape the sides of the bowl as needed. This step ensures every bit gets mixed in. Roasting garlic is easy and adds great flavor. Start by preheating your oven to 400°F (200°C). Wrap the garlic cloves in aluminum foil. Drizzle a little olive oil on top. Seal the foil tightly and bake for about 30-35 minutes. The cloves should be soft and golden brown. Let them cool before you handle them. You can use the roasted garlic in your hummus or on bread for a tasty treat. Roasted garlic hummus is very versatile. You can serve it with fresh veggie sticks like carrots, cucumbers, and bell peppers. Pita bread, toasted or soft, makes a great dipper too. For a fun twist, try pairing it with warm pita chips. Add a sprinkle of sweet paprika and fresh parsley on top for color. This makes your dish look beautiful and tasty. Don't forget to check out the Full Recipe for more details! {{image_4}} You can boost the taste of your roasted garlic hummus with spices and herbs. Try adding paprika for a smoky kick or chili powder for heat. Fresh herbs like cilantro or basil can add a bright touch. A pinch of za'atar brings an earthy flavor, while a dash of black pepper enhances the taste. Mix and match to find your favorite combination! Though chickpeas are classic, other beans and peas work well too. White beans like cannellini add creaminess and a mild taste. Black beans give a rich color and unique flavor. You can even use peas for a sweet twist. Each option brings its own character, so experiment to discover what you love! Roasted garlic hummus shines as a dip, but it can do much more. Spread it on sandwiches or wraps for a flavorful layer. Use it as a base for veggie pizzas or flatbreads. Pair it with crackers or pita chips for a fun snack. You can even dollop it on salads for added creaminess. The options are endless! For the full recipe, check out the detailed steps to make your own roasted garlic hummus. To keep your roasted garlic hummus fresh, place it in an airtight container. Make sure to press a piece of plastic wrap against the hummus before sealing. This helps to keep the air out and maintain its creamy texture. Store it in the fridge for up to one week. Always use a clean spoon when scooping out hummus. This avoids introducing bacteria that can spoil your dip. You can freeze roasted garlic hummus for longer storage. Use a freezer-safe container or a resealable bag. Leave some space at the top, as the hummus may expand when frozen. It can last for about three months in the freezer. To use, thaw it overnight in the fridge before serving. Stir well after thawing to restore its smooth consistency. Homemade hummus can last for about a week when stored correctly in the fridge. If you notice any off smells or changes in color, it’s best to discard it. Always trust your senses. Freshness is key for the best flavor. If you made a big batch, consider freezing a portion for later use. Check the [Full Recipe] for tips on making the perfect hummus. You can easily make roasted garlic hummus vegan. The main ingredients are already plant-based. Just use chickpeas, roasted garlic, olive oil, lemon juice, and seasoning. Ensure your tahini is vegan too. Most brands are, but it’s good to check the label. If you don’t have tahini, don’t worry! You can use sunflower seed butter or almond butter. These will change the flavor a bit, but they still taste great. You can also skip it entirely. Just add a bit more olive oil for creaminess. Check the texture while blending. If the hummus feels hard to mix, it’s too thick. Add water, one tablespoon at a time, until it smooths out. If it’s runny, add more chickpeas or tahini to thicken it. Always taste as you go! For the full recipe and precise steps, check the Full Recipe section. Roasted garlic hummus is simple to make and enjoy. You learned about key ingredients, how to roast garlic, and tips for creamy texture. Variations add excitement to the dish, while proper storage keeps it fresh. This tasty dip fits many diets and pairs well with many foods. Now, it’s time to get creative in the kitchen. Make your version and share it with friends. You’ll love the flavor and fun it brings! Enjoy your hummus journey!](https://goldendishy.com/wp-content/uploads/2025/07/73315b96-5df4-4df6-b272-95a468d12cec-768x768.webp)
