Easy Sheet Pan Nachos Quick and Flavorful Snack

Looking for a quick and tasty snack? Try Easy Sheet Pan Nachos! They are perfect for game day or when friends drop by. With just a few simple ingredients, you can whip up a plate that’s loaded with flavor. In this article, I’ll guide you through the steps to make the best nachos ever. Get ready to impress everyone with your cooking skills!
Ingredients
Main Ingredients
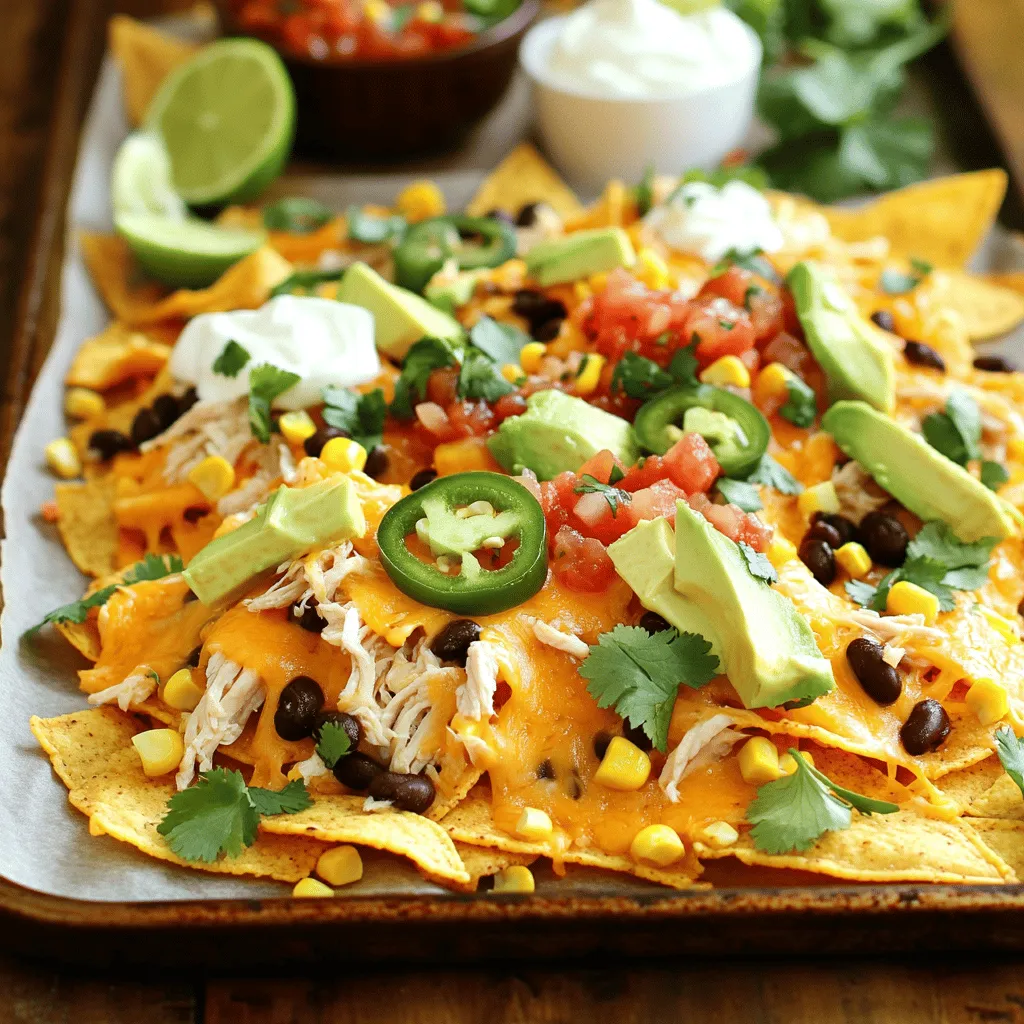
– 1 bag (12 oz) tortilla chips
– 1 cup cooked chicken, shredded
– 1 cup black beans, rinsed and drained
– 1 cup corn kernels, fresh or frozen
– 1 1/2 cups shredded cheddar cheese
– 1 cup sliced jalapeños (pickled or fresh)
– 1 avocado, diced
– 1/4 cup fresh cilantro, finely chopped
– 1/4 cup sour cream
– 1/4 cup salsa
– Lime wedges, for serving
– Salt and pepper, to taste
To make Easy Sheet Pan Nachos, you need a few simple ingredients. Start with tortilla chips. I like to use a 12-ounce bag. Next, grab some cooked chicken. Shred it so it spreads well. Black beans add protein and texture. Make sure to rinse and drain them. Sweet corn brings a great crunch, fresh or frozen works.
Cheddar cheese is a must. It melts nicely and adds flavor. Jalapeños give it a spicy kick. You can use fresh or pickled ones, depending on your taste. An avocado, diced fresh, adds creaminess. Don’t forget fresh cilantro! It gives a burst of flavor.
Sour cream and salsa are perfect finishing touches. They add moisture and tang. Finally, lime wedges brighten every bite! Keep salt and pepper handy for seasoning.
Step-by-Step Instructions
Preparation Steps
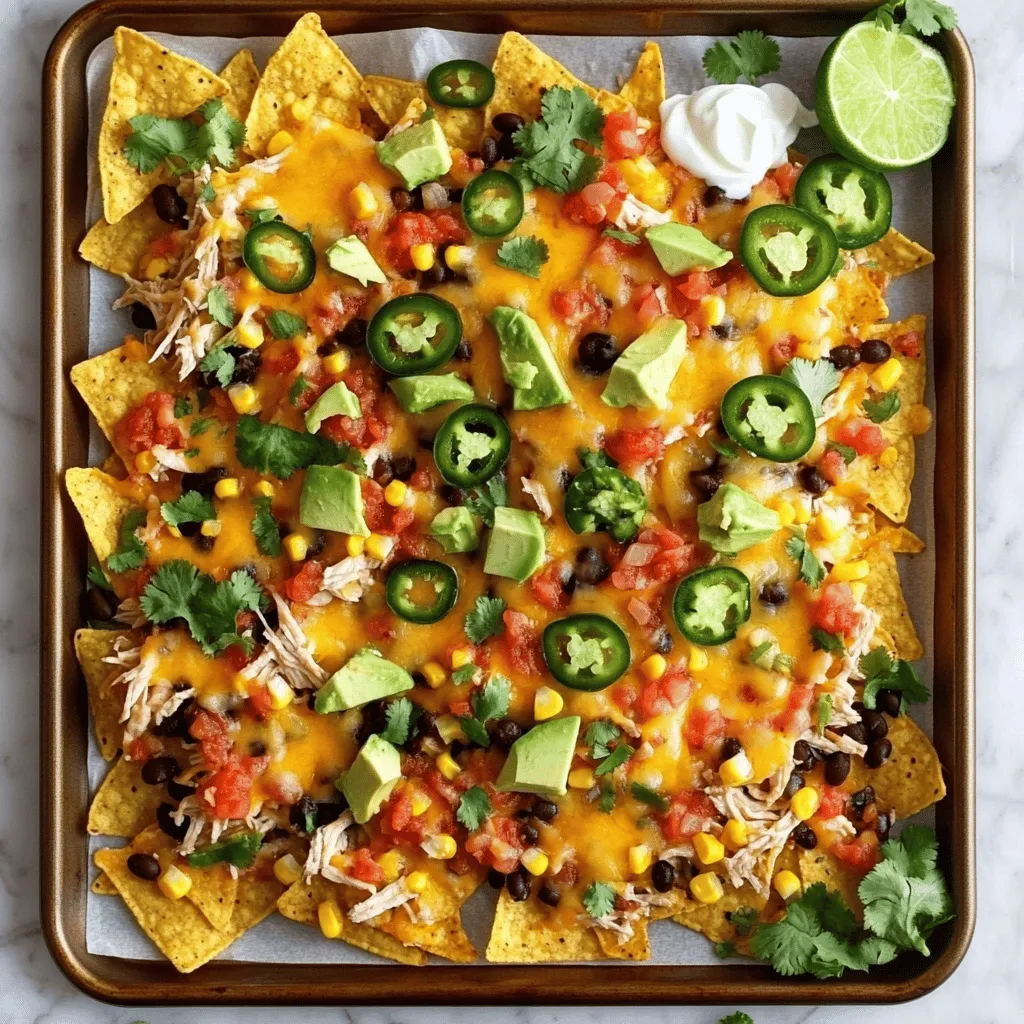
– Preheat the oven to 375°F (190°C).
– Line a large baking sheet with parchment paper.
– Spread tortilla chips evenly on the baking sheet.
Assembling the Nachos
– In a bowl, combine shredded chicken, black beans, and corn.
– Season the mixture with salt and pepper to taste.
– Distribute the chicken mixture over the tortilla chips.
Baking Instructions
– Sprinkle shredded cheddar cheese over the nachos.
– Add jalapeño slices based on your heat preference.
– Bake for 10-15 minutes until the cheese is melted and bubbly.
– Garnish with diced avocado, cilantro, sour cream, and salsa before serving.Enjoy making your nachos!
Tips & Tricks
Perfecting Your Nachos
– Use a variety of toppings for added flavor. Try black olives, pico de gallo, or even pulled pork.
– Layer ingredients to ensure even cooking. Spread chips, then toppings, then cheese for the best melt.
– Adjust baking time according to your oven’s performance. Ovens can vary, so check for golden cheese and bubbly goodness.
Serving Suggestions
– Serve directly on the baking sheet for a casual look. This makes it easy for everyone to dig in.
– Offer additional toppings on the side for customization. You can include items like guacamole, sour cream, or extra jalapeños.
Enhancing the Flavor
– Squeeze lime juice over finished nachos for brightness. It adds a fresh zing that complements the cheese.
– Use quality ingredients for the best taste. Fresh tortillas, homemade salsa, and good cheese make a big difference.

Variations
Protein Alternatives
You can switch up the protein in your nachos. Instead of chicken, try beef or turkey. If you want a vegetarian option, use beans or lentils. For a vegan version, choose plant-based cheeses or proteins. These swaps keep the dish fun and fresh.
Flavor Innovations
Cheese is key for great nachos. Try Monterey Jack or Pepper Jack for a twist. You can also mix in unique toppings like roasted veggies or pineapple. These additions bring new flavors and textures. Don’t hesitate to explore your favorites!
Spice it Up
To turn up the heat, add more jalapeños. You can also use spicy salsa for extra flavor. Hot sauces and chili flakes work great too. Adjust the spice level to match your taste. Everyone loves a little kick in their nachos!
Storage Info
Storing Leftovers
– Keep leftovers in an airtight container in the fridge.
– Consume within 2-3 days for best quality.
I find that nachos taste best fresh, but leftovers can be tasty, too. Just store them right, and they will stay good for a short time. An airtight container helps keep them fresh.
Reheating Tips
– Reheat in the oven for crispiness or in a microwave for convenience.
– Add a sprinkle of cheese before reheating to revive flavors.
When reheating, I like using the oven for that crunchy texture. If you’re in a hurry, the microwave is fine. Adding cheese before you heat them helps the flavors pop back. Enjoy your nachos again!
FAQs
Can I make Easy Sheet Pan Nachos ahead of time?
Yes, you can prepare the ingredients in advance and assemble them before baking. This makes it easy for parties or busy weeknights. Just store the toppings and chips separately in the fridge. When you’re ready, layer them on the sheet pan and bake.
How do I prevent my nachos from getting soggy?
To keep your nachos crisp, use thick chips. Thin chips break easily and can get soggy fast. Also, avoid adding wet toppings until you serve the nachos. This way, your chips stay crunchy and delicious.
What can I serve with Easy Sheet Pan Nachos?
Nachos pair well with many sides. Guacamole brings creaminess, while salsas add zest. You can also serve beans on the side for extra protein. These pairings make your nachos even more delightful and filling.
How long do nachos take to cook in the oven?
Nachos typically take 10-15 minutes at 375°F (190°C) until the cheese is melty. Keep an eye on them to avoid burning. You’ll know they’re ready when the cheese bubbles and turns golden. Enjoy the aroma as they bake!
In this blog post, we covered how to make delicious Easy Sheet Pan Nachos. You learned about essential ingredients, step-by-step prep, and even some tasty variations. These nachos are quick to prepare and can be customized to your taste.
Remember, using fresh ingredients and layering your toppings will elevate your nacho game. Enjoy experimenting with flavors and serving them up for friends or family. Get inventive and have fun with your nachos!


![- Bell pepper (red, yellow, or green) - Zucchini and yellow squash - Red onion and cherry tomatoes - Mushrooms When I make grilled veggie skewers, I choose a mix of colorful vegetables. They not only look great but also taste fantastic. Bell peppers are a must. You can pick red, yellow, or green. Each type adds a sweet taste. Zucchini and yellow squash are next. Their soft texture and mild flavor work well on the grill. I like to cut them into thick rounds. This helps them hold their shape while cooking. Red onions add a nice bite. I cut them into wedges so they cook evenly. Cherry tomatoes are fun and juicy. I use them whole, so they burst with flavor when grilled. Finally, I love mushrooms. They soak up the marinade and get smoky when grilled. - Olive oil, garlic powder, smoked paprika - Salt and black pepper To bring out the flavors, I use a simple marinade. I drizzle extra virgin olive oil over the veggies. It helps the spices stick and adds richness. I sprinkle garlic powder for a savory kick and smoked paprika for a hint of smoke. Don’t forget to add salt and black pepper. They enhance all the natural flavors. I mix everything well, so each piece is coated. This step is crucial for a tasty outcome. - Fresh basil leaves After grilling, I like to add fresh basil leaves. They give a burst of color and flavor. Just tear them up and sprinkle on top of the skewers. This final touch makes the dish even more inviting. For the full recipe, check out the [Full Recipe]. First, we need to get our grill ready. Preheating is key to good grilling. It helps to cook the veggies evenly and gives them nice grill marks. Set your grill to medium-high heat. This temperature is perfect for cooking our colorful skewers. Let’s prep our vegetables. Start by cutting them into pieces. Cut the bell pepper into 1-inch chunks. Slice the zucchini and yellow squash into thick rounds. Cut the red onion into wedges. Keep the cherry tomatoes whole and use whole mushrooms or half them if they are large. Next, we’ll mix the veggies. Place all the cut veggies in a big bowl. Drizzle them with olive oil and sprinkle in garlic powder, smoked paprika, salt, and black pepper. Now, toss everything gently with your hands or a spatula. Make sure each piece is well-coated with the seasoning. This step adds a lot of flavor! Now comes the fun part: assembling the skewers. Take a skewer and start threading the veggies. Alternate the types of veggies to create a colorful mix. This not only looks great but also adds different flavors in every bite. Be careful when handling the skewers. The ends can be sharp, so keep your hands clear when you thread the veggies. Once you finish, your skewers are ready for the grill. For the full recipe, check out the details above. Grilling veggie skewers is simple and fun. Aim for a medium-high heat. This ensures your veggies cook well. Grill them for about 10-12 minutes. Turn them often to get nice grill marks. You want them tender but not mushy. To boost flavor, try adding spices like cumin or dill. A splash of lemon juice also brightens the taste. For a smoky flavor, use smoked paprika or a dash of liquid smoke. Marinades can add depth, too. A blend of olive oil, vinegar, and herbs works great. For a beautiful presentation, stand skewers upright in a holder. You can also lay them on a platter. Drizzle with olive oil and sprinkle fresh herbs. Pair the skewers with dips like hummus or tzatziki. These add flavor and make serving easier. Check out the Full Recipe for more ideas! {{image_4}} You can mix and match veggies for your skewers. Seasonal vegetables make great choices. In summer, try zucchini and corn. In fall, use butternut squash and Brussels sprouts. You can also add eggplant for a nice smoky taste. Asparagus gives a nice crunch and fresh flavor. If you can’t grill, you can bake or roast your skewers. For oven-baking, preheat your oven to 400°F (200°C). Place the skewers on a baking sheet. Bake for about 20 minutes. Keep an eye on them to ensure they don’t burn. Roasting gives a rich taste and helps the flavors blend well. This recipe is easy to adapt for different diets. For a vegan version, stick to the veggies and oil. If you need gluten-free options, all ingredients in this recipe work well. Just make sure to check labels on sauces or seasonings. You can enjoy tasty skewers that fit your needs by making small swaps. For the full recipe, check the details above. To keep your grilled veggie skewers fresh, use airtight containers. Store them in the fridge right after they cool down. Make sure to eat them within three days for the best taste and quality. If you notice any moisture, add a paper towel inside the container to soak it up. You can reheat skewers in the microwave or on the grill. For the microwave, place them on a plate and cover them with a damp paper towel. Heat in short bursts to avoid overcooking. To reheat on the grill, warm it up and place the skewers back on for a few minutes. This keeps the texture nice and doesn't make them soggy. To freeze skewers, wrap them tightly in plastic wrap and place them in a freezer bag. Make sure to remove as much air as possible. They can last for up to three months in the freezer. When you’re ready to eat them, thaw them in the fridge overnight. Reheat on the grill or in the oven to restore their flavor and texture. For the full recipe, check out the details above. I prefer metal skewers for grilling. They heat up quickly and help cook the veggies evenly. They are also reusable, making them eco-friendly. Wooden skewers are lighter but can burn easily. If you use wooden skewers, you need to soak them in water first. This helps prevent them from catching fire. Both types work well, so choose what you like best. Yes, you can use frozen vegetables. They are convenient and save time. However, frozen veggies may not have the same texture as fresh ones. They can become mushy when cooked. If you choose to use them, thaw them first. Pat them dry to remove extra moisture before grilling. This helps keep them from steaming and allows for better grilling. To prevent sticking, coat your vegetables with olive oil. This adds flavor and creates a barrier. Preheat your grill well before adding the skewers. A hot grill helps to sear the veggies quickly. Turn them gently with tongs. Avoid using a fork, as this can pierce the vegetables and let juices escape. Keep an eye on them, so they don't burn. Soaking wooden skewers is a good idea. It prevents them from burning on the grill. Soak them for at least 30 minutes before using. This helps them stay intact while grilling. If you skip soaking, watch them closely as they cook. You might need to turn down the heat to avoid burning. Soaking is a simple step that makes grilling easier. This blog post guides you on making vibrant vegetable skewers. We covered key ingredients, including bell peppers, zucchini, and cherry tomatoes. I shared tips for preparing the grill and veggies, along with assembling skewers safely. Remember optimal grilling time and temperature for the best results. You can try different vegetables or cooking methods for variety. Don’t forget about storing leftovers properly for later enjoyment. With the right techniques, you’ll create tasty skewers that impress. Your grilling skills can elevate any meal!](https://goldendishy.com/wp-content/uploads/2025/06/899b9bee-2fb2-475c-b5a5-3b543ce01d01-768x768.webp)