Easy Chicken Caesar Wraps Quick and Tasty Meal

Are you ready to whip up a delicious meal in no time? Easy Chicken Caesar Wraps are quick, tasty, and perfect for any day. With simple ingredients like chicken, lettuce, and Caesar dressing, you can create a satisfying dish in minutes. Whether for lunch or dinner, these wraps are sure to impress. Let’s dive into the easy steps to make your own wraps, and turn a busy day into a delicious one!
Ingredients
Required Ingredients
– 2 cups cooked chicken breast, diced
– 4 large flour tortillas
– 1 cup romaine lettuce, chopped
– 1/2 cup Parmesan cheese, grated
– 1/2 cup Caesar dressing
– 1/4 cup cherry tomatoes, halved
– Salt and pepper to taste
– Optional ingredients: croutons for added crunch
Gathering the right ingredients is key for great Chicken Caesar Wraps. Start with cooked chicken breast. You can grill, bake, or even use leftovers. Dice it into small pieces for easy wrapping.
Next, choose large flour tortillas. These hold all the tasty fillings.
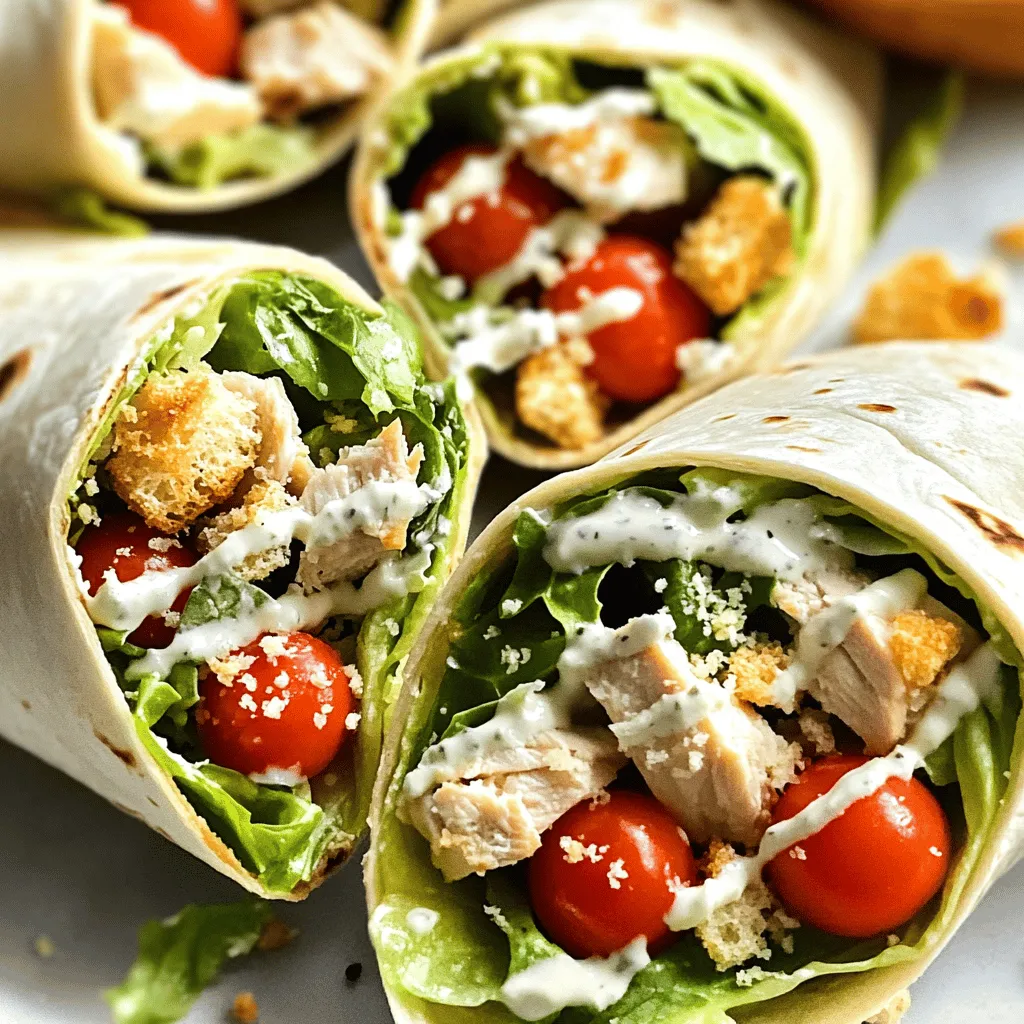
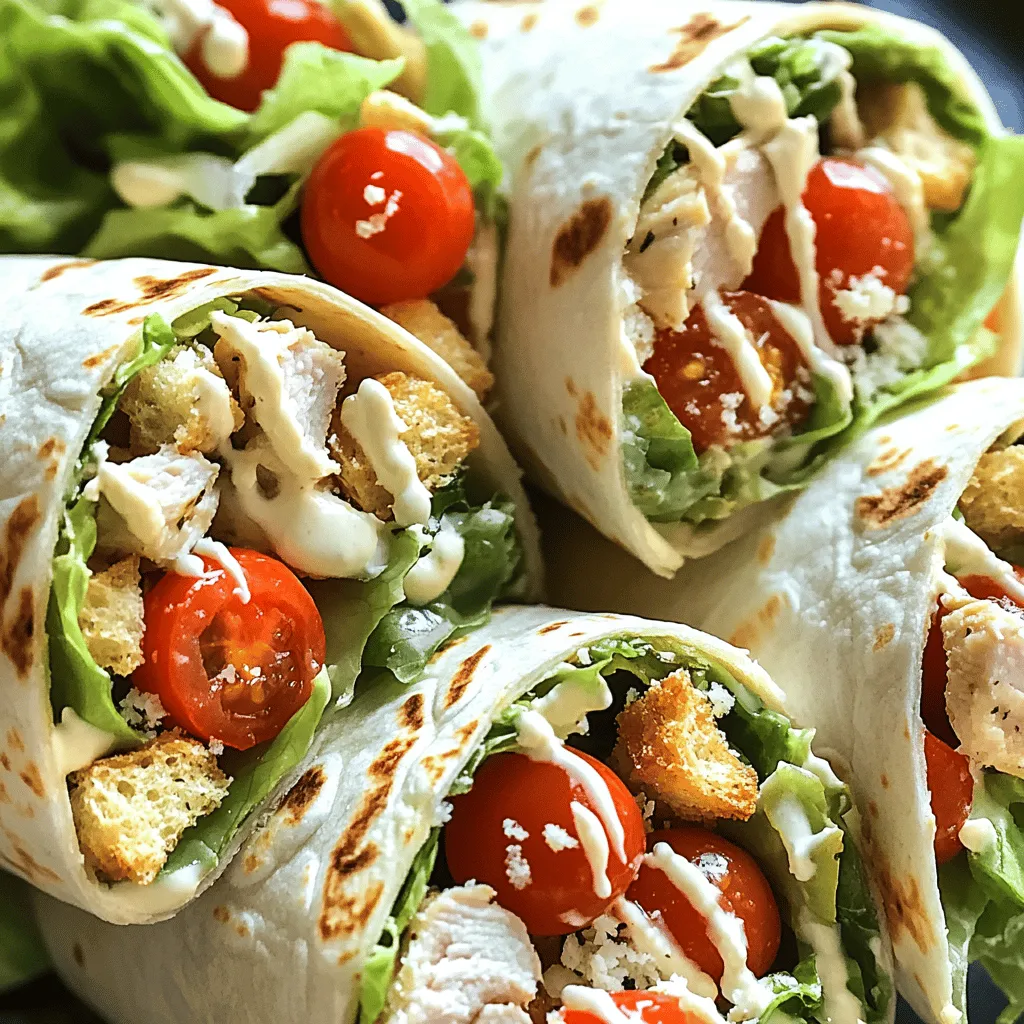
Chop fresh romaine lettuce. It adds crunch and freshness. Grate Parmesan cheese for a salty kick. Use a good-quality Caesar dressing to mix all the flavors. Cherry tomatoes add color and sweetness. Season with salt and pepper to enhance the taste.
If you want more texture, don’t forget croutons! They give an extra crunch.
Step-by-Step Instructions
Preparation Steps
– Combine chicken, lettuce, cheese, and tomatoes in a bowl.
– Add Caesar dressing and toss to coat.
– Season with salt and pepper.
In this first step, I love to use tender, cooked chicken. It makes a big difference. Chopped romaine adds crunch. The grated Parmesan gives a rich taste. Halved cherry tomatoes add sweetness. Mixing these in a bowl makes sure every bite is full of flavor.
Once I coat everything with Caesar dressing, it becomes creamy and delicious. I always taste and adjust the salt and pepper. You want just the right amount to bring out the flavors.
Wrapping the Tortillas
– Lay tortilla flat and add filling.
– Fold sides and roll the wrap.
Now, it’s time to wrap! I take a tortilla and lay it flat. Spoon a good amount of the chicken mixture in the center. Don’t overfill, or it will spill out!
To wrap, I fold the sides in and roll it up tightly. It’s like a present filled with tasty goodness. I repeat this with all the tortillas until everything is wrapped up.
Serving Suggestions
– Serve immediately or prepare for on-the-go lunches.
– Optional: Offer extra Caesar dressing for dipping.
These wraps are best right away. But they also work for lunches later. Just wrap them in foil or parchment paper.
I love to cut each wrap in half. It shows off the colorful filling. Serving with a small dish of extra Caesar dressing is a great touch. It adds flavor and fun to the meal.
Tips & Tricks
Customizing Your Wraps
You can change the amounts of each ingredient to fit your taste. If you want more crunch, add more lettuce or croutons. For a meatier wrap, try using more chicken. You can also swap the chicken for other proteins. Try grilled shrimp or tofu for a fun twist. Experiment with different flavors to find your favorite mix.
Presentation Tips
Cut each wrap in half diagonally. This makes them look nice and shows off the colorful filling. You can serve the halves on a plate with extra Caesar dressing on the side. This adds to the visual appeal and gives a tasty dip option. A simple garnish, like a sprinkle of parsley, can also enhance the look.
Making Ahead
Making these wraps in advance saves time during busy days. You can prepare them for lunches or quick dinners. Wrap each one tightly in plastic wrap or foil to keep them fresh. Store them in the fridge for up to two days. Make sure to enjoy them chilled or at room temperature. For best taste, add dressing just before eating.

Variations
Different Proteins
You can swap chicken for grilled shrimp or tofu. Grilled shrimp adds a sweet, smoky taste. It’s quick to cook and pairs well with Caesar flavors. Tofu gives a nice texture and absorbs dressings well. Just marinate the tofu for extra flavor before grilling. Both options change the wrap while keeping it delicious.
Vegetarian Options
For a meatless meal, use chickpeas or tempeh instead of chicken. Chickpeas add protein and a nutty flavor. They are also great for texture. Tempeh has a unique taste and is full of protein, too. Both choices make the wrap filling and satisfying. This makes the dish great for vegetarians or anyone wanting less meat.
Flavor Enhancements
You can play with dressings and seasonings to boost flavor. Try ranch or Greek dressing for a twist. Adding spices like garlic powder or smoked paprika can give your wrap a kick. You might even sprinkle some lemon juice for a fresh zing. These small changes can make your Easy Chicken Caesar Wraps exciting and different every time you make them.
Storage Info
Refrigeration Guidelines
You can store your Chicken Caesar Wraps in the fridge for up to three days. Keep them in a sealed container to keep them fresh. The wraps may get soggy if left too long, so eat them sooner rather than later.
Freezing Options
Yes, you can freeze these wraps! To freeze, wrap each one tightly in plastic wrap. Then, place them in a freezer bag. They can last up to two months in the freezer. When ready to eat, thaw them in the fridge overnight. Then, enjoy them cold or heat them in a microwave.
Best Containers
Use airtight containers to keep your wraps fresh. Glass containers work well, as do BPA-free plastic containers. Make sure they seal tightly to prevent air from getting in. This will help maintain the flavor and texture of your wraps for a longer time.
FAQs
How to make Easy Chicken Caesar Wraps?
To make Easy Chicken Caesar Wraps, you start with cooked chicken. Chop it into small pieces. Then, mix the chicken with chopped romaine lettuce, grated Parmesan cheese, and halved cherry tomatoes in a bowl. Drizzle Caesar dressing over this mix and toss it gently. Season with salt and pepper to taste. Next, lay a tortilla flat. Spoon the chicken mixture into the center. If you like, add croutons for crunch. Fold the sides in and roll it up tightly. Repeat this for all tortillas. Enjoy them right away or wrap them for later!
What can I substitute for Caesar dressing?
If you want to change the flavor, you can use different dressings. Ranch dressing adds a creamy taste. Greek yogurt can give a nice tang. You can also try a simple mix of olive oil and lemon juice. These options keep the wraps tasty and fresh. Choose one that you like best.
Can I use whole wheat tortillas instead?
Yes, you can use whole wheat tortillas! They work great with this wrap. Whole wheat adds more fiber and nutrients. The flavor is slightly different, but still delicious. You can use any type of tortilla you enjoy. Just remember to fill them the same way!
This blog post covered tasty Chicken Caesar Wraps, detailing the key ingredients and simple steps. You learned how to customize your wraps and serve them fresh. Remember, you can explore different proteins and make vegetarian options as well. Storing these wraps properly ensures they stay delicious longer. Try new flavors to keep things interesting. Whether for a quick meal or lunch prep, these wraps are easy and fun! Enjoy making and sharing your creations.


. 1. Heat olive oil in a large skillet over medium heat. 2. Add finely chopped red onion to the skillet. 3. Sauté the onion for 2-3 minutes until it becomes soft. 4. Now, add diced red and green bell peppers to the skillet. 5. Cook for 3-4 minutes until the peppers soften. 6. Stir in corn kernels and black beans. 7. Season with ground cumin, smoked paprika, garlic powder, salt, and pepper. 8. Mix well and cook for 5 more minutes until hot. 1. Heat another skillet over medium heat. 2. Place a tortilla in the skillet and sprinkle ¼ cup of cheese on it. 3. Layer ½ cup of the veggie mixture over the cheese. 4. Top with another ¼ cup of cheese for extra flavor. 5. Fold the tortilla in half, covering the filling. 6. Cook for 3-4 minutes until golden brown on one side. 7. Flip the quesadilla gently using a spatula. 8. Cook for another 3-4 minutes until crispy and cheese melts. - Keep the heat at medium for a crispy texture. - Use a spatula to flip the quesadilla easily. - Check for doneness by ensuring both sides are golden brown. These simple steps make it easy to create loaded veggie quesadillas at home. For the full recipe, refer to the recipe section above. Enjoy the process! Choosing the right cheese is key. I love a mix of cheddar and mozzarella. This mix melts well and adds great flavor. You want the cheese to stretch and pull when you take a bite. Balancing spices and seasonings is also important. Start with the basics like salt and pepper. Then, add spices like cumin and smoked paprika. Adjust them to fit your taste. A little heat can come from red pepper flakes if you like it spicy. Day-to-day storage tips help keep your quesadillas fresh. Place leftovers in an airtight container. Keep them in the fridge for up to three days. You can also wrap them tightly in foil or plastic wrap. Reheating suggestions for best flavor include using the oven or skillet. For the oven, preheat to 350°F. Heat the quesadillas for about 10 minutes. In a skillet, cook them over medium heat. This method keeps them crispy and delicious. Plating ideas can make your meal pop. Arrange the quesadillas in a fan shape on a colorful plate. This makes them look fun and inviting. Adding colorful garnishes like fresh cilantro adds a nice touch. You can also sprinkle some diced tomatoes or avocado on top. These small changes make your meal look gourmet. Enjoy your loaded veggie quesadillas! For the full recipe, check out the Loaded Veggie Quesadillas 🥑 section. {{image_4}} You can make loaded veggie quesadillas even more fun. Here are some easy ideas. Want some extra protein? You can add grilled chicken or tofu. Just cook them first, then slice and add to your quesadilla mix. If you like seafood, try shrimp. Cook them quickly and toss them in for a tasty twist. Spices can change the game. Try different spices like chili powder or oregano. They add depth and warmth. You can also add sauces or marinades. A dash of hot sauce or a sprinkle of lime juice can elevate your quesadillas. Need gluten-free options? Use gluten-free tortillas. They work great and taste just as good. If you're vegan, swap out the cheese for a plant-based version. There are many tasty dairy-free cheeses out there that melt well. You can find the full recipe for loaded veggie quesadillas to get started on these variations. To keep your uncooked quesadillas fresh, wrap them tightly in plastic wrap. This keeps out moisture and air. You can also place them in an airtight container. If you want to freeze them, stack the quesadillas with parchment paper in between. This prevents them from sticking together. Uncooked quesadillas can stay in the freezer for up to three months. After cooking, let the quesadillas cool completely. Then, wrap them in foil or place them in a container. Store them in the fridge for up to four days. I find they taste best within the first two days. If you notice any odd smell or mold, it’s best to toss them. To reheat, use an oven or a skillet. For the oven, preheat to 350°F (175°C). Place the quesadilla on a baking sheet and heat for about 10 minutes. If using a skillet, add a little oil and heat over medium heat for about 3-4 minutes on each side. Leftover quesadillas can also become a fun breakfast. Chop them up and add them to scrambled eggs for a tasty twist. For more ideas, check out the Full Recipe. Making loaded veggie quesadillas is quick and easy. It takes about 10 minutes to prep. Cooking them takes around 15 minutes. In total, you can make them in about 25 minutes. This makes them a great choice for busy days or quick meals. Yes, you can prep loaded veggie quesadillas in advance. To do this, cook the veggie mixture and let it cool. Then, assemble the quesadillas but do not cook them. Store them in an airtight container in the fridge for up to two days. You can also freeze them for a month. When ready to eat, just cook them straight from the fridge or freezer. This makes meal prepping super easy! You can mix and match many veggies in quesadillas. Some great options include: - Spinach or kale for a green boost - Mushrooms for a savory taste - Zucchini or squash for extra texture - Jalapeños for a spicy kick - Tomatoes for freshness Feel free to get creative! Each veggie adds its own flavor and texture. You can make quesadillas that fit your taste perfectly. For more ideas, check out the Full Recipe. These loaded veggie quesadillas are fun and easy to make. We explored essential ingredients like black beans, bell peppers, and corn. I’ve shared tips for perfect texture, storing leftovers, and creative garnishes. Remember, you can customize them with protein or spices to suit your taste. In the end, these quesadillas are more than just food; they bring flavor and joy. Enjoy making them your own!](https://goldendishy.com/wp-content/uploads/2025/06/a7c52493-2108-4a2f-8f90-ee80e7df7b2a-768x768.webp)
![To make Cranberry Orange Energy Bites, you need the right mix of flavors and textures. Here’s what you will need: - 1 cup rolled oats - 1/2 cup almond butter - 1/4 cup honey or maple syrup - 1/2 cup dried cranberries, finely chopped - Zest of 1 medium orange - 1/4 cup freshly squeezed orange juice - 1/4 cup chia seeds - 1/2 teaspoon ground cinnamon - Pinch of sea salt - Optional: 1/4 cup chopped nuts or seeds These ingredients come together to create a tasty and healthy snack. The oats provide fiber and energy. Almond butter adds protein and a creamy texture. Honey or maple syrup gives a touch of sweetness, while dried cranberries add a chewy burst of flavor. The zest and juice of the orange brighten the bites, making them refreshing. Chia seeds add crunch and healthy omega-3s. You can also mix in nuts or seeds for extra texture. They can make your bites even more filling. You can find the full recipe for the perfect energy bites in the recipe section above. - Mixing the Base Ingredients Start by taking a large bowl. Add 1 cup of rolled oats, 1/2 cup of almond butter, and 1/4 cup of honey or maple syrup. Mix with a sturdy spoon until everything blends well. This base forms the heart of your energy bites. - Adding Flavorful Components Next, stir in 1/2 cup of finely chopped dried cranberries, the zest of 1 medium orange, and 1/4 cup of freshly squeezed orange juice. Also, add 1/4 cup of chia seeds, 1/2 teaspoon of ground cinnamon, and a pinch of sea salt. Keep mixing until you see a uniform color and texture. - Achieving the Right Texture Use your hands or a spatula to mix the ingredients thoroughly. You want a sticky but manageable consistency. If it feels too dry, add a bit more orange juice. If it’s too wet, sprinkle in extra oats until it feels just right. - Rolling Into Balls After you’ve mixed everything, cover the bowl with plastic wrap or a lid. Chill the mixture in the fridge for about 30 minutes. Once chilled, take portions and roll them into 1-inch balls. You should get about 15 to 20 bites. - Optional Coating with Nuts or Seeds For added crunch and flavor, roll some of the balls in chopped nuts or seeds. This step is optional, but it gives a nice touch to each bite. - Chilling the Mixture After rolling, arrange the energy bites on a plate. You can chill them for an extra 10 to 15 minutes to firm them up even more. This makes them easier to eat. - Presentation Tips For a pretty display, stack the energy bites or place them in a rustic jar. You can sprinkle some extra orange zest on top for color and aroma. Enjoy your tasty, nutritious snack! Check the [Full Recipe] for more details. - Best Practices for Freshness: Store energy bites in an airtight container. This keeps them moist and tasty. - Duration of Shelf Life: These bites last up to 1 week in the fridge. After that, they may dry out. - Freezing Energy Bites for Later Use: You can freeze these bites. Place them in a single layer on a tray. Once frozen, store them in a bag. They can last for up to 3 months. - Preparing in Bulk: Make a double batch! This way, you always have a quick snack ready. - Overmixing or Undermixing: Mix just enough to combine all ingredients. Too much mixing can make them tough. - Adjusting Consistency: If the mixture is too dry, add more juice. If too wet, mix in more oats. Always aim for a sticky but manageable mixture. For the full recipe, check out Cranberry Orange Energy Bites. {{image_4}} You can mix things up by adding different nuts. Walnuts, almonds, or pecans give a nice crunch. Just chop them finely and fold them into the mix. You can use about 1/4 cup of your choice. Incorporating other fruits can also change the flavor. Try using dried apricots, raisins, or figs. They add sweetness and texture. Just chop them to match the size of the cranberries. If you want a vegan option, swap honey for maple syrup. This keeps the bites sweet without using animal products. Almond butter is already vegan, so you’re set there! For gluten-free substitutions, choose certified gluten-free oats. Most oats are naturally gluten-free but can get cross-contaminated. Make sure to check the label. Using different nut butters can change the taste and texture. Peanut butter or cashew butter works great. Just use the same amount as almond butter. Adjusting crunchiness with seeds is another fun option. Add chia seeds or flaxseeds for some extra bite. You can also toss in sunflower seeds for a nut-free crunch. The cranberry orange energy bites are packed with nutrients. Each ingredient brings unique health benefits. - Rolled oats offer fiber, which helps digestion and keeps you full. - Almond butter is a great source of healthy fats and protein. - Dried cranberries add antioxidants that fight free radicals. - Chia seeds are rich in omega-3s and help with heart health. - Orange juice boosts your immune system with vitamin C. These bites provide energy and nutrients to fuel your day. They are perfect for a quick boost before a workout or during a busy afternoon. How many bites should you eat for a snack? I suggest two to three bites. This gives you enough energy without overdoing it. Each bite is satisfying. Dietary recommendations may vary. Listen to your body. If you feel hungry after two bites, enjoy another! Balance is key. Each bite contains about 70 calories. This makes it easy to track your snack intake. If you want fewer calories, consider adjusting the recipe. You can reduce the honey or use less nut butter. This way, you can fit these bites into your dietary goals without losing flavor. For more details, check the full recipe. Enjoy these tasty energy bites while staying mindful of your nutrition! Cranberry orange energy bites can last up to one week in the fridge. Store them in an airtight container to keep them fresh. If you want to keep them longer, you can freeze them. They can last up to three months in the freezer. Just thaw them in the fridge before enjoying. Yes, you can substitute almond butter with other nut butters. Peanut butter, cashew butter, or sunflower seed butter work well. Each will give a unique taste. Make sure to choose one that fits your dietary needs. You can use the mixture for various snacks. Try spreading it on toast or mixing it into yogurt. You can also make energy bars by pressing the mixture into a pan and slicing it. This way, you have more options for your snack. To make them sweeter, you can add more honey or maple syrup. You can also mix in some chocolate chips or dried fruits like dates. Adjust the sweetness based on your taste. This way, you can create a snack that you love. Yes, there are many alternatives for honey or maple syrup. You can use agave nectar, brown rice syrup, or coconut nectar. Each of these will add a different sweetness. Just make sure to adjust the amount based on how sweet you want your bites to be. For the full recipe, check out the recipe section above. These Cranberry Orange Energy Bites are simple to make and taste great. You mix healthy ingredients, shape them into bites, and enjoy a tasty snack. Remember to store them properly to keep them fresh. You can also tweak ingredients for your tastes or diet. With these tips and flavor ideas, you’ll enjoy these bites any time you need a quick boost. Get creative and make this snack your own!](https://goldendishy.com/wp-content/uploads/2025/06/5774e534-56b3-4e6d-8a48-215f930e3d22-768x768.webp)

