
Are you ready to elevate your snacking game? Crispy Air Fryer Chickpeas are not just delicious; they’re a healthy option packed with flavor. In this article, I’ll show you how to turn simple chickpeas into a crunchy, spice-filled treat. With just a few ingredients and easy steps, you can whip up a snack that will impress your friends and family. Let’s dive in and get cooking!
Ingredients
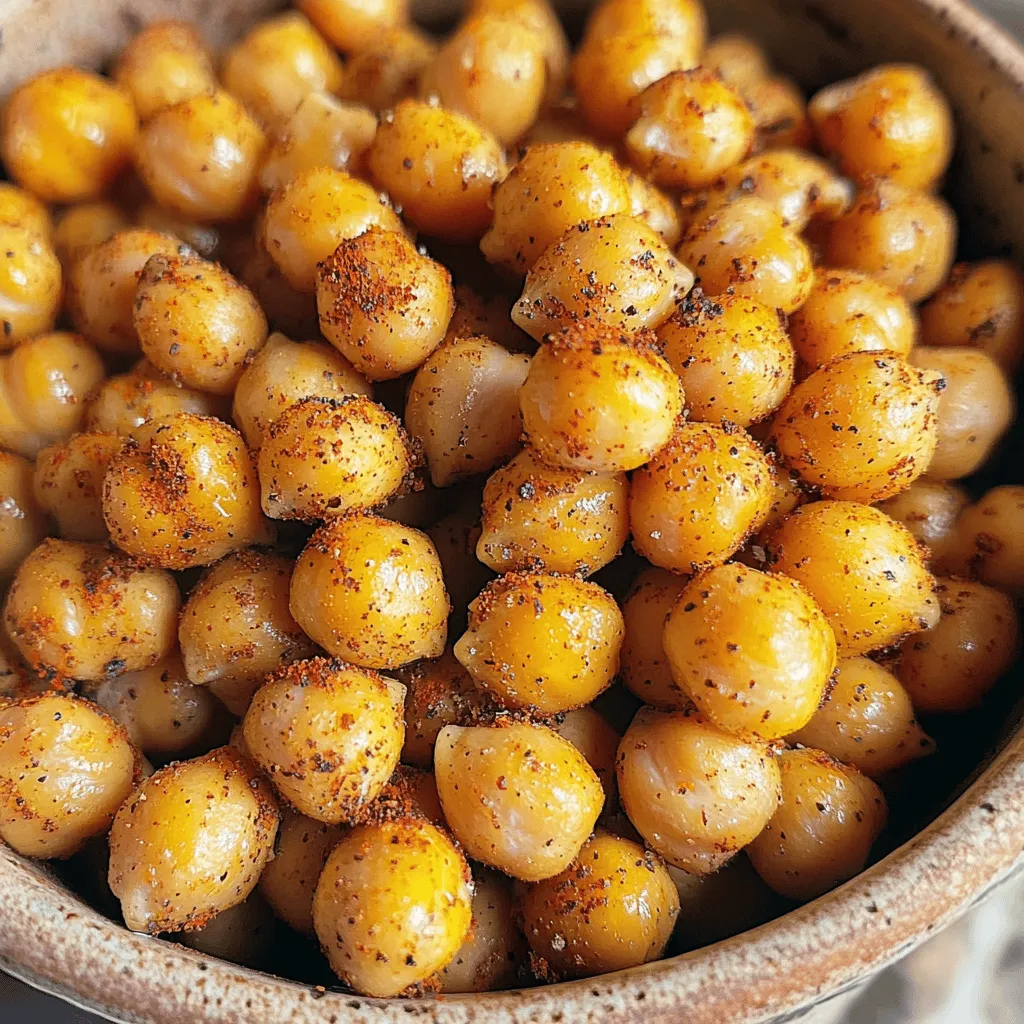
To make crispy air fryer chickpeas packed with flavorful spice, you need these simple ingredients:
– 1 can (15 oz) chickpeas, drained and rinsed
– 1 tablespoon olive oil
– 1 teaspoon garlic powder
– 1 teaspoon smoked paprika
– ½ teaspoon ground cumin
– ½ teaspoon chili powder
– Salt to taste
– Freshly cracked black pepper to taste
These ingredients come together to create a snack that’s not only tasty but also healthy. The chickpeas provide protein and fiber, while the spices bring in a burst of flavor.
When you pick your ingredients, try to choose high-quality spices. Fresh spices can make a big difference in taste. Using good olive oil will also enhance the flavor.
If you want to switch things up, feel free to experiment with other spices. You can add herbs or even a pinch of cayenne for heat.
Step-by-Step Instructions
Preheat the Air Fryer
First, set your air fryer to 400°F (200°C). Preheating helps cook your chickpeas evenly. This step is key for that perfect crunch.
Drying the Chickpeas
After draining and rinsing the chickpeas, dry them well. Use a clean towel or paper towels. The drier they are, the crispier they get. This is an important step that impacts texture.
Seasoning the Chickpeas
In a mixing bowl, add the dried chickpeas. Drizzle with olive oil and toss until they are coated. Next, sprinkle in the garlic powder, smoked paprika, ground cumin, chili powder, salt, and pepper. Mix until every chickpea is well-seasoned. This step adds lots of flavor.
Cooking the Chickpeas
Place the seasoned chickpeas in the air fryer basket. Spread them in a single layer. This allows them to cook evenly. Cook for 15-20 minutes, shaking the basket halfway through. Watch for them to turn golden brown and crispy.
Cooling and Adjusting Seasoning
After cooking, take out the chickpeas and let them cool for a few minutes. They will crisp up even more as they cool. Taste a few and adjust the seasoning if needed. You can add more salt or spices to suit your taste. Enjoy your crispy air fryer chickpeas as a tasty snack or salad topping.
Tips & Tricks
Achieving Maximum Crispiness
To make crispy air fryer chickpeas, you need to dry them well. After draining and rinsing, pat them dry with a towel. The drier your chickpeas, the crispier they will turn out. If they are wet, they will steam instead of crisp.
Spread the chickpeas out in the air fryer. This ensures even cooking and maximum crunch. If they are too close, they won’t get that golden finish.
Flavor Enhancements
Experimenting with spices can take your chickpeas to the next level. Try adding different spices to suit your taste. You can mix in herbs like oregano or thyme for a fresh twist.
For a zesty kick, squeeze some lemon juice on the chickpeas before serving. This adds brightness and enhances the flavors.
Cooking Times and Temperatures
Different air fryers may have slight variations in cooking time. I recommend cooking your chickpeas for about 15-20 minutes at 400°F (200°C). Check them halfway through and shake the basket for even cooking.
You’ll know your chickpeas are perfect when they are golden brown and crunchy. If they look pale, give them a few more minutes.
Variations
Flavorful Spice Mixes
You can change the flavor of your crispy air fryer chickpeas with different spice mixes. Here are a couple of my favorite ideas:
– Mediterranean Herb Blend: Use dried oregano, thyme, and rosemary. This mix adds a refreshing taste. It pairs well with salads or as a snack.
– Spicy Sriracha Chickpeas: Mix in some sriracha sauce. You can also add cayenne pepper for more heat. This option is perfect for those who love bold flavors.
Additional Ingredients
You can also add other ingredients for fun twists:
– Nuts & Seeds for a Mixed Snack: Toss in almonds, sunflower seeds, or pumpkin seeds. This adds crunch and healthy fats. You can roast them together with the chickpeas.
– Adding Cheese for a Savory Twist: Try adding grated Parmesan or feta cheese. Sprinkle it on right before serving for a delicious flavor boost.
Dietary Alternatives
If you have dietary needs, there are easy swaps:
– Gluten-Free Options: All the ingredients are naturally gluten-free. Just check your spice labels to ensure they are safe.
– Vegan & Vegetarian Substitutions: This recipe is already vegan! You can enjoy it without any changes. If you want a creamier dip, blend the chickpeas into a hummus-style dip.
These variations make crispy air fryer chickpeas fun and exciting. Get creative and find your favorite mix!
Storage Info
Best Practices for Storing Leftovers
To keep your crispy air fryer chickpeas fresh, store them in an airtight container. This helps maintain their crunch. Avoid using plastic bags, as they can trap moisture. Let the chickpeas cool down completely before sealing them. This ensures they stay crispy longer.
How to Reheat Crispy Chickpeas
If your chickpeas lose their crunch, you can easily revive them. Spread them on a baking sheet and reheat in the oven at 350°F (175°C) for about 5-10 minutes. You can also put them back in the air fryer for a few minutes. This method brings back the crunch without drying them out.
Shelf Life Tips
– Duration for Store in Air-Tight Containers: When stored properly, crispy chickpeas can last up to one week. Check for any signs of moisture or sogginess before eating.
– Tips for Long-Term Storage: For longer storage, freeze the chickpeas in a single layer on a baking sheet. Once frozen, transfer them to a freezer bag. They can last up to three months in the freezer. Just remember to reheat them straight from the freezer for best results.
Enjoy your flavorful crispy air fryer chickpeas even days later!
FAQs
How Long Does It Take to Make Crispy Air Fryer Chickpeas?
It takes about 30 minutes to make crispy air fryer chickpeas. You spend 10 minutes preparing the ingredients and 15-20 minutes cooking them. Preheating the air fryer takes just a few minutes, too. This quick process gives you a tasty snack or topping in no time!
Can I Use Dried Chickpeas Instead?
Yes, you can use dried chickpeas. However, you need to soak and cook them first. Soaking helps them soften, which makes them easier to cook. After soaking, cook them until they are tender. Then, follow the recipe just as you would with canned chickpeas.
What Other Dishes Can I Use Crispy Chickpeas In?
Crispy chickpeas are very versatile. You can add them to salads for crunch. They also work well on soups, giving a nice texture. Use them in grain bowls or as a snack. Try mixing them with nuts for a tasty trail mix!
Are Crispy Air Fryer Chickpeas Healthy?
Yes, crispy air fryer chickpeas are healthy! They are high in protein and fiber. Using olive oil adds healthy fats without too many calories. They are a great snack option compared to chips or cookies. You get flavor and crunch while staying healthy.
You’ve learned how to make crispy air fryer chickpeas. We covered each step, from drying to seasoning. You also discovered tips for maximizing crispiness and flavor. Remember to explore different spices and variations for more fun. Store leftovers in an air-tight container for freshness. These chickpeas make a healthy snack or topping. Enjoy experimenting in the kitchen with this easy recipe. Happy cooking!


