Chickpea Curry Flavorful and Easy Vegan Delight

Are you ready to whip up a dish that’s both simple and bursting with flavor? This Chickpea Curry is a delightful vegan treat that will impress everyone at your table. With just a few key ingredients and some easy steps, you can enjoy a meal that’s not only healthy but also packed with taste. Let’s dive into the heart of this recipe and discover how to create your own bowl of happiness!
Ingredients
Essential Ingredients for Chickpea Curry
To make a great chickpea curry, you need some key ingredients:
– 2 cups canned chickpeas, thoroughly rinsed and drained
– 1 medium onion, finely diced
– 3 cloves garlic, minced
– 1-inch piece of fresh ginger, finely grated
– 1 can (14 oz) full-fat coconut milk
– 2 tablespoons concentrated tomato paste
These ingredients form the base of our flavorful curry. The chickpeas provide protein and texture, while the coconut milk adds creaminess. The onion, garlic, and ginger create a fragrant and savory foundation.
Spices and Seasonings
Spices are the heart of any curry. For this dish, you will need:
– 1 teaspoon ground turmeric
– 1 teaspoon whole cumin seeds
– 1 teaspoon ground coriander
– 1 teaspoon garam masala
– 1 tablespoon extra virgin olive oil
– Salt and freshly cracked black pepper to taste
Turmeric gives a lovely golden color. Cumin seeds add warmth and depth. Garam masala brings a complex blend of flavors that elevates the dish.
Fresh Additions
Fresh ingredients make the curry vibrant. You should include:
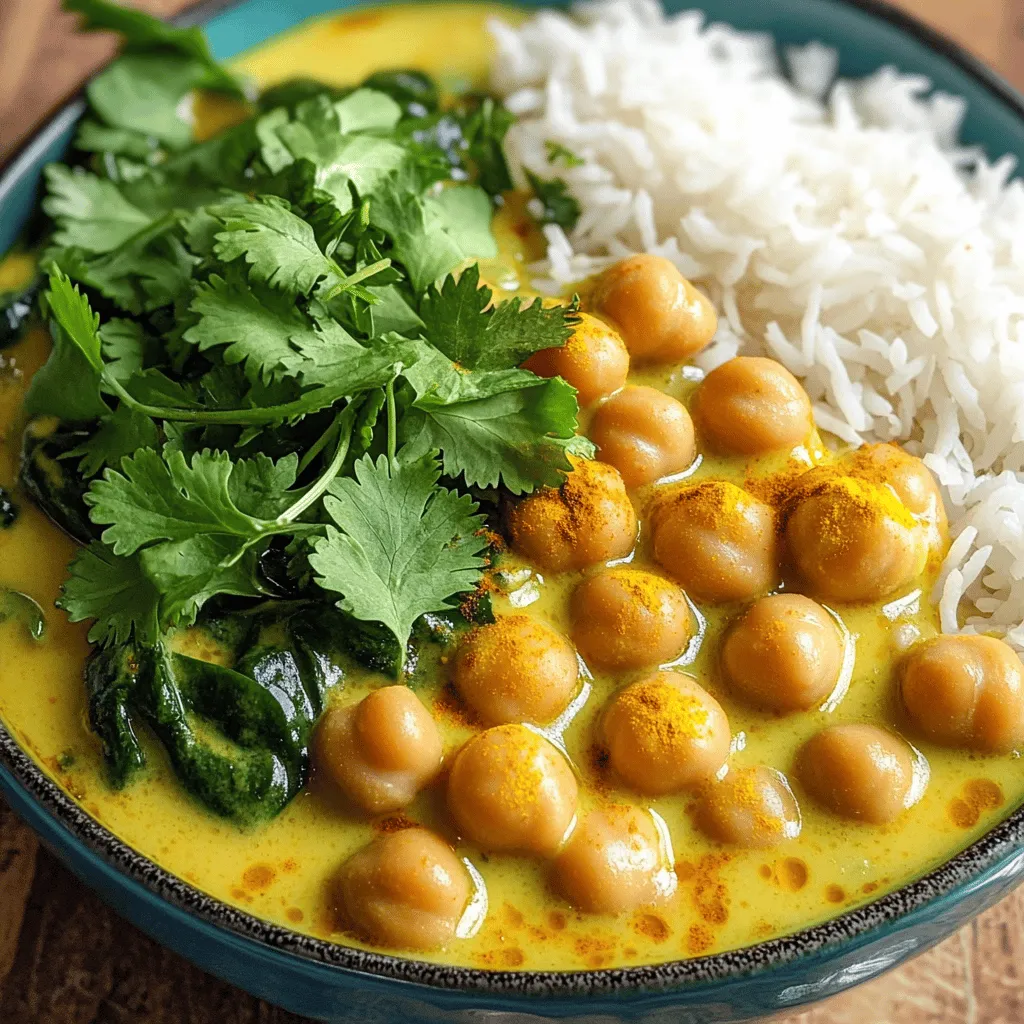
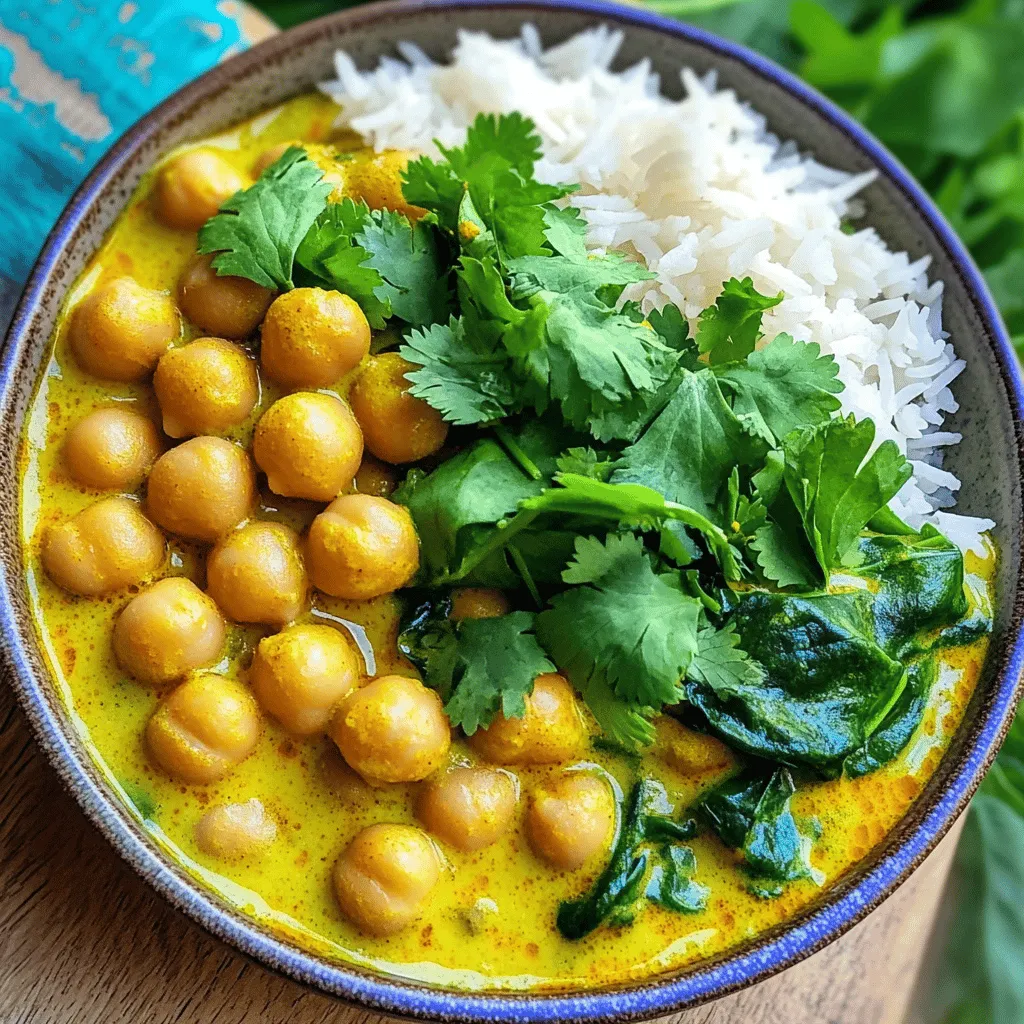
– 1 cup fresh spinach, roughly chopped
– Fresh cilantro leaves for garnish
– Suggested serving options: basmati rice or warm naan
Spinach adds a pop of green and nutrients. Cilantro enhances the flavor and makes it look pretty. Serve the curry with fluffy basmati rice or warm naan for a complete meal.
Step-by-Step Instructions
Preparing the Base
Heat olive oil in a large pot over medium heat. Add cumin seeds and sauté for 30 seconds. This step brings out their warm, nutty flavor. Next, add the finely diced onion. Stir it occasionally for about 5 to 7 minutes. You want the onions to be soft and translucent. Then, add minced garlic and grated ginger. Cook them together for 1 to 2 minutes, until they smell amazing.
Building Flavor
Now, stir in the ground turmeric, ground coriander, and tomato paste. Mix everything well and cook for about 2 minutes. This helps the spices bloom and creates a tasty base. After that, add the drained chickpeas and pour in the coconut milk. Stir gently to blend all the ingredients. Bring it to a gentle simmer, which lets the flavors combine beautifully.
Finishing Touches
Let the curry simmer for 15 to 20 minutes. This step allows all the flavors to meld together. After simmering, add the chopped spinach and garam masala. Stir the pot and cook for another 5 minutes. The spinach will wilt and turn a bright green. Taste the curry and adjust the seasoning with salt and pepper as needed. Serve this delicious chickpea bliss curry hot. For a complete meal, enjoy it with fluffy basmati rice or warm naan.
Tips & Tricks
Cooking Techniques
Sautéing adds depth to chickpea curry. It brings out the flavors of spices. When you heat olive oil, add cumin seeds first. This step wakes up their aroma. After that, add onion, garlic, and ginger. Cook until they are soft and fragrant. Boiling does not give the same rich taste, so avoid it.
Simmering time is key. Once you mix in the coconut milk and chickpeas, let it sit. Simmer for at least 15 minutes. This time helps flavors blend perfectly. The longer you simmer, the better it gets. Just keep an eye on it to avoid burning.
Timing and Temperature
Cook chickpea curry over medium heat. This helps all ingredients cook evenly. If you turn the heat too high, some parts may burn. If you use different fresh veggies, adjust the cook time. For example, bell peppers may need less time than spinach. Just keep tasting to find the right balance.
Serving Suggestions
Pair your chickpea curry with rice or naan. Both options soak up the rich sauce. This makes every bite a delight. For a nice touch, serve the curry in a big bowl. Show off the bright colors of the dish. Add a sprig of cilantro on top for flavor and looks. This makes your meal feel special and inviting.

Variations
Dietary Modifications
You can easily make chickpea curry vegan. The recipe is already plant-based. Use coconut milk for creaminess. For gluten-free options, enjoy this dish with rice or gluten-free naan. Check labels on any packaged items to ensure they are gluten-free.
Flavor Enhancements
You can boost flavor by adding different veggies. Try bell peppers or sweet carrots. They add color and texture. You can also mix in some leafy greens like kale for added nutrition. Want more spice? Add chili powder or paprika for heat. A pinch of smoked paprika can add depth.
Alternate Cooking Methods
You can make chickpea curry in different ways. An Instant Pot cooks it fast and keeps flavors strong. Just set it to pressure cook for about 10 minutes. On the stovetop, simmer for deeper flavor. You can also use a slow cooker. This method allows flavors to develop slowly over 4-6 hours. It’s great for meal prep.
Storage Info
Proper Storage Techniques
To keep your chickpea curry fresh, store leftovers in the refrigerator. Use an airtight container. This helps maintain its flavor and texture. Your curry can stay good for about 3 to 5 days in the fridge.
If you want to save it for longer, freezing is a great option. Let the curry cool completely before you freeze it. Then, place it in a freezer-safe container. It can last up to three months in the freezer without losing its taste.
Reheating Guidelines
When you’re ready to eat, reheating properly matters. The best way is to warm it on the stove. Pour the curry into a pot and heat it on low. Stir it often to avoid burning. This method keeps the flavors intact.
If you’re in a hurry, you can use the microwave. Just place your curry in a safe bowl. Cover it loosely and heat for about 1 to 2 minutes. Stir halfway through to heat evenly. Adjust time based on your microwave’s power.
Shelf Life
Chickpea curry can last in the fridge for 3 to 5 days. Always check for signs of spoilage. If it smells off or has a strange color, it’s best to throw it away.
When stored correctly, frozen chickpea curry can last up to three months. However, the longer it stays frozen, the more it may lose flavor. Always label your containers with the date for easy tracking.
FAQs
What are the health benefits of chickpea curry?
Chickpeas are packed with protein and fiber. This makes them great for your health. They help keep you full and satisfied. Plus, chickpeas support digestion and heart health. Coconut milk adds healthy fats, too. It gives the curry a creamy texture. Spices like turmeric have anti-inflammatory properties. They can help boost your immune system. With each bite, you nourish your body while enjoying a tasty meal.
Can I make chickpea curry spicy?
Yes, you can easily make chickpea curry spicy. Start by adding more spices like cayenne pepper. You can also use fresh chili peppers. Adjust the amount to match your heat level. If you like it mild, add spices slowly. Taste as you go to find the right balance. You can even serve hot sauce on the side for extra kick.
What to serve with chickpea curry?
Chickpea curry pairs well with many side dishes. Cooked basmati rice is a classic choice. It soaks up the sauce and adds texture. Warm naan is also a great option. You can use it to scoop up the curry. In some cultures, serving yogurt adds a cool contrast. A simple salad can refresh your palate, too. These pairings enhance your meal and connect with tradition. Enjoy your chickpea curry with friends and family!
Chickpea curry offers rich flavors and nutrition through simple ingredients. This dish shines with spices, coconut milk, and fresh veggies. You can adjust spices for heat or add new flavors. Proper storage keeps it fresh for later meals. With these tips, you can enjoy a tasty, healthy dish any day. Explore variations and make it your own. Dive into chickpea curry and savor every bite!


![To make maple glazed butternut squash, you’ll need the following items: - 1 medium butternut squash, peeled and cut into 1-inch cubes - 3 tablespoons pure maple syrup - 2 tablespoons extra virgin olive oil - 1 teaspoon ground cinnamon - 1/2 teaspoon freshly grated nutmeg - 1/4 teaspoon cayenne pepper (optional, for a kick) - Sea salt and freshly cracked black pepper, to taste - 1/4 cup pecans, roughly chopped (for garnish) - Fresh parsley, finely chopped (for garnish) When cooking, measuring accurately is key. Use dry measuring cups for solid items like squash and nuts. For liquids, use a liquid measuring cup. Always level off dry ingredients with a straight edge. This step ensures you get the right amount for best results. You can swap ingredients based on your needs. If you prefer a sweeter taste, try honey instead of maple syrup. For a nut-free option, skip the pecans or use seeds like pumpkin seeds. Always check for allergies, especially with nuts and spices. To make maple glazed butternut squash, start by gathering your ingredients. You'll need: - 1 medium butternut squash, peeled and cut into 1-inch cubes - 3 tablespoons pure maple syrup - 2 tablespoons extra virgin olive oil - 1 teaspoon ground cinnamon - 1/2 teaspoon freshly grated nutmeg - 1/4 teaspoon cayenne pepper (optional) - Sea salt and freshly cracked black pepper, to taste - 1/4 cup pecans, roughly chopped (for garnish) - Fresh parsley, finely chopped (for garnish) First, preheat your oven to 400°F (200°C). This step is key for good roasting. Next, peel and cube the butternut squash. Place the cubes in a large bowl. Drizzle the olive oil and maple syrup over the squash. Then, sprinkle the ground cinnamon, nutmeg, cayenne, sea salt, and black pepper. Toss gently until all the pieces are well coated. Now, it's time to roast your squash. Line a baking sheet with parchment paper. This helps prevent sticking and makes cleanup easy. Spread the coated squash in a single layer on the sheet. Place the baking sheet in the oven. Roast the squash for 25-30 minutes. About halfway through the cooking time, stir the squash. This ensures all sides caramelize and cook evenly. When the squash is fork-tender and has a nice golden color, it's done. Remove it from the oven and let it cool for 2-3 minutes. To get that perfect caramelization, watch your cooking time closely. Stirring halfway through helps. The key is to spread the squash out evenly. If it's too crowded, it will steam instead of roast. You can also adjust the maple syrup for sweetness. A little extra can help with caramelization. If you like a kick, add the cayenne pepper. It balances the sweet and savory flavors beautifully. Once cooked, transfer the squash to a serving dish. Top with chopped pecans and parsley for a fresh touch. This dish is sure to impress! For the complete recipe, check out the [Full Recipe]. When making maple glazed butternut squash, avoid cutting the squash too small. Smaller pieces cook too fast and can burn. Also, don’t skip the olive oil. It helps the squash caramelize and adds flavor. Overcrowding the baking sheet is another mistake. Leave space between the cubes to ensure even cooking. To boost the flavor, add a splash of balsamic vinegar before roasting. This adds depth to the sweetness. Try different spices, too. A pinch of smoked paprika can give a nice twist. For a savory touch, mix in garlic powder or fresh garlic. These will elevate your dish. Use a sturdy baking sheet lined with parchment paper. This helps with easy cleanup and prevents sticking. A large mixing bowl is great for tossing the squash and spices. If you have one, a vegetable peeler makes peeling the squash quick and easy. For a perfect roast, an oven thermometer ensures your oven is at the right temperature. For the full recipe, refer to the above instructions. {{image_4}} You can make this dish even better by adding other veggies. Try sweet potatoes for a richer flavor. Carrots add sweetness and color, while red onions bring a slight bite. Just cut them into similar sizes as the squash. Toss them in the same maple glaze for a yummy blend. You’ll create a colorful and flavorful dish that everyone will love. Want to change the taste? You can use different spices. Try ginger for a warm kick. If you like it spicy, add more cayenne pepper. You can also use smoked paprika for a smoky flavor. Experiment with herbs like thyme or rosemary. Just remember to keep it balanced, so no single flavor overpowers the dish. This recipe is naturally vegan and gluten-free. You can enjoy it without worry. If you want to add protein, try chickpeas. They pair well with the flavors and add a nice crunch. For those who need low-carb options, skip the maple syrup and use a sugar substitute. It’s easy to adapt this dish to fit your needs. For the full recipe, check out the detailed instructions above. To keep your maple glazed butternut squash fresh, store it in an airtight container. Let the squash cool down after cooking. Then, place it in the fridge. It will stay fresh for about 3 to 5 days. If you want to keep it longer, consider freezing. Reheat your butternut squash in the oven for the best results. Preheat your oven to 350°F (175°C). Spread the squash on a baking sheet. Heat it for about 10-15 minutes or until warm. You can also use the microwave. Place it in a microwave-safe dish and cover it. Heat in short bursts, checking to avoid overcooking. Freezing is a great way to save this dish for later. First, let the squash cool completely. Then, spread it on a baking sheet in a single layer. Freeze it for about 1-2 hours until firm. Once frozen, transfer the squash to a freezer-safe bag or container. It can last for up to 3 months in the freezer. When ready to eat, thaw overnight in the fridge before reheating. For more details, check the Full Recipe. Yes, you can prepare this dish ahead of time. Cook the butternut squash and let it cool. Store it in an airtight container in the fridge. You can make it up to two days in advance. When you're ready to eat, just reheat it in the oven or microwave. This makes it great for meal prep. Maple glazed butternut squash lasts about 3 to 5 days in the fridge. Make sure it’s in a sealed container. Check for any signs of spoilage before eating. If it looks or smells off, it’s best to toss it. Freshness is key for enjoying this tasty dish. You can pair this dish with many foods. It goes well with roasted chicken or turkey. You can also serve it with quinoa or brown rice for a healthy meal. For a vegetarian option, pair it with a bean salad. The sweet and savory flavors work well with many sides. For more details on how to whip up this incredible dish, check out the Full Recipe. This guide walked you through each step of making Maple Glazed Butternut Squash. We covered ingredients, how to prepare, cook, and store your dish. I shared tips to avoid mistakes and ideas for adding your own twist. Remember, the key to perfect caramelization is patience. Enjoy experimenting with flavors and variations. This dish can be a crowd-pleaser and is easy to adapt. I hope you feel ready to try it out. Enjoy your cooking!](https://goldendishy.com/wp-content/uploads/2025/07/e9e7eb41-1a1b-4d7a-9d20-35ffe8b1aa92-768x768.webp)


![For perfect Greek lemon potatoes, gather these simple ingredients: - 2 pounds baby potatoes, halved - 1 cup chicken or vegetable broth - 2 tablespoons extra virgin olive oil - 3 tablespoons freshly squeezed lemon juice - 2 teaspoons fresh lemon zest - 4 cloves garlic, minced - 1 tablespoon dried oregano - Sea salt and freshly cracked pepper to taste - Fresh parsley, chopped (for garnish) You can swap baby potatoes for Yukon Gold or red potatoes. Both work well and add great taste. If you want a vegan option, use vegetable broth instead of chicken broth. Fresh lemon juice is best, but bottled works in a pinch. You can add fresh herbs like thyme or rosemary to change the flavor. For a spicy kick, consider a pinch of red pepper flakes. Using high-quality ingredients makes a big difference. Fresh potatoes give the best texture and flavor. Extra virgin olive oil adds richness. Fresh lemon juice and zest brighten the dish. Quality broth enhances the taste. When you use good ingredients, you create an authentic Greek experience. They help your dish shine and make every bite delicious. Check out the Full Recipe for more tips and tricks on how to make these zesty potatoes. To make Greek lemon potatoes, start by gathering your ingredients. You need baby potatoes, broth, olive oil, fresh lemon juice, lemon zest, garlic, oregano, salt, and pepper. 1. Preheat the oven to 425°F (220°C). This heat helps the potatoes become crispy. 2. Halve the baby potatoes. This allows them to soak up all the flavors. 3. In a large bowl, mix the broth, olive oil, lemon juice, lemon zest, garlic, oregano, salt, and pepper. Stir well to combine. 4. Add the halved potatoes to the bowl. Toss them until they are fully coated with the mixture. Once your potatoes are ready, it’s time to roast them. 1. Pour the potato mix into a roasting pan. Spread the potatoes out in a single layer. This step ensures they cook evenly. 2. Roast in the oven for about 30-35 minutes. Check for a golden brown color and fork-tender texture. 3. Stir the potatoes halfway through roasting. This helps them absorb more flavors and become crispy all around. Sometimes things don’t go as planned. Here are some tips to help. - If your potatoes are not browning, increase the oven temperature by 25°F. This can help them crisp up. - If they seem too dry, add a splash more broth. This will keep them moist and flavorful. - If they are not tender after 35 minutes, roast them a bit longer. Just keep an eye on them to prevent burning. For a full recipe, refer to the [Full Recipe]. Enjoy the deliciousness of Greek lemon potatoes! To boost the taste of Greek lemon potatoes, use fresh ingredients. Fresh garlic and herbs add a lot of flavor. When using oregano, choose dried or fresh based on what you have. For a zingy kick, try adding a pinch of red pepper flakes. This little touch makes a big difference. You can also let the potatoes marinate in the broth mixture for an hour before cooking. This extra time helps the flavors soak in deeply. To get potatoes that are both soft and crispy, cut them evenly. Halving the baby potatoes helps ensure they cook at the same rate. Use a hot oven, around 425°F (220°C). The high heat helps the outside crisp up while keeping the inside tender. Halfway through cooking, give the potatoes a good stir. This helps them brown evenly. If you want extra crispiness, broil them for the last 2-3 minutes. Just keep an eye on them to avoid burning. Prep the ingredients ahead of time to save effort later. You can wash and cut the potatoes a day before. Store them in water in the fridge to keep them fresh. You can also mix the broth and seasonings ahead. Just combine everything in a bowl and cover it. When you are ready to cook, simply combine the potatoes with the mixture. This makes dinner quick and easy. For even faster meals, consider roasting a larger batch. Leftovers taste great and can be enjoyed in many ways. For the full recipe, check out the complete cooking guide for Greek lemon potatoes. {{image_4}} You can easily make Greek lemon potatoes vegan. Just swap chicken broth for vegetable broth. This change keeps the rich flavor intact. Make sure your broth is gluten-free if needed. You can use any vegetable broth you like. This way, everyone can enjoy this dish! Feel free to mix up the flavors! Add fresh herbs like thyme or rosemary. These herbs give a nice twist. You can also try spices like paprika or cumin for heat. For a creamier taste, sprinkle some feta cheese on top before serving. You can even toss in some olives for a salty kick. Each of these options makes the dish unique! Greek lemon potatoes shine as a side dish. Pair them with grilled chicken or fish for a full meal. They also go well with a fresh salad or tzatziki sauce. If you want to make it special, serve with warm pita bread. These potatoes are great for any gathering. They will impress your guests, and they are easy to share. For the full recipe, check out the Full Recipe link above. To keep your Greek Lemon Potatoes fresh, let them cool first. Then, place them in an airtight container. You can also cover them tightly with plastic wrap. Store them in the fridge for up to three days. This method helps keep their flavor and texture. When reheating, use the oven for the best taste. Preheat your oven to 350°F (175°C). Spread the potatoes on a baking sheet. Heat them for about 15 to 20 minutes. This way, they will regain their crispiness. If you’re in a hurry, you can use the microwave. Just heat them in 30-second bursts, but they may not be as crispy. Greek Lemon Potatoes stay good in the fridge for three days. If you want to keep them longer, you can freeze them. Place the cooled potatoes in a freezer-safe bag. They can last up to three months in the freezer. When ready to eat, thaw them in the fridge overnight. Then, reheat them as mentioned above. Greek Lemon Potatoes are a delicious side dish. They are made with baby potatoes, lemon juice, and herbs. The dish is known for its bright, zesty flavor. The potatoes become tender and crisp when roasted. You can enjoy them with grilled meats or fish. They add a refreshing touch to any meal. You can prepare Greek Lemon Potatoes ahead of time. First, follow the recipe up to the roasting step. After mixing the ingredients, cover the dish and store it in the fridge. This way, the flavors will blend. When you're ready to cook, just preheat your oven and roast them. You may need to add a few extra minutes to the cooking time. Yes, you can use other potatoes like Yukon Gold or red potatoes. These types work well due to their creamy texture. Just remember to cut them into similar sizes. This helps them cook evenly. Each potato type will offer a slightly different taste and texture. Feel free to experiment with your favorites! Greek Lemon Potatoes are a delightful dish that you can easily make. You learned the key ingredients that make them special, and tips for the best flavor. Following the step-by-step guide ensures perfect roasting every time. You also discovered tasty variations for different diets and ways to store leftovers. In closing, use fresh ingredients and don't rush the cooking process. Enjoy this dish with friends and family. Each bite will showcase Greek flavors. Happy cooking!](https://goldendishy.com/wp-content/uploads/2025/07/055e8462-33de-483e-a53c-599291ba0dde-768x768.webp)
