Skip to content
About
Contact
Cookie Policy
Copyright Policy
Disclaimer
Search
Home
Dinner
Appetizer
Desserts
Drinks
About
Contact
Privacy Policy
Toggle Menu
Home
/
Dinner
- Page 18
Dinner
Chicken Zoodle Soup Comforting and Hearty Bowl
Sausage and Veggie Skillet Tasty and Quick Meal
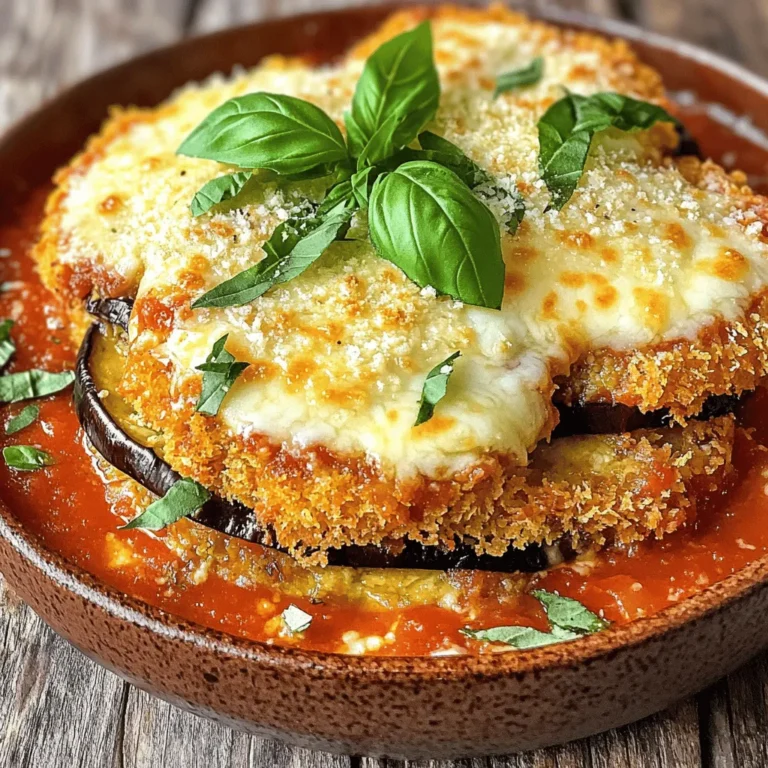
Baked Eggplant Parmesan Flavorful and Easy Recipe
Cheesy Cauliflower Bake Tasty and Simple Recipe
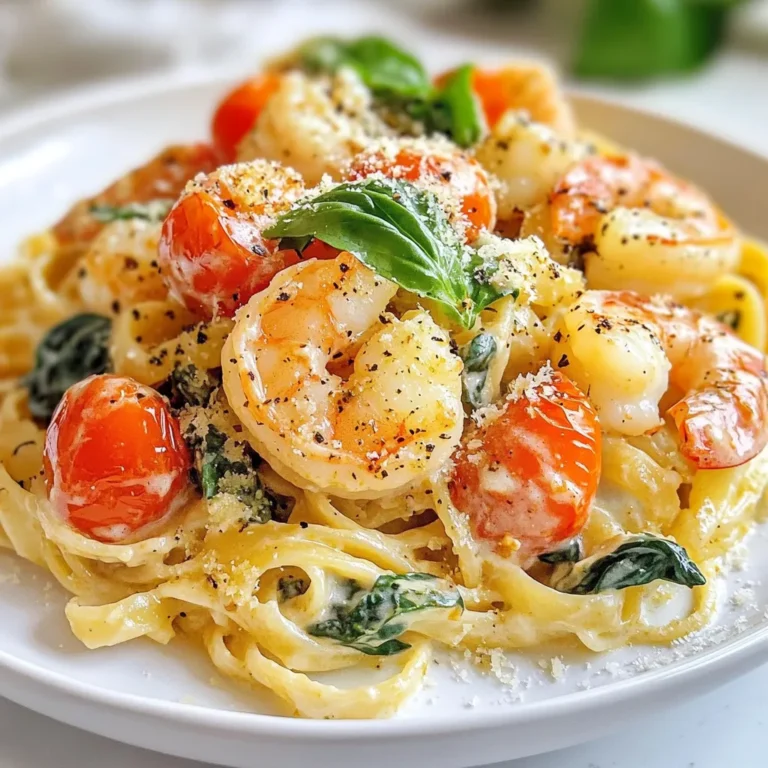
Creamy Tuscan Shrimp Linguine Delightful and Easy Meal
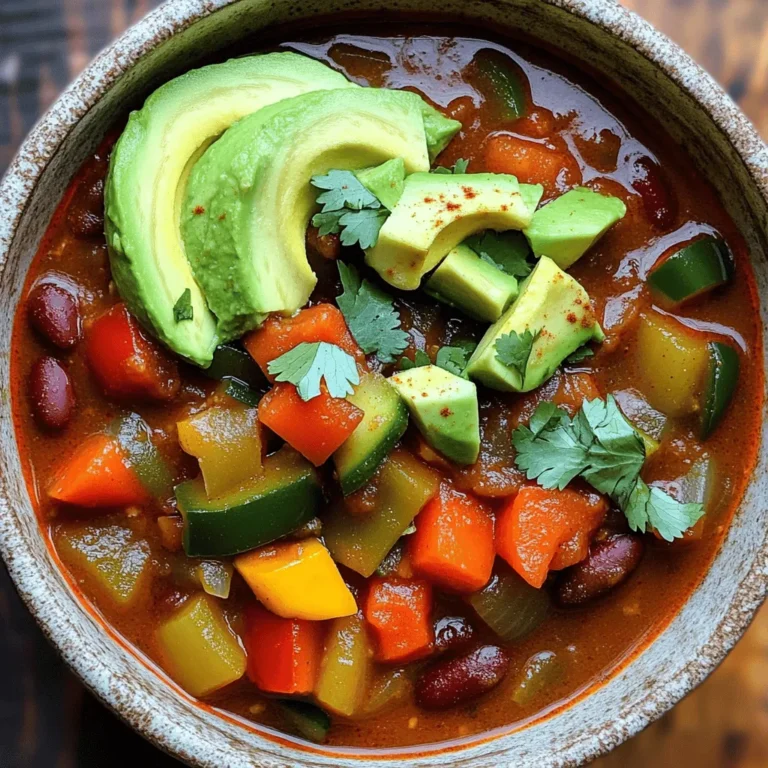
Vegan Chili Delight Packed with Flavorful Ingredients
Greek Lemon Chicken Soup Comforting and Simple Recipe
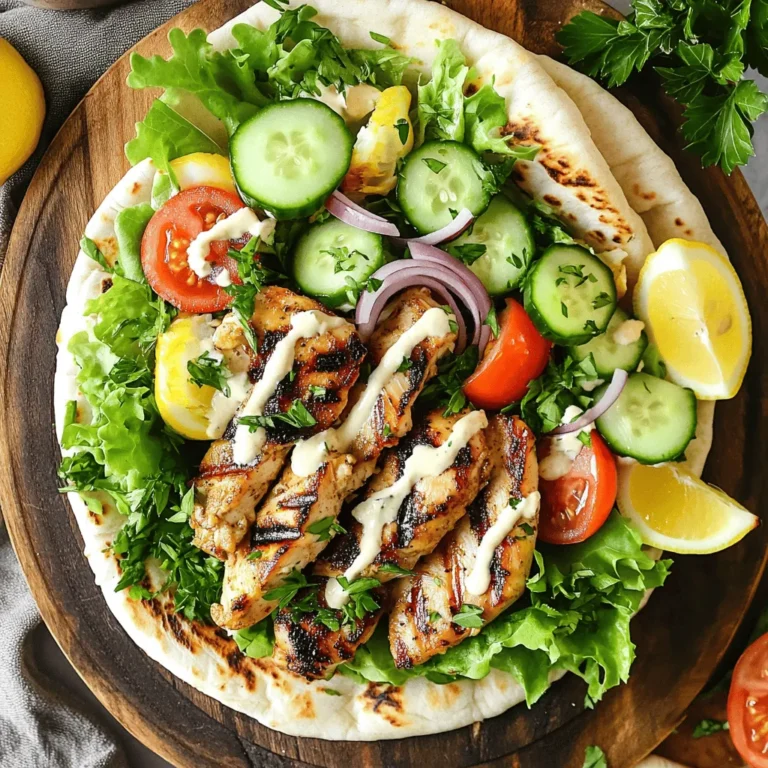
Easy Chicken Shawarma Flavorful and Simple Recipe
Spicy Chickpea Buddha Bowl Healthy and Flavorful Meal
Cheesy Cauliflower Bake Creamy and Delicious Treat
Page navigation
Previous Page
Previous
1
…
16
17
18
19
20
…
30
Next Page
Next
Home
Dinner
Appetizer
Desserts
Drinks
About
Contact
Privacy Policy
Toggle Menu Close
Search for:
Search

![To make a tasty Chicken Zoodle Soup, gather these fresh ingredients: - 2 medium zucchinis, spiralized into noodles (zoodles) - 1 pound boneless, skinless chicken breast, diced into bite-sized pieces - 4 cups low-sodium chicken broth - 1 medium onion, finely chopped - 2 cloves garlic, minced - 2 medium carrots, peeled and sliced into thin rounds - 1 celery stalk, diced into small pieces - 1 teaspoon dried thyme - 1 teaspoon dried oregano - 1 tablespoon extra virgin olive oil - Salt and freshly ground black pepper to taste - Fresh parsley, finely chopped (for garnish) You can also add optional toppings like grated cheese or a squeeze of lemon for extra flavor. Using fresh herbs adds a bright touch to your bowl. Each ingredient plays a role, from the chicken's protein to the zoodles' crunch. For the full recipe, check out the detailed steps to create this comforting dish. To make Chicken Zoodle Soup, start by preparing your zoodles. You can use a spiralizer to turn the zucchinis into long, thin noodles. If you don’t have a spiralizer, a vegetable peeler works too. Just slice the zucchini into thin strips. Next, chop your vegetables. Finely chop the onion and mince the garlic. Peel the carrots and slice them into thin rounds. Finally, dice the celery into small pieces. This will help the veggies cook evenly. Now, it’s time to cook the chicken and vegetables. In a large pot, heat one tablespoon of extra virgin olive oil over medium heat. When hot, add the chopped onion and minced garlic. Stir for about 2 minutes until they smell great. Then, add the sliced carrots and diced celery. Cook for 5 to 7 minutes until they soften. After the veggies soften, add the diced chicken to the pot. Sprinkle in one teaspoon each of dried thyme and oregano, along with salt and pepper to taste. Cook for another 5 to 7 minutes until the chicken is no longer pink. Then, pour in the low-sodium chicken broth. Turn the heat up to bring it to a boil. Once it boils, lower the heat and let it simmer for about 10 minutes. This allows all the flavors to blend well. Now comes the fun part! When your soup has simmered, it’s time to add the zoodles. Stir them into the broth and cook for an additional 3 to 5 minutes. You want them tender but still a bit firm, so check them often. After cooking, taste the soup. If it needs more flavor, add more salt or pepper to your liking. Finally, ladle the hot soup into bowls. Use fresh parsley to garnish each bowl for a pop of color. This step adds a fresh touch to your comforting meal. For the full recipe, make sure to check out the complete instructions. Enjoy your delicious Chicken Zoodle Soup! - How to make the best zoodles Start with firm zucchinis. Use a spiralizer to cut them into thin noodles. This gives the best texture. Avoid wet zucchinis; they can turn soggy. If needed, salt the zoodles and let them sit for 15 minutes to draw out moisture. Rinse and pat them dry before cooking. - Perfecting the soup flavor Use low-sodium chicken broth for a balanced taste. Fresh herbs like thyme and oregano add depth. Sauté your onions and garlic well to build a strong base flavor. Taste the soup as it cooks, adjusting salt and pepper for the perfect bite. - Avoiding mushy zucchini noodles Add zoodles towards the end of cooking. They only need 3 to 5 minutes to soften. Overcooking makes them mushy and less appealing. Keep them slightly firm for the best texture in your soup. - Ideal serving dishes Use warm, deep bowls to enhance the cozy feel of your soup. The depth keeps the soup hot longer. If you like, serve with a side of crusty bread or a light salad. - Accompaniments like bread or salad Crusty bread pairs well with this soup. It’s perfect for dipping. A fresh side salad can add crunch and flavor to your meal. Choose greens like spinach or arugula for a nice contrast. - Garnishing techniques for presentation Finish your soup with a sprinkle of fresh parsley. This adds color and freshness. A slice of lemon on the side can brighten the flavors, too. For a fun twist, add a few chili flakes for heat. For the complete method, check out the Full Recipe. {{image_4}} You can switch up the chicken for many options. Try turkey, tofu, or chickpeas for a plant-based meal. Each brings its own taste and texture to the soup. For those who want low-carb or dairy-free options, use vegetable broth instead of chicken broth. You can also replace the chicken with cauliflower or mushrooms. These choices keep the soup hearty and tasty. Want to add more veggies? Toss in spinach, bell peppers, or green beans. They add color and crunch to your bowl. To add spice and kick, consider cayenne pepper or red pepper flakes. Just a pinch can warm up your soup without being too hot. Herbs can change the flavor based on the season. In winter, use rosemary or sage. In summer, fresh basil and cilantro brighten the dish. You can also incorporate noodles or pasta for a different twist. Whole wheat pasta or rice noodles work well. They make the soup even more filling. For the full recipe, check out the details above. Enjoy experimenting with your Chicken Zoodle Soup! To keep your Chicken Zoodle Soup fresh, store it in the fridge. Use an airtight container. Make sure the soup cools first. This helps prevent condensation. You can freeze the soup if you want to store it longer. Use freezer-safe bags or containers. Leave some space at the top for expansion. To reheat, warm it on the stove over low heat. Stir often to avoid burning. You can also use the microwave. Heat in short bursts, stirring in between. In the fridge, your soup lasts about three to four days. If you freeze it, it can last up to three months. Just remember to label the containers with the date. Look for signs of spoilage. If the soup smells sour or has mold, it’s time to toss it. Always trust your senses; they guide you well. What are zoodles and how can they be made? Zoodles are zucchini noodles. You can make them by spiralizing zucchinis. Use a spiralizer or a peeler for thin strips. They are a great, low-carb alternative to pasta. Can I make Chicken Zoodle Soup ahead of time? Yes, you can make the soup ahead. Store it in the fridge for up to three days. Just add the zoodles when you're ready to eat. This keeps them fresh and firm. How do I prevent zoodles from becoming soggy? To keep zoodles from getting soggy, add them at the end of cooking. Only cook them for a few minutes. This way, they stay crisp and tasty. Can I use rotisserie chicken for this recipe? Absolutely! Rotisserie chicken saves time. Just shred or cube the chicken and add it to the soup. It adds a nice flavor boost, too. Is it possible to make this in a slow cooker? Yes, you can use a slow cooker. Cook the chicken and veggies on low for 4-6 hours. Add zoodles in the last 15 minutes to keep them tender. How do I make the soup gluten-free? To make the soup gluten-free, use gluten-free chicken broth. Ensure all added spices are also gluten-free. This way, everyone can enjoy your delicious Chicken Zoodle Soup. For a full recipe, check out the [Full Recipe]. You now have a clear guide to making Chicken Zoodle Soup. We covered the key ingredients, preparation steps, and cooking instructions. I shared useful tips to keep your zoodles from turning mushy and ways to enhance the flavor. Remember, you can customize your soup with ingredient swaps to fit your needs. Store leftovers properly to enjoy later. Cooking doesn’t have to be complicated. Experiment and have fun with this recipe. Your kitchen can be a place of creativity and health. Enjoy your tasty, homemade soup!](https://goldendishy.com/wp-content/uploads/2025/06/e4db2e18-4a3d-4a81-8032-e96fb997d624-768x768.webp)


![- 1 pound boneless, skinless chicken breasts - 6 cups low-sodium chicken broth - 1 medium onion, finely chopped - 2 cloves garlic, minced - 2 medium carrots, diced - 2 stalks celery, diced - 1 cup orzo pasta - 3 large eggs - 1/2 cup freshly squeezed lemon juice (about 2-3 lemons) This soup starts with tender chicken. I prefer boneless, skinless chicken breasts. They cook fast and stay juicy. Next, low-sodium chicken broth gives the soup its rich base. Fresh veggies add flavor and nutrition. Onion, garlic, carrots, and celery create a perfect mix. I chop them finely for even cooking. Orzo pasta makes the soup filling. It cooks well in the broth, soaking up all the flavors. To achieve that creamy texture, I use eggs and lemon juice. The eggs blend with the broth, creating a silky finish. Fresh lemon juice brightens the soup, making every bite refreshing. - 1 teaspoon dried oregano - 1 teaspoon sea salt - 1/2 teaspoon freshly ground black pepper - 2 tablespoons extra-virgin olive oil Seasoning is key in this recipe. Dried oregano adds a hint of earthiness. Sea salt and black pepper enhance the natural flavors. I always choose extra-virgin olive oil for sautéing. It has a wonderful taste and is healthy too. - Fresh parsley, finely chopped - Lemon wedges for serving Garnishes make a dish special. Fresh parsley adds color and freshness. I sprinkle it on top before serving. Lemon wedges are great for those who want extra zing. They brighten the dish and add a punch of flavor. For the full recipe, check out the Mediterranean Lemon Chicken Orzo Soup! It’s a perfect guide to make this comforting dish. Start by chopping the vegetables. You will need to dice the onion, carrots, and celery. Next, shred the cooked chicken. This can be done easily with two forks. For the egg mixture, whisk together the eggs and lemon juice in a medium bowl. Make sure they blend well. In a large pot, heat two tablespoons of olive oil over medium heat. Once hot, add the chopped onion, diced carrots, and celery. Sauté these vegetables for about 5 to 7 minutes. They should become tender and fragrant. Now, stir in two minced garlic cloves. Cook for one more minute. You want the garlic to smell wonderful, but not brown. Add the chicken breasts into the pot. Pour in six cups of low-sodium chicken broth. Increase the heat slightly and bring it to a gentle simmer. Let the chicken cook for 15 to 20 minutes. Once fully cooked, carefully remove the chicken from the pot and set it aside to cool. When cool, shred the chicken into bite-sized pieces. Return to the pot and add one cup of orzo pasta. Let the soup simmer for 8 to 10 minutes, stirring to prevent sticking. In your mixing bowl, you have the whisked eggs with lemon juice. Now, temper the eggs by slowly adding a ladleful of hot broth from the pot. Whisk constantly to prevent the eggs from cooking too quickly. Gradually mix the egg mixture back into the soup. This will give your soup a creamy texture. Now it’s time to adjust the seasoning. Taste the soup and add sea salt and black pepper as needed. Finally, garnish your soup with fresh parsley before serving. This adds a nice color and fresh flavor. Enjoy your comforting bowl of Greek lemon chicken soup! For the full recipe, see the detailed instructions above. - Choosing the right type of chicken: I recommend using boneless, skinless chicken breasts. This cut cooks quickly and stays tender in the soup. It also absorbs the rich flavors of the broth well. - Adjusting salt levels for broth versus soup: Start with low-sodium chicken broth. Taste as you cook, and add salt as needed. This way, you control the saltiness without overwhelming the dish. - Techniques for tempering eggs properly: To prevent egg curdling, whisk the eggs and lemon juice in a bowl. Slowly add hot broth while whisking. This warms the eggs without cooking them. - Continuous whisking for a smooth texture: Keep whisking as you add the broth. This ensures a creamy, smooth texture in your soup. It’s key for that authentic Greek flavor. - Suggestions for family dinners or special occasions: Greek Lemon Chicken Soup is perfect for family dinners. Serve it on cozy nights or special occasions like holidays. It brings warmth and comfort to the table. - Pairing with sides for a complete meal: I love pairing this soup with a fresh Greek salad or crusty bread. These sides complement the soup and make a full meal. Enjoy your cooking adventure with this classic dish! Check out the [Full Recipe] for step-by-step details on making this delightful soup. {{image_4}} If you can't find orzo, don't worry! You can use other small pasta shapes, like ditalini or acini di pepe. Both work great in this soup. For those who need gluten-free options, try rice or quinoa. These grains add texture and flavor while keeping the dish gluten-free. You can make your soup even better by adding greens. Spinach or kale works well. Simply toss them in during the last few minutes of cooking. This adds color and nutrients. You can also enhance the flavor by using herbs. Fresh dill or basil adds a lovely aroma and taste. Try adding a handful of either herb for a bright twist. If you want a meatless version, you can replace the chicken with plant-based proteins. Tofu or chickpeas are good choices. They soak up the soup's flavors nicely. Use vegetable broth instead of chicken broth to keep the taste rich and savory. This way, everyone can enjoy a bowl of this comforting soup! For the full recipe, check out the Mediterranean Lemon Chicken Orzo Soup . To keep your Greek Lemon Chicken Soup fresh, let it cool first. Pour it into airtight containers. Make sure to store it in the fridge. It should stay good for about 3 to 4 days. Always label your containers with the date. This helps you track how long it’s been there. When reheating, do it gently. You can use the stove or microwave. If using the stove, heat it on low heat. Stir often to prevent sticking. If it seems thick, add a splash of broth or water. This keeps the soup nice and smooth. To freeze Greek Lemon Chicken Soup, let it cool completely. Pour it into freezer-safe bags or containers. Remove as much air as possible. It can last up to 3 months in the freezer. When you’re ready to eat, thaw it in the fridge overnight. Reheat gently to enjoy the same great flavor. Greek Lemon Chicken Soup, also known as Avgolemono, is a classic dish. It features tender chicken, bright lemon, and creamy eggs. This soup warms the heart and soul, especially during cold months. It is a staple in Greek homes and often appears at family gatherings. The mix of flavors showcases the essence of Greek cooking. To achieve a creamy texture, temper the eggs. Whisk eggs and lemon juice together in a bowl. Gradually add hot broth while whisking. This method prevents the eggs from scrambling. Slowly stir the egg mixture back into the soup. This creates a smooth and velvety finish. Avoid boiling the soup after adding the egg to keep it creamy. Yes, you can make this soup ahead of time. Prepare the soup but skip adding the egg mixture until serving. Store the soup in an airtight container in the fridge for up to three days. When ready to serve, reheat gently and add the egg mixture. This keeps the soup fresh and creamy. This soup pairs well with a simple Greek salad. You can also serve it with warm pita bread or crusty bread. For a lighter meal, consider grilled vegetables on the side. These options enhance the flavors and create a lovely dining experience. In this post, I shared how to make Greek Lemon Chicken Soup. You learned about the key ingredients, like chicken, orzo, and the egg-lemon mixture that gives the soup its creamy texture. I provided steps for preparation, cooking, and tips for keeping the soup delicious and authentic. Don't hesitate to mix it up with different ingredients or share it with others. Enjoy this comforting dish anytime!](https://goldendishy.com/wp-content/uploads/2025/06/4ca94f54-e42c-42a8-b75c-f7048ee8bbd9-768x768.webp)
![To make a Spicy Chickpea Buddha Bowl, you need the following main ingredients: - 1 can (15 oz) chickpeas, drained and rinsed - 2 tablespoons olive oil - 1 tablespoon smoked paprika - 1 teaspoon ground cumin - 1/2 teaspoon cayenne pepper (adjust for spiciness) - Salt and black pepper, to taste - 1 medium sweet potato, peeled and diced - 1 cup quinoa, rinsed - 2 cups vegetable broth (or water) - 1 cup fresh spinach, roughly chopped - 1/2 cup cherry tomatoes, halved - 1 ripe avocado, sliced - 1/4 cup tahini - 2 tablespoons fresh lemon juice - Fresh cilantro leaves for garnish These ingredients blend well to give you a burst of flavor. The chickpeas add protein, while the sweet potato brings sweetness. Quinoa provides a hearty base, and the veggies add freshness. You can enhance your bowl with these optional toppings: - Feta cheese, crumbled - Pumpkin seeds or sunflower seeds - Fresh herbs like parsley or basil - Sliced radishes for crunch - Hot sauce for extra heat These toppings let you customize each bowl. They add flavor, texture, and nutrition. This Buddha bowl offers great health perks: - Chickpeas are high in protein and fiber. - Sweet potatoes are rich in vitamins A and C. - Quinoa is a complete protein and gluten-free. - Spinach packs iron and antioxidants. - Avocado provides healthy fats for heart health. Together, these ingredients create a balanced meal. You get energy, nutrients, and delicious flavors. For the full recipe, click here: [Full Recipe]. Start by preheating your oven to 400°F (200°C). In a bowl, mix the drained chickpeas with olive oil, smoked paprika, ground cumin, cayenne pepper, salt, and black pepper. Toss until every chickpea gets the spice mix. Spread them out on a baking sheet in a single layer. Roast them for 20-25 minutes. Shake the pan halfway through to make sure they cook evenly. While the chickpeas roast, take a separate baking sheet for the sweet potatoes. Toss the diced sweet potato in olive oil. Season with salt and black pepper. Place the sweet potatoes in the oven alongside the chickpeas. Roast for about 25-30 minutes. Stir them once to help them caramelize and soften. Next, rinse the quinoa under cold water. In a medium pot, combine the rinsed quinoa with vegetable broth or water. Bring it to a boil on high heat. Once it boils, lower the heat, cover the pot, and let it simmer for 15 minutes. When done, the quinoa should be fluffy and all the liquid absorbed. Remove it from heat and let it sit for 5 minutes. Fluff it gently with a fork. For the tahini dressing, whisk together tahini, fresh lemon juice, and a few tablespoons of water in a small bowl. Keep whisking until smooth. Adjust the water to make it drizzle easily. Season with salt to taste. To assemble, take a serving bowl and add a generous scoop of fluffy quinoa as the base. Next, layer on the roasted sweet potatoes, crispy chickpeas, chopped spinach, halved cherry tomatoes, and slices of avocado. Make it colorful for a beautiful presentation! Drizzle your tahini dressing over the assembled bowls. Let it cascade down the ingredients for a lovely effect. Top it off with fresh cilantro leaves. Serve right away and enjoy the vibrant flavors of this wholesome meal! For the full recipe, check out the detailed instructions above. You can make this bowl your own. Try different grains like brown rice or farro. Add more veggies like bell peppers or carrots for color and crunch. If you love heat, add jalapeños or chili flakes. You can swap chickpeas for black beans for a different taste. Enjoy your personal twist on this spicy chickpea Buddha bowl. The cooking time can change based on your oven. If your oven runs hot, check the chickpeas and sweet potatoes early. You want them crispy but not burnt. If you prefer softer veggies, roast them longer. Just keep an eye on them to avoid overcooking. Adjusting the time helps you get the best texture. Serve this bowl warm for the best taste. Pair it with a crisp green salad for balance. You can also add a dollop of yogurt or a sprinkle of feta cheese for creaminess. This bowl is perfect for meal prep. Just store each element separately. When ready to eat, combine them for a quick, healthy meal. You can find the full recipe here: [Full Recipe]. {{image_4}} This dish is naturally vegan and gluten-free. Chickpeas, quinoa, and veggies make it great for all. You don’t need to change the recipe to fit these diets. Just enjoy! You can switch out chickpeas for black beans or lentils. Try brown rice instead of quinoa. Sweet potatoes can be replaced with butternut squash. Each swap brings a new flavor. Use seasonal veggies for freshness. In spring, add asparagus or peas. In summer, use zucchini or bell peppers. In fall, try roasted Brussels sprouts or pumpkin. In winter, root veggies shine. These changes keep your Buddha bowl exciting. Check the full recipe for more ideas. To keep your Spicy Chickpea Buddha Bowl fresh, place leftovers in an airtight container. Make sure it cools to room temperature before sealing. Store it in the fridge for up to three days. The flavors will meld, making it even tastier the next day! When you're ready to enjoy your leftovers, you can reheat them in a few ways. The microwave works well for quick meals. Heat in short bursts, stirring in between. If you prefer, you can also use a skillet over medium heat. Add a splash of water to keep it moist while you warm it up. If you want to save some for later, freezing is a great option. Place the chickpeas and sweet potatoes in a freezer-safe bag. Keep the quinoa and fresh veggies separate. They freeze best when stored this way. You can freeze the chickpeas and sweet potatoes for up to three months. Just thaw in the fridge overnight before reheating. Enjoy your meal anytime, even when you're busy! For the full recipe, check out [Full Recipe]. Chickpeas are packed with protein and fiber. They help you feel full longer. They also contain essential vitamins and minerals. Eating chickpeas can boost heart health and aid digestion. They may help regulate blood sugar levels too. Plus, they are versatile and fit in many dishes. Yes, you can make parts of the Spicy Chickpea Buddha Bowl ahead of time. You can roast the chickpeas and sweet potatoes a day before. Store them in airtight containers in the fridge. You can also cook the quinoa in advance. Just reheat it when you are ready to assemble the bowl. If you don’t have tahini, try using almond butter or sunflower seed butter. You can also make a quick dressing with yogurt or avocado. Each option brings a unique flavor to the bowl. Feel free to experiment and find what you like best! To change the spice level, adjust the cayenne pepper amount in the recipe. If you prefer it milder, use less or skip it entirely. For more heat, add extra cayenne or some hot sauce. Taste as you go to find your perfect balance. Absolutely! You can include any veggies you love. Roasted broccoli, bell peppers, or zucchini work well. Fresh ingredients like cucumber or radishes add crunch. Mix and match to create your ideal bowl. The more colors, the better it looks and tastes! The Spicy Chickpea Buddha Bowl packs flavor and nutrition. We explored key ingredients, step-by-step prep, and tips for easy customizations. You can adjust the heat, swap ingredients, or even try new seasonal veggies. In the end, this meal is fun to make and eat. It supports your health and keeps well, too. Dive into your own bowl and enjoy the amazing taste and benefits!](https://goldendishy.com/wp-content/uploads/2025/06/fbd17ced-051b-409f-8c76-69a7b070695a-768x768.webp)
![- 1 large head of cauliflower, cut into bite-sized florets - 1 cup shredded sharp cheddar cheese - 1/2 cup grated Parmesan cheese, divided - 1 cup heavy cream - 2 cloves garlic, finely minced - 1/2 teaspoon smoked paprika - 1/2 teaspoon freshly ground black pepper - 1 teaspoon salt, or to taste - 1/2 teaspoon onion powder - 1/4 cup seasoned breadcrumbs (optional, for added crunch) - Fresh parsley, chopped, for garnish The key to a great cheesy cauliflower bake lies in its simple yet flavorful ingredients. First, you need a large head of cauliflower. Cut it into bite-sized florets. This helps it cook evenly. Next, gather your cheeses. I love using sharp cheddar for its strong taste and Parmesan for a hint of nutty flavor. Heavy cream is a must for that rich, creamy texture. Don't forget the garlic! Mince two cloves finely for a burst of flavor. Seasoning is important, too. Smoked paprika adds warmth, while black pepper and onion powder enhance the dish. If you want a crunchy topping, use seasoned breadcrumbs. They give the bake a nice texture. Finally, finish with fresh parsley. It brings color and freshness. These ingredients come together to create a comforting dish that everyone will enjoy. Check out the Full Recipe for more details! - Preheat the oven to 375°F (190°C). - Boil the cauliflower florets. Start by preheating your oven. This step is key to getting that nice, golden top. While the oven heats, take a pot and fill it with water. Add a pinch of salt. Bring the water to a boil. Once boiling, add the cauliflower florets. Cook them for about 5 to 7 minutes. You want them tender but still a bit firm. Drain the cauliflower and set it aside. - Combine heavy cream, garlic, and spices in a saucepan. - Stir in shredded cheddar and Parmesan cheese until smooth. Now, let’s make the cheese sauce. In a medium saucepan, pour in the heavy cream. Add the minced garlic, salt, black pepper, smoked paprika, and onion powder. Heat it on medium. Stir this mix gently, keeping it warm but don’t let it boil. Once warm, slowly add the shredded cheddar and half of the grated Parmesan cheese. Stir until the cheese melts and the sauce is smooth and creamy. - Mix the cauliflower with the cheese sauce. - Transfer to a baking dish and top with breadcrumbs. In a large bowl, mix the cooked cauliflower with your cheese sauce. Make sure every floret gets coated with that cheesy goodness. Next, take a baking dish and lightly grease it. Pour the cauliflower mixture into the dish. Spread it evenly. If you want a crunchy topping, sprinkle the remaining grated Parmesan cheese and breadcrumbs on top. - Bake until golden brown and bubbly. - Garnish and serve. Place the baking dish in the preheated oven. Bake it for about 20 to 25 minutes. You want the top to be golden brown and bubbly. When it's done, take it out and let it cool for a few minutes. For a nice touch, sprinkle some freshly chopped parsley on top before serving. Enjoy your cheesy cauliflower bake! For the full recipe, refer to the earlier sections. To make the best cheesy cauliflower bake, cook the cauliflower just right. Boil it for about 5-7 minutes. You want it tender but still slightly firm. This helps keep the florets intact when you mix them with the cheese sauce. For the cheese sauce, ensure it is smooth. Stir the heavy cream and garlic over medium heat. Add the cheese slowly while stirring. This will help you avoid lumps. A smooth sauce coats the cauliflower evenly, giving it that creamy goodness. Don't be afraid to experiment with flavors. A little smoked paprika adds a nice touch. You can also try different cheeses. A mix of cheddar and Gruyère can elevate your dish. Using fresh herbs for garnish makes a big difference. Chopped parsley adds color and freshness. You can also use chives for an onion flavor boost. These small touches can turn a great dish into a memorable one. Think about what pairs well with cheesy cauliflower bake. It goes great with roasted chicken or grilled fish. You can also serve it with a crisp salad for added crunch. This dish is perfect for gatherings. Serve it at family dinners or potlucks. It is a great side dish for holidays too. Everyone loves a warm, cheesy treat! For the full recipe, check the instructions above. {{image_4}} You can make this dish lighter with a few easy swaps. - Low-fat cheese options: Try using part-skim mozzarella or low-fat cheddar. - Alternative non-dairy cream substitutes: Use almond milk or coconut cream for a dairy-free choice. These swaps keep the taste rich while cutting calories and fat. Want to spice it up? There are plenty of ways to add flavor. - Adding cooked bacon or sausage for extra protein: Crumbled crispy bacon brings a smoky touch. - Introducing vegetables like spinach or bell peppers: These add color and nutrients to your bake. Feel free to mix and match your favorite proteins and veggies for a unique dish. How you serve this dish can change the experience. - Individual ramekins for portion control: They make for a fun and fancy presentation. - Making it a main dish with protein additions: Pair it with chicken or fish for a complete meal. These options help you customize your cheesy cauliflower bake for any occasion. After enjoying your cheesy cauliflower bake, you might have some leftovers. To keep them fresh, place them in an airtight container. This helps lock in moisture and flavor. You can store the leftovers in the fridge for up to three days. When you’re ready to eat again, just scoop out what you need. Want to save some for later? Freezing is a great option. Cool the dish completely first. Then, transfer it to a freezer-safe container. Make sure to label it with the date. You can freeze it for up to three months. When you’re ready to enjoy it again, thaw it in the fridge overnight. For reheating, you can use the oven. Preheat it to 350°F (175°C). Cover the dish with foil to keep it moist. Bake for about 25-30 minutes, or until heated through. If you want a crispy top, remove the foil for the last 10 minutes. Enjoy your cheesy goodness! For the full recipe, click here [Full Recipe]. Yes, you can prepare cheesy cauliflower bake ahead of time. Start by cooking the cauliflower and making the cheese sauce. After mixing them together, place the dish in the fridge. Cover it tightly with plastic wrap or foil to keep it fresh. When ready to bake, remove it from the fridge. Bake it straight from the cold for about 10 minutes longer than the usual time. This way, you enjoy a warm, cheesy treat without a lot of last-minute work. Cheesy cauliflower bake pairs well with many dishes. Here are some great options: - Grilled chicken: The savory chicken complements the creamy bake. - Steak: A juicy steak adds richness to the meal. - Salad: A fresh garden salad balances the heaviness of the bake. - Roasted vegetables: Crisp, roasted veggies add color and flavor. These side dishes can make your meal feel complete and delicious. Yes! Cheesy cauliflower bake is perfect for vegetarians. It uses cauliflower, cheese, and cream, all plant-based. Just ensure that the cheese options are vegetarian-friendly. Many cheeses are made without animal rennet, making them suitable for vegetarian diets. This dish is a tasty way to enjoy a healthy meal while meeting dietary needs. To sum up, this blog covered how to make a delicious cheesy cauliflower bake. We talked about required ingredients, step-by-step instructions, and tips for great results. You learned about variations, healthy swaps, and how to store leftovers. This dish is not just tasty; it is easy to make and perfect for many meals. Try it yourself for a comforting treat that everyone will enjoy. Remember, the best part is making it your own by adding what you love!](https://goldendishy.com/wp-content/uploads/2025/06/4f60bbbb-6786-4607-99e4-9a4e6c15f60e-768x768.webp)