Skip to content
About
Contact
Cookie Policy
Copyright Policy
Disclaimer
Search
Home
Dinner
Appetizer
Desserts
Drinks
About
Contact
Privacy Policy
Toggle Menu
Home
/
Desserts
- Page 10
Desserts
Chocolate Chip Scones Flaky and Delightful Treat
White Chocolate Raspberry Scones Savory and Simple
Maple Pecan Scones Simple and Tasty Recipe Guide
Gingerbread Waffles Cozy and Hearty Breakfast Treat
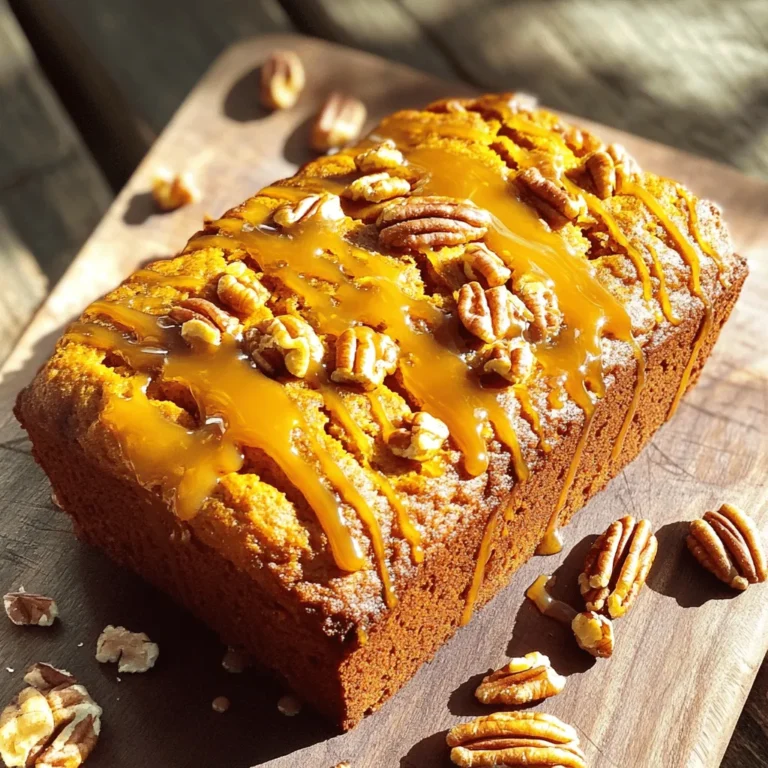
Caramel Pecan Pumpkin Bread Irresistible Fall Treat
Strawberry Shortcake Trifle Delightful Layered Dessert
Chocolate Marshmallow Rocky Road Delightful Treat
Cherry Cheesecake Dip Flavorful and Simple Delight
Raspberry Lemonade Sorbet Refreshing Summer Treat
Easy Lemon Raspberry Loaf Simple and Tasty Recipe
Page navigation
Previous Page
Previous
1
…
8
9
10
11
12
…
22
Next Page
Next
Home
Dinner
Appetizer
Desserts
Drinks
About
Contact
Privacy Policy
Toggle Menu Close
Search for:
Search

. This blog post covered how to make delicious chocolate chip scones. You learned about the key ingredients, step-by-step instructions, and tips for success. Remember, cold butter and careful mixing are key to flaky, tasty scones. Feel free to explore different flavors and variations. They can impress your friends or brighten your morning. With good storage methods, you can enjoy them later, too. Baking scones is fun, and the results are always worth it. Enjoy your baking journey and share your creations!](https://goldendishy.com/wp-content/uploads/2025/07/8341b68f-e0af-4c5e-ad3a-191f22800308-768x768.webp)
![To make white chocolate raspberry scones, you need simple ingredients. These items come together to create a sweet treat. The scones balance rich white chocolate with tart raspberries, making them delightful. - 2 cups all-purpose flour - 1/2 cup granulated sugar - 2 teaspoons baking powder - 1/2 teaspoon salt - 1/4 cup cold unsalted butter, cubed - 1/2 cup heavy cream - 1 large egg - 1 teaspoon pure vanilla extract - 1 cup fresh raspberries - 1/2 cup white chocolate chips (plus extra for topping) - 1 tablespoon milk (for brushing) You can add mix-ins for more flavor. Some ideas include: - Lemon zest for brightness - Chopped nuts for crunch - A dash of almond extract for depth These options let you tailor the scones to your taste. 1. Preheat your oven to 425°F (220°C). This helps the scones rise well. 2. Line a baking sheet with parchment paper for easy cleanup later. 3. In a large bowl, mix together 2 cups of all-purpose flour, 1/2 cup of granulated sugar, 2 teaspoons of baking powder, and 1/2 teaspoon of salt. Whisk them until smooth. 4. Cut 1/4 cup of cold, unsalted butter into small cubes. Add it to the flour mix. Use a pastry cutter or your fingertips to mix until it looks like coarse crumbs. 5. In another bowl, whisk together 1/2 cup of heavy cream, 1 large egg, and 1 teaspoon of pure vanilla extract. This will add flavor and richness to your scones. 6. Pour the wet mix into the dry mix. Stir gently with a spatula until they just combine. Don't overmix; this keeps the scones tender. 7. Fold in 1 cup of fresh raspberries and 1/2 cup of white chocolate chips. Be careful not to break the raspberries. 8. Lightly flour a clean surface and turn the dough out onto it. Shape it into a disc about 1 inch thick. 9. Cut the disc into 8 wedges. Place these on the prepared baking sheet, leaving 2 inches between each one. 10. Brush the tops with 1 tablespoon of milk. This gives them a nice shine. Add some extra white chocolate chips on top for sweetness. 11. Bake for 15-20 minutes until golden brown. Check doneness with a toothpick. If it comes out clean, they are ready. 12. Once baked, remove the scones from the oven. Let them cool on a wire rack for the best texture. 13. For serving, arrange the warm scones on a pretty platter. Garnish with fresh raspberries and drizzle melted white chocolate on top. 14. Enjoy them with a cup of tea or coffee for a delightful treat. For the full recipe, check [Full Recipe]. To make light and fluffy scones, use cold butter. The cold butter creates small pockets of air. This helps your scones rise well as they bake. Aim for a crumbly texture when mixing the butter into the flour. You want to see small clumps of butter. These clumps will melt and create steam, leading to a tender scone. Another tip is to avoid overmixing. When you mix wet and dry ingredients, do it gently. Stir just until combined. This keeps the scones tender and flaky. One common mistake is using warm butter. Warm butter will not create the same fluffy texture. Always stick with cold, cubed butter. Another mistake is overworking the dough. If you knead or mix too much, your scones can become tough. Remember, treat the dough gently. Make sure to space the scones well on the baking sheet. If they are too close, they won't bake evenly. Keep about 2 inches of space between each scone. You can enhance the flavor by adding a pinch of salt. It balances the sweetness of the white chocolate. For visual appeal, sprinkle extra white chocolate chips on top before baking. This adds a lovely touch. A drizzle of melted chocolate after baking looks fancy too. Try serving the scones warm with fresh raspberries. This not only looks great but also adds a burst of flavor. For the full recipe, check the section above. {{image_4}} You can easily change the recipe for white chocolate raspberry scones. Use different berries, like blueberries or strawberries. You can also try nuts, like chopped pecans or walnuts, for crunch. If you want a zesty twist, add lemon or orange zest. This adds a fresh flavor that pairs well with the sweetness of white chocolate. Mixing flavors can make your scones unique. For a tropical vibe, add shredded coconut along with the raspberries. If you love spices, try cinnamon or cardamom for warmth. A touch of almond extract can boost the flavor too. These combinations can take your scones to a new level. You can make these scones gluten-free by using a gluten-free flour blend. Just ensure it has a binding agent, like xanthan gum. For a dairy-free option, swap heavy cream with coconut cream or almond milk. Use dairy-free butter or margarine instead of regular butter. These simple swaps let everyone enjoy these scones, no matter their diet. For more ideas and details, check out the Full Recipe. To keep your white chocolate raspberry scones fresh, store them in an airtight container. This helps them stay soft and moist. You can leave them at room temperature for up to two days. If you want to keep them longer, refrigerate them. Just remember to wrap them well to avoid drying out. Reheating scones is easy. Preheat your oven to 350°F (175°C). Place the scones on a baking sheet and cover them lightly with foil. Heat for about 10 minutes. This method warms them up nicely without making them tough. You can also use a microwave for a quick fix. Just heat them for about 15-20 seconds. Enjoy them warm for the best taste. If you want to save some scones for later, freezing is a great option. First, let the scones cool completely. Then, wrap each one in plastic wrap. Place the wrapped scones in a freezer bag or container. They can stay frozen for up to three months. When you are ready to enjoy, thaw them overnight in the fridge and reheat as mentioned above. For the full recipe, check out the detailed instructions above. Yes, you can use frozen raspberries. They work well in scones but may change the texture. Thaw the raspberries first and drain excess liquid. This step helps keep the dough from getting too wet. Frozen raspberries may break apart more easily. Just handle them gently when mixing into the dough. The scones are done when they turn golden brown. Insert a toothpick into the center of a scone. If it comes out clean, the scones are baked through. Baking time is about 15-20 minutes at 425°F. Watch them closely toward the end to prevent burning. These scones pair well with tea or coffee. A nice cup of Earl Grey tea complements the sweet flavors. You can also enjoy them with fresh cream or a dollop of clotted cream. Adding a few fresh raspberries on the side enhances the presentation and taste. For a sweet touch, drizzle melted white chocolate over them just before serving. In this post, we covered how to make delicious white chocolate raspberry scones. We detailed the ingredients, step-by-step instructions, and tips to ensure great texture and flavor. You learned about variations and storage ideas to keep your scones fresh. Remember to avoid common mistakes and experiment with mix-ins for unique flavors. I hope you feel confident to bake these tasty treats and share them with others. Enjoy every bite!](https://goldendishy.com/wp-content/uploads/2025/07/437e04f1-a683-4ca4-9d0f-364a7bf5e892-768x768.webp)
![To make tasty Maple Pecan Scones, you need some key ingredients. Here they are: - 2 cups all-purpose flour - 1/2 cup chopped pecans, plus extra for garnish - 1/3 cup packed brown sugar - 1 tablespoon baking powder - 1/2 teaspoon fine salt - 1/2 teaspoon ground cinnamon - 1/4 cup cold unsalted butter, cut into small cubes - 1/2 cup heavy cream, chilled - 1/4 cup pure maple syrup - 1 large egg, at room temperature - 1 teaspoon pure vanilla extract - Additional maple syrup for drizzling (optional) These ingredients work together to create a rich, flavorful scone. The maple syrup and pecans bring a sweet and nutty taste. You can add a few optional ingredients to enhance your scones even more. Consider these: - Dried cranberries or cherries for a tart kick - Chocolate chips for a sweet treat - Fresh herbs like rosemary for a savory twist These extras can make your scones unique. Mix and match to find your favorite flavor. If you need to swap out some items, here are some good substitutions: - Use whole wheat flour instead of all-purpose flour for more fiber. - Swap brown sugar with coconut sugar for a different taste. - Replace heavy cream with coconut cream for a dairy-free option. - Use maple extract if you run out of pure maple syrup. These swaps still keep the scones delicious. Feel free to get creative with what you have on hand. For the full recipe, check out the earlier sections. First, you need to preheat your oven. Set it to 400°F (200°C). While that heats up, grab a baking sheet. Line it with parchment paper. This step helps the scones not stick. It makes clean-up easy too. Now, let’s get to the mixing! In a large bowl, whisk these dry ingredients together: - 2 cups all-purpose flour - 1/2 cup chopped pecans - 1/3 cup packed brown sugar - 1 tablespoon baking powder - 1/2 teaspoon fine salt - 1/2 teaspoon ground cinnamon Whisk until everything is mixed well. In another bowl, combine the wet ingredients. Take: - 1/2 cup heavy cream - 1/4 cup pure maple syrup - 1 large egg - 1 teaspoon pure vanilla extract Whisk them together until smooth. Next, add the wet mix to the dry mix. Stir gently with a spatula. The dough should be sticky and chunky. Don’t overmix! Now, turn the dough onto a floured surface. Knead it gently a few times. Shape it into a circle, about 1-inch thick. Cut it into 8 wedges. Place the wedges on the baking sheet, giving them some room to grow. Bake your scones for 15-20 minutes. They should turn a light golden color and feel firm. Once done, let them cool on a wire rack. For extra flavor, drizzle with more maple syrup and sprinkle some chopped pecans on top. Enjoy your delicious maple pecan scones! For a detailed list of steps, check the Full Recipe. To get the best texture in your Maple Pecan Scones, focus on the butter. Use cold, unsalted butter. Cut it into small cubes and mix it with the flour until you see coarse crumbs. Some pieces should be the size of peas. This step keeps the scones flaky and tender. Baking time is key. Preheat your oven to 400°F (200°C). Bake the scones for 15 to 20 minutes. Watch them closely during the last few minutes. You want them lightly golden and firm to the touch. If you bake them too long, they will become dry. Serving is just as important as baking. Place warm scones on a rustic wooden board or a nice platter. Drizzle with extra maple syrup for sweetness. Add chopped pecans on top for crunch. A sprig of mint or edible flowers can add color and make the dish more inviting. For more details, check the Full Recipe. {{image_4}} You can make gluten-free maple pecan scones easily. Replace all-purpose flour with a gluten-free blend. Look for a mix that has xanthan gum, as it helps bind the ingredients. Keep the other ingredients the same. The texture may change a bit, but they will still taste great! To make vegan maple pecan scones, swap the heavy cream with almond milk or coconut milk. Use coconut oil instead of butter. You can also replace the egg with a flax egg. To make a flax egg, mix one tablespoon of ground flaxseed with three tablespoons of water. Let it sit for five minutes to thicken. These changes keep the scones tasty and fluffy! You can add fun flavors to your scones. Try mixing in chocolate chips or dried fruit. For a sweet touch, add 1/2 cup of chocolate chips or chopped dried apricots. You can also use cranberries or raisins for a chewy texture. Mix these in when you fold in the pecans. This adds extra flavor and makes each bite exciting! For the full recipe, check out the recipe section above. To keep your maple pecan scones fresh, store them in an airtight container. Place a piece of parchment paper between layers to prevent sticking. They will stay good for about three days at room temperature. If you want to keep them longer, consider freezing them. To reheat your scones, preheat your oven to 350°F (175°C). Place the scones on a baking sheet and warm them for about 5-10 minutes. This helps restore their fresh-baked taste and texture. You can also microwave them for about 15-20 seconds, but the oven gives better results. If you want to freeze your scones, do it before baking. After shaping the dough into wedges, place them on a baking sheet. Freeze them for about an hour until firm, then transfer them to a freezer bag. They can stay frozen for up to three months. When ready to bake, just add a few extra minutes to the baking time. For the full recipe, refer back to the details above. Yes, you can make Maple Pecan Scones ahead of time. Prepare the dough and shape it into wedges. Then, wrap the dough in plastic wrap and store it in the fridge for up to two days. When you're ready to bake, just slice and bake as usual. This method keeps them fresh and tasty. You can tell when the scones are done by looking for a golden color on top. They should feel firm to the touch. You can also insert a toothpick into the center. If it comes out clean, the scones are ready. Maple Pecan Scones pair well with many things. You can serve them with a drizzle of maple syrup for added sweetness. A dollop of clotted cream or butter also works great. Pair them with coffee or tea for a lovely breakfast or snack. For a fun twist, add fresh fruit or yogurt on the side. For the full recipe, check out the [Full Recipe]. Maple pecan scones bring warmth and flavor to your kitchen. We explored key ingredients and smart substitutions for a perfect batch. Step-by-step instructions ensured clear baking methods. Tips helped with texture and bake time, making your scones shine. We also discussed tasty variations to brighten your meals. Finally, proper storage methods keep leftovers fresh. Enjoy these scones with friends or alone—they're a delight for all.](https://goldendishy.com/wp-content/uploads/2025/07/b23162c1-955c-4f99-8dc2-297b57ec6074-768x768.webp)
![- Fresh strawberries - Vanilla sponge cake - Heavy whipping cream - Granulated sugar - Powdered sugar - Lemon juice - Fresh mint leaves - Alternative decoration options The main ingredients in this trifle are fresh strawberries, vanilla sponge cake, and heavy whipping cream. You will want ripe strawberries for the best taste. They add a sweet and juicy flavor. The vanilla sponge cake gives the trifle its light and fluffy base. You can use store-bought or homemade cake—whichever you prefer! For the cream, we use heavy whipping cream. It whips up nicely to form soft peaks. This cream adds richness and makes the trifle feel special. Next, we have some additional ingredients. Granulated sugar helps sweeten the strawberries. It helps bring out their natural juice. Powdered sugar sweetens the whipped cream while keeping it smooth. Lemon juice adds a nice touch of tartness and brightens the flavors. For garnishes, fresh mint leaves add a pop of color and freshness. You can also use extra strawberry slices for decoration. If you want to get creative, consider adding chocolate shavings or crushed cookies on top. These small touches can enhance the trifle's look and taste. For the full recipe, check out the details above! To start, we need to macerate the strawberries. This means we will make them sweeter and juicier. - Ingredients: - 4 cups fresh strawberries, hulled and sliced - 1/4 cup granulated sugar - 1 tablespoon lemon juice In a medium bowl, combine the sliced strawberries, sugar, and lemon juice. Toss them gently to coat. This step helps the strawberries release their juices. Let this sit for 15 to 20 minutes. You will see them get juicy and sweet. Next, let's prepare the whipped cream. This will add a light and fluffy layer to our trifle. - Ingredients: - 2 cups heavy whipping cream - 1/4 cup powdered sugar - 1 teaspoon vanilla extract In a large bowl, mix the heavy whipping cream, powdered sugar, and vanilla extract. Using an electric mixer, beat this mixture on medium-high speed. Keep mixing until soft peaks form, which takes about 3 to 5 minutes. Be careful not to over-whip. We want it to stay light and fluffy. Now comes the fun part: assembling the trifle! This is where our layers come together. 1. Start by placing a layer of sponge cake cubes at the bottom of your trifle bowl. Spread them evenly. 2. Next, add a generous layer of macerated strawberries on top of the sponge cake. Make sure to include those sweet juices. 3. Follow with a layer of the freshly whipped cream. Repeat the layering process with sponge cake, strawberries, and whipped cream until you reach the desired height. Usually, two to three layers work well. For the top layer, add a smooth layer of whipped cream. Decorate with fresh strawberry slices and a sprig of mint. Cover with plastic wrap and chill in the fridge for at least 2 hours. This chilling time makes the flavors blend well. And there you have it! Your Strawberry Shortcake Trifle is ready to impress. For the complete recipe, check out the Full Recipe. To make your trifle shine, pay close attention to the whipped cream. Avoid over-whipping it. Ideal whipped cream is light and fluffy. If you whip it too long, it can become grainy. Watch it closely as you mix. Next, ensure your sponge cake absorbs flavors. Let the cake soak up the strawberry juice. This step is key for a moist and tasty dessert. Layer each ingredient gently, so the flavors meld well together. Choose clear glass bowls or cups for serving. This choice highlights the beautiful layers. You can see the juicy strawberries and fluffy cream through the glass. It adds a nice touch to your table. For garnish, use fresh mint leaves. A sprig on top creates a pop of color. You can also add extra strawberry slices to the top. This makes your trifle look even more appealing. Chill your trifle for at least 2 hours. This time allows the flavors to mix well. The cake absorbs the strawberry juices, enriching the taste. When ready to serve, take it out of the fridge. Use a large spoon to scoop out servings. This method keeps the layers intact and makes each bite delightful. {{image_4}} You can mix things up with different fruits. Other berries like blueberries or raspberries work great. Their tartness adds a nice twist. You can also add complementary fruits like bananas. Bananas bring a creamy texture that pairs well with the other layers. Do you want to try something new with the cake? You can use flavored cakes. Chocolate or lemon cakes add a fun taste. If you need gluten-free options, there are many gluten-free cakes available. You can use sponge cake made from almond flour or coconut flour. These options keep the dessert light and fluffy. Not a fan of whipped cream? You can substitute it with yogurt. Greek yogurt gives a nice tang and is a bit healthier. If you're looking for dairy-free options, try coconut cream. It’s rich and creamy, making it a great choice for this trifle. Feel free to explore these variations to make the Strawberry Shortcake Trifle your own. For a full recipe, check out the [Full Recipe]. After making your strawberry shortcake trifle, store it in the fridge. Cover it with plastic wrap or a lid. This keeps it fresh and prevents it from absorbing other smells. It stays fresh for up to three days. The flavors will meld and deepen over time, making it even tastier. You can freeze your trifle for later enjoyment. However, it’s best to freeze layers separately. Wrap the sponge cake and strawberries tightly in plastic wrap. Place the whipped cream in an airtight container. This helps keep the taste and texture. When ready to serve, move the layers to the fridge to thaw overnight. Once thawed, layer them again for a fresh look. You can get creative with leftover trifle. Try blending the leftover cake and cream into a milkshake. You can also make parfaits with yogurt and fruit. If you have sponge cake left, warm it in the oven. This brings back some of its soft texture, making it perfect for new desserts. Use these ideas to enjoy your trifle in new and fun ways! The trifle needs to chill for at least 2 hours. This allows the flavors to mix well. Chilling also helps the sponge cake soak up the strawberry juices. For the best taste, I recommend leaving it in the fridge longer if you can. The longer it chills, the better it gets. Yes, you can make this dessert a day in advance. Just assemble the trifle and chill it. This way, you save time on the day of serving. If you prepare it early, the flavors will deepen and blend even more. Just make sure to cover it well to keep it fresh. If you want a lighter version, you can use whipped topping. You can also try Greek yogurt for a creamy texture. Another option is coconut cream for a dairy-free choice. These substitutes may change the flavor, but they can work well in a pinch. This dessert recipe shines through simple, fresh ingredients and easy steps. We explored how to prepare fresh strawberries, make light whipped cream, and assemble a delicious trifle. With tips on texture, presentation, and storage, you can create impressive layers in no time. Remember, variations are endless—try different fruits or cakes. Enjoy your trifle today and impress your friends with your skills. Happy layering!](https://goldendishy.com/wp-content/uploads/2025/07/6bc930bf-8069-41ce-85f7-a06b19a5b93e-768x768.webp)