Skip to content
About
Contact
Cookie Policy
Copyright Policy
Disclaimer
Search
Home
Dinner
Appetizer
Desserts
Drinks
About
Contact
Privacy Policy
Toggle Menu
Home
/
Appetizer
- Page 8
Appetizer
Garlic Butter Green Beans Flavorful and Easy Side Dish
Sweet Potato Broccoli Salad Fresh and Flavorful Dish
Easy Sheet Pan Nachos Quick and Flavorful Snack
Chickpea Avocado Toast Fresh and Flavorful Delight
Classic Guacamole Flavorful and Simple Recipe
Spicy Roasted Chickpeas Crispy and Flavorful Snack
Easy Garlic Parmesan Knots Tasty and Simple Treat
Crispy Air Fryer Potato Wedges Easy and Tasty Snack
Zucchini Noodle Caprese Salad Fresh and Flavorful Dish
Honey Garlic Green Beans Savory Delight in Minutes
Page navigation
Previous Page
Previous
1
…
6
7
8
9
10
…
19
Next Page
Next
Home
Dinner
Appetizer
Desserts
Drinks
About
Contact
Privacy Policy
Toggle Menu Close
Search for:
Search

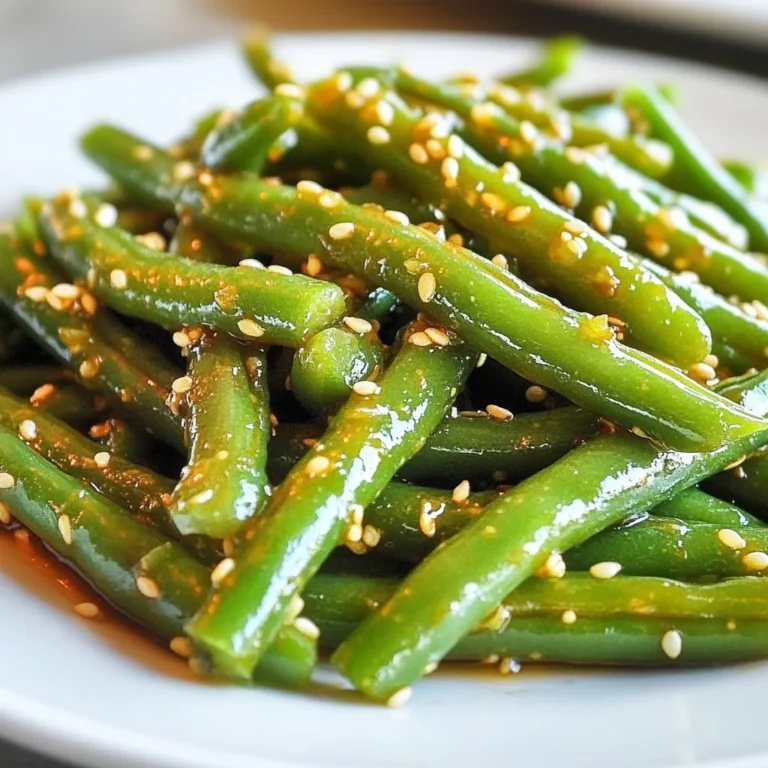
![- 1 pound fresh green beans, trimmed - 4 tablespoons unsalted butter - 4 cloves garlic, finely minced - 1 teaspoon fresh lemon zest - 1 tablespoon fresh lemon juice - 1/2 teaspoon red pepper flakes (optional for heat) - Salt and freshly ground black pepper to taste - 1/4 cup sliced almonds, toasted (for garnish) Fresh green beans are key for this dish. Look for bright, crisp beans without blemishes. The unsalted butter lets you control the salt level. Garlic adds a strong, savory taste, so use fresh cloves when possible. Lemon zest and juice brighten the dish, adding a nice tang. Red pepper flakes give a little kick, but you can skip them if you want a milder flavor. Toasted almonds add a crunchy finish, so don’t skip them! If you can’t find fresh green beans, frozen ones work too. Just thaw and drain them first. For a dairy-free option, use olive oil instead of butter. You can swap garlic for shallots for a milder taste. If you don’t like lemon, try lime juice or vinegar for acidity. Instead of almonds, use walnuts or pine nuts for a different crunch. Feel free to mix and match these options to fit your taste! For the full recipe, check out the step-by-step guide to make these tasty Garlic Butter Green Beans. 1. Boil Water: Start by filling a large pot with water. Add salt and bring it to a boil. 2. Trim Beans: While waiting, trim the ends of the green beans. This simple step makes them easier to eat. 3. Ice Bath Ready: Prepare a bowl with ice water. This will help stop the cooking later. 1. Blanch the Beans: Once the water is boiling, add the green beans. Cook them for 3-4 minutes. They should be bright green and crisp-tender. 2. Cool Down: Quickly move the beans to the ice bath. Let them cool for about 5 minutes. Drain the beans and set them aside. 3. Melt Butter: In a large skillet, add butter over medium heat. Wait until it melts and bubbles. 4. Add Garlic: Put in the minced garlic. Sauté for about 30 seconds. Be careful not to brown the garlic. It can turn bitter. 5. Combine Beans: Add the blanched green beans to the skillet. Toss them gently in the garlic butter. Cook for 4-5 minutes until heated through. 6. Finish with Flavor: Stir in lemon zest, lemon juice, and optional red pepper flakes. Season with salt and pepper. Mix well. 1. Serving Dish: Carefully transfer the green beans to a serving dish. 2. Garnish: Sprinkle toasted almond slices on top. This adds crunch and looks lovely. 3. Presentation: Arrange the green beans neatly. Place lemon wedges on the side for extra flair. Enjoy your Garlic Butter Green Beans! You can find the Full Recipe linked here. To make the best garlic butter green beans, start with fresh green beans. Look for beans that are bright green and firm. Trim the ends for a clean look. Blanching is key. It keeps the beans bright and crisp. Use a large pot of salted water for boiling. An ice bath helps stop the cooking. This gives you that perfect crunch! To add more flavor, try using garlic oil instead of butter. This gives a nice twist to the dish. Adding lemon zest brightens the taste too. If you like spice, sprinkle in red pepper flakes. For extra crunch, toast almond slices before adding them on top. These small steps really boost the flavor and texture. One common mistake is overcooking the beans. They should be crisp-tender, not mushy. Be careful with the garlic; it can burn quickly. If it turns brown, it will taste bitter. Also, don’t skip the ice bath after blanching. It keeps your beans looking fresh and vibrant. Following these tips will help you create a stunning side dish. For a full recipe, check out the complete details above. {{image_4}} You can change the flavor of garlic butter green beans easily. Try adding herbs like thyme or basil for a fresh twist. If you prefer a spicy kick, use diced jalapeños instead of red pepper flakes. For a unique taste, mix in some soy sauce or balsamic vinegar. These additions bring out different flavors and keep the dish exciting. Want to make your green beans a full meal? Consider adding protein. Cooked chicken or shrimp pairs well with the garlic butter. Just toss them in the skillet with the green beans. For a plant-based option, add chickpeas or tofu. These ingredients not only enhance flavor but also make the dish heartier. Switching ingredients based on the season can elevate your green beans. In spring, consider adding fresh peas for sweetness. During summer, cherry tomatoes add a burst of flavor. In fall, roasted butternut squash brings warmth. Winter calls for crispy Brussels sprouts for a crunchy contrast. These swaps keep your dish fresh and interesting all year round. For the complete recipe, check out the [Full Recipe]. To store leftover Garlic Butter Green Beans, place them in an airtight container. Make sure they are completely cool before sealing. This helps keep them fresh. Store the container in the fridge for up to three days. When you want to enjoy your leftovers, you can reheat them easily. You can use the microwave or a skillet. For the microwave, heat for about 30 seconds. Stir and check if they are warm enough. If using a skillet, add a little butter and heat on low. Stir until hot, about 3-4 minutes. You can freeze Garlic Butter Green Beans, but they may lose some crunch. To freeze, first, blanch the beans as in the recipe. Cool them in ice water, then drain well. Place the beans in a freezer-safe bag. Remove as much air as possible before sealing. They can freeze for up to three months. When you are ready to use them, thaw overnight in the fridge before reheating. For the full recipe, check out the details above. To make Garlic Butter Green Beans vegan, swap the butter for vegan butter or olive oil. Use the same amount for a rich flavor. The garlic and lemon will still shine through. This change keeps the dish tasty while meeting vegan needs. The best ways to prepare green beans include blanching, steaming, or sautéing. Blanching keeps them bright and crisp. Sautéing with garlic, like in this recipe, adds great flavor. You can also roast them for a lovely char. Each method brings out the green beans' natural sweetness. Yes, you can make Garlic Butter Green Beans ahead of time. Cook them fully and let them cool. Store in an airtight container in the fridge for up to three days. When ready to serve, reheat in a pan. This keeps the flavors fresh and vibrant. For the full recipe, check out the details above. You learned about the key ingredients for Garlic Butter Green Beans and how to use them. I shared tips to make your dish better, avoid common mistakes, and add variety. You'll know how to store leftovers, reheat, and even freeze them. Remember to tweak the recipe based on your taste or what you have on hand. Cooking should be fun, so feel free to try new things. Enjoy making this dish and impressing your family or friends!](https://goldendishy.com/wp-content/uploads/2025/07/f7ec476a-8ba6-4070-896d-8b390928597f-768x768.webp)

![- 1 can (15 oz) chickpeas, drained and rinsed - 2 ripe avocados - 1 tablespoon fresh lemon juice - 1 clove garlic, finely minced Chickpeas and avocados are the stars of this dish. Chickpeas give a nice, hearty feel. They are rich in protein and fiber. Ripe avocados add creaminess and healthy fats. Lemon juice brightens the mix, while garlic adds depth. - 1/4 teaspoon ground cumin - Salt and freshly ground black pepper - 4 slices of whole grain bread Cumin brings warmth to the mix. Salt and pepper help enhance the flavors. Whole grain bread gives a hearty base that complements the toppings well. Choose bread that toasts nicely for the best crunch. - 1 small red onion, finely chopped - 1/2 cup cherry tomatoes, halved - Fresh cilantro or parsley, chopped - Extra virgin olive oil for drizzling Toppings add fun and flavor. Red onion gives a sweet bite, while cherry tomatoes add freshness. Fresh herbs like cilantro or parsley add color and taste. A drizzle of olive oil adds richness that ties everything together. For the full recipe, check the [Full Recipe]. 1. Start by opening the can of chickpeas. Drain and rinse them well. This helps remove extra sodium and gives a cleaner taste. 2. In a medium bowl, use a fork or potato masher to lightly mash the chickpeas. Aim for a mix of chunky and smooth. This texture makes the spread more fun to eat. 3. Next, scoop out the ripe avocados and add them to the bowl. The creaminess of the avocado balances the chickpeas perfectly. 4. Pour in the fresh lemon juice and add the minced garlic. This gives your mixture a zesty kick. 5. Sprinkle in the ground cumin, salt, and black pepper. Adjust the seasonings based on your taste. Mix everything together until it’s creamy but still a bit chunky. 1. Take your slices of whole grain bread. Lightly toast them in a toaster or on a skillet. Aim for a golden brown color. 2. For a perfect crunch, keep an eye on the bread while toasting. Too light and it’s soft; too dark and it burns. You want that nice, crispy bite. 1. Once your bread is ready, take a generous scoop of the chickpea-avocado mixture. Spread it evenly over each slice of toast. 2. Now, chop the red onion finely and halve the cherry tomatoes. Scatter these colorful toppings over the spread for a fresh crunch. 3. Drizzle a touch of extra virgin olive oil over the top. This adds richness and a lovely finish. 4. Finish with a sprinkle of fresh cilantro or parsley. This not only looks great but also adds a burst of flavor. For the full recipe, check out the [Full Recipe]. Enjoy your vibrant and flavorful chickpea avocado toast! To make your chickpea avocado toast burst with flavor, start by adjusting the seasonings. Everyone's taste is different, and you may want more lemon or salt. Adding spices can also elevate the taste. Fresh ingredients are key. Ripe avocados give a creamy texture that blends beautifully with chickpeas. Use freshly squeezed lemon juice for the best zing. When mashing chickpeas, aim for a mix of chunky and smooth. This gives a nice texture that feels great on the palate. Use a fork or potato masher for this. Avoid over-mashing; you want some bits to stay whole. Ripe avocados are essential too. If they are too firm, the mixture won’t be creamy. Look for avocados that yield slightly when pressed. Presentation matters when serving your toast. Arrange the toasts on a wooden or elegant platter. This adds a rustic charm. You can also place extra cherry tomatoes around the toasts. This makes the dish look colorful and fresh. Drizzle olive oil on top for a glossy finish. A sprinkle of herbs adds a pop of green and invites your guests to dig in. {{image_4}} You can easily change the flavor of your chickpea avocado toast. Start by adding spices like smoked paprika or chili flakes. They give a warm kick that brings out the creaminess of the avocado. You might also try adding fresh herbs like basil or dill. These herbs add a fresh twist and brighten up your dish. Explore different toppings to make your toast unique. Adding protein like feta cheese crumbles or a poached egg can boost flavor and nutrition. For extra crunch, consider adding thinly sliced radishes or refreshing cucumbers. These toppings not only add texture but also enhance the color of your dish. Chickpea avocado toast is great for brunch or a light lunch. You can serve it with a side salad or crispy sweet potato fries for a hearty meal. Pair it with a refreshing iced tea or a glass of lemonade to complete the experience. Each bite is a fresh and flavorful delight that you can enjoy any time of day. Check out the Full Recipe for more tips! To keep your chickpea mixture fresh, store it in an airtight container. This helps lock in flavors. Always refrigerate the mixture right after you finish your meal. For the toasted bread, keep it separate from the chickpeas. Wrap the slices in foil or place them in a zip-top bag. This prevents the bread from getting soggy. Yes, you can freeze the chickpea-avocado mixture! Just place it in a freezer-safe container. Leave some space at the top, as it will expand. When you're ready to use it, take it out and thaw it in the fridge overnight. For serving, give it a quick stir. This helps bring back its creamy texture. You can refrigerate leftovers for about three days. After that, the quality drops. Always check for signs of spoilage. If the mixture smells off or looks discolored, it’s best to toss it. Keep an eye out for any mold or an unusual texture. It’s better to be safe than sorry when it comes to food! For chickpea avocado toast, I love using whole grain bread. Its dense texture holds the spread well. Sourdough also works great; it adds a tangy taste. If you want something softer, try multigrain bread. Look for bread that is sturdy enough to support the toppings without getting soggy. Yes, this recipe is vegan! Both chickpeas and avocados are plant-based. You can enjoy this dish without any animal products. Just ensure that your bread is vegan-friendly too. Most whole grain and multigrain breads are vegan. To make this recipe gluten-free, choose gluten-free bread. Many stores offer a variety of gluten-free options now. Check the label to ensure it’s truly gluten-free. Also, all other ingredients in this recipe are gluten-free. You can enjoy this delicious toast without worry. Chickpeas are high in protein and fiber. They help keep you full and satisfied. Avocados provide healthy fats, which are good for your heart. Together, they make a nutritious combo. In terms of calories, this dish is balanced. One serving has around 300 calories, depending on the bread. Each ingredient adds its own nutrients. This makes chickpea avocado toast great for a snack or meal. This blog post covered the ingredients for chickpea avocado toast, how to prepare it, and tips for great flavor and texture. You learned about various toppings, ways to store leftovers, and how to adapt the recipe to meet dietary needs. Remember, chickpea avocado toast is fun to make and packed with nutrients. You can customize it for any meal. Try different flavors and toppings to keep things exciting. Enjoy experimenting and creating your own delicious versions!](https://goldendishy.com/wp-content/uploads/2025/07/d91d2ffa-6d2b-4892-832e-374b5d5b44d0-768x768.webp)
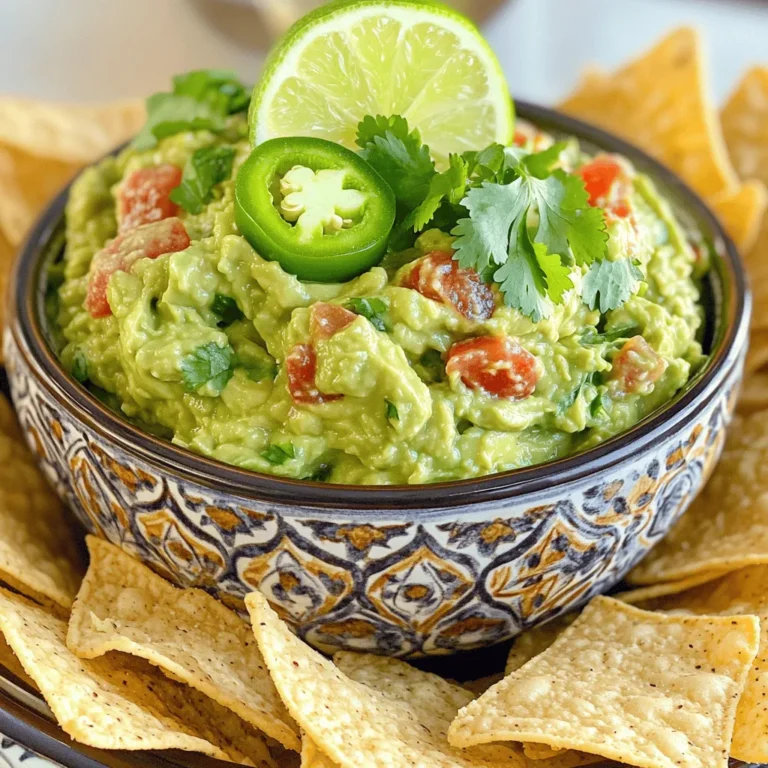
![- 2 cans (15 oz each) chickpeas, thoroughly drained and rinsed - 2 tablespoons extra virgin olive oil - 1 tablespoon smoked paprika - 1 teaspoon cayenne pepper - 1 teaspoon garlic powder - 1 teaspoon onion powder - 1 teaspoon ground cumin - Salt, to taste - Fresh cilantro for garnish (optional) Chickpeas are the star of this recipe. They are high in protein and fiber, making them a healthy choice. Each can of chickpeas gives you a great base for a crispy snack. Now, let's break down the other ingredients. Extra virgin olive oil adds healthy fats, helping the spices stick. Smoked paprika gives a deep flavor, while cayenne pepper adds heat. Garlic and onion powders give a nice aroma and a touch of sweetness. Ground cumin brings an earthy taste that balances the spices. You can adjust the salt to your liking. Fresh cilantro is optional but adds a fresh touch. Chickpeas are packed with nutrients. One serving has about 120 calories. They provide around 6 grams of protein and 2 grams of fat. You also get about 20 grams of carbs and 5 grams of fiber. Chickpeas support heart health, help with digestion, and can aid in weight management. They are a smart choice for a snack or a meal. They fit well into many diets, too! For the full recipe, check out [Full Recipe]. Start by preheating your oven to 400°F (200°C). This step is key for making the chickpeas crispy. Use a baking sheet lined with parchment paper. This helps with easy cleanup and ensures the chickpeas do not stick. Next, rinse the chickpeas under cold water. Drain them well, then pat them dry with a clean paper towel. This step is very important. Removing moisture makes the chickpeas crispier when roasting. In a large bowl, mix the drained chickpeas with olive oil and spices. Use smoked paprika, cayenne pepper, garlic powder, onion powder, ground cumin, and a pinch of salt. Toss gently so every chickpea gets coated in the spice mix. Even coverage is vital for that great flavor. Spread the seasoned chickpeas on the baking sheet in a single layer. This helps them roast evenly. Place the sheet in the oven and roast for about 25-30 minutes. Shake the pan halfway through to promote even cooking. Watch them closely near the end to avoid burning. Once they are golden and crispy, take the chickpeas out. Let them cool on the baking sheet for a few minutes. They will continue to crisp up as they cool. For a fresh touch, sprinkle chopped cilantro on top before serving. Enjoy them as a snack or use them as a topping on salads. For the full recipe, check the ingredient list above. To make your spicy roasted chickpeas super crispy, dry them well. After draining, rinse them under cold water. Then, pat them dry with a paper towel. This step is vital! Any leftover moisture will make them soggy. Spread the chickpeas in a single layer on your baking sheet. This helps them cook evenly. If they overlap, they won’t get as crisp. Adjusting the spice levels is easy. If you want more heat, add more cayenne pepper. For less spice, reduce the amount or skip it. You can also experiment with other spices! Try adding chili powder or even a dash of curry powder for a fun twist. Taste the mix before roasting to find your perfect balance. Store any leftover roasted chickpeas in an airtight container. Keep them at room temperature for up to three days. If they get soft, re-crisp them in the oven for a few minutes. This restores their crunch. Enjoy them as a snack or toss them on salads. For the full recipe, check out the original source. {{image_4}} You can change the flavor of spicy roasted chickpeas easily. Try adding different spices or herbs. Here are some great ideas: - Cumin: Boost the earthy flavor. - Chili powder: Add more heat. - Turmeric: For a warm, golden color. - Herbs: Experiment with thyme or rosemary for fresh notes. For a sweet twist, mix in a little cinnamon and honey. Toss your roasted chickpeas with a bit of honey after cooking. The sweetness pairs well with spice. It creates a tasty snack that balances flavors. Spicy roasted chickpeas work well with many dishes. They are great as a snack on their own. You can also add them to salads or grain bowls for extra crunch. - Salads: Sprinkle them over leafy greens. They add texture and flavor. - Bowls: Use them in grain bowls for a hearty meal. - Snacking: Serve them in a bowl at parties for a fun treat. Feel free to mix them into soups for added richness. The crispy texture enhances warm dishes too. Get creative and enjoy these versatile little gems! For the full recipe, check the earlier section. To keep your spicy roasted chickpeas fresh, place them in an airtight container. This helps lock in their crunch. You can store them on the counter for up to three days. For longer storage, try the fridge, where they can last up to a week. However, they might lose some crispness in the fridge. If you want to save them for later, consider freezing them. In the freezer, they can last for about three months. Just remember to let them cool completely before storing. When you’re ready to enjoy leftovers, the best way to reheat them is in the oven. Preheat your oven to 375°F (190°C). Spread the chickpeas on a baking sheet in a single layer. Heat them for about 10 minutes. This method helps restore their crunch and flavor. You can also use an air fryer for quick reheating. Set it to 350°F (175°C) and heat for five to seven minutes. Both methods keep your chickpeas crispy and tasty! If you can't use chickpeas, try these options: - Canned white beans: They are creamy and mild in taste. - Edamame: These young soybeans add a nice crunch. - Lentils: Cooked lentils can work, but they won’t be as crunchy. - Roasted pumpkin seeds: They give a great crunch and are nutty. These alternatives are great for those with dietary restrictions or different tastes. Yes, you can easily adapt this recipe for an air fryer. Here’s how: - Preheat your air fryer to 400°F (200°C). - Follow the same steps to season your chickpeas. - Place them in the air fryer basket in a single layer. - Cook for about 15 to 20 minutes, shaking the basket halfway. This method gives you extra crispiness while saving time. The spice level of spicy roasted chickpeas is adjustable. The cayenne pepper in the recipe gives a kick, but you can change it. - For mild: Use less or skip the cayenne. - For extra spicy: Add more cayenne or include chili powder. Taste as you go to find your perfect heat! Yes, spicy roasted chickpeas are naturally gluten-free. Chickpeas do not contain gluten, making them a safe choice for those with gluten sensitivities. Always check your spice labels to ensure no gluten-containing ingredients are added. Enjoy these snacks worry-free! For the full recipe, visit the Spicy Roasted Chickpeas section. This blog post covered how to make spicy roasted chickpeas. We went through the ingredients, detailed the steps, and shared tips for perfecting your snack. Chickpeas are healthy, tasty, and easy to customize. You can adjust spices or enjoy them sweet. Whether you serve them in salads or as a snack, there are many ways to enjoy them. With proper storage, your leftovers will stay fresh. Get ready to impress with this simple recipe!](https://goldendishy.com/wp-content/uploads/2025/07/52a5824a-88a4-4b76-bbe8-61087731f54f-768x768.webp)
![To make easy garlic parmesan knots, gather these key items: - 1 package (16 oz) refrigerated pizza dough - 4 tablespoons unsalted butter, melted - 4 cloves garlic, minced - 1/4 cup grated Parmesan cheese - 1/2 teaspoon salt - 1/4 teaspoon black pepper These ingredients create the base for your tasty knots. The pizza dough gives them a nice texture, while butter and garlic add rich flavor. You might consider adding these for extra taste: - 1 tablespoon fresh parsley, chopped (or 1 teaspoon dried parsley) - Pinch of red pepper flakes Fresh parsley adds color and a fresh taste. Red pepper flakes give a little heat, so use them if you like spice. To make your cooking easier, have these tools on hand: - Sharp knife or pizza cutter - Baking sheet - Parchment paper - Small bowl - Pastry brush Using these tools helps with cutting the dough and baking the knots evenly. They make the process smooth and simple. For the full recipe, refer to the details above. Start by preheating your oven to 400°F (200°C). This heat helps the knots rise and bake well. Line a baking sheet with parchment paper. This keeps the knots from sticking. Next, take the refrigerated pizza dough. Roll it out on a clean, floured surface. Aim for a rectangle about ¼ inch thick. This thickness ensures even cooking. Slice the dough into strips. Each strip should be about 1 inch wide and 6 inches long. Take one strip and tie it into a knot. Tuck the ends underneath to keep them secure. Place each knot on the prepared baking sheet, leaving space between them. In a small bowl, combine melted butter, minced garlic, salt, black pepper, and red pepper flakes if desired. This garlic butter mixture gives the knots a rich flavor. Use a brush to apply the mixture on top of each knot. Make sure to get some garlic pieces on top. Now, it’s time to bake! Place the baking sheet in the oven and bake for 12-15 minutes. Watch for a golden brown color on the knots. When done, take them out and let them cool for a few minutes. Brush any leftover garlic butter on top for extra flavor. You can find the full recipe in the ingredients section. To get your knots just right, oven temperature matters. Always preheat to 400°F (200°C). This helps them cook evenly. Roll your pizza dough to about ¼ inch thick. If it's too thick, the knots may not cook well inside. Cut the strips 1 inch wide and 6 inches long. This size allows them to twist easily and cook evenly. For a burst of flavor, use fresh garlic. Fresh garlic gives more taste than jarred. Add herbs like rosemary or thyme for more depth. You can also mix in different cheeses, like mozzarella or cheddar. A pinch of red pepper flakes adds a nice kick. Try different spices to find your perfect blend. One common mistake is overcrowding the baking sheet. Leave space between knots so they rise well. Don't skip brushing the garlic butter mixture on top. It adds flavor and a nice shine. Lastly, keep an eye on them while baking. They can go from golden brown to burnt quickly. For the full recipe, click here: [Full Recipe]. {{image_4}} You can play with the cheese in your garlic knots. Instead of Parmesan, try mozzarella for a melty twist. You might also use cheddar for a sharp taste. Goat cheese adds creaminess, while feta offers a salty kick. Combine different cheeses for a fun mix. Each choice brings a unique flavor to your knots. Want to spice things up? Add herbs like oregano or thyme for extra flavor. A pinch of cayenne pepper gives a nice heat. You could also add lemon zest for a fresh twist. Try mixing in Italian seasoning for a classic touch. Be creative to find your perfect blend of spices. If you want to change the base, you have options. You can use bread dough for a fluffier texture. Biscuit dough makes a quick and easy choice, too. For a gluten-free option, try a gluten-free pizza dough. Each dough type gives a different taste and texture to your knots. Check out the Full Recipe for more ideas. To store your leftover garlic parmesan knots, first let them cool down. Place them in an airtight container. This keeps them fresh and prevents drying out. If you plan to eat them in a day or two, the fridge works well. For longer storage, the freezer is a better choice. Reheating your garlic parmesan knots is easy. For the best taste, use the oven. Preheat it to 350°F (175°C). Place the knots on a baking sheet. Heat them for about 5-7 minutes. This restores the crispy texture. You can also use a microwave. Heat them for about 30 seconds. However, the texture may not be as nice as oven heating. If you want to freeze garlic parmesan knots, wrap them well. Use plastic wrap or aluminum foil. Then, place them in a freezer bag. Squeeze out as much air as you can. They can stay in the freezer for up to three months. When ready to eat, thaw them in the fridge overnight. Reheat as described earlier. Your knots will taste almost fresh! For the full recipe, check out the earlier section. Yes, you can use homemade dough. Just make sure it has the right texture. If your dough is soft, it may not hold the knot shape well. Use a simple recipe that yields a stretchy and firm dough for best results. This way, you get that fresh flavor and texture right from your kitchen. Garlic parmesan knots last about 2-3 days at room temperature. Store them in an airtight container to keep them fresh. If you want to save them longer, put them in the fridge, where they can last up to a week. Just remember, they taste best when fresh! Yes, you can make garlic knots without garlic. You can swap garlic with herbs or spices. Try using Italian seasoning or even pesto for flavor. This way, you still get a tasty knot without the garlic punch. Garlic parmesan knots pair well with many dishes. You can serve them with marinara sauce for dipping. They also go great alongside pasta, salads, or soups. If you want a fun snack, try them with cheese or charcuterie boards. The options are endless! You’ve learned how to make delicious garlic parmesan knots. We covered all the key ingredients, tools, and step-by-step baking instructions. I shared tips to avoid common mistakes and enhance flavors. You also discovered fun variations and how to store and reheat your knots. With these skills, you can impress anyone at your next meal. Enjoy your tasty creation and make it your own! Happy cooking!](https://goldendishy.com/wp-content/uploads/2025/07/36d16f76-26da-465a-ba33-0a5ce8f4ea78-768x768.webp)
![- 2 medium zucchinis - 1 cup cherry tomatoes - 1/4 cup fresh basil leaves The fresh produce makes this dish feel bright and lively. Zucchini adds a crunchy texture, while cherry tomatoes bring a sweet burst. Basil gives a fragrant touch that brightens every bite. When you use fresh ingredients, you elevate the salad. - 1 cup fresh mozzarella balls Fresh mozzarella balls, or bocconcini, are creamy and soft. They add richness to the salad that balances the fresh flavors. Their bite-sized shape makes them easy to enjoy. I recommend using high-quality mozzarella for the best taste. - 2 tablespoons balsamic glaze - 2 tablespoons extra-virgin olive oil - Salt and black pepper - 1 clove garlic (optional) The dressing ties all the ingredients together. Balsamic glaze provides sweetness and depth, while olive oil adds richness. Salt and pepper enhance the natural flavors. If you want an extra kick, add minced garlic. It brings a wonderful aroma and taste to the dish. For the full recipe, check out the detailed instructions on how to make this fresh and flavorful dish. To start, you need to spiralize the zucchinis. This will make long, noodle-like strands. A spiralizer works best for this task. If you do not have one, you can use a vegetable peeler. Just slice thin ribbons of zucchini instead. Next, combine all salad components in a large bowl. Add the spiralized zucchini, cherry tomatoes, and fresh mozzarella balls. This colorful mix creates a vibrant base for your salad. In a small bowl, whisk together balsamic glaze and olive oil. This will help blend the flavors nicely. If you want a bolder taste, add minced garlic to the dressing. The garlic gives it a nice kick. Now, pour the dressing over the zucchini noodle mixture. Sprinkle salt and black pepper to taste. These simple seasonings enhance the dish's flavors. Use your hands or tongs to toss the salad gently. Make sure all the ingredients are well coated. To finish, add the torn basil leaves on top of the salad. This adds a fresh aroma and flavor. Gently toss the salad again to mix the basil throughout. For serving, you can put it in a big bowl. A light drizzle of balsamic glaze on top makes it look even better. For the full details, check out the [Full Recipe]. If you want to switch things up, there are great options. For mozzarella, try using burrata. Burrata is creamier and adds a rich twist. You can also use vegan cheese if you prefer a plant-based option. For the dressing, consider a light vinaigrette. A mix of lemon juice, olive oil, and a dash of mustard works well. This gives a fresh flavor while cutting calories. To keep the salad fresh, store it properly. Use an airtight container to keep the salad from getting soggy. If you layer the ingredients, place the zucchini at the bottom. This helps keep moisture away from the tomatoes and cheese. On busy days, you can prep the salad in advance. Spiralize the zucchini and chop the tomatoes ahead of time. Just add the dressing and basil when you're ready to eat. This saves you time without losing flavor. To boost the taste, consider adding fresh herbs like oregano or parsley. They add depth and freshness. You can also sprinkle in some crushed red pepper for a bit of heat. For extra crunch, serve the salad with toasted pine nuts or sunflower seeds. These add a nice texture contrast and make the dish even more enjoyable. You can find the full recipe [here](#). {{image_4}} You can add protein to your Zucchini Noodle Caprese Salad for a fuller meal. Here are two great options: - Grilled chicken or shrimp: Both add a tasty twist and extra nutrients. Cook them simply with salt, pepper, and olive oil. Slice and mix them in. - Chickpeas for a vegetarian option: These add a nice crunch and plant-based protein. Just rinse and toss them in for a hearty touch. Mixing up flavors can keep this salad exciting. Here are some ideas: - Adding different dressing styles: Try pesto, ranch, or lemon vinaigrette for a fresh taste. Each will give your salad a unique flair. - Incorporating seasonal vegetables: Add bell peppers, corn, or avocado. These can enhance the texture and flavor while keeping it fresh and vibrant. How you serve this salad can change its vibe. Consider these styles: - Zucchini noodle bowls: Serve it in deep bowls for a casual gathering. It makes it easy for guests to dig in. - Plated salads for special occasions: For a fancy dinner, plate it neatly. This elevates the look and makes it feel more special. These variations can help you customize your Zucchini Noodle Caprese Salad. Choose your favorites to make it truly yours! For the full recipe, check out the details above. To store leftovers, place your Zucchini Noodle Caprese Salad in an airtight container. This keeps the salad fresh and prevents odors from mixing. Use a container that fits the salad snugly to minimize air exposure. Ideal storage containers: - Glass containers with tight lids - BPA-free plastic containers - Silicone food bags Zucchini noodles can stay fresh in the fridge for about 2 to 3 days. Cherry tomatoes and mozzarella also last up to this time frame. Always check for signs of spoilage. Signs of spoilage: - Slimy texture on zucchini - Mold growth on tomatoes - Sour smell from mozzarella Freezing zucchini noodles is a great way to keep them longer. However, fresh zucchini noodles can lose their texture when thawed. To freeze, spiralize the zucchini and place it in a freezer-safe bag. Remove as much air as possible before sealing. Best practices for freezing prepared salad: - Avoid freezing with the dressing; add it later. - Store without fresh basil, as it does not freeze well. - Use within 1 to 2 months for the best flavor. For the full recipe, refer back to the Zucchini Noodle Caprese Salad section. Zucchini noodles last about 3 to 5 days in the fridge. Store them in an airtight container. They will keep fresh and crisp during this time. If they start to look slimy, it’s best to toss them out. Yes, you can use other vegetables. Some great alternatives are carrots, cucumbers, and sweet potatoes. Each offers a unique taste and texture, making your salad fun and versatile. Yes, this salad is gluten-free. The main ingredients contain no gluten. Zucchini, tomatoes, and cheese all fit into a gluten-free diet. Enjoy this dish without worry! You can prep some parts ahead. Spiralize the zucchini and cut the tomatoes a day before. However, add the dressing just before serving. This keeps the salad fresh and crunchy. This salad pairs well with grilled chicken or shrimp. It also goes great with crusty bread or a light soup. For drinks, try a crisp white wine or sparkling water. Enjoy the mix of flavors! For the full recipe, check out the details above! This blog explored a delicious and fresh Zucchini Noodle Caprese Salad. You learned about key ingredients like zucchini, cherry tomatoes, and mozzarella. The instructions simplified making this dish with easy steps. Tips offered ways to customize and store your salad. Variations let you add protein or seasonal flavors. This salad is perfect for any meal. With its bright flavors, it suits busy days or special occasions. Enjoy your cooking adventure and make this salad often!](https://goldendishy.com/wp-content/uploads/2025/07/4c5bc4a7-43a5-40d0-aa85-49819cbbae48-768x768.webp)