Skip to content
About
Contact
Cookie Policy
Copyright Policy
Disclaimer
Search
Home
Dinner
Appetizer
Desserts
Drinks
About
Contact
Privacy Policy
Toggle Menu
Home
/
Appetizer
- Page 14
Appetizer
Easy Chicken Caesar Wraps Quick and Tasty Meal
Garlic Butter Roasted Mushrooms Flavorful Oven Delight
Cheesy Garlic Pull-Apart Bread Delightful and Easy
Mini Cheeseburger Sliders Tasty and Simple Treat
Classic Waldorf Salad Crunchy and Flavorful Delight
Roasted Red Pepper Hummus Creamy and Flavorful Dip
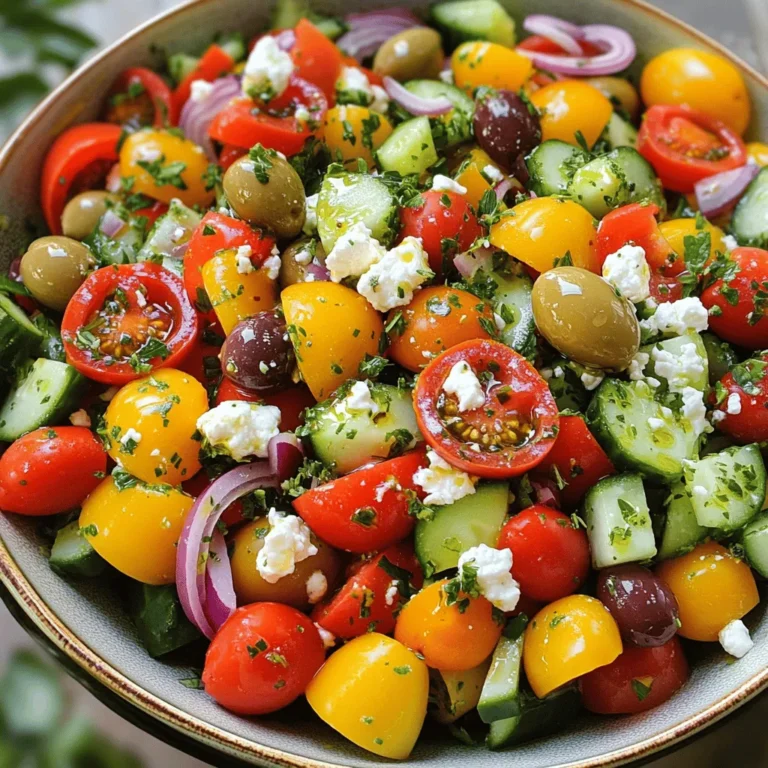
Easy Greek Salad Fresh and Flavorful Delight
Zesty Corn Salad Flavorful and Fresh Recipe Guide
Buffalo Quinoa Bites Flavorful and Healthy Snack
Creamy Avocado Chicken Salad Tasty and Healthy Choice
Page navigation
Previous Page
Previous
1
…
12
13
14
15
16
…
19
Next Page
Next
Home
Dinner
Appetizer
Desserts
Drinks
About
Contact
Privacy Policy
Toggle Menu Close
Search for:
Search


![- 2 cups Granny Smith apples, diced into bite-sized pieces - 1 cup celery, finely sliced - 1 cup red grapes, halved - 1 cup walnuts, coarsely chopped for texture - 1/2 cup plain Greek yogurt, for creaminess - 1/4 cup mayonnaise, to enhance richness - 1 tablespoon fresh lemon juice, to brighten flavors - 1 teaspoon honey, to balance tartness - Salt and freshly ground black pepper, to taste This classic Waldorf salad features fresh produce that bursts with flavor. I love using Granny Smith apples because they add a nice crunch and tartness. They pair perfectly with the sweet red grapes. Celery provides a refreshing crunch, making every bite enjoyable. You also need walnuts for a rich nutty flavor and a great texture. I like to coarsely chop them to keep some larger pieces for crunch. The creamy dressing comes from a mix of plain Greek yogurt and mayonnaise. This blend adds richness and keeps the salad light. Add fresh lemon juice to keep the apples bright and tasty. A touch of honey balances the tartness of the apples and grapes. Seasoning with salt and black pepper enhances the overall taste. This mix of ingredients creates a delightful and colorful salad that is perfect for any meal. For the full recipe, check out the detailed instructions to create this refreshing Waldorf salad. Start by dicing the Granny Smith apples into bite-sized pieces. This makes them easy to eat. To keep the apples fresh and bright, toss them in lemon juice right away. The juice helps stop browning. Next, slice the celery into thin pieces. You want them crunchy and fresh. Then, halve the red grapes. This adds a sweet and juicy burst to the salad. For the dressing, take a bowl and combine plain Greek yogurt and mayonnaise. This mix brings creaminess and smoothness to your salad. Add honey, salt, and black pepper. Whisk these together until you have a smooth, even texture. This dressing is key to making your salad flavorful. In a large bowl, fold the diced apples, sliced celery, halved grapes, and chopped walnuts together. Be gentle to keep all the pieces intact. Then, pour the creamy dressing over the salad. Carefully mix everything to coat the ingredients evenly. Taste the salad and adjust flavors if needed. Add more salt, pepper, or honey for balance. Let it chill for at least 30 minutes so the flavors blend well. Serve it on crisp lettuce leaves for a bright and tasty dish. For the full recipe, check the earlier sections. To keep your apples fresh, start by using lemon juice. After dicing Granny Smith apples, toss them in lemon juice right away. This helps prevent browning. You can also use a mix of water and lemon juice. Soak the diced apples for a few minutes. Drain and dry them before adding to your salad. This step keeps your salad looking vibrant. You can adjust the sweetness and tanginess of your Waldorf salad. If you want more sweetness, add extra honey. For a tangier taste, increase the lemon juice. You can also try different dressings. A bit of apple cider vinegar can give a nice twist. Experiment with your flavors until you find what you love. For a beautiful presentation, serve your salad on crisp lettuce leaves. Use romaine or butter lettuce for a nice touch. You can also add fresh herbs as a garnish. Chopped mint or parsley can add color. Serve the salad in a clear bowl to show off the bright colors. This makes your dish not only tasty but also eye-catching. For more details, refer to the Full Recipe. {{image_4}} You can switch up the fruits in Waldorf salad. Try using ripe pears or sweet strawberries. Each fruit gives a new flavor twist. You can also use different nuts. Pecans or almonds add a nice crunch. Each change can make the salad feel fresh and new. If you want a vegan version, swap Greek yogurt with plant-based yogurt. Use a vegan mayo for creaminess. For gluten-free diets, ensure your mayonnaise is gluten-free. You can also make a low-fat dressing. Use low-fat yogurt and reduce the mayo. These options keep the salad tasty while meeting dietary needs. Waldorf salad shines as both a side dish and a main course. Serve it alongside grilled chicken for a hearty meal. You can also pair it with other salads for a light lunch. Mixing flavors and textures makes it exciting. For a fun twist, serve it in endive leaves or on a bed of spinach. This adds a lovely presentation and taste. For the full recipe, check out the [Full Recipe]. To store leftover Waldorf salad, place it in an airtight container. Make sure to seal it tightly. This keeps the salad fresh and prevents any unwanted smells. Keep it in the fridge right after serving. If you have any extra lettuce, store it separately to keep it crisp. Waldorf salad tastes best when eaten within three days. After that, the apples may start to brown and lose their crunch. The salad will still be safe to eat for up to five days, but the texture might change. Waldorf salad is best served cold. If you need to serve it after refrigeration, just give it a gentle stir. If the salad seems a bit too thick, add a splash of lemon juice or a bit of yogurt to loosen it up. Avoid reheating, as it can change the texture and taste. Enjoy it fresh for the best flavor! Waldorf Salad dates back to the late 1800s. It first appeared at the Waldorf Astoria Hotel in New York City. Chef Oscar Tschirky created this dish for a charity ball. The original recipe included only apples, celery, and mayonnaise. Over time, people added nuts, grapes, and yogurt for extra flavor. Today, we enjoy many versions of this classic salad. Yes, you can prepare Waldorf Salad ahead of time. Make the salad and store it in the fridge. Keep it covered to keep it fresh. I recommend waiting to add nuts until serving. This keeps them crunchy. If you want to serve it later, mix all the ingredients except the dressing. Add the dressing just before serving for the best taste. You can easily swap out some ingredients in Waldorf Salad. Use different fruits like pears or strawberries if you like. If you prefer a vegan option, replace yogurt and mayo with avocado or a plant-based yogurt. For nuts, use almonds or pecans instead of walnuts. These options let you customize the salad to your taste. This blog post covered the making of a Waldorf Salad. You learned about fresh ingredients like apples, celery, and grapes. We discussed how to prepare them, make a tasty dressing, and mix everything together. I shared tips for keeping your apples crisp and customizing flavor. You can also try different fruits and nuts or adapt the recipe for dietary needs. Enjoy your Waldorf Salad, and remember to store it correctly for the best taste. Happy eating!](https://goldendishy.com/wp-content/uploads/2025/06/f7b618e5-0e03-408a-a1e5-f7591c04b926-768x768.webp)

![Fresh corn is the star of this salad. Use about 3 cups of corn kernels, which equals around 4 ears of corn. To get the best flavor, choose corn that is sweet and crisp. You can also use frozen corn, but fresh offers a better taste and texture. This salad needs vibrant veggies for color and crunch: - 1 cup cherry tomatoes, halved - 1 red bell pepper, diced - 1/2 red onion, finely chopped - 1 jalapeño pepper, minced (remove seeds for less heat) - 1/4 cup fresh cilantro, chopped These veggies add freshness and a mix of flavors. The tomatoes bring sweetness, while the jalapeño offers a nice kick. The dressing ties everything together. Here’s what you need: - 1/4 cup freshly squeezed lime juice (about 2 limes) - 2 tablespoons extra virgin olive oil - 1 teaspoon ground cumin - Salt and black pepper to taste This zesty dressing balances the sweet corn and veggies. The lime juice adds brightness, while cumin gives depth. Check out the [Full Recipe] for detailed instructions on making this delicious Zesty Corn Salad! To start, you need fresh corn. If you have fresh corn, fill a large pot with water. Bring it to a rolling boil. Once it boils, add the corn cobs and blanch them for about 3 minutes. After that, take them out and let them cool. When cool, cut the kernels off the cobs with a sharp knife. If you want to use frozen corn, just thaw it and drain any extra liquid. In a big mixing bowl, combine the corn kernels with cherry tomatoes, red bell pepper, and red onion. Make sure to mix them well. This way, you spread the flavors evenly throughout the salad. Take a small mixing bowl to prepare the dressing. Whisk together freshly squeezed lime juice, olive oil, ground cumin, and some salt and black pepper. Mix until all the ingredients blend together well. This zesty dressing will bring everything to life. Now, drizzle the dressing over your mixed vegetables. Gently toss everything together so that all the ingredients get coated in the dressing. This step is key for flavor. Taste the salad and adjust the seasoning if needed. If you want more zing, add more lime juice or salt. For the best flavor, let the salad sit for at least 15 minutes before serving. This wait helps the flavors mix well. You can find the full recipe for Zesty Corn Salad with a Kick! to guide you through the steps. To enhance the taste of your zesty corn salad, let it rest. After mixing, cover it and chill for at least 15 minutes. This time allows the flavors to blend. The lime juice and spices soak into the corn and veggies. You will notice a big difference in taste. If you have more time, letting it sit for an hour is even better. You can swap some ingredients based on your taste. Don’t have fresh corn? Use canned or frozen corn instead. If you want a milder flavor, skip the jalapeño or use a bell pepper. You can also replace cilantro with parsley or green onions if you prefer. For a tangy twist, try lemon juice instead of lime juice. Get creative with what you have on hand! A good-looking salad makes it more fun to eat. Serve your corn salad in a bright bowl. Top it with extra cilantro leaves for color. Add lime wedges on the side for a fresh touch. For a fun idea, layer the salad in mason jars. This not only looks nice but makes serving easy. Plus, it’s perfect for picnics or gatherings. Check out the Full Recipe for more ideas to impress your guests! {{image_4}} You can add protein to your zesty corn salad for more flavor and nutrition. Grilled chicken or shrimp works great. You can also use black beans for a plant-based option. Just rinse and drain a can of beans. Mix them in with the veggies for a hearty meal. Feel free to play with the veggies. You can use cucumbers for a cool crunch. Avocado adds creaminess and healthy fats. Try adding radishes for a peppery bite, or corn peppers for more heat. Any colorful veggie will brighten your dish and add taste. Switch up the dressing to keep things fresh. Try adding honey for sweetness or garlic for a kick. A splash of balsamic vinegar can bring a lovely tang. If you're feeling adventurous, mix in some salsa or a dash of hot sauce for extra zest. Explore the full recipe for more ideas! You can store Zesty Corn Salad in the fridge. Place it in an airtight container. This keeps the flavors fresh and vibrant. Make sure to eat it within three to five days. If you notice any changes in smell or color, it’s best to toss it out. You can freeze this salad, but it’s not ideal. Freezing changes the texture of the corn and veggies. If you want to freeze it, pack it tightly in a freezer-safe container. It can last up to three months. When you’re ready to eat it, thaw it in the fridge overnight. Reheating is not recommended for Zesty Corn Salad. It’s best enjoyed cold or at room temperature. If you must warm it, do so gently in a pan over low heat. Avoid overheating to keep the veggies crisp and fresh. For a quick fix, serve it on top of warm grains or proteins for a tasty twist. Yes, you can use frozen corn in this recipe. Just thaw the corn and drain any extra liquid. Frozen corn saves time, and it still tastes great. It’s a good option if fresh corn is not available. Try it out for a quick fix! The Zesty Corn Salad can last about 3 to 5 days in the fridge. Make sure to store it in an airtight container. If the salad starts to look watery, give it a quick stir. It’s best to eat it fresh, but leftovers make a tasty snack. This salad pairs well with many dishes. You can serve it with grilled meats, tacos, or fish. It also makes a great side for barbecues or picnics. Try it alongside some tortilla chips for a fun twist! Yes, Zesty Corn Salad is gluten-free! All the ingredients are naturally free of gluten. You can enjoy it safely if you have gluten intolerance. This salad is a light and tasty choice for everyone. This blog post covered the key ingredients, steps, tips, and variations for Zesty Corn Salad. You can use fresh corn, mix in your favorite vegetables, and create a tasty dressing. Remember to store it properly for the best flavor. Feel free to experiment with ingredients to suit your taste. Whether you add protein or unique dressings, enjoy this salad your way. Make it a staple for meals or gatherings. Embrace the freshness and flavor of this salad, and get creative!](https://goldendishy.com/wp-content/uploads/2025/06/9c485b94-0626-453a-9168-3540dee7db81-768x768.webp)

![- 2 cups cooked chicken breast, shredded - 1 ripe avocado, mashed until smooth - 1/4 cup smooth Greek yogurt - 1 tablespoon freshly squeezed lemon juice - 1/4 cup red onion, finely chopped - 1/2 cup cherry tomatoes, halved - 1/4 cup celery, finely diced - 1/4 teaspoon garlic powder - Salt and freshly ground black pepper to taste - Fresh cilantro or parsley, chopped, for garnish The ingredients in creamy avocado chicken salad make it tasty and healthy. The chicken provides protein, while avocado adds healthy fats. Greek yogurt makes it creamy without extra calories. Fresh veggies like tomatoes and celery give a nice crunch. Using fresh ingredients is key. This brings out the best flavors. You can adjust the amounts based on what you like. For example, add more tomatoes if you love them. Don’t forget the seasoning! Salt and pepper enhance the taste. Fresh herbs like cilantro or parsley top it off perfectly. They add color and flavor. I recommend checking the full recipe for detailed steps. Enjoy making this delicious dish! - Combine mashed avocado, Greek yogurt, and lemon juice in a bowl. - Mix until smooth using a fork or whisk. To make the creamy dressing, start with a ripe avocado. Mash it in a bowl until it is smooth. Next, add 1/4 cup of Greek yogurt. This adds creaminess and protein. Then, squeeze in 1 tablespoon of lemon juice. This will brighten the flavor. Mix these three ingredients well with a fork or whisk. You want a creamy and smooth texture. This creamy dressing is the base of your salad and full of healthy fats. - Add shredded chicken to the avocado mixture. - Stir thoroughly to coat the chicken evenly. Now it’s time to add in the chicken. Use 2 cups of cooked chicken breast, shredded. You can use leftover chicken or rotisserie chicken for ease. Add the chicken to the creamy dressing. Stir well so every piece of chicken is coated. This adds protein and makes the salad filling. The creamy dressing brings all the flavors together. - Gently fold in red onion, cherry tomatoes, and celery. - Season with garlic powder, salt, and black pepper to taste. Next, let’s add some crunch and color. Gently fold in 1/4 cup of finely chopped red onion, 1/2 cup of halved cherry tomatoes, and 1/4 cup of diced celery. These veggies add freshness and texture. Now, season your salad. Add a pinch of garlic powder, salt, and freshly ground black pepper. Taste it and adjust the seasoning as needed. Mix gently so you don’t break the veggies. Now, your creamy avocado chicken salad is ready to serve! Check out the Full Recipe for more details. - Look for avocados that yield slightly to pressure. - Check the color; ripe avocados usually have a darker skin. Selecting the perfect avocado is key for your creamy avocado chicken salad. When you gently press the avocado, it should give a bit. This tells you it is ripe and ready to use. A darker skin tone often means ripeness, but don't rely on color alone. Always feel for that slight softness! - Use rotisserie chicken for convenience. - Ensure chicken is fully cooked; internal temperature should reach 165°F (75°C). Cooking the chicken can take time, but using rotisserie chicken saves you effort. It offers great flavor and saves cooking time. If you cook your own chicken, make sure to check the internal temperature. It needs to reach 165°F (75°C) to be safe to eat. - Serve in individual bowls, atop lettuce leaves, or in a wrap. - Consider a lemon wedge on the side for added flavor. Serving your salad can be fun! You can use individual bowls or place it on crisp lettuce leaves. If you want a wrap, that works too. A lemon wedge on the side brightens the meal and adds a zesty kick. For the full experience, try the [Full Recipe]. Enjoy your tasty and healthy choice! {{image_4}} You can make your creamy avocado chicken salad even better by adding fruits. Diced apples or grapes bring a nice sweetness. They also add a nice crunch. If you want a tropical twist, try adding mango. Its juicy flavor blends well with creamy avocado. Not in the mood for chicken? You can easily swap it out. Canned tuna or chickpeas work well for a vegetarian option. Both of these options add protein and flavor. If you love seafood, consider using grilled shrimp. It adds a fresh, light taste to the salad. Want to spice things up? Adding spices can really boost the flavor. Try cumin or smoked paprika for a warm kick. If you like heat, toss in some jalapeños. These will give your salad a spicy edge that keeps it exciting. Feel free to get creative with your mix-ins! Each variation gives you a new twist on this delicious dish. Check out the Full Recipe for more ideas. Store your creamy avocado chicken salad in an airtight container in the refrigerator. It will stay fresh for up to 2 days. I suggest enjoying it right after you make it. However, if you keep the ingredients separate, it can last a little longer. This way, you keep the textures nice. Do not freeze the salad. Avocado gets mushy when frozen. If you want to prepare ahead, consider freezing the chicken on its own. This will keep it fresh and ready for your salad. Prep your ingredients ahead of time. Store them separately to mix later. This salad is a great option for busy weeks. You can have a tasty meal ready in minutes! For the full recipe, check out the detailed instructions above. Typically lasts for about 2 days when stored properly. I recommend using an airtight container. This helps keep your salad fresh and tasty. After two days, the avocado may brown and lose its creamy texture. Yes, but it’s best to combine the ingredients just before serving to maintain freshness. If you prepare it early, store the salad components separately. This way, the avocado stays bright and creamy. Great with whole-grain bread, crackers, or a side of fruit. I love serving it on toast for a hearty lunch. Pairing it with fresh fruit offers a nice, sweet contrast. You can also use it as a filling in wraps for a tasty twist. For the full recipe, check out the detailed steps above. This creamy avocado chicken salad is easy to make and full of flavor. We covered the main ingredients, steps, and tips to perfect it. You learned how to mix chicken with creamy dressing and fresh veggies. Remember to store leftovers properly for the best taste. Enjoy this salad as a quick meal or snack. Feel free to customize with your favorite ingredients. With these simple tips, you can create a dish that is both healthy and delicious.](https://goldendishy.com/wp-content/uploads/2025/06/50306de2-9119-4a0c-8cb7-3da0c4c0a2a4-768x768.webp)