Skip to content
About
Contact
Cookie Policy
Copyright Policy
Disclaimer
Search
Home
Dinner
Appetizer
Desserts
Drinks
About
Contact
Privacy Policy
Toggle Menu
Home
/
Appetizer
- Page 11
Appetizer
Loaded Potato Skins Flavorful and Simple Recipe
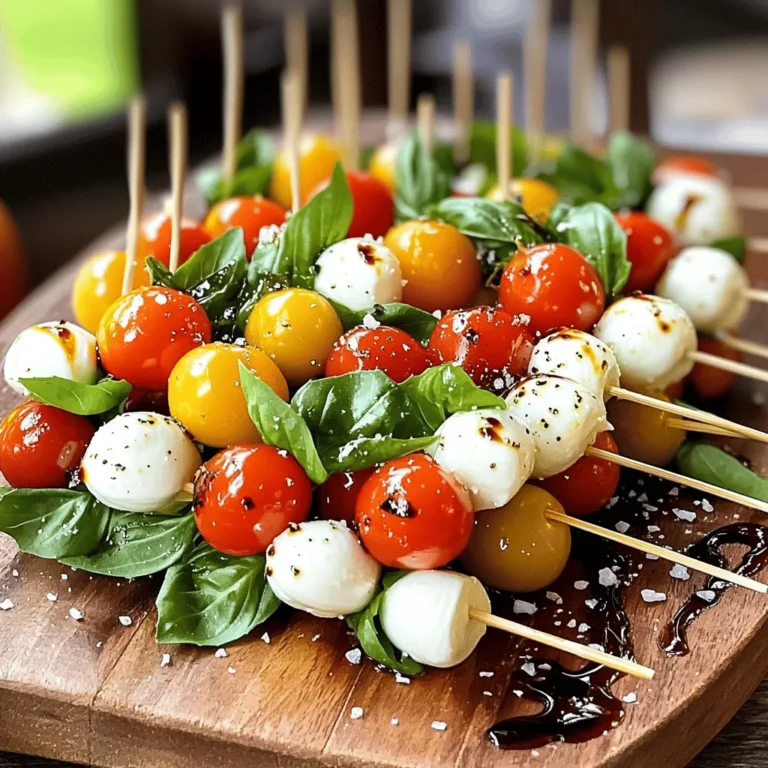
Easy Caprese Skewers Fresh and Flavorful Appetizer
Classic Caesar Salad Fresh and Flavorful Recipe Guide
Crispy Baked Avocado Fries for a Tasty Snack
Crispy Air Fryer French Fries Easy and Flavorful Recipe
Homemade Bagels Simple and Delicious Recipe Guide
Mango Avocado Salsa Flavorful and Fresh Delight
Easy Greek Pasta Salad Simple and Flavorful Delight
Homemade Ranch Dressing Simple and Flavorful Recipe
Cheesy Garlic Breadsticks Irresistible Flavor Awaits
Page navigation
Previous Page
Previous
1
…
9
10
11
12
13
…
19
Next Page
Next
Home
Dinner
Appetizer
Desserts
Drinks
About
Contact
Privacy Policy
Toggle Menu Close
Search for:
Search


![A classic Caesar salad has a few key components. First, you need fresh romaine lettuce. It adds a nice crunch. Next, croutons bring texture and flavor. You can buy them or make your own. Parmesan cheese gives a rich taste. The dressing is vital too. You need mayonnaise, Dijon mustard, and lemon juice. Garlic adds depth, while Worcestershire sauce is optional for extra flavor. Don't forget salt and pepper to enhance everything. You can add other ingredients to make your Caesar salad special. Grilled chicken or shrimp makes it a full meal. Avocado adds creaminess. For a twist, try capers or anchovies. They give a salty kick. Fresh herbs like parsley or basil can brighten the salad. These options let you customize your dish to your taste. If you're missing an ingredient, don’t worry! You can use Greek yogurt instead of mayonnaise for a lighter dressing. If you don’t have Dijon mustard, regular mustard works too. For cheese, try Pecorino Romano if you can't find Parmesan. If you're out of Worcestershire sauce, soy sauce can be a good substitute. These swaps keep your salad tasty and fresh. For the complete recipe, check out the Full Recipe. To start, you need to make the dressing. In a medium bowl, whisk together these ingredients: - 1/4 cup mayonnaise - 2 tablespoons Dijon mustard - 2 tablespoons fresh lemon juice - 1 teaspoon Worcestershire sauce (optional) - 1 clove garlic, minced - Salt and freshly cracked black pepper Mix until smooth and creamy. The dressing should have a nice tang from the lemon and mustard. Adjust the salt and pepper to your taste. If you like it zestier, add a bit more lemon juice. Next, grab a large bowl. Add the chopped romaine lettuce: - 1 large head of romaine lettuce, washed and chopped - A drizzle of olive oil Toss the lettuce gently to coat it with the oil. This step helps keep the leaves crisp. Now, pour the dressing over the lettuce and toss again. Make sure every leaf gets a good coating. Now, fold in the croutons and sprinkle: - 1 cup of croutons - 1/2 cup grated Parmesan cheese Be gentle here to keep the croutons crunchy. Taste the salad and adjust the seasoning if needed. Transfer the salad to a serving platter or individual bowls. For a nice touch, garnish with more Parmesan cheese and a sprinkle of black pepper. Serve it right away for the best crunch. If you want more ideas, try adding grilled chicken or shrimp for a heartier meal. Check out the Full Recipe for more tips! To get that perfect crunch, start with fresh romaine lettuce. Look for crisp, vibrant leaves. Wash them well, then chop them into bite-sized pieces. This helps each bite stay crunchy. Next, use good quality croutons. You can make your own by toasting bread with olive oil and garlic. This adds flavor and keeps them crunchy. Mix the croutons in just before serving. This way, they won’t get soggy. When applying dressing, less is more. Start with a small amount. Toss the salad gently to coat the leaves without bruising them. If the salad seems dry, add more dressing little by little. Always taste as you go. This lets you find the right balance for your flavor. Remember, the goal is to enhance the salad, not drown it. Taste is personal, so feel free to adjust. If you like it tangy, add more lemon juice or Dijon mustard. If you want it richer, add more Parmesan cheese. Salt and pepper are key too. A little extra can elevate the dish. Experiment with Worcestershire sauce for unique depth. This can give your salad a signature twist. {{image_4}} Adding grilled chicken or shrimp makes your Caesar salad hearty. Both options bring flavor and protein. For grilled chicken, season it with salt and pepper. Cook it until it is golden brown. Slice it thin and place it on top of your salad. For shrimp, sauté them in olive oil with garlic. Cook until they turn pink. Either choice takes your salad to the next level. If you want a veggie-packed salad, add more vegetables. Try diced bell peppers, cucumbers, or cherry tomatoes. These add crunch and freshness. You can also include roasted veggies like zucchini or asparagus for depth. This gives your Caesar salad a colorful twist. Each vegetable choice adds its own flavor, making it unique. Get creative with your ingredients for a fun twist. Consider adding avocado for creaminess. You can also sprinkle nuts like pine nuts or walnuts for crunch. Another option is to use different cheeses. Feta or blue cheese can change the flavor profile. Lastly, add a touch of hot sauce for some heat. Experimenting with these unique ingredients can make your Caesar salad exciting. For the full recipe, check out the [Full Recipe]. To keep your Classic Caesar Salad fresh, store it in the fridge. Place the salad in an airtight container. If you have leftover dressing, store it separately. This keeps the croutons crunchy and the lettuce crisp. Always add croutons just before serving. This way, they stay crunchy and not soggy. You can also wrap the lettuce in a damp paper towel. This helps the leaves stay fresh longer. When stored properly, Classic Caesar Salad lasts about 2 to 3 days. If the lettuce wilts or the croutons become soft, it’s best to toss it out. Always check for signs of spoilage before enjoying leftovers. A Caesar Salad stands out due to its unique dressing and ingredients. It typically includes romaine lettuce, croutons, and Parmesan cheese. The dressing is creamy, made with mayonnaise, mustard, lemon juice, garlic, and Worcestershire sauce. This mix gives the salad its rich flavor. The crunch of the croutons and the fresh lettuce create a delightful texture. Yes, you can make Caesar Dressing from scratch. It’s simple and rewarding. Just whisk together mayonnaise, Dijon mustard, lemon juice, garlic, and Worcestershire sauce. This homemade version tastes fresher than store-bought dressings. You can adjust flavors according to your taste. For a twist, add a bit of anchovy paste for a classic touch. Absolutely! A Caesar Salad can be made nut-free. Traditional recipes do not include nuts. Just focus on the core ingredients: romaine lettuce, croutons, and the creamy dressing. If you make your own croutons, ensure the bread you use is also nut-free. Everyone can enjoy this tasty salad without nuts. To make a Caesar Salad healthier, try these tips: - Use Greek yogurt instead of mayonnaise for the dressing. - Add more vegetables like cherry tomatoes or cucumbers for extra nutrients. - Use whole-grain croutons for more fiber. - Limit the cheese or use a lower-fat version. These changes keep the flavors while boosting the nutrition. You can find the full recipe for a Classic Caesar Salad here: Crispy Caesar Delight 🥗. This recipe guides you through making a fresh and flavorful salad that you will love. This blog post covers how to make a classic Caesar salad. We discussed key ingredients and tips for adding flavor. You learned how to prepare the dressing and toss the salad correctly. I shared storage info and answered common questions about Caesar salads. Keep experimenting with variations, whether adding protein or fresh veggies. Enjoy making your salad just right for you! Your perfect Caesar awaits.](https://goldendishy.com/wp-content/uploads/2025/06/57ecdae1-38df-4f5b-a4b6-710b22066cc6-768x768.webp)


![- Ripe mango, diced - Ripe avocados, diced - Small red onion, finely chopped - Medium red bell pepper, finely diced - Jalapeño peppers, deseeded and minced Fresh produce is key for a bright flavor. I love the sweet, juicy mango and creamy avocado. Choose ripe mangoes for the best taste. They should feel soft, but not mushy. Avocados should also yield slightly when pressed. This gives the salsa a smooth texture. - Fresh cilantro leaves, chopped - Juice of fresh limes - Salt and freshly cracked black pepper - Optional: Honey for sweetness Cilantro adds a fresh kick. Lime juice brightens the mix. Salt and pepper bring out all the flavors. Honey is a fun twist. It balances the heat from the jalapeños. Adjust the salt and pepper to match your taste. - Suggested amounts for a balanced flavor - Importance of using ripe ingredients Use equal amounts of mango and avocado for balance. A small onion and bell pepper add crunch. Adjust jalapeños based on your spice level. Ripe ingredients really make a difference. They enhance the taste and texture of the salsa. Remember, fresh is always best! For the full recipe, check out the complete guide. Gather your ingredients first. You will need: - 1 ripe mango, diced into small cubes - 2 ripe avocados, diced into small cubes - 1 small red onion, finely chopped - 1 medium red bell pepper, finely diced - 1-2 jalapeño peppers, deseeded and minced - 1/4 cup fresh cilantro leaves, chopped - Juice of 2 limes - Salt and freshly cracked black pepper, to taste - Optional: 1 teaspoon honey You’ll want a sharp knife for dicing and a cutting board. A large mixing bowl is also essential for combining everything. Start by placing the diced mango and avocado into the bowl. Next, add the chopped red onion and diced red bell pepper. Use a large spoon to mix gently. Be careful not to mash the avocado. When you add the minced jalapeño, adjust the amount for your spice level. Add the cilantro leaves, then squeeze fresh lime juice over the mix. Season with salt and pepper, and if you like, stir in honey for a touch of sweetness. Gently toss the ingredients together until well combined. This keeps the avocado pieces intact and makes for a prettier salsa. Letting the salsa sit is key. This helps the flavors blend together nicely. I recommend letting it sit for at least 10 minutes at room temperature. During this time, the lime juice and salt work their magic, enhancing the overall taste. Enjoy this fresh delight with your favorite chips or as a topping on grilled dishes. For the full recipe, check out the details above. How do you choose ripe mangoes and avocados? Look for soft spots. A ripe mango gives slightly when pressed. The skin should be a mix of green and yellow. For avocados, check the skin color. It should be dark green or black. Gently squeeze; it should feel soft but not mushy. Fresh herbs and vegetables make your salsa shine. Look for bright colors and firm textures. Cilantro should smell fresh and green. Bell peppers should be smooth and shiny. Avoid any with brown spots or wrinkles. How can you keep avocados intact? Use a sharp knife for cutting. Dice them gently. Avoid stirring too hard when mixing. Use a large spoon to gently fold the salsa. For tossing the salsa, you want to be careful. Start by mixing the firmer ingredients first. Then, add the avocados and mango last. This way, you avoid mashing them. How can you adjust spice levels with jalapeños? Start with one jalapeño. Taste before adding more. If you want it spicier, add more minced peppers. Remember, you can always add spice, but you can't take it away! To balance sweetness, you can add honey or other sweeteners. A teaspoon of honey works wonders. It brings out the fruit flavors without being too sweet. You can also try agave syrup or maple syrup for a twist. For the full recipe, check out the details above. Enjoy your Mango Avocado Salsa! {{image_4}} You can make mango avocado salsa even more exciting. Adding fruits like pineapple or peach gives it a sweet twist. The juicy sweetness of pineapple pairs well with mango. Try diced peaches for a softer sweetness. These fruits bring unique flavors that brighten up the dish. Herbs can also change the taste. Instead of cilantro, try mint or parsley. Mint adds a fresh and cool taste. Parsley gives a mild flavor that still pops. Experimenting with herbs can transform your salsa. Making this salsa vegan or gluten-free is easy. The recipe is already plant-based, so you’re set. You can also adjust the ingredients based on what you have. If you don't have lime, use lemon juice instead. Missing jalapeños? Just leave them out or use a milder pepper. If you want to make it creamier, try adding black beans. They add protein and texture without changing the flavor much. This way, you can enjoy a nutritious dish that fits your needs. Mango avocado salsa pairs great with tacos or grilled dishes. Spoon it over fish or chicken for a fresh burst of flavor. You can also serve it with crispy tortilla chips for dipping. Get creative! Use the salsa in salads for an extra kick. It can work as a topping for baked potatoes too. The fresh flavors make any meal feel special. For the full recipe, check out the [Full Recipe]. To keep your Mango Avocado Salsa fresh, use an airtight container. Glass or plastic containers work well. Make sure to fill the container to the top. This minimizes air and keeps it fresher longer. To prevent browning of the avocado, squeeze extra lime juice over the salsa. The acidity helps slow down oxidation. Mango Avocado Salsa lasts about 2-3 days in the fridge. Always check for signs of spoilage. If you see browning, it's still okay. But if it smells sour or looks mushy, it's time to toss it. Fresh salsa is best enjoyed right away! You can freeze Mango Avocado Salsa, but the texture may change. Freezing can make the avocado mushy when thawed. If you decide to freeze it, use a freezer-safe container. Leave some space at the top for expansion. When ready to use, thaw it in the fridge overnight. Stir well before serving to mix the flavors. Store your Mango Avocado Salsa in an airtight container. This keeps it fresh. Place it in the fridge right after making it. Use it within two days for the best taste. To slow browning, add lime juice on top before sealing. Yes, you can make it ahead, but it is best fresh. If you want to prepare it early, chop the mango and avocado just before serving. This keeps the salsa vibrant and tasty. If you can't find mango, try peach or pineapple for sweetness. For avocado, use mashed banana or even silken tofu for creaminess. The flavors change, but the salsa stays delicious. To change the spice level, use fewer jalapeños. You can also remove the seeds and ribs of the peppers. For more heat, add more jalapeños or a pinch of cayenne. Taste as you go to get it just right. Yes, it is great for meal prep! You can add it to salads, tacos, or grilled meats. Just remember to store it properly. Enjoying this salsa adds flavor and fun to your meals! For the full recipe, check out the previous section. Mango Avocado Salsa is a fresh and vibrant dish. We discussed the best ingredients, like ripe mangoes and avocados, and how to combine them. I shared tips for mixing, storing, and serving, plus fun variations to try. In the end, enjoy creating your salsa! Fresh flavors and fun twists await you. Dive in and savor every bite.](https://goldendishy.com/wp-content/uploads/2025/06/5eda548a-8636-40c4-8fce-ece2351eafc8-768x768.webp)
![- 8 oz (about 225g) rotini or penne pasta - 1 cup cherry tomatoes, halved - 1 cucumber, finely diced - 1/2 red onion, finely chopped - 1 bell pepper (any color), diced into small pieces - 1 cup Kalamata olives, pitted and sliced in half - 1 cup feta cheese, crumbled into bite-sized pieces - 1/4 cup fresh parsley, roughly chopped - 1/4 cup high-quality olive oil - 2 tablespoons red wine vinegar (optional for flavor) - 1 tablespoon freshly squeezed lemon juice - 1 teaspoon dried oregano - Sea salt and freshly cracked black pepper to taste You can make this salad your own. Try adding: - Grilled chicken or shrimp for protein - Artichoke hearts for extra flavor - Sun-dried tomatoes for a sweeter touch - Avocado for creaminess - Different herbs like mint or dill for freshness Fresh ingredients shine in this salad. Here’s how to pick the best: - Choose firm, bright cherry tomatoes. They should smell sweet. - Look for a cucumber with smooth skin. It should feel heavy for its size. - Pick bell peppers that are shiny and firm. Avoid any with soft spots. - For olives, select Kalamata that are dark and plump. - Get feta cheese that is crumbly and moist, not dry. Using fresh ingredients elevates the flavor and makes your Easy Greek Pasta Salad a true delight. For the full recipe, check out the Mediterranean Delight Pasta Salad 🥗! Start by boiling a large pot of salted water. This step is key to flavor. Add 8 oz of rotini or penne pasta. Cook it according to the package directions until it is al dente. This should take about 8-10 minutes. Once the pasta is cooked, drain it well. Rinse the pasta under cold water to stop the cooking and cool it down. This keeps the texture just right. In a large mixing bowl, add the cooled pasta. Next, toss in 1 cup of halved cherry tomatoes, 1 diced cucumber, and 1/2 finely chopped red onion. Don’t forget 1 diced bell pepper, which adds color and crunch. Add 1 cup of Kalamata olives that you’ve pitted and sliced. Finally, sprinkle in 1/4 cup of roughly chopped fresh parsley. Mix everything well to combine the flavors. In a small bowl, whisk together the dressing. Use 1/4 cup of high-quality olive oil. Add 2 tablespoons of red wine vinegar or fresh lemon juice if you prefer a brighter taste. Squeeze in 1 tablespoon of lemon juice for extra zest. Mix in 1 teaspoon of dried oregano. Season with sea salt and freshly cracked black pepper to taste. Whisk until the ingredients blend into a smooth dressing. Drizzle the dressing over the pasta and vegetable mix. Toss gently to coat all the ingredients well with the dressing. This step is crucial for flavor. Now, softly fold in the crumbled feta cheese. Be careful not to break the cheese too much; you want those nice chunks. For the best flavor, cover the salad with plastic wrap. Place it in the refrigerator for at least 20 minutes. This waiting period allows the flavors to blend beautifully. After chilling, taste the salad. Adjust the seasoning with more salt, pepper, or lemon juice if needed. Enjoy making this Easy Greek Pasta Salad! For the Full Recipe, check the link. To make the best Greek pasta salad, start with the right pasta. Use rotini or penne, as they hold the dressing well. Cook the pasta just right. It should be al dente, so it stays firm. Rinse it under cold water after cooking. This step cools the pasta and stops it from cooking more. Next, chop your veggies evenly. This way, each bite has a bit of everything. Fresh ingredients bring the best flavor. Use ripe cherry tomatoes and a crisp cucumber. Kalamata olives add a nice briny touch. Don’t forget the feta cheese! It should be crumbly but not too small. Many people overcook the pasta. This makes it mushy and not enjoyable. Also, don’t skip the rinsing step. It keeps the pasta from sticking together. Another mistake is not seasoning enough. Taste your salad after mixing. You might need more salt, pepper, or lemon juice. Always adjust to make it perfect for your palate. Lastly, let your salad chill before serving. This step allows the flavors to blend and deepen. A quick chill of at least 20 minutes works wonders. For more flavor, try adding fresh herbs. Basil or dill can brighten the dish. If you like heat, add a pinch of red pepper flakes. This gives your salad a nice kick. Experiment with your dressing too! Swap red wine vinegar for lemon juice for a brighter taste. A splash of balsamic vinegar can also add depth. Lastly, if you want a creamier salad, mix in some Greek yogurt. It adds richness without overpowering other flavors. For the full recipe, check out the Mediterranean Delight Pasta Salad. Enjoy making this simple and colorful dish! {{image_4}} You can easily add proteins to your Easy Greek Pasta Salad. Grilled chicken or canned tuna are great choices. They boost the dish's nutrition and make it more filling. For chicken, use cooked, diced pieces. For tuna, just drain and flake it. Mix your chosen protein right into the salad for a complete meal. Feel free to switch up the veggies in your pasta salad. Different colors and flavors keep it exciting. Try adding artichoke hearts, sun-dried tomatoes, or roasted red peppers. You can also use zucchini or spinach for a fresh twist. Just chop them into small pieces and mix them in. If you want a vegan version, swap feta cheese for a plant-based alternative. Nutritional yeast can also add a cheesy flavor without dairy. For gluten-free options, use gluten-free pasta. There are many types available now. This way, you can enjoy the salad without worry. Check labels to ensure all ingredients meet your dietary needs. Find the full recipe at [Full Recipe]. To keep your Easy Greek Pasta Salad fresh, store it in an airtight container. This helps prevent air and moisture from spoiling your salad. If you have leftovers, make sure to cool the salad before sealing it. This keeps the flavors intact and avoids sogginess. You can also separate the dressing if you want to keep the salad crisp for longer. This salad tastes best cold, so there’s no need to reheat it. If you find the pasta has absorbed the dressing, add a splash of olive oil or lemon juice. Toss it gently to revive the flavors. If you stored the salad in the fridge, let it sit at room temperature for about 10 minutes before serving. This will enhance the taste and texture. Your Easy Greek Pasta Salad can last about 3 to 5 days in the fridge. Always check for any signs of spoilage. Look for changes in color or texture. If you notice any off smells, discard it. Trust your senses; if something seems off, it’s better to be safe. Enjoy your salad while it's fresh for the best taste! You can store Easy Greek Pasta Salad in the fridge for about 3 to 5 days. Keep it in a sealed container to keep it fresh. If you see any signs of spoilage, like an off smell or discoloration, it's best to toss it out. Yes, you can make this salad ahead of time! In fact, it tastes better after sitting for a while. The flavors meld together nicely. I recommend making it a few hours in advance or even the night before. Just remember to add the feta cheese right before serving to keep it fresh. Greek Pasta Salad pairs well with various dishes. You can serve it alongside grilled chicken, lamb, or fish. It also works great as a side for burgers or sandwiches. If you're having a picnic, it's perfect with some crusty bread and hummus. Yes, you can substitute feta cheese if you prefer. Try using goat cheese or ricotta for a different flavor. For a dairy-free option, you can use a plant-based cheese. Just keep in mind that the taste will change slightly, but the salad will still be delicious! This blog post covers how to make Easy Greek Pasta Salad. We discussed essential ingredients and tips for freshness. You learned steps to prepare the salad, mix the ingredients, and make the dressing. We highlighted ways to enhance flavors and avoid common mistakes. Plus, you can try various protein and veggie options. Finally, you got storage tips to keep the salad fresh. Enjoy making this salad for your next meal or gathering! It’s simple, tasty, and fun to customize.](https://goldendishy.com/wp-content/uploads/2025/06/0fc22d26-3c6f-4a8e-aae2-92058968a948-768x768.webp)

. - Combine 1 cup warm water, 2 ¼ teaspoons yeast, and 1 teaspoon sugar. - Let this sit for 5-10 minutes until it becomes frothy. This means the yeast is ready. - In a large bowl, mix 3 cups flour and 1 teaspoon salt. - Pour in the activated yeast mixture and 2 tablespoons olive oil. - Use your hands to mix until a sticky dough forms. - Place the dough on a floured surface and knead for about 5 minutes. - The goal is a smooth and elastic dough. - Lightly grease a bowl and place the kneaded dough inside. - Cover it with a kitchen towel and let it rise for 1 hour. - Once it doubles in size, gently punch it down to release air. - Roll the dough into a rectangle, about ½ inch thick. - Transfer it to a baking sheet, and score it into breadstick shapes. You can find the complete process in the Full Recipe. To make great breadsticks, check your dough's texture. The dough should feel smooth and soft. If it sticks to your fingers, it is too wet. If it pulls away cleanly, you’re on the right track. Knead it until it is elastic. This gives you that perfect bite. For the best results, preheat your oven to 425°F (220°C). This hot oven helps the breadsticks puff up and get golden. Line your baking sheet with parchment paper. This keeps your breadsticks from sticking and makes cleanup easy. Bake for 12-15 minutes. Watch for a golden brown color, that means they are ready! Want to spice things up? You can add extra flavors to your breadsticks. Try adding crushed red pepper for heat or fresh basil for a hint of sweetness. You can also use different cheeses. Cheddar or pepper jack can give you a fun twist. Mix and match to find your favorite! For the full recipe, check out the detailed steps. {{image_4}} You can change the cheese to make each batch unique. Try using cheddar for a sharp taste. Pepper jack adds a fun spicy kick. Mix and match cheeses to create your favorite flavor. Just remember, the more cheese, the better! If you want a vegan option, use plant-based cheese. There are many tasty brands available today. You can also make a garlic spread with olive oil and herbs instead of butter. This keeps the flavor rich while being dairy-free. Add fresh herbs to bring new life to your breadsticks. Chopped basil or thyme can add a lovely aroma. You can mix herbs into the dough or sprinkle them on top before baking. These small changes make a big difference. Try one of these variations next time you bake your cheesy garlic breadsticks using the Full Recipe! To store leftover breadsticks, let them cool completely first. Place them in an airtight container. This keeps them fresh. You can also wrap them in plastic wrap. Store them at room temperature for up to two days. If you want them to last longer, keep them in the fridge. Just remember, cold breadsticks can lose some of their warmth. Freezing is a great way to keep these breadsticks tasty for later. After they cool, wrap each breadstick in plastic wrap. Then, place them in a freezer bag. Make sure to remove as much air as possible. This helps avoid freezer burn. To reheat, take them out and let them thaw first. Then, bake them at 350°F (175°C) for about 10 minutes. They will taste fresh again! When stored properly, these breadsticks stay fresh for about two days at room temperature. In the fridge, they can last up to a week. If frozen, they can last for about three months. Just remember, the sooner you eat them, the better they will taste. For more details, check the Full Recipe. To make your breadsticks extra cheesy, you can add more cheese. Here are some tips: - Use a blend of mozzarella and cheddar for depth. - Sprinkle cheese on top before baking. - Add cheese to the dough for a cheesy base. - Mix in cream cheese with your garlic butter for a rich flavor. Each of these tips gives your breadsticks a gooey, cheesy texture. It enhances the flavor and makes every bite delightful. Yes, you can prepare these breadsticks ahead of time! Here’s how: - Make the dough and let it rise. - Shape the breadsticks and cover them with plastic wrap. - Store in the fridge for up to 24 hours. When you are ready, just take them out to rise a bit more and bake. This method saves time and allows you to enjoy fresh breadsticks without the fuss. Dipping sauces elevate your cheesy garlic breadsticks. Here are some great options: - Marinara sauce adds a classic touch. - Garlic butter enhances the garlic flavor. - Ranch dressing offers a creamy contrast. - Alfredo sauce gives a rich, cheesy dip. These dips not only complement the breadsticks but also add fun flavors to each bite. You can mix and match to find your perfect pairing! In this post, I shared how to make delicious cheesy garlic breadsticks. We covered essential ingredients, step-by-step instructions, and helpful tips. I also shared variations if you want something different. Now, you have the tools and knowledge to create your own. Enjoy these tasty treats with family or friends. Happy cooking!](https://goldendishy.com/wp-content/uploads/2025/06/f014268d-bdac-4f9e-9ca6-06fbafbccd76-768x768.webp)