Baked Eggplant Parmesan Flavorful and Easy Recipe

Are you ready to enjoy a delicious and easy Baked Eggplant Parmesan? This dish is packed with flavor and perfect for any meal. I’ll walk you through simple steps to create the best version you’ve ever had. From choosing the right ingredients to baking tips, you’ll impress your friends and family. Let’s dive in and make a dish that’s sure to please everyone at the table!
Ingredients
Key Ingredients for Baked Eggplant Parmesan
To make the best Baked Eggplant Parmesan, you need fresh and simple ingredients. Here’s what you will need:
– 2 large eggplants, sliced into ½-inch rounds
– 1 teaspoon salt
– 1 cup all-purpose flour
– 2 large eggs, beaten
– 1 ½ cups breadcrumbs (Italian seasoned preferred)
– 2 cups marinara sauce (homemade or store-bought)
– 2 cups shredded mozzarella cheese
– 1 cup grated Parmesan cheese
– 1 tablespoon dried oregano
– 1 tablespoon fresh basil, chopped (or 1 teaspoon dried basil)
– Olive oil spray or ¼ cup olive oil for drizzling
– Fresh basil leaves for garnish (optional)
These ingredients work together to create a rich and tasty dish.
Recommended Quality Ingredients
Using quality ingredients makes a big difference. Choose firm, fresh eggplants. Look for those with smooth skin and no blemishes. For cheese, fresh mozzarella gives a great melt. If you use store-bought marinara sauce, pick one with no added sugar. This ensures a clean flavor in every bite.
Dietary Alternatives and Substitutions
You can make this dish fit your needs. If you want a gluten-free version, swap all-purpose flour and breadcrumbs for gluten-free options. For a vegan twist, use egg replacements like flax eggs and substitute cheese with vegan cheese. This makes it easy to enjoy Baked Eggplant Parmesan no matter your diet.
Step-by-Step Instructions
Preparation Steps for Eggplant
Start by slicing the eggplants. Use two large eggplants and cut them into ½-inch rounds. Next, sprinkle salt on the slices. This step is key; it draws out moisture and bitterness. Let the eggplant sit for about 30 minutes. After that, rinse the slices under cold water. Pat them dry using paper towels. This helps ensure a crispy texture when baked.
Breading Process Explained
Now, let’s create a breading station. You will need three shallow dishes. In the first dish, add one cup of all-purpose flour. In the second dish, beat two large eggs. For the third dish, pour in 1 ½ cups of breadcrumbs. I recommend using Italian seasoned breadcrumbs for extra flavor.
Take each eggplant slice and dip it into the flour first. Shake off any excess flour. Then, dip it into the beaten eggs, coating it well. Finally, press it into the breadcrumbs until it is fully covered. Set the breaded slices aside on a plate. This process gives the eggplant a crunchy, golden crust.
Baking Instructions for Perfect Texture
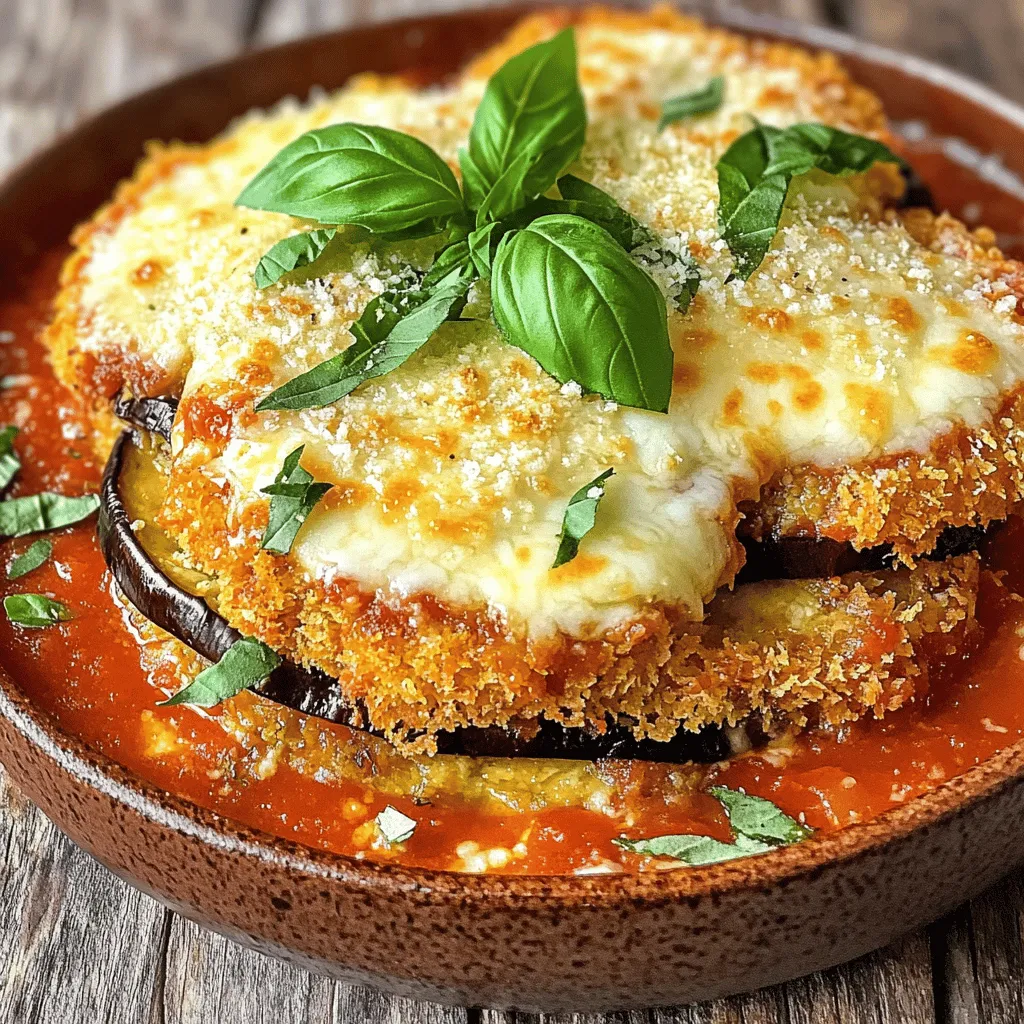
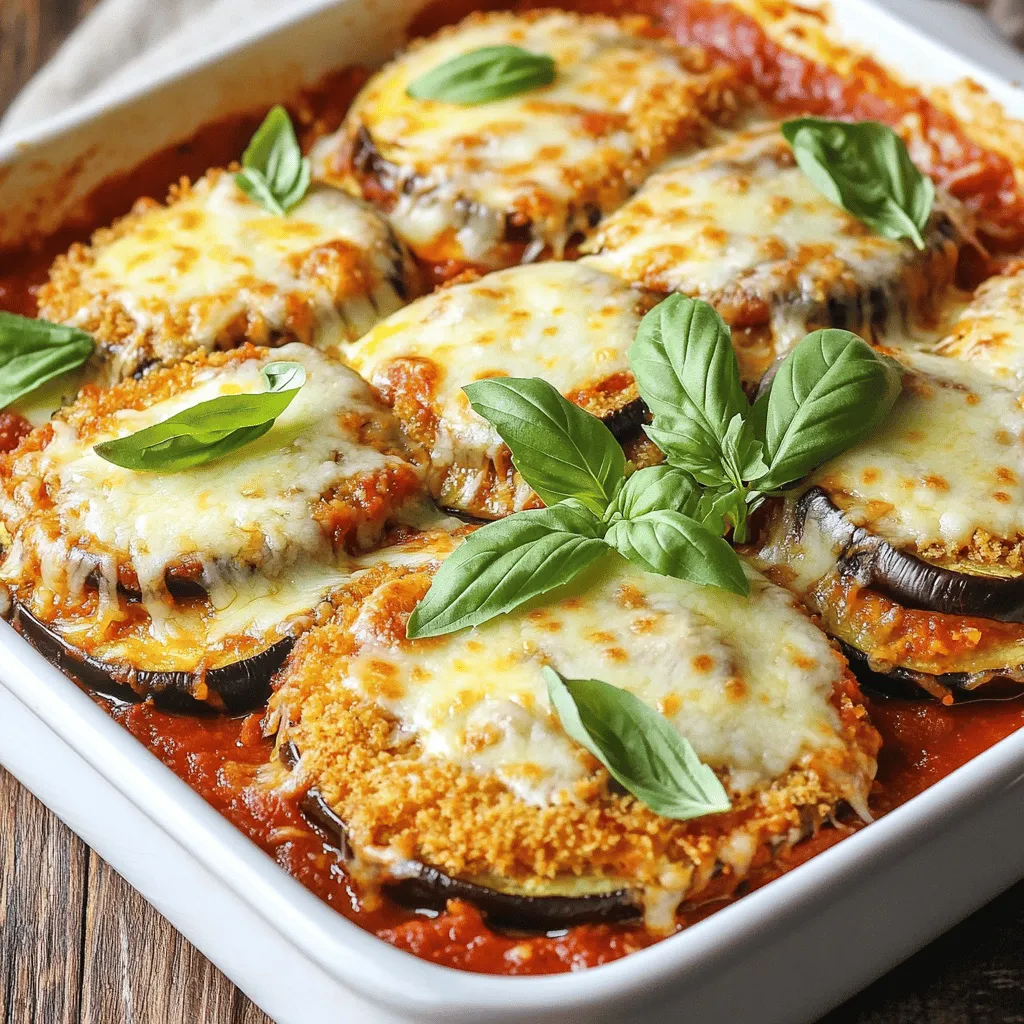
Preheat your oven to 375°F (190°C). In a large baking dish, spread a thin layer of marinara sauce on the bottom. Add half of the fried eggplant slices over the sauce. Then, sprinkle half of the shredded mozzarella and grated Parmesan cheese on top. Add half of the oregano and basil as well.
Repeat the layers with the remaining eggplant, sauce, and cheeses. Cover the baking dish tightly with aluminum foil. Bake for 25 minutes. After that, remove the foil and bake for another 15 minutes. The goal is for the cheese to bubble and turn golden brown.
Once done, let it sit for about 10 minutes. This resting time helps the layers set, making it easier to slice. If you want, garnish your dish with fresh basil leaves before serving. This adds a nice touch and boosts flavor.
Tips & Tricks
Best Practices for Baking Eggplant
To get the best results when baking eggplant, follow these steps:
– Salting the Eggplant: Always salt the sliced eggplant. This draws out moisture and bitterness. Let it sit for 30 minutes, then rinse and dry.
– Uniform Slices: Cut the eggplant into even ½-inch rounds. This ensures even cooking.
– Oil the Pan: Use olive oil spray or drizzle olive oil in the baking dish. This helps prevent sticking and adds flavor.
Enhancing Flavor with Seasonings
To boost the flavor of your baked eggplant parmesan, try these tips:
– Season the Breadcrumbs: Add garlic powder, onion powder, or Italian herbs to the breadcrumbs. This adds depth and aroma.
– Layer with Marinara Sauce: Use a rich marinara sauce. It adds moisture and tanginess.
– Fresh Herbs: Sprinkle fresh basil or oregano between layers. This brings freshness and brightens the dish.
Troubleshooting Common Issues
Sometimes, things don’t go as planned. Here are solutions for common problems:
– Eggplant is Soggy: If the eggplant is soggy, ensure you salted it well and dried it after rinsing.
– Cheese is Not Melting: If your cheese doesn’t melt, cover the dish with foil initially. This traps heat and helps the cheese melt evenly.
– Burnt Top: If the top gets too dark, cover it with foil for the last few minutes of baking.
By using these tips, you can create a delicious baked eggplant parmesan that impresses everyone.

Variations
Healthier Versions of Baked Eggplant Parmesan
If you want a lighter dish, you can try baking instead of frying the eggplant. This cuts down on oil and calories. You can also use whole wheat breadcrumbs for extra fiber. Consider using low-fat cheese to reduce fat while still enjoying that cheesy goodness.
Ingredient Swaps for Dietary Preferences
For a gluten-free option, swap regular flour and breadcrumbs for almond flour and gluten-free breadcrumbs. If you are vegan, you can replace cheese with cashew cheese or nutritional yeast. You can also use plant-based eggs made from flaxseed or chia seeds. These swaps keep the dish tasty while meeting your dietary needs.
Creative Serving Suggestions
Baked eggplant parmesan shines as a main dish, but you can also serve it in fun ways. Try it on a bed of fresh spinach or with a side of zoodles (zucchini noodles). You can also make a sandwich with layers of eggplant parmesan between crusty bread. It adds a new twist to this classic dish.
Storage Info
Proper Storage Techniques
To keep your baked eggplant parmesan fresh, store it in an airtight container. Make sure to let it cool to room temperature first. Layer parchment paper between slices if you want to stack them. This helps prevent sticking. If you plan to eat it within three days, you can keep it in the fridge.
Reheating Instructions
When you’re ready to enjoy leftovers, preheat your oven to 350°F (175°C). Place the eggplant parmesan in an oven-safe dish. Cover it with foil to keep it moist, and heat for about 20 minutes. You can also reheat individual slices in the microwave for about 1-2 minutes. This method is quick but may not keep the crust crispy.
Freezing Tips for Long-term Storage
If you want to store baked eggplant parmesan for a longer time, freezing is a great option. Cut it into portions and wrap each slice tightly in plastic wrap. Then, place the wrapped slices in a freezer-safe bag. Make sure to label the bag with the date. It can last up to three months in the freezer. To reheat, thaw overnight in the fridge and then follow the reheating instructions.
FAQs
Can I make Baked Eggplant Parmesan ahead of time?
Yes, you can make Baked Eggplant Parmesan ahead of time. You can assemble the layers, then cover it and refrigerate. This lets the flavors blend. Bake it when you’re ready to eat, following the same baking instructions. This method saves time on busy days.
What can I use instead of breadcrumbs?
If you need a substitute for breadcrumbs, consider these options:
– Crushed crackers
– Panko crumbs
– Ground nuts (like almonds or walnuts)
– Cornmeal
These options add a tasty crunch. Choose what you like best for your dish.
How long does Baked Eggplant Parmesan last in the refrigerator?
Baked Eggplant Parmesan lasts about 3 to 5 days in the refrigerator. Make sure to store it in an airtight container. This keeps it fresh. Reheat portions in the oven or microwave when you want to enjoy it again. For the best taste, eat it within a few days.
We explored the key ingredients, step-by-step instructions, and helpful tips for baked eggplant Parmesan. You learned about dietary swaps and how to store your dish properly. Remember, choosing quality ingredients and practicing good baking techniques lead to a great meal. Don’t hesitate to experiment with flavors and variations. With these insights, you can enjoy a delicious and versatile dish today!


![- 4 large bell peppers (any vibrant color) - 1 cup quinoa, thoroughly rinsed and drained - 2 cups vegetable broth - 1 can (15 oz) black beans, well rinsed and drained - 1 cup corn (fresh, frozen, or canned, drained) - 1 cup cherry tomatoes, halved - 1 teaspoon ground cumin - 1 teaspoon smoked paprika - 1 teaspoon garlic powder - Salt and freshly cracked black pepper to taste - 1 tablespoon extra virgin olive oil - ½ cup shredded cheddar cheese (optional but recommended) - Fresh cilantro or parsley, finely chopped for garnish - Additional vegetables (e.g., zucchini, mushrooms) - Spices and herbs (e.g., oregano, chili powder) When making stuffed bell pepper boats, you have many options. I love using colorful bell peppers. They add a fun look to your dish. Choose ones that are firm and bright. For the filling, I use quinoa. It’s not only healthy but also tasty. Rinse it well before cooking. The vegetable broth adds flavor and makes it rich. Black beans are another great choice. They are filling and packed with protein. Rinse them well too, to get rid of extra salt. Corn brings sweetness to the dish. You can use fresh, frozen, or canned corn. Cherry tomatoes add a nice juicy burst. Spices like cumin and paprika give depth. Garlic powder adds that warm flavor we all love. Don’t forget to season with salt and pepper to make it pop. Finally, I drizzle olive oil on the filling. It helps everything blend together. If you love cheese, add some cheddar on top for creaminess. Feel free to customize your stuffed peppers with optional add-ins. You can mix in other veggies like zucchini or mushrooms. Extra spices can make a big impact too. This recipe is flexible. You can adjust it to fit your taste. Explore and have fun with your stuffed bell pepper boats! For the complete guide, check out the Full Recipe I have shared. - Preheat the oven to 375°F (190°C). - Prepare the bell peppers by cutting off their tops. Carefully remove the seeds and membranes. Make sure they sit upright in a baking dish. - Combine 1 cup of quinoa and 2 cups of vegetable broth in a saucepan. - Bring this mix to a boil, then reduce the heat to low. Cover the pot and let it simmer. Cook for about 15 minutes or until the quinoa is fluffy and the broth has absorbed. - In a large mixing bowl, combine the cooked quinoa with one can of black beans, one cup of corn, and spices. - Add 1 teaspoon of ground cumin, 1 teaspoon of smoked paprika, and 1 teaspoon of garlic powder. Season with salt and black pepper. - Drizzle 1 tablespoon of olive oil over the mixture. Stir until everything is well blended. - Carefully spoon the filling into each prepared bell pepper. Press it down gently to pack it in. - If you like, top each stuffed pepper with ½ cup of shredded cheddar cheese for added flavor. - Pour a little water into the bottom of the baking dish. Cover the dish with aluminum foil. This helps keep the peppers moist. - Bake the stuffed peppers in the preheated oven for 25-30 minutes. Check for doneness; they should be fork-tender. Enjoy your delicious Stuffed Bell Pepper Boats with vibrant colors and flavors! For the full recipe, please refer back to the recipe section. To start, cutting bell peppers right matters. Slice off the tops using a sharp knife. Be careful not to cut too deep. Next, remove the seeds and white membranes inside. A small spoon works great for this. Rinse the peppers under cold water to clean them. For even cooking, place your stuffed peppers tightly in the baking dish. This helps them cook at the same rate. Mixing flavors is key, too. Use spices like cumin and smoked paprika to boost taste. You can taste the filling before you stuff the peppers. Adjust the salt and pepper as needed. Serving your stuffed bell pepper boats can be fun. Use a colorful platter to catch the eye. Arrange the peppers upright, showing off their filling. You can add a wedge of lime on the side for a fresh touch. A sprinkle of chopped cilantro or parsley adds color and flavor. You can prepare stuffed peppers ahead of time. Stuff them and cover with foil. Store them in the fridge for up to a day. This makes meal prep easy for busy nights. For sides, consider a fresh salad or crusty bread. You can also pair them with rice or quinoa for a filling meal. These peppers are great for family dinners or potlucks. For the full recipe, check out Stuffed Bell Pepper Boats. {{image_4}} You can easily make this dish vegetarian. Substituting quinoa with rice or couscous works well. Rice gives a nice texture, while couscous cooks faster. Both options taste great in these stuffed bell pepper boats. Adding different vegetables also boosts flavor and nutrition. Try diced zucchini, mushrooms, or spinach. These veggies add color and crunch. You can mix and match to fit your taste. Want to add meat? Ground turkey or beef makes a hearty filling. Just cook the meat before adding it to the quinoa mixture. This step ensures the meat is safe to eat. When adding meat, adjust the spices. You might want to use more cumin or paprika. This adjustment gives the dish a richer taste. Cheese can take your stuffed peppers to the next level. Mozzarella or feta are great choices. Mozzarella melts beautifully, while feta adds a tangy twist. For even more flavor, add layers of salsa or sauce. It keeps the filling moist and adds a kick. You can also drizzle some sauce on top before baking. This extra step makes the dish even more delicious. Check out the [Full Recipe] for all the details! To keep your stuffed bell pepper boats fresh, store them in an airtight container. This helps lock in moisture and flavor. You can keep them in the fridge for about 3 to 4 days. If you want to save them for later, allow them to cool completely before storing. You can freeze stuffed peppers both before and after baking. If you freeze them before cooking, wrap them tightly in plastic wrap and then in aluminum foil. This keeps out air and prevents freezer burn. If you choose to freeze them after baking, let them cool first. Then, place them in a freezer-safe container. They will stay good for up to 3 months. To reheat your stuffed peppers, the oven works best. Preheat it to 350°F (175°C). Place the peppers in a baking dish and cover with foil. Bake for about 20 to 25 minutes until heated through. You can also use a microwave if you're in a hurry. Just place one pepper on a plate and heat for 2 to 3 minutes. This method may make them a bit softer, but they'll still taste great! To make stuffed bell peppers in advance, prepare the filling first. Cook the quinoa and mix it with your beans, corn, and spices. Once mixed, stuff each bell pepper with the filling. You can store them in the fridge for up to two days before baking. Cover them tightly to keep them fresh. When ready to bake, just pop them into the oven. This saves you time and effort on busy nights. Yes, you can use other types of peppers! Try using poblano, Anaheim, or even jalapeño peppers. Each type adds a unique flavor and spice level. Poblano peppers are mild and have a rich taste. They also hold a good amount of filling. If you like a bit of heat, jalapeños are a great choice. Just remember to adjust the cooking time if your peppers are smaller. Stuffed bell pepper boats pair well with many side dishes. Some great options include a fresh green salad, roasted vegetables, or rice. You can also serve them with a side of guacamole or salsa for added flavor. If you want something warm, consider serving bread or cornbread. These sides complement the flavors and make for a complete meal. To adjust the spice level, you can add or reduce spices. For less heat, skip the cumin and paprika. If you want more flavor, add some chili powder or crushed red pepper. You can also mix in diced jalapeños or hot sauce. Start with a little and taste as you go. This way, you can find the perfect balance for your taste. Yes, this dish can be gluten-free! The main ingredients, like quinoa and beans, are naturally gluten-free. Just be sure to check that your vegetable broth is gluten-free as well. If you add other ingredients, like sauces or spices, check their labels. This way, you can enjoy a safe and tasty meal. Stuffed bell peppers are simple and fun to make. We covered the key ingredients and steps to prepare them. You learned how to customize flavors and presentation. Remember, you can use different spices, grains, or veggies. These peppers can please everyone, regardless of diet. Enjoy your meal prep and share these tasty, healthy treats with friends and family. Happy cooking!](https://goldendishy.com/wp-content/uploads/2025/07/06b7afd9-4005-4ab6-8aaa-ba374b5d3167-768x768.webp)
![- 2 lbs baby potatoes, halved - 1/4 cup extra virgin olive oil - 1/2 cup vegetable or chicken broth (low sodium recommended) - Juice of 2 large fresh lemons - Zest of 1 lemon - 4 cloves garlic, finely minced - 1 tablespoon dried oregano - Salt and freshly ground black pepper to taste - Fresh parsley, finely chopped (for garnish) To make Easy Greek Lemon Potatoes, you need fresh ingredients. Start with baby potatoes. They are the star of this dish. Their small size makes them cook evenly and taste great. Extra virgin olive oil adds richness and depth. The broth keeps the potatoes moist and adds flavor. Lemon juice and zest give a bright, tangy taste. Fresh garlic brings a bold kick. Dried oregano adds a lovely herb note. Finally, salt and pepper balance all the flavors. Garnish with parsley for a pop of color. This adds freshness and makes the dish look inviting. For the full recipe, check out [Full Recipe]. Enjoy the magic of these simple, yet flavorful Greek lemon potatoes! 1. Preheat the oven to 400°F (200°C). This step helps the potatoes cook evenly and get a nice crust. 2. Mix ingredients in a large bowl. Combine the halved baby potatoes, olive oil, broth, lemon juice, lemon zest, garlic, oregano, salt, and pepper. Stir until all potatoes are coated. 3. Transfer potatoes to baking dish. Spread the potatoes evenly in a single layer. Pour any leftover liquid from the bowl over them for extra flavor. 1. Cover with aluminum foil and bake for 30 minutes. This traps steam, helping the potatoes cook through. 2. Uncover and stir, bake uncovered for 25-30 minutes. This allows the potatoes to brown and become tender. Check for doneness by piercing with a fork. 1. Cool and garnish with parsley before serving. Let the potatoes sit for a few minutes, then sprinkle fresh parsley on top. 2. Presentation tips for serving. Use a rustic wooden bowl or a white platter. Add lemon wedges for a bright touch. Enjoy your Easy Greek Lemon Potatoes! Check the Full Recipe for more details. Using fresh lemon and quality olive oil is key. The lemon gives a bright taste, while good olive oil adds depth. I always choose extra virgin for its rich flavor. When seasoning, I recommend marinating the potatoes in the lemon juice and olive oil mix. This enhances the taste. Let them sit for at least 30 minutes if you can. The longer, the better the flavor. To ensure even cooking and browning, cut the potatoes into similar sizes. This helps them cook at the same rate. Arrange them in a single layer in the baking dish. Avoid crowding them, as this traps steam and keeps them from getting crispy. I often use broth instead of water. Broth adds a savory touch that elevates the dish. These Greek lemon potatoes pair wonderfully with grilled meats, like chicken or lamb. They also complement fresh salads, such as Greek salad or tabbouleh. For a perfect dining experience, serve them with a crisp white wine, like Sauvignon Blanc. The wine matches the lemony flavors well. You can find the full recipe for these tasty potatoes in my collection. {{image_4}} You can change herbs for fun flavors. Try fresh thyme or rosemary instead of oregano. If you want a kick, add some crushed red pepper flakes. For vegan or gluten-free options, swap chicken broth for vegetable broth. This keeps the dish tasty without animal products. Always read labels for gluten-free broth to be safe. Want to make these in an air fryer? Simply set it to 400°F (200°C). Cook for about 20-25 minutes. Shake the basket halfway to get even browning. You can also use a slow cooker. Add all ingredients and cook on low for 6-8 hours. This method makes the potatoes very tender and flavorful. To boost flavor, add crumbled feta cheese or olives on top. This brings a lovely salty touch. You can also mix in seasonal veggies like cherry tomatoes or bell peppers. They roast well and add color. These little tweaks make your dish burst with extra zest and excitement! To keep your Greek lemon potatoes fresh, use an airtight container. Place the cooled potatoes inside. You can store them in the fridge for up to three days. This helps keep the flavor and texture intact. If you see any signs of spoilage, it’s best to toss them out. When reheating, the oven is your friend. Preheat it to 350°F (175°C). Spread the potatoes on a baking sheet. Bake for about 15-20 minutes. This method keeps them crispy. If you use a microwave, place them in a microwave-safe bowl. Heat in 30-second intervals. Stir between intervals. This helps warm them evenly. To freeze your cooked potatoes, let them cool completely. Then, spread them on a baking sheet in a single layer. Freeze for about an hour. This prevents them from sticking together. Once frozen, transfer them to a freezer bag. Be sure to remove as much air as possible. When you want to eat them, just thaw in the fridge overnight. Reheat them in the oven at 350°F (175°C). Bake for 20-25 minutes until heated through. This keeps their flavor and texture nice. Enjoy your tasty Greek lemon potatoes anytime! For the full recipe, check out the [Full Recipe]. You bake Greek lemon potatoes for about 55 to 60 minutes. Start by covering them with foil for the first 30 minutes. This helps them cook well. After that, remove the foil and stir the potatoes. Bake them uncovered for another 25 to 30 minutes. Check if they are soft by poking them with a fork. If the fork goes in easily, they are done! You can use regular potatoes, but cooking times will change. Regular potatoes take longer to cook. Cut them into smaller pieces to match the cooking time of baby potatoes. This helps them cook evenly. The texture may also be different. Baby potatoes have a creamy texture, while regular potatoes can be a bit fluffier. Greek lemon potatoes pair well with many dishes. You can serve them with grilled chicken or lamb for a tasty meal. They also go great with a fresh Greek salad. The bright lemon flavor complements the rich dishes well. For a fun twist, add some tzatziki on the side. It adds a cool, creamy touch to the meal. For the full recipe, check out the Full Recipe section. In this blog post, we covered how to make Greek Lemon Potatoes. We explored the key ingredients, preparation steps, and the baking process. I shared tips for flavor and cooking techniques, plus variations to customize your dish. Proper storage and reheating tips help keep leftovers fresh. Remember, using fresh ingredients greatly enhances the taste. Enjoy these potatoes with your favorite Mediterranean meals. They are tasty and easy to make. Your cooking will impress friends and family alike. Dig in and savor every bite!](https://goldendishy.com/wp-content/uploads/2025/06/8502e506-5824-4799-8038-5c3f7491fce4-768x768.webp)