Almond Butter Energy Balls Easy Healthy Snack Idea

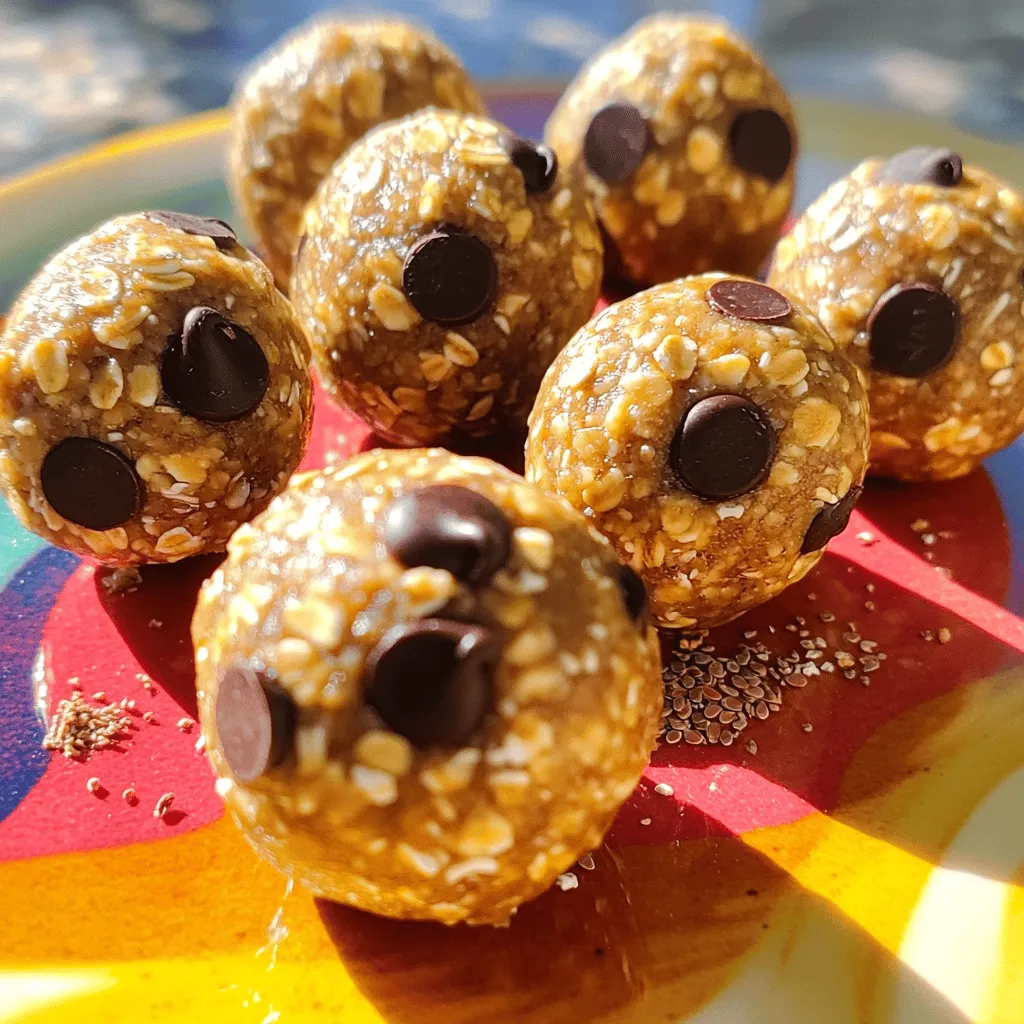
Are you looking for a quick and healthy snack? Almond Butter Energy Balls are easy to make and packed with nutrition. I love these little bites for a boost of energy on busy days. With just a few key ingredients, you can whip them up in no time. Let me guide you through the simple steps to create this tasty treat that can fit any diet. Stay with me to learn more!They take only 10 minutes to prep. You can make a batch quickly, and they store well. You will find joy in mixing simple, wholesome ingredients.
Ingredient Breakdown
– Key ingredients for Almond Butter Energy Balls
– 1 cup creamy almond butter
– 1 cup rolled oats
– 1/2 cup honey or pure maple syrup
– 1/2 cup ground flaxseed
– 1/2 cup dark chocolate chips
– 1 teaspoon pure vanilla extract
– A pinch of fine sea salt
These ingredients pack a punch of flavor and nutrition. Almond butter gives protein and healthy fats. Rolled oats add fiber and help bind the mixture. Honey or maple syrup brings natural sweetness. Ground flaxseed boosts fiber and omega-3s. Dark chocolate chips lend a delicious touch.
– Optional ingredients for personalization
You can switch things up with your favorite mix-ins. Try adding shredded coconut for a tropical vibe. Dried fruits like cranberries or apricots add a chewy texture. Nuts or seeds can provide crunch and extra nutrients.
Feel free to experiment to find your perfect blend!
Step-by-Step Instructions
Preparation Steps
To start, gather your ingredients. You need creamy almond butter, rolled oats, honey, ground flaxseed, dark chocolate chips, vanilla extract, and salt. In a large bowl, add all these items. Mix them well with a sturdy spatula. You want a sticky dough that holds together. Make sure the chocolate chips spread out in the mix. This step is key to a tasty energy ball.
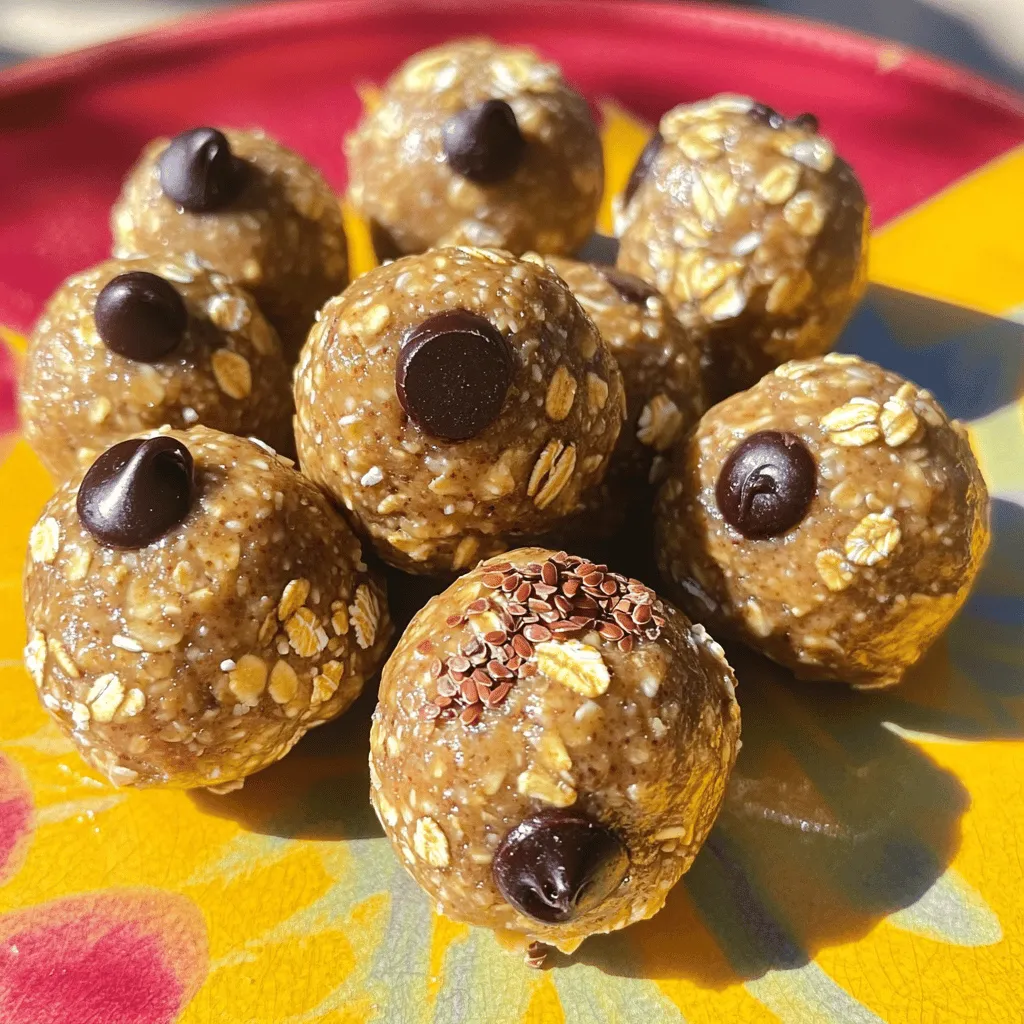
Shaping and Chilling
Now comes the fun part: shaping the balls! Take a tablespoon of the mixture. Roll it between your hands to form a ball about one inch wide. If it feels too sticky, wet your hands slightly. This helps the mixture roll easier. Place the balls on a baking sheet lined with parchment paper. Leave some space between them so they don’t stick together.
Once you roll all the mixture, put the baking sheet in the fridge. Chill for about 30 minutes. This helps the energy balls set and keeps their shape.
Final Touches
After chilling, it’s time for the final touches. Transfer the energy balls to an airtight container. Store them in the fridge for up to a week. If you want to keep them longer, freeze them.
Tips for rolling the perfect energy balls
– Wet Hands: If the mix is sticky, wet your hands to help with rolling.
– Size Matters: Aim for about one inch in diameter for even energy balls.
– Even Distribution: Make sure chocolate chips are evenly mixed in. It gives each bite a sweet surprise.
Tips & Tricks
Perfecting Your Recipe
When making Almond Butter Energy Balls, avoid a few common mistakes. First, don’t skip the chilling step. Chilling helps the balls hold their shape. If you make them too sticky, they will not roll well. If your mixture is too dry, add a little more almond butter or honey. This helps bind everything together.
Enhancing Flavor
You can make these energy balls even more fun with flavor add-ins. Try adding:
– 1/2 cup shredded coconut for a tropical twist
– 1/2 cup chopped nuts for added crunch
– 1 teaspoon cinnamon for warmth
– 1/2 cup dried fruits like cranberries or apricots for sweetness
Feel free to mix and match. Each addition brings a unique taste to your snack.
Serving Suggestions
Serving Almond Butter Energy Balls can be creative and fun. Here are some ideas:
– Place them in cute paper cups for a party.
– Serve them on a colorful plate with fresh fruit.
– Pair them with yogurt or a smoothie for a quick breakfast.
These ideas make your snack not only tasty but also visually appealing. Enjoy your healthy treat!

Variations
Alternative Nut Butters
You can swap almond butter for other nut butters. Peanut butter works great. It gives a classic taste. Cashew butter adds a rich creaminess. Sunflower seed butter is a good choice for nut-free diets. Each nut butter has its unique flavor and texture. Choose what you like best!
Flavor Combinations
Mix and match flavors to make energy balls exciting. Try adding dried fruits like cranberries or raisins. These add sweetness and chewiness. You can also use spices like cinnamon or nutmeg. They add warmth and depth to the taste. For a tropical twist, add shredded coconut. These combos make each bite a new experience!
Dietary Adaptations
You can easily adapt this recipe to fit your diet. For a vegan version, use maple syrup instead of honey. It keeps the energy balls plant-based. If you need gluten-free snacks, use certified gluten-free oats. These small changes make the recipe work for everyone. Enjoy a tasty treat that meets your needs!
Storage Info
Best Storage Practices
To keep your Almond Butter Energy Balls fresh, store them in an airtight container. If you plan to eat them within a week, the fridge works great. Just make sure it stays cool and dry. For longer storage, you can freeze them. Use a freezer-safe bag or container. You can layer parchment paper between the balls to prevent sticking.
Shelf Life
How long do Almond Butter Energy Balls last? When stored in the fridge, they last about one week. If you freeze them, they can last up to three months. This makes them a perfect snack for busy days. You can enjoy them whenever you need a quick energy boost.
Reheating Instructions
When you want to eat frozen energy balls, simply take them out of the freezer. Let them sit at room temperature for about 10 to 15 minutes. They will thaw quickly and be ready to eat. If you’re in a hurry, you can microwave them for about 10 seconds. Just be careful not to heat them too long, or they might get too soft. Enjoy your snacks anytime!
FAQs
How to make Almond Butter Energy Balls without oats?
You can make Almond Butter Energy Balls without oats. Instead, use ground almonds or protein powder. This will change the texture but still taste great. Mix the almond butter with your chosen ingredient. Add honey, flaxseed, chocolate chips, vanilla, and salt. Follow the same steps to shape and chill the balls.
Can I use different sweeteners?
Yes, you can use different sweeteners. Maple syrup, agave nectar, or coconut sugar work well. Each sweetener brings its flavor and sweetness level. Test each option to find what you like best. Just remember that the texture may change slightly based on the sweetener you choose.
What are the nutritional benefits of Almond Butter Energy Balls?
Almond Butter Energy Balls are healthy snacks. They provide a good source of protein and healthy fats. Almond butter offers vitamin E, magnesium, and fiber. Flaxseed adds omega-3 fatty acids and extra fiber. Dark chocolate chips bring antioxidants. These energy balls help keep you full and satisfied. They are perfect for a quick snack or post-workout boost.
In this article, we covered how to make Almond Butter Energy Balls. You learned about essential ingredients and optional ones for your unique twist. We walked through each step, from preparation to final touches. Remember, there are tips to avoid common mistakes and ideas to enhance flavor. You can even swap in different nut butters or fruits as you like. Store them right, and they will stay fresh for weeks. Enjoy these tasty snacks that are easy to make and fit your needs. Happy cooking!


![To make easy lemon bars, you need a few simple ingredients. Here’s what you’ll need: - 1 cup all-purpose flour - 1/2 cup powdered sugar (plus extra for dusting) - 1/4 teaspoon salt - 1/2 cup unsalted butter, melted - 2 large eggs - 1 cup granulated sugar - 1/4 cup freshly squeezed lemon juice - Zest of 1 fresh lemon - 1/2 teaspoon baking powder Each ingredient plays a key role in the flavor and texture. The flour gives structure, while the butter adds richness. The eggs help bind everything together. The lemon juice and zest bring that bright, zesty flavor. Using fresh lemon juice makes a big difference. It adds a vibrant taste that bottled juice can’t match. The powdered sugar gives the bars a sweet finish. Make sure to have some extra on hand for dusting. Gather these ingredients before you start. This will make the cooking process smooth and easy. For the full recipe, check out the complete guide to making these delicious lemon bars. 1. Preheat your oven to 350°F (175°C). This is important for even baking. 2. In a medium bowl, mix the flour, powdered sugar, and salt. Use a whisk to combine them well. 3. Pour the melted butter into the bowl. Mix it with a fork until it looks like clumpy dough. 4. Press this dough firmly into the bottom of an 8x8 inch baking dish. This will be your crust. 1. In a separate bowl, whisk together the eggs and granulated sugar. Beat them until smooth and slightly frothy. This takes about 1-2 minutes. 2. Next, add the lemon juice, lemon zest, and baking powder to the egg mixture. Stir until everything is mixed well. 1. Bake the crust in the preheated oven for about 15 minutes. It should turn a light golden brown. 2. Carefully pour the lemon filling over the hot crust. Return the dish to the oven. 3. Bake for an additional 20-25 minutes. The filling should be set and lightly browned when done. 4. Once baked, remove the dish from the oven and let it cool for at least 15 minutes. This helps the bars set up. 5. Transfer the bars to a wire rack to cool completely. Once cool, dust with powdered sugar and cut into squares. For the full recipe, check out the detailed instructions. Enjoy your refreshing lemon bars! - Use room temperature ingredients. This helps the batter mix well. - Fresh lemon juice boosts the taste. It brings out the bright, zesty flavor. When you use room temperature eggs and butter, they mix better. This helps create a smooth filling. Fresh lemon juice is key for a strong lemon flavor. Bottled juice can taste flat. - Dust your bars with powdered sugar. This adds a nice touch and looks pretty. - Garnish with lemon slices and mint leaves. They make your bars pop and look inviting. Once your lemon bars cool, dust them with sugar. Then, place lemon slices on top. Add a few mint leaves for color. This makes your dessert not just tasty but also beautiful. For the full recipe, check out the details above. {{image_4}} You can make these lemon bars even more exciting. One way is to add berries. Fresh blueberries or raspberries pair well with lemon. They add a pop of color and taste. Just fold in one cup of your chosen berries after mixing the lemon filling. Another fun idea is to infuse the bars with herbs. Basil or rosemary works great. Chop a few leaves finely and mix them in with the lemon juice. This adds a unique twist that surprises the taste buds. If you need gluten-free bars, don't worry! You can swap the all-purpose flour for a gluten-free blend. Look for a mix that includes rice flour and starches. This keeps the texture light and tasty. For those who follow a vegan diet, you can replace the eggs. Use flax eggs instead. To make one flax egg, mix one tablespoon of flaxseed meal with two and a half tablespoons of water. Let it sit for about five minutes until it gets thick. This works well in the lemon filling to keep it creamy. Check the [Full Recipe] for the main steps to create these delightful lemon bars. To keep your lemon bars fresh, store them in the refrigerator. - Wrap them well: Use plastic wrap or an airtight container. - Keep them chilled: This helps maintain their texture and flavor. If you want to save some for later, you can freeze lemon bars. - Cool completely: Let them cool fully before freezing. - Cut into squares: This makes it easy to grab one later. - Wrap in plastic: Use freezer-safe wrap to prevent freezer burn. - Place in a container: Use an airtight container for extra protection. Lemon bars stay fresh in the fridge for about one week. - Check for freshness: Look for any signs of mold or off smells. If they have been in the fridge too long, they may go bad. - Signs of spoilage: If they look discolored or smell sour, it’s time to toss them. - Texture changes: A slimy texture means they’re no longer good. Storing them right helps you enjoy their bright flavor longer! For the complete recipe, check out the Full Recipe. To make your lemon bars less tart, adjust the sugar and lemon juice. You can add more sugar to balance the tartness of the lemon juice. Try adding an extra 1/4 cup of sugar to the filling. If you want, you can also reduce the lemon juice. Use about 3 tablespoons instead of 1/4 cup. This way, you keep the lemon flavor while making it sweeter. You can use bottled lemon juice, but fresh is better. Bottled juice often lacks the bright flavor of fresh lemons. Fresh lemon juice also has a more vibrant acidity. This difference makes your bars taste much better. If you must use bottled juice, try to find one with no added sugar or preservatives. To cut lemon bars into neat squares, use a sharp knife. First, let the bars cool completely. This helps them set and makes cutting easier. Dip your knife in warm water before each cut. Wipe the knife clean between cuts for a smoother edge. For even squares, use a ruler or a guide to measure before cutting. These tips will help your bars look great on any plate. You learned how to make easy lemon bars from scratch. We covered essential ingredients, step-by-step instructions, and helpful tips for perfect results. Don’t forget to try variations, like adding fruits or herbs. Proper storage keeps your bars fresh longer. Enjoy your sweet and tangy treat! The fun lies in making them your own. Experiment. Share your creations with friends and family. Happy baking!](https://goldendishy.com/wp-content/uploads/2025/07/78212822-f759-45eb-b990-dd8ea93e2cb8-768x768.webp)
![To make Peach Cobbler French Toast, gather these items: - 4 slices of thick bread (brioche or challah is best) - 2 ripe peaches, sliced (canned peaches work too; drain them) - 2 large eggs - 1 cup milk (whole or almond milk is great) - 1 tablespoon pure vanilla extract - 1 teaspoon ground cinnamon - 1 tablespoon brown sugar - 1 tablespoon unsalted butter (for cooking) - ½ cup granola (optional, for crunch) - Whipped cream (optional, for serving) If you have dietary needs, consider these swaps: - For gluten-free, use gluten-free bread. - Vegan? Swap eggs with flaxseed meal and use plant-based milk. - For low-sugar diets, try a sugar substitute in place of brown sugar. Picking peaches is easy with these tips: - Look for peaches that are firm but slightly soft when squeezed. - Choose fruit with a sweet smell; this indicates ripeness. - Avoid peaches with bruises or dark spots, as these can affect flavor and texture. By following these tips and using the right ingredients, you’ll make a delightful Peach Cobbler French Toast that everyone will love! Check out the Full Recipe for more details. Making Peach Cobbler French Toast is a fun and simple process. I’ll walk you through each step to ensure your dish turns out perfectly. 1. Mixing the egg custard: In a medium bowl, whisk together 2 large eggs, 1 cup of milk, 1 tablespoon of pure vanilla extract, and 1 teaspoon of ground cinnamon. Mix well until it is smooth and creamy. This egg custard gives the French toast its rich flavor. 2. Soaking the bread slices: Pour the egg mixture into a shallow dish. Take 4 slices of thick bread, like brioche or challah. Place each slice in the dish, soaking for about 2-3 minutes on each side. Make sure they absorb the custard well. 3. Preparing the peach topping: While the bread soaks, slice 2 ripe peaches. If you use canned peaches, ensure they are drained. In a small saucepan, combine the sliced peaches with 1 tablespoon of brown sugar. Cook over medium heat for about 5-7 minutes, stirring often. When the peaches are soft and syrupy, take them off the heat. 4. Cooking the French toast: Heat a skillet over medium heat and add 1 tablespoon of unsalted butter. Let the butter melt completely. Place the soaked bread slices in the skillet. Cook each side for 3-4 minutes until golden brown. The butter helps give the toast a nice, crisp texture. Once cooked, arrange the French toast on plates and spoon the warm peach topping over each slice. For a delightful crunch, you can sprinkle granola on top. If you want to indulge, add a dollop of whipped cream. For detailed steps, refer to the Full Recipe. - Achieving the perfect golden crust: To get that nice, golden crust, use thick bread. Brioche or challah works best. Soak each slice well, but don't leave it too long. This ensures the center stays soft while the outside crisps up. - Temperature control for even cooking: Keep your skillet or griddle at medium heat. If it’s too hot, the bread will burn before cooking through. If it’s too cool, you won’t get the lovely crust. Adjust as needed while cooking each slice. - How to avoid soggy bread: Soak the bread just enough to absorb the flavors. If the bread is too soggy, it won’t cook well. A quick 2-3 minute soak on each side is perfect for keeping it fluffy yet not falling apart. - Pairing with syrup or whipped cream: Drizzle with maple syrup for sweetness. A dollop of whipped cream adds a creamy touch. Both make your Peach Cobbler French Toast even more delightful. - Presentation ideas for special occasions: Stack the slices on a platter. Add warm peach syrup on top. Garnish with fresh peach slices. A sprinkle of cinnamon creates an eye-catching centerpiece for brunch. - Best sides to complement Peach Cobbler French Toast: Serve with crispy bacon or sausages for a savory balance. Fresh fruit adds color and freshness, making your meal more appealing. You can also add a light salad for a refreshing touch. For the full recipe, check out [Full Recipe]. {{image_4}} You can make Peach Cobbler French Toast to fit your diet. If you need gluten-free options, choose gluten-free bread. Many brands offer tasty alternatives. For dairy-free choices, almond or oat milk works well. Both give a nice flavor. You can also swap out spices. Try nutmeg or allspice for a twist. Extracts like almond or maple add a fun taste. To make this dish even better, think about adding nuts or seeds. Chopped pecans or walnuts give a nice crunch. You can also mix in berries. Blueberries or raspberries pair well with peaches. They add color and flavor. If you want new fruit choices, try apples or mango. Both fruits bring a fresh taste and keep it exciting. With these tips, you can create your own unique version. Check out the Full Recipe for more details! To keep your Peach Cobbler French Toast fresh, follow these tips: - Refrigerate promptly: Place leftover French toast in an airtight container within two hours of cooking. - Layer wisely: If you have multiple pieces, insert parchment paper between them to prevent sticking. - Use within three days: For the best taste and texture, enjoy your leftovers within this time. When it comes to reheating, use a skillet or microwave: - Skillet method: Heat on low for about 3-4 minutes on each side. This keeps the toast crispy. - Microwave method: Heat on medium for 30-second intervals until warm. This method may soften the toast. You can freeze Peach Cobbler French Toast for later enjoyment! Here’s how: - Cool completely: Let the French toast cool to room temperature before freezing. - Wrap well: Use freezer-safe bags or wrap each slice in plastic wrap, then aluminum foil. - Label and date: Write the date on the bag for easy tracking. To thaw and reheat: - Thaw overnight: Place in the fridge for several hours or overnight. - Reheat: Use the skillet method mentioned above or microwave for 1-2 minutes until hot. Now you can enjoy this delicious treat anytime! Check out the Full Recipe for all the details. Choosing the right bread makes a big difference. I recommend using thick slices of brioche or challah. These breads soak up the egg mixture well and become nice and fluffy. Look for bread that is fresh but not too soft. You want a sturdy texture that holds up during cooking. Yes, you can prepare some parts ahead of time. You can soak the bread slices in the egg mixture and store them in the fridge for a few hours. Just be sure to cook them right before serving. You can also prepare the peach topping in advance and warm it up when you are ready to eat. If you don’t have peaches, you can try other fruits. Fresh or canned sliced pears work well. You can also use berries like blueberries or strawberries. Just keep in mind that cooking times may vary slightly. The cooked Peach Cobbler French Toast lasts about three days in the fridge. Store it in an airtight container to keep it fresh. When you reheat it, warm it in a skillet or microwave until hot. This helps keep the texture nice. For the full recipe, check the one provided above. Peach Cobbler French Toast is a delightful dish that brings joy to breakfast. We covered ingredients, preparation steps, and useful tips for cooking. I offered ideas for variations, storage, and answers to common questions. Embrace your creativity with this recipe. Try different fruits or spices for unique flavors. Enjoy the process and make it your own! Happy cooking!](https://goldendishy.com/wp-content/uploads/2025/06/19b86d0b-72ea-4091-b6de-feef30e599d4-768x768.webp)