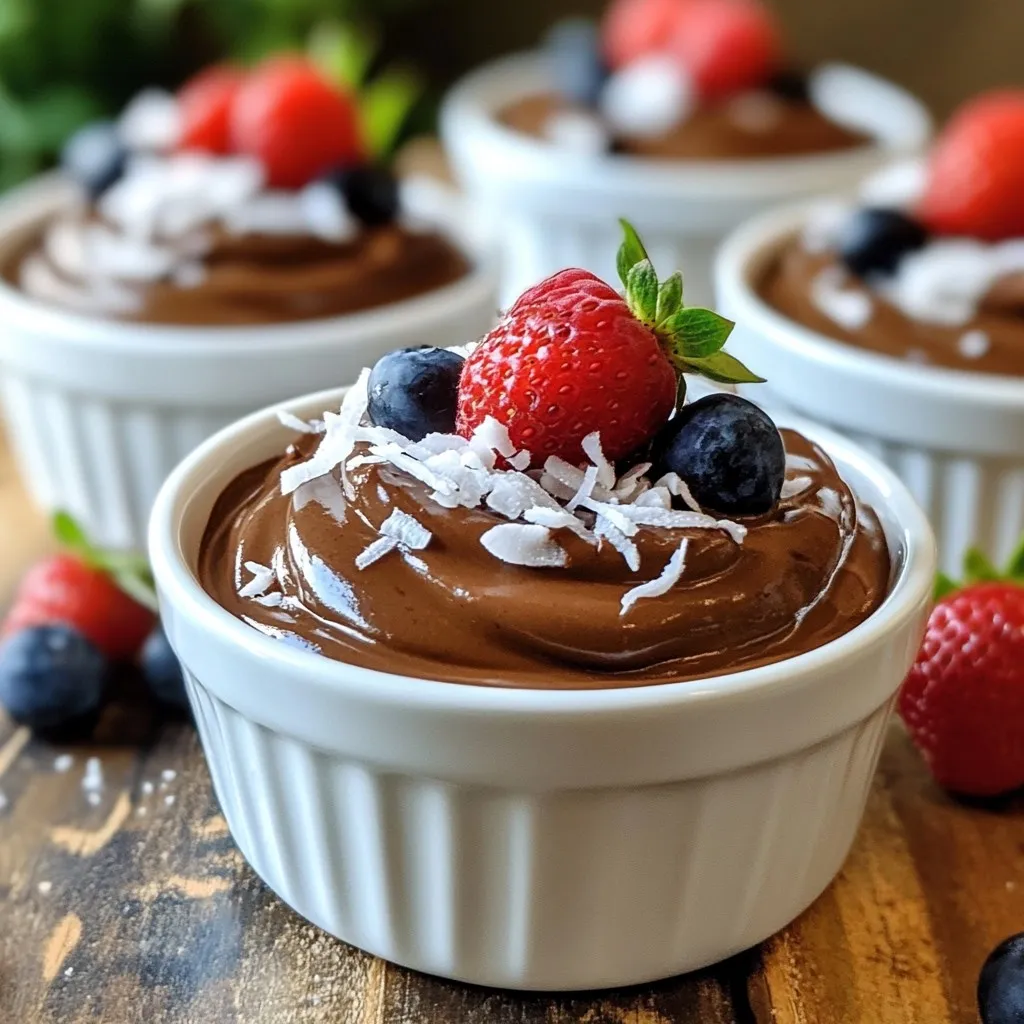
Dark Chocolate Avocado Mousse Delightful and Creamy Treat
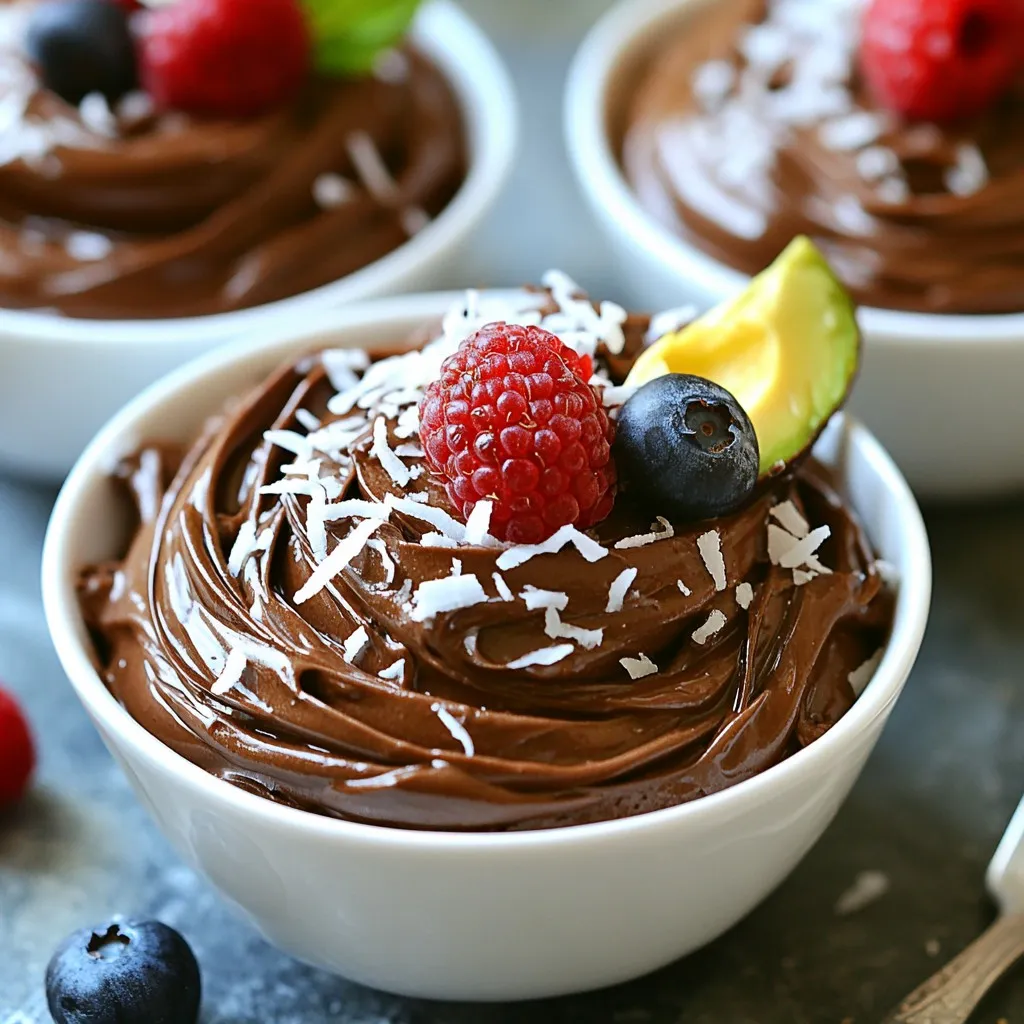
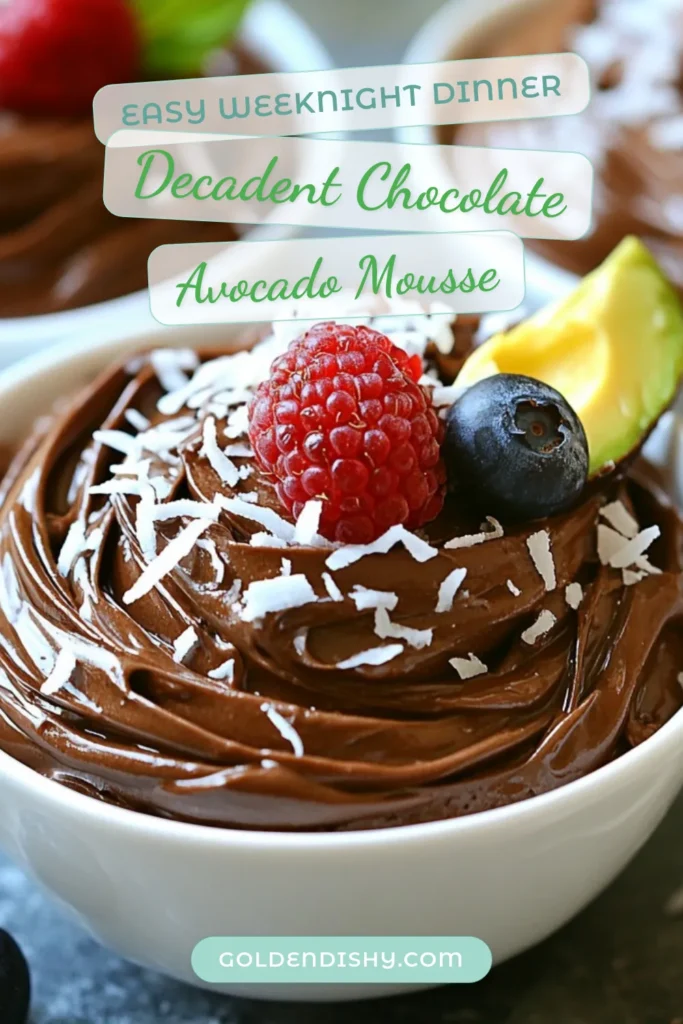
Are you ready to indulge in a rich and creamy treat without the guilt? This Dark Chocolate Avocado Mousse is your answer! Using simple ingredients like ripe avocados and cocoa powder, this mousse is both delicious and nutritious. I’ll guide you step-by-step to create a dessert that satisfies your sweet tooth and boosts your health. Let’s dive into this delightful recipe and discover how easy it can be to enjoy a healthier dessert!
Why I Love This Recipe
- Healthier Dessert Option: This mousse offers a delicious way to enjoy dessert while incorporating healthy fats from avocados.
- Quick and Easy Preparation: With just 10 minutes of prep time, you can whip up this indulgent treat without any hassle.
- Rich Chocolate Flavor: The unsweetened cocoa powder provides a deep chocolate taste, ensuring it satisfies any chocolate cravings.
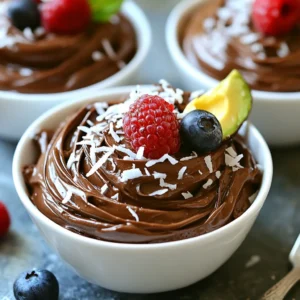
- Customizable Toppings: Fresh berries, nuts, or shredded coconut allow for creative and appealing presentations that enhance the dessert experience.
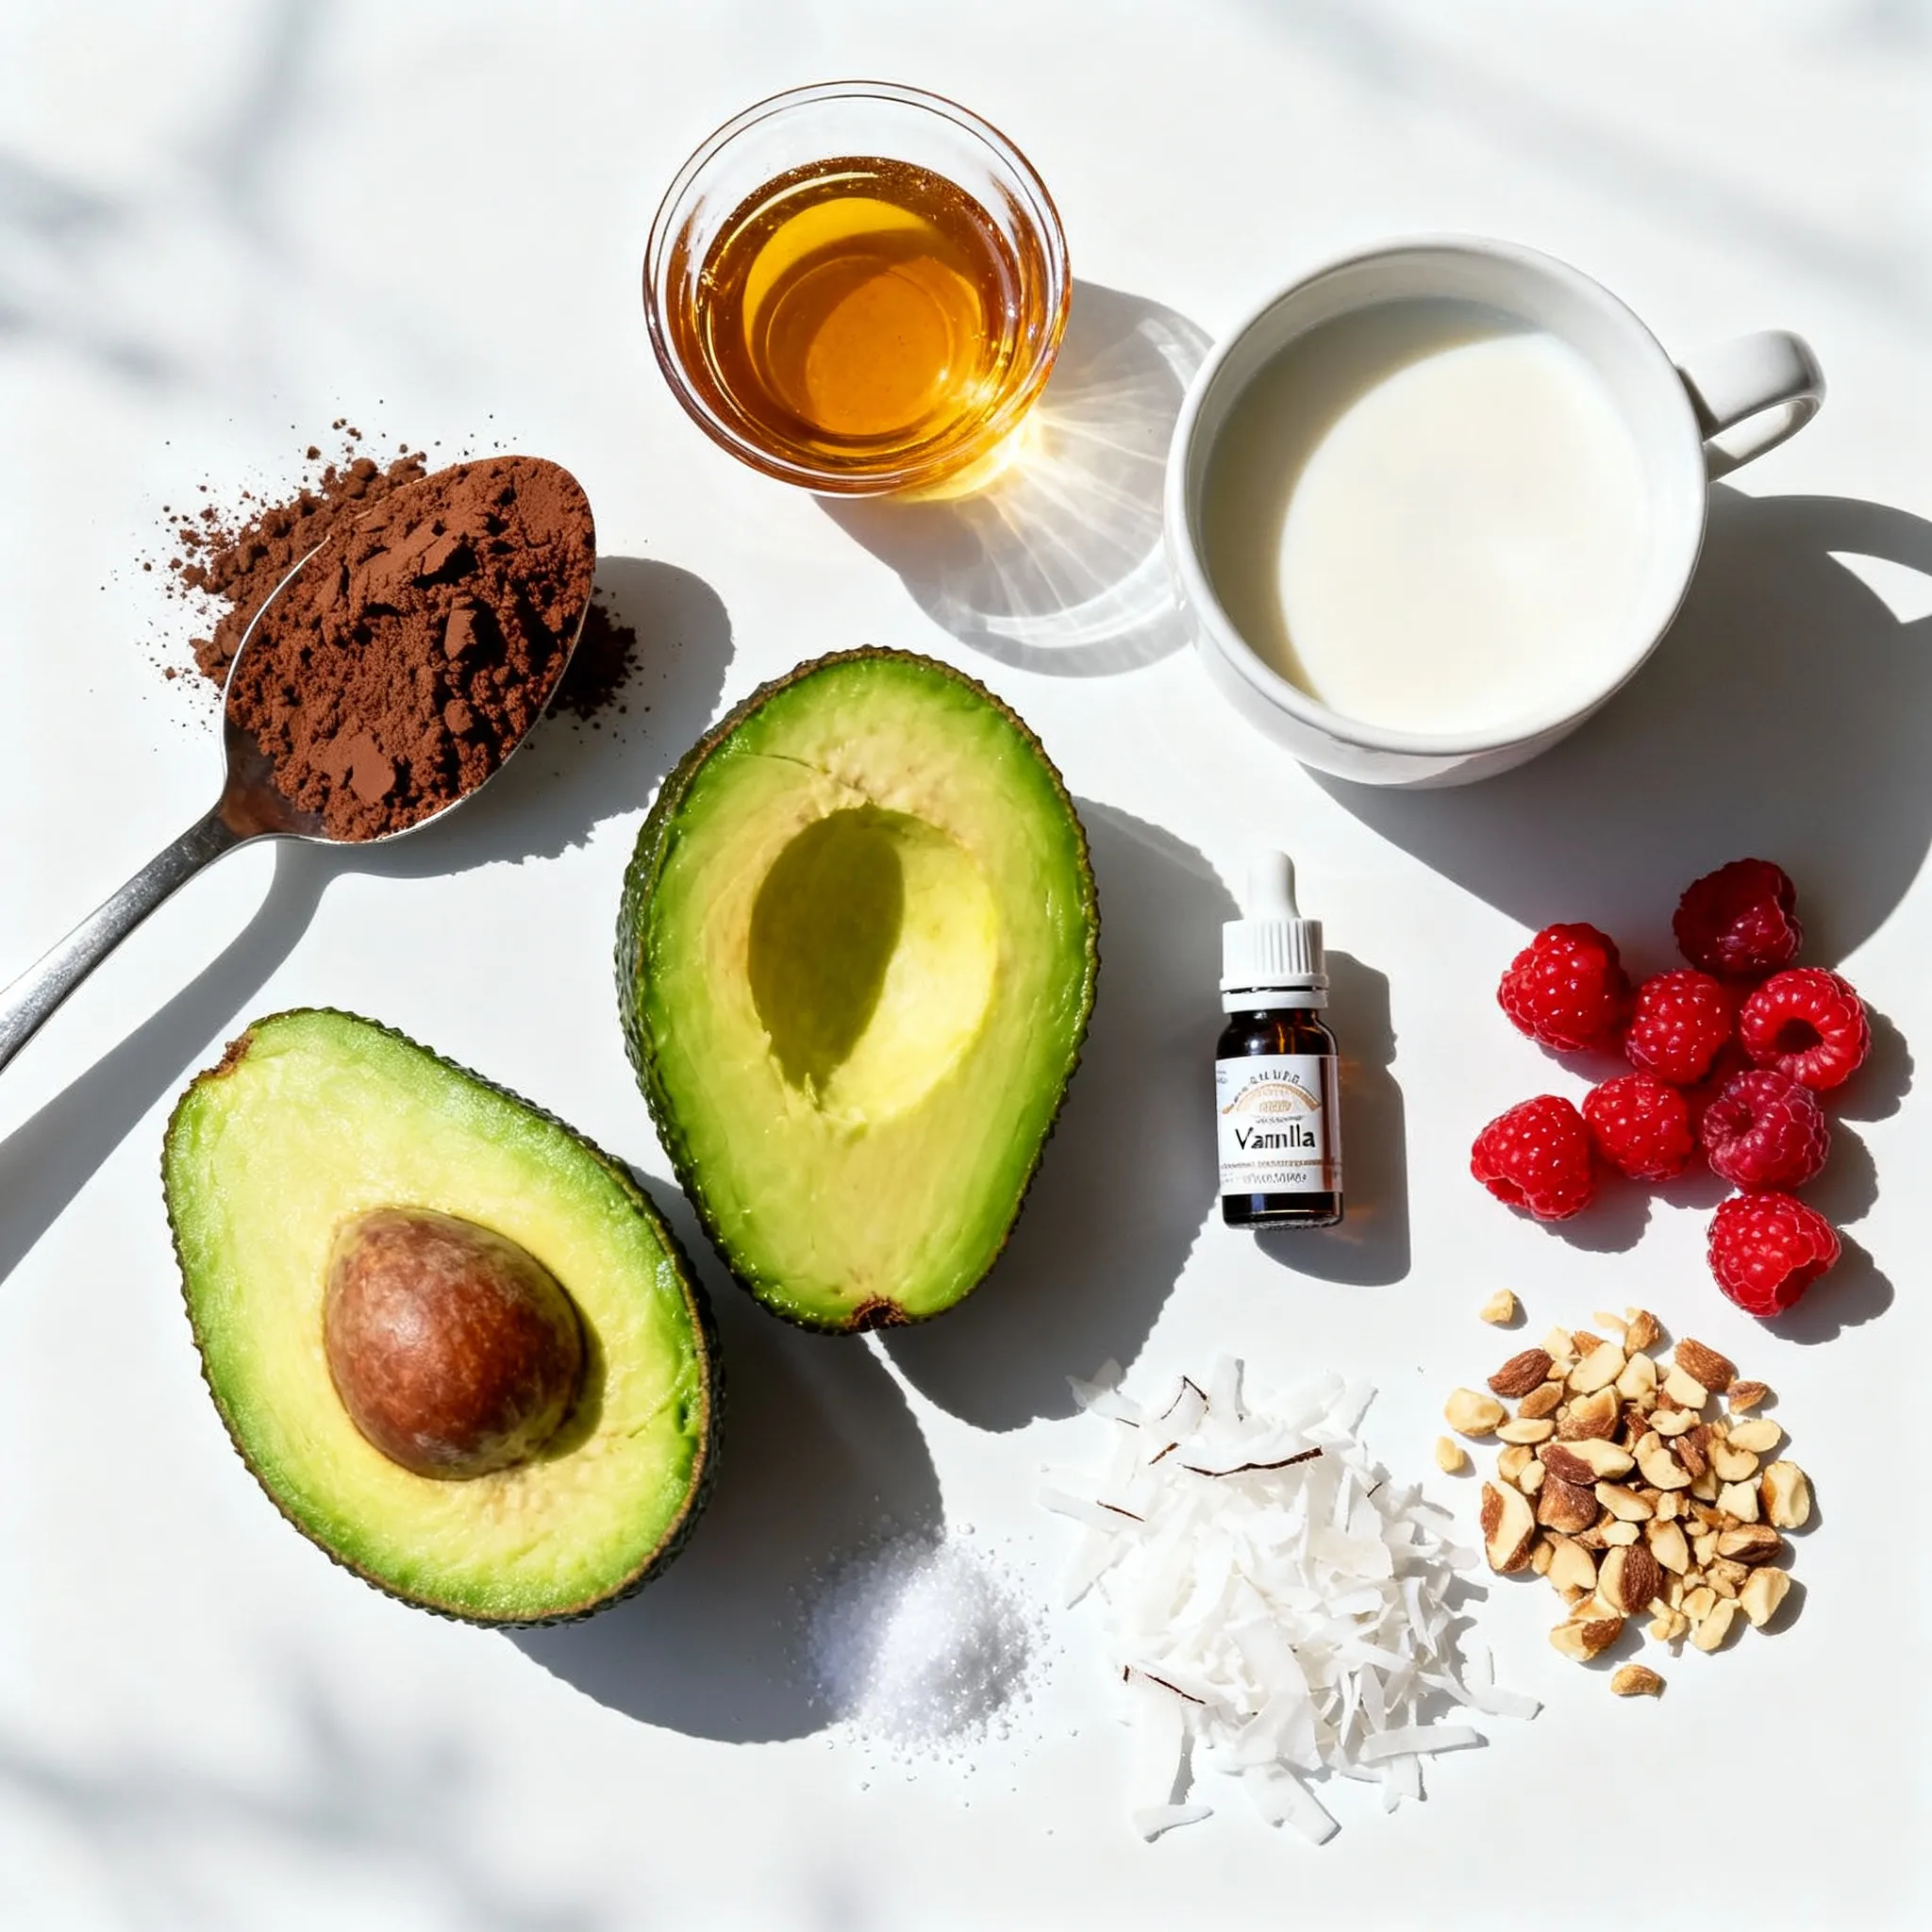
Ingredients
To make your Dark Chocolate Avocado Mousse, you need just a few simple items. Here’s what you will need:
– Ripe avocados
– Unsweetened cocoa powder
– Maple syrup
– Coconut milk
– Pure vanilla extract
– Sea salt
– Optional toppings
Each ingredient plays an important role in creating the rich and creamy texture.
Ripe avocados are key. They add creaminess and healthy fats. Make sure they are soft to the touch for the best results.
Unsweetened cocoa powder gives the mousse its deep, chocolate flavor. It’s rich and packed with antioxidants.
Maple syrup adds sweetness. You can also use honey if you prefer a non-vegan option. Adjust the amount based on your taste.
Coconut milk brings a smooth texture. It adds a hint of tropical flavor. You can swap it with almond milk for a lighter mousse.
Pure vanilla extract enhances the overall taste. It adds warmth and rounds out the flavor profile perfectly.
Sea salt is crucial. A pinch of it balances the sweetness and enhances the chocolate.
Lastly, optional toppings like fresh berries, shredded coconut, or crushed nuts add texture and a pop of color. They make your dessert look even more inviting.
Gather these ingredients, and you’re ready to whip up a delicious treat!
Step-by-Step Instructions
Preparation Steps
– Start by getting your high-powered blender or food processor ready.
– Add the ripe avocados, unsweetened cocoa powder, maple syrup, coconut milk, pure vanilla extract, and a pinch of sea salt.
– Blend on high speed, pausing to scrape down the sides. Keep blending until the mousse is smooth and creamy.
Adjusting Sweetness
– After blending, taste the mousse. You might want it sweeter.
– If needed, add more maple syrup. Blend again briefly to mix it well.
Serving Suggestions
– Scoop the mousse into bowls or elegant glasses. Fill each serving generously.
– Cover with plastic wrap and chill in the fridge for at least 30 minutes. This helps it firm up and brings out the flavors.
– When ready to serve, add toppings like fresh berries, shredded coconut, or crushed nuts for color and texture.
Tips & Tricks
Ensuring Creamy Texture
Using ripe avocados is key. They should feel soft but not mushy. Ripe avocados blend easily and create a smooth mousse. If your avocados are hard, let them ripen for a few days.
To avoid lumps, blend everything well. Use a high-powered blender or food processor. Start on low speed to mix, then increase to high. Stop to scrape down the sides as needed. This ensures a silky texture without any avocado bits.
Sweetener Alternatives
If you want non-vegan options, honey works great. It adds a nice sweetness that blends well. Just swap honey for maple syrup in the recipe.
There are other sweetener choices, too. Agave nectar, coconut sugar, or stevia can be used. Adjust the amount based on your taste. Each sweetener gives a unique flavor, so feel free to experiment!
Presentation Tips
Serve the mousse in stylish bowls or glasses. Clear containers show off its rich, dark color. You can layer it with toppings for a fun look.
For toppings, choose fresh berries, shredded coconut, or crushed nuts. These add color and crunch. They also make the mousse more appealing. Just sprinkle them on top before serving for a delightful finish.
Pro Tips
- Choose Ripe Avocados: Ensure your avocados are perfectly ripe for the creamiest texture. They should yield slightly when gently pressed.
- Quality Cocoa Powder: Use high-quality unsweetened cocoa powder for a richer chocolate flavor. This makes a significant difference in taste.
- Chill for Best Results: Allow the mousse to chill in the refrigerator for at least 30 minutes. This enhances the flavors and gives the mousse a firmer texture.
- Experiment with Toppings: Get creative with your toppings! Fresh berries, nuts, or coconut can add texture and visual appeal to your dessert.
Variations
Flavor Enhancements
You can easily boost the flavor of your mousse. Adding espresso or instant coffee brings a rich depth. Just a teaspoon can make a big difference. The coffee’s bitterness pairs well with the dark chocolate. You can also try spices like cinnamon. A pinch can add warmth and a unique taste.
Dietary Modifications
If you want this mousse to be vegan, stick to maple syrup. It’s a great sweetener that keeps it plant-based. For nut-free options, use coconut milk or other nut-free alternatives. This way, everyone can enjoy this treat without worries. You can also make it gluten-free. The ingredients listed are already gluten-free, so you are safe!
Different Types of Milk
When choosing milk, consider almond milk. It keeps the mousse light and creamy. Almond milk has a subtle flavor that works well. You can compare it with coconut milk, which adds a richer texture. Both choices are great, but the coconut milk gives a more decadent taste.
Storage Info
Refrigerator Storage
To keep your dark chocolate avocado mousse fresh, store it in airtight containers. This helps prevent the mousse from absorbing other smells in the fridge. It stays fresh for up to three days. After this time, the texture may change, and it may not taste as good.
Freezing Options
You can freeze mousse if you want to keep it longer. Pour the mousse into freezer-safe containers, leaving space for expansion. It can last for about two months in the freezer. When you want to enjoy it, move it to the fridge to thaw overnight. Avoid using the microwave, as it may change the texture.
Reheating Instructions
Serve the mousse chilled for the best taste. If you freeze it, the mousse may become a bit firm. To adjust the texture, blend it for a few seconds after thawing. This helps restore its creamy consistency. Enjoy your mousse topped with fresh berries or nuts for extra flavor!
FAQs
What does dark chocolate avocado mousse taste like?
Dark chocolate avocado mousse has a rich, creamy, and smooth texture. The flavor is deep and chocolatey. The avocado adds a subtle creaminess, making it feel indulgent without being too sweet. You might taste hints of vanilla, which enhance the overall richness. The balance between the cocoa and avocado creates a unique dessert experience.
Can I use sweetened cocoa powder instead?
You can use sweetened cocoa powder if you prefer. However, you should adjust the maple syrup amount. Sweetened cocoa will add extra sugar, so you might want less syrup. This change can make your mousse sweeter. Just ensure you blend everything well to combine the flavors.
How healthy is avocado mousse compared to traditional mousse?
Avocado mousse is much healthier than traditional mousse. It uses wholesome ingredients like avocados, which are full of healthy fats. Traditional mousse often has heavy cream and sugar. With avocado mousse, you gain fiber and nutrients while enjoying a tasty treat. It’s a guilt-free dessert option that still feels indulgent.
How long can I keep the mousse in the fridge?
You can keep the mousse in the fridge for about three days. Make sure to cover it tightly with plastic wrap. This helps it stay fresh and prevents it from absorbing other flavors in the fridge. If you notice any browning, just give it a quick stir before serving.
Is this recipe suitable for vegans?
Yes, this recipe is perfect for vegans! It uses avocados and maple syrup, which are both plant-based. You can also use coconut milk or almond milk for creaminess. Just avoid honey if you’re strictly vegan. This mousse offers a delicious and dairy-free dessert option everyone can enjoy.
In this blog post, I shared a simple recipe for dark chocolate avocado mousse. We covered the main ingredients, like ripe avocados and cocoa powder, and the steps to make it creamy and delicious. I also provided tips on adjusting sweetness and presenting your mousse attractively. You can explore variations and storage options to enjoy it longer. Remember, this dessert is not just tasty but also healthier than traditional mousse. Dive in and enjoy your treat, knowing it’s a smart choic
Creamy Dark Chocolate Avocado Mousse
Ingredients
- 2 whole ripe avocados, pitted and peeled
- 0.5 cup unsweetened cocoa powder
- 0.33 cup maple syrup
- 0.5 cup coconut milk
- 1 teaspoon pure vanilla extract
- a pinch fine sea salt
- Optional toppings: fresh berries, shredded coconut, or crushed nuts
Instructions
- Begin by placing the ripe avocados into a high-powered blender or food processor. Follow with the unsweetened cocoa powder, maple syrup, coconut milk, pure vanilla extract, and a pinch of sea salt.
- Blend the mixture on high speed, pausing to scrape down the sides as necessary. Continue blending until the mousse achieves a completely smooth and creamy consistency, free of any avocado lumps.
- Taste the mousse and determine if you’d like it sweeter. If desired, add more maple syrup to enhance the sweetness, and blend again briefly to ensure the additional syrup is thoroughly mixed.
- Once the mousse is glossy and velvety, scoop it into individual serving bowls or elegant glasses, taking care to fill each generously.
- Cover the bowls or glasses with plastic wrap and place them in the refrigerator for a minimum of 30 minutes. This chilling time allows the mousse to firm up slightly and deepens the luscious flavors.
- When ready to serve, remove the mousse from the refrigerator. Top each serving with your choice of fresh berries, a sprinkle of shredded coconut, or a handful of crushed nuts to add an appealing contrast in texture and a burst of color.
![- 1 ripe avocado, peeled and pitted - 1/2 cup unsweetened cocoa powder - 1/2 cup maple syrup or honey - 1/4 cup almond butter or peanut butter - 1/2 cup whole wheat flour - 1/2 teaspoon baking soda - 1/4 teaspoon salt - 1 teaspoon pure vanilla extract - 1/2 cup dark chocolate chips The key ingredient here is the avocado. Why choose avocado for brownies? It adds creaminess and healthy fats. This makes the brownies moist without extra oil. Next, we have cocoa powder. It gives the brownies a rich chocolate taste. The maple syrup or honey acts as a natural sweetener. I prefer maple syrup for its unique flavor. Almond butter or peanut butter brings a nutty taste. Whole wheat flour adds fiber, making these brownies healthier. Baking soda helps the brownies rise. Salt enhances all the flavors. Finally, dark chocolate chips are a must for that gooey chocolate burst. Using avocado offers many perks. It is rich in vitamins and healthy fats. These fats can help lower bad cholesterol. The fiber in avocado also aids digestion. Cocoa powder is full of antioxidants. It can improve heart health while making brownies delicious. Maple syrup is a lower glycemic option. It can provide a steady energy boost without a sugar crash. Switching to whole wheat flour adds more nutrients. It has more fiber than white flour. This helps keep you full longer. If you need gluten-free options, use almond flour instead of whole wheat. It works well and keeps the taste rich. For a vegan-friendly version, replace honey with maple syrup. Use a nut butter that fits your diet. You can also find dairy-free chocolate chips easily. These easy swaps ensure everyone can enjoy these healthy chocolate avocado brownies! - Preheat your oven to 350°F (175°C). - Line an 8x8 inch baking pan with parchment paper. Leave some paper hanging over the edges. This helps with easy removal later. - Take your ripe avocado and mash it in a bowl. You want it smooth and creamy. You can also use a food processor for this step. - In the same bowl, add maple syrup (or honey), almond butter, and vanilla extract. Mix until everything is blended well. - In a different bowl, whisk together cocoa powder, whole wheat flour, baking soda, and salt. Make sure these dry ingredients are mixed well. - Gradually add the dry mix to the wet mix. Stir gently until just combined. It’s okay to have a few lumps; this helps keep the brownies soft. - Fold in dark chocolate chips so they are evenly spread in the batter. - Pour the batter into your prepared pan. Use a spatula to smooth it out evenly. - Place the pan in your oven. Bake for 20-25 minutes. - To check if they are done, insert a toothpick into the center. It should come out with a few moist crumbs but not wet batter. - Once baked, let the brownies cool in the pan on a wire rack for 15 minutes. Use the parchment paper to lift them out. Let them cool further before cutting into squares. Enjoy making these Healthy Chocolate Avocado Brownies with the [Full Recipe]. To make your brownies just right, avoid overmixing. When you combine wet and dry ingredients, mix gently. A few lumps are okay. This keeps your brownies soft and fudgy. Even baking is also key. Make sure to spread the batter evenly in the pan. This helps them bake at the same time. For a lovely presentation, dust the brownies with cocoa powder or powdered sugar. You can also serve them with fresh berries. A dollop of yogurt adds creaminess and balances the rich chocolate. These simple touches make your brownies look great on any plate. You can boost the taste of your brownies easily. Try adding spices like cinnamon or a pinch of sea salt. A splash of almond or peppermint extract gives a fun twist. Using flavored chocolate chips adds another layer of taste. Think about using orange or hazelnut chips for a unique flavor profile. Check out the Full Recipe for more ideas! {{image_4}} To make these brownies gluten-free, swap whole wheat flour for almond flour or coconut flour. These options keep the texture rich and moist while avoiding gluten. Just remember to adjust the amount, as almond flour is more absorbent. For a vegan twist, replace honey with maple syrup. You can also use a plant-based nut butter, like almond or sunflower seed butter, instead of peanut butter. This keeps the flavor intact without any animal products. You can add a fresh twist to these brownies by mixing in mint extract. Use about 1 teaspoon of pure mint extract for a refreshing flavor. This makes mint chocolate avocado brownies that are perfect for any mint lover! Another fun option is to create a peanut butter swirl. Drop spoonfuls of peanut butter into the brownie batter before baking. Use a knife to swirl it around for a beautiful marbled look. This adds a delicious peanut flavor that pairs well with chocolate. If you want to change the serving size, you can easily convert the recipe. For a smaller batch, halve the ingredients. Use a smaller pan, like 6x6 inches, and keep an eye on the baking time. Smaller brownies will bake faster. You can also bake these brownies in a larger pan for thinner squares. A 9x13 inch pan works well, but adjust the baking time to about 15-20 minutes. Check for doneness with a toothpick, just like before. For the full recipe, check out the details above! To keep your brownies fresh, store them in an airtight container. This prevents air from making them dry. You can also place a slice of bread in the container. The bread helps maintain moisture. Always let brownies cool before storing. This avoids steam build-up, which can make them soggy. If you want to freeze brownies, first cut them into squares. Wrap each piece tightly in plastic wrap. Then, place them in a freezer-safe bag or container. This helps avoid freezer burn. When you're ready to eat them, just take out a piece and let it thaw at room temperature. You can also warm them in the microwave for a few seconds. Brownies last about 3-4 days at room temperature. If you see any mold, throw them away. To keep them fresh longer, refrigerate or freeze them. Refrigeration can extend their life to about a week. For best taste, enjoy them within a few days. For the full recipe, check out the provided details. Can I use ripe bananas instead of avocado? Yes, you can use ripe bananas. They add sweetness and moisture. However, the flavor changes slightly. Bananas may make the brownies taste fruitier. If you love banana, give it a try! How can I make these brownies less sweet? To reduce sweetness, cut back on the maple syrup or honey. You can also swap some sweetener for unsweetened applesauce. This keeps the texture but lowers the sugar. What is the best way to test brownies for doneness? The best way is to use a toothpick. Insert it in the center. If it comes out with a few moist crumbs, the brownies are done. If it has wet batter, bake a bit longer. Can these brownies be made without flour? Yes, you can make them without flour. Use a blend of nut flour or almond flour instead. This gives a nutty flavor and keeps the brownies moist. How many calories are in a serving? Each brownie has about 100 calories. This can change based on the ingredients you use. For example, using less sweetener or different nut butter may alter the calorie count. What are good dairy-free alternatives for chocolate chips? Look for dairy-free dark chocolate chips. Many brands make these with coconut or almond milk. You can also chop up a dairy-free chocolate bar for chunks. In this article, I covered a delicious brownie recipe that uses healthy ingredients. You learned about the key components, their nutritional benefits, and how to adapt the recipe for dietary needs. I shared step-by-step instructions for baking these brownies to perfection. With tips on flavor and texture, you can create the best version. Remember to store your leftovers properly to keep them fresh. Enjoy baking these brownies, knowing they are a tasty treat that can fit your diet!](https://goldendishy.com/wp-content/uploads/2025/06/19347e51-2d6e-4328-baa5-83086a8293f2-768x768.webp)

![To make Peach Cobbler French Toast, gather these items: - 4 slices of thick bread (brioche or challah is best) - 2 ripe peaches, sliced (canned peaches work too; drain them) - 2 large eggs - 1 cup milk (whole or almond milk is great) - 1 tablespoon pure vanilla extract - 1 teaspoon ground cinnamon - 1 tablespoon brown sugar - 1 tablespoon unsalted butter (for cooking) - ½ cup granola (optional, for crunch) - Whipped cream (optional, for serving) If you have dietary needs, consider these swaps: - For gluten-free, use gluten-free bread. - Vegan? Swap eggs with flaxseed meal and use plant-based milk. - For low-sugar diets, try a sugar substitute in place of brown sugar. Picking peaches is easy with these tips: - Look for peaches that are firm but slightly soft when squeezed. - Choose fruit with a sweet smell; this indicates ripeness. - Avoid peaches with bruises or dark spots, as these can affect flavor and texture. By following these tips and using the right ingredients, you’ll make a delightful Peach Cobbler French Toast that everyone will love! Check out the Full Recipe for more details. Making Peach Cobbler French Toast is a fun and simple process. I’ll walk you through each step to ensure your dish turns out perfectly. 1. Mixing the egg custard: In a medium bowl, whisk together 2 large eggs, 1 cup of milk, 1 tablespoon of pure vanilla extract, and 1 teaspoon of ground cinnamon. Mix well until it is smooth and creamy. This egg custard gives the French toast its rich flavor. 2. Soaking the bread slices: Pour the egg mixture into a shallow dish. Take 4 slices of thick bread, like brioche or challah. Place each slice in the dish, soaking for about 2-3 minutes on each side. Make sure they absorb the custard well. 3. Preparing the peach topping: While the bread soaks, slice 2 ripe peaches. If you use canned peaches, ensure they are drained. In a small saucepan, combine the sliced peaches with 1 tablespoon of brown sugar. Cook over medium heat for about 5-7 minutes, stirring often. When the peaches are soft and syrupy, take them off the heat. 4. Cooking the French toast: Heat a skillet over medium heat and add 1 tablespoon of unsalted butter. Let the butter melt completely. Place the soaked bread slices in the skillet. Cook each side for 3-4 minutes until golden brown. The butter helps give the toast a nice, crisp texture. Once cooked, arrange the French toast on plates and spoon the warm peach topping over each slice. For a delightful crunch, you can sprinkle granola on top. If you want to indulge, add a dollop of whipped cream. For detailed steps, refer to the Full Recipe. - Achieving the perfect golden crust: To get that nice, golden crust, use thick bread. Brioche or challah works best. Soak each slice well, but don't leave it too long. This ensures the center stays soft while the outside crisps up. - Temperature control for even cooking: Keep your skillet or griddle at medium heat. If it’s too hot, the bread will burn before cooking through. If it’s too cool, you won’t get the lovely crust. Adjust as needed while cooking each slice. - How to avoid soggy bread: Soak the bread just enough to absorb the flavors. If the bread is too soggy, it won’t cook well. A quick 2-3 minute soak on each side is perfect for keeping it fluffy yet not falling apart. - Pairing with syrup or whipped cream: Drizzle with maple syrup for sweetness. A dollop of whipped cream adds a creamy touch. Both make your Peach Cobbler French Toast even more delightful. - Presentation ideas for special occasions: Stack the slices on a platter. Add warm peach syrup on top. Garnish with fresh peach slices. A sprinkle of cinnamon creates an eye-catching centerpiece for brunch. - Best sides to complement Peach Cobbler French Toast: Serve with crispy bacon or sausages for a savory balance. Fresh fruit adds color and freshness, making your meal more appealing. You can also add a light salad for a refreshing touch. For the full recipe, check out [Full Recipe]. {{image_4}} You can make Peach Cobbler French Toast to fit your diet. If you need gluten-free options, choose gluten-free bread. Many brands offer tasty alternatives. For dairy-free choices, almond or oat milk works well. Both give a nice flavor. You can also swap out spices. Try nutmeg or allspice for a twist. Extracts like almond or maple add a fun taste. To make this dish even better, think about adding nuts or seeds. Chopped pecans or walnuts give a nice crunch. You can also mix in berries. Blueberries or raspberries pair well with peaches. They add color and flavor. If you want new fruit choices, try apples or mango. Both fruits bring a fresh taste and keep it exciting. With these tips, you can create your own unique version. Check out the Full Recipe for more details! To keep your Peach Cobbler French Toast fresh, follow these tips: - Refrigerate promptly: Place leftover French toast in an airtight container within two hours of cooking. - Layer wisely: If you have multiple pieces, insert parchment paper between them to prevent sticking. - Use within three days: For the best taste and texture, enjoy your leftovers within this time. When it comes to reheating, use a skillet or microwave: - Skillet method: Heat on low for about 3-4 minutes on each side. This keeps the toast crispy. - Microwave method: Heat on medium for 30-second intervals until warm. This method may soften the toast. You can freeze Peach Cobbler French Toast for later enjoyment! Here’s how: - Cool completely: Let the French toast cool to room temperature before freezing. - Wrap well: Use freezer-safe bags or wrap each slice in plastic wrap, then aluminum foil. - Label and date: Write the date on the bag for easy tracking. To thaw and reheat: - Thaw overnight: Place in the fridge for several hours or overnight. - Reheat: Use the skillet method mentioned above or microwave for 1-2 minutes until hot. Now you can enjoy this delicious treat anytime! Check out the Full Recipe for all the details. Choosing the right bread makes a big difference. I recommend using thick slices of brioche or challah. These breads soak up the egg mixture well and become nice and fluffy. Look for bread that is fresh but not too soft. You want a sturdy texture that holds up during cooking. Yes, you can prepare some parts ahead of time. You can soak the bread slices in the egg mixture and store them in the fridge for a few hours. Just be sure to cook them right before serving. You can also prepare the peach topping in advance and warm it up when you are ready to eat. If you don’t have peaches, you can try other fruits. Fresh or canned sliced pears work well. You can also use berries like blueberries or strawberries. Just keep in mind that cooking times may vary slightly. The cooked Peach Cobbler French Toast lasts about three days in the fridge. Store it in an airtight container to keep it fresh. When you reheat it, warm it in a skillet or microwave until hot. This helps keep the texture nice. For the full recipe, check the one provided above. Peach Cobbler French Toast is a delightful dish that brings joy to breakfast. We covered ingredients, preparation steps, and useful tips for cooking. I offered ideas for variations, storage, and answers to common questions. Embrace your creativity with this recipe. Try different fruits or spices for unique flavors. Enjoy the process and make it your own! Happy cooking!](https://goldendishy.com/wp-content/uploads/2025/06/19b86d0b-72ea-4091-b6de-feef30e599d4-768x768.webp)