Coconut Curry Sweet Potato Soup Flavor-Packed Delight


Welcome to my kitchen! Today, we’re diving into a flavor-packed delight: Coconut Curry Sweet Potato Soup. This creamy blend of sweet potatoes and coconut milk, mixed with aromatic spices, will warm you up and leave you craving more. Perfect for a cozy night in, it’s easy to prepare and packed with goodness. So grab your ingredients, and let’s create a dish that’s both delicious and healthy!
Why I Love This Recipe
- Comforting and Creamy: This soup combines the sweetness of sweet potatoes with the richness of coconut milk, creating a comforting and creamy texture that warms the soul.
- Easy to Make: With simple ingredients and straightforward steps, this recipe is perfect for both novice and experienced cooks looking for a quick and delicious meal.
- Full of Flavor: The addition of red curry paste and fresh ginger brings a delightful kick to the soup, making each spoonful packed with vibrant flavors.
- Nutritious and Wholesome: Packed with vitamins and minerals from sweet potatoes and enriched with healthy fats from coconut milk, this soup is both nourishing and satisfying.
Ingredients
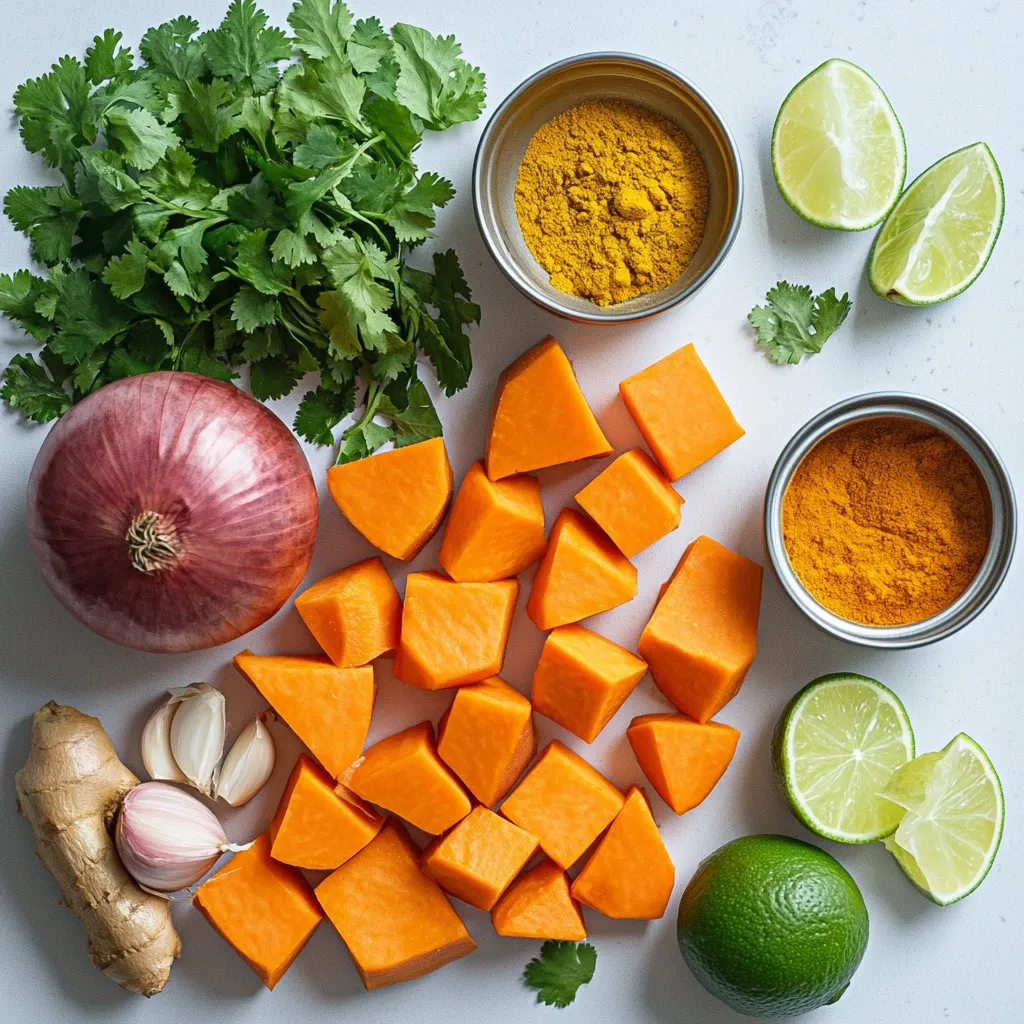
To make Coconut Curry Sweet Potato Soup, you need a few key ingredients. Each item brings unique flavors and textures to the dish. Here’s the complete list:
– 2 medium sweet potatoes, peeled and diced into bite-sized cubes
– 1 can (400ml) coconut milk, shaken well
– 1 medium onion, finely chopped
– 2 cloves garlic, minced or pressed
– 1 inch piece of fresh ginger, grated or minced
– 2 tablespoons red curry paste (adjust based on spice preference)
– 4 cups vegetable broth (homemade or low-sodium)
– 1 tablespoon olive oil
– 1 teaspoon turmeric powder
– Salt and freshly ground black pepper to taste
– Fresh cilantro leaves, roughly chopped, for garnish
– Lime wedges, for serving
Each ingredient plays a role in making this soup creamy, spicy, and comforting. Sweet potatoes provide sweetness and creaminess. Coconut milk adds a rich, velvety texture. Aromatics like onion, garlic, and ginger deepen the flavor. Curry paste and spices create warmth and depth. Finally, the broth brings everything together.
Feel free to adjust the spices to match your taste. You can also play around with garnishes. Enjoy creating this flavorful dish!
Step-by-Step Instructions
Preparation steps
To start, heat olive oil in a large pot over medium heat. Add the chopped onion. Cook for about 5-7 minutes until it gets soft and clear. Then, mix in the minced garlic and grated ginger. Stir for about 1 minute until the smell fills the air.
Next, add the red curry paste and turmeric powder. Cook these spices for 2 minutes. This helps bring out their flavors. Now, toss in the diced sweet potatoes. Make sure they are well-coated with the onion and spice mix.
Pour in 4 cups of vegetable broth. Turn up the heat until it boils. Once boiling, reduce the heat to a gentle simmer. Let it cook for 15-20 minutes. You want the sweet potatoes to be soft and easy to pierce with a fork.
Blending the soup
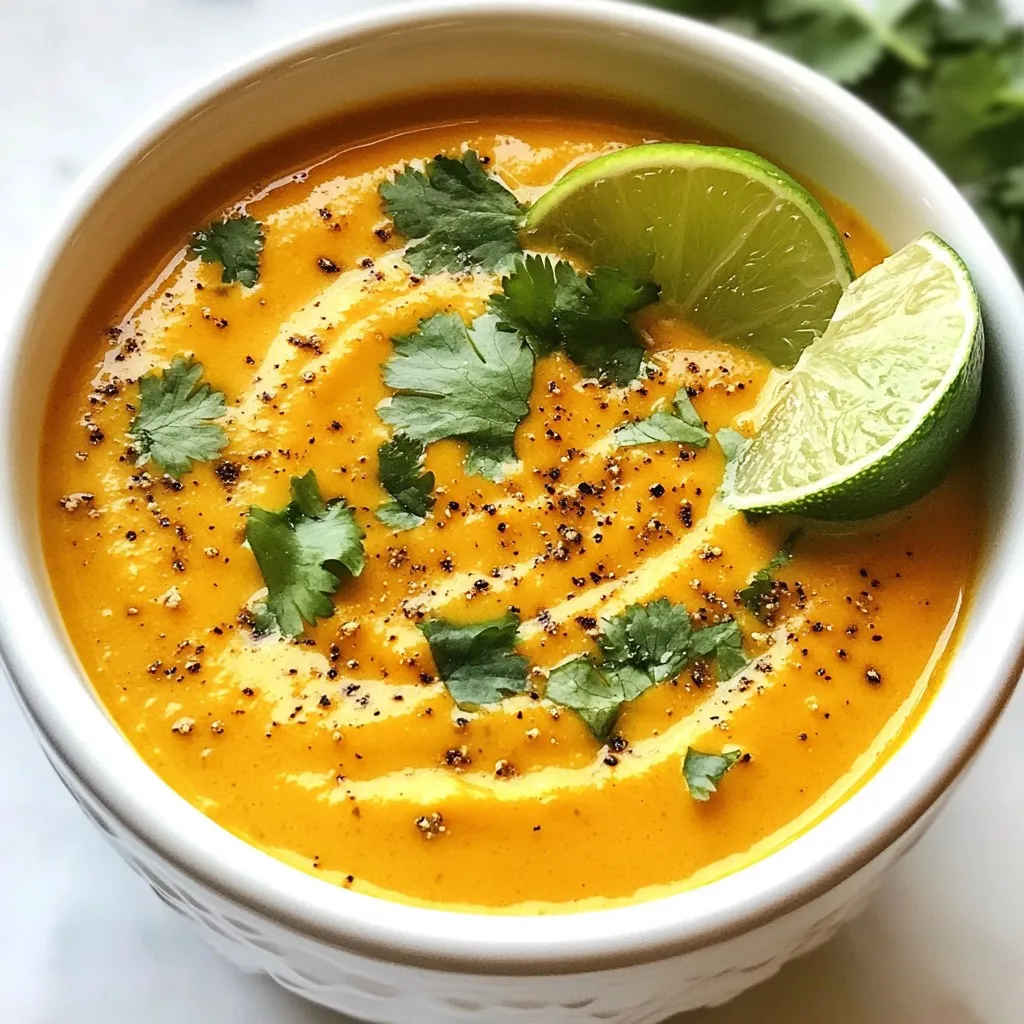
Once the sweet potatoes are tender, take the pot off the heat. Slowly stir in the coconut milk to create a creamy mix. For blending, you can use an immersion blender. Puree the soup right in the pot until it is smooth.
If you prefer, you can pour the soup into a countertop blender. Blend in batches until smooth. Then return it all to the pot.
Final seasoning and serving
Put the pot back on low heat. Taste the soup and add salt and freshly ground black pepper to your liking. Warm it gently for about 5 minutes.
Serve the soup hot in bowls. Top with roughly chopped fresh cilantro. Add lime wedges on the side for a zesty kick. Enjoy your coconut curry sweet potato soup!
Tips & Tricks
Cooking tips for best results
How to choose sweet potatoes
When picking sweet potatoes, look for firm ones with smooth skin. Avoid those with soft spots or blemishes. The best sweet potatoes should feel heavy for their size. A mix of orange and purple varieties can add depth to your soup.
Adjusting spice levels
Red curry paste can be spicy. Start with one tablespoon if you prefer less heat. You can taste the soup as it cooks and add more if you want it spicier. Mixing in some coconut milk can also help tone down the heat.
Garnishing ideas
Additional flavor enhancers
Add a squeeze of lime juice before serving. This brightens the soup and adds a fresh taste. You can also sprinkle some toasted coconut flakes on top for a crunchy texture.
Alternative toppings
Try adding sliced green onions or diced avocado for creaminess. Chopped peanuts also add a nice crunch. Fresh herbs like basil or mint can give a unique twist to your dish. Mix and match these toppings to find your favorite combination!
Pro Tips
- Adjust Spice Level: Feel free to modify the amount of red curry paste based on your personal spice preference; start with less and add more as needed.
- Creaminess Factor: For an extra creamy texture, blend in a little additional coconut milk after pureeing the soup.
- Flavor Boost: Enhance the soup’s flavor by adding a splash of lime juice directly into the pot before serving.
- Storage Tips: This soup can be stored in the refrigerator for up to 4 days; just reheat gently on the stove before serving.
Variations
Dietary modifications
You can easily make this soup vegan and gluten-free. Use vegetable broth that is certified gluten-free. The coconut milk makes it creamy and rich without dairy. For a low-sodium version, choose low-sodium vegetable broth. You can even skip the added salt and let the spices shine.
Flavor variations
Feel free to add more vegetables to this soup. Carrots, bell peppers, or spinach work great. You can also add proteins like chickpeas or cooked chicken for a heartier meal. If you enjoy spice, try adding fresh chili or extra curry paste. A squeeze of lime juice at the end boosts the flavor too.
Experimenting with these variations keeps the soup exciting and fresh!
Storage Info
Storage guidelines
– Refrigeration tips: Allow the soup to cool before storing. Use an airtight container to keep it fresh. It stays well in the fridge for 3 to 5 days.
– Freezing the soup: For longer storage, freeze the soup. Use freezer-safe containers or bags. It lasts up to 3 months in the freezer. To thaw, place it in the fridge overnight.
Reheating instructions
– Best practices to maintain texture: Reheat the soup gently. This keeps the creamy texture. Stir it often to prevent sticking.
– Microwave vs. stove: The microwave is quick but may heat unevenly. Use the stove for better heat control. Warm it over low heat, stirring until hot.
FAQs
Can I make this soup ahead of time?
Yes, you can make this soup ahead of time. It keeps well in the fridge for about three days. Just let it cool before storing it in an airtight container. When you are ready to eat, reheat it on the stove or in the microwave.
What can I serve with Coconut Curry Sweet Potato Soup?
This soup pairs well with many sides. You can serve it with crusty bread or rice. A simple salad can also complement it nicely. For a special touch, try it with naan bread.
How can I adjust the thickness of the soup?
To adjust the thickness, you have a few options. If the soup is too thick, add more vegetable broth or coconut milk. If it’s too thin, let it simmer longer to reduce. You can also blend it more to create a creamier texture.
Can I use coconut cream instead of coconut milk?
Yes, you can use coconut cream instead of coconut milk. It will give the soup a richer flavor and thicker texture. Just be aware that it can make the soup more calorie-dense. Adjust the other liquids to maintain the right consistency.
This blog post covers making a delicious Coconut Curry Sweet Potato Soup in detail. We explored the necessary ingredients, step-by-step instructions, and tips for the best results. You learned about variations for different diets and flavors, plus how to store and reheat your soup.
In summary, this soup is easy and versatile. Enjoy experimenting with flavors and garnishes. You can share it with friends or savor it all on your own. Happy cookin

Coconut Curry Sweet Potato Soup
Ingredients
- 2 medium sweet potatoes, peeled and diced into bite-sized cubes
- 1 can coconut milk, shaken well
- 1 medium onion, finely chopped
- 2 cloves garlic, minced or pressed
- 1 inch piece fresh ginger, grated or minced
- 2 tablespoons red curry paste
- 4 cups vegetable broth
- 1 tablespoon olive oil
- 1 teaspoon turmeric powder
- to taste salt and freshly ground black pepper
- for garnish fresh cilantro leaves, roughly chopped
- for serving lime wedges
Instructions
- In a large pot, heat the olive oil over medium heat. Once hot, add the chopped onion. Sauté the onion for about 5-7 minutes, stirring occasionally, until it softens and becomes translucent.
- Add the minced garlic and grated ginger to the pot, stirring for about 1 minute until the mixture becomes aromatic and fragrant.
- Stir in the red curry paste and turmeric powder. Cook the spices for an additional 2 minutes, stirring frequently to ensure they are evenly distributed and fragrant.
- Add the diced sweet potatoes to the pot, mixing them thoroughly with the onion and spice mixture to ensure they are well-coated.
- Pour in the vegetable broth and increase the heat to bring the mixture to a rolling boil. Once boiling, reduce the heat to a gentle simmer and let it cook for approximately 15-20 minutes, or until the sweet potatoes are tender and easily pierced with a fork.
- Once the sweet potatoes are tender, remove the pot from the heat and gradually stir in the coconut milk until the mixture is fully combined and creamy.
- Using an immersion blender, carefully puree the soup in the pot until it reaches a silky smooth consistency. Alternatively, you can transfer the soup in batches to a countertop blender, blending until smooth, then return it to the pot.
- Place the pot back on the stove over low heat. Season the soup with salt and freshly ground black pepper to taste, warming it gently for about 5 minutes to combine the flavors.
- Serve the soup hot in bowls, garnished with roughly chopped fresh cilantro on top and lime wedges on the side for an added burst of tangy flavor.
![- 9 lasagna noodles - 2 cups cooked chicken, shredded - 2 cups Alfredo sauce (store-bought or homemade) - 2 cups ricotta cheese - 2 cups shredded mozzarella cheese - 1 cup grated Parmesan cheese - 1 cup fresh spinach, chopped - 1 teaspoon garlic powder - 1 teaspoon onion powder - Salt and pepper to taste - Fresh basil leaves for garnish Each ingredient plays a big role in flavor and texture. - Lasagna noodles form the base, holding all the layers together. - Cooked chicken adds protein and heartiness. Use rotisserie chicken for ease. - Alfredo sauce gives creaminess and rich flavor. Store-bought saves time, or you can make your own. - Ricotta cheese provides a creamy filling. It’s soft and mild, blending well with other flavors. - Shredded mozzarella cheese melts beautifully, adding gooey texture. - Grated Parmesan cheese gives a salty, nutty kick on top. - Fresh spinach brings a pop of color and nutrients. - Garlic and onion powder enhance the flavor without overpowering the dish. - Salt and pepper are essential for seasoning, balancing the taste. - Fresh basil adds brightness when you serve the dish. You can change some ingredients to suit your taste. - Swap chicken for turkey or keep it meatless with a veggie mix. - Use cottage cheese instead of ricotta for a lighter option. - Try different cheeses like gouda or cheddar for unique flavors. - If you don't have Alfredo sauce, use a white sauce or a creamy tomato sauce. - For a gluten-free version, look for gluten-free lasagna noodles. These adjustments keep the spirit of the dish while catering to your needs. For the complete recipe, check the Full Recipe. To start, bring a large pot of salted water to a boil. This water helps cook the noodles evenly. Add 9 lasagna noodles to the pot. Cook them according to the package instructions. Aim for an al dente texture, which means they should be slightly firm. Once cooked, drain the noodles. Rinse them briefly under cold water to stop the cooking process and prevent sticking. Set them aside on a clean surface or a plate. Now, grab a spacious mixing bowl. In this bowl, combine 2 cups of shredded cooked chicken, 2 cups of ricotta cheese, and 1 cup of chopped fresh spinach. Add 1 teaspoon each of garlic powder and onion powder for flavor. Don’t forget to sprinkle in some salt and pepper to taste. Mix all these ingredients thoroughly. You want a nice, smooth filling that binds together well. This mixture is the heart of your lasagna. Take a 9x13 inch baking dish and spread a thin layer of Alfredo sauce on the bottom. This helps prevent the noodles from sticking. Lay down 3 noodles side by side over the sauce. Next, spread half of your chicken and ricotta mixture over the noodles. Top this layer with a third of the shredded mozzarella cheese. Repeat this layering: add another 3 noodles, the remaining chicken mixture, and another third of mozzarella cheese. For the final layer, place the last 3 noodles on top. Cover these noodles with the rest of the Alfredo sauce. Finish with the remaining mozzarella and all of the grated Parmesan cheese on top. This will create a beautiful, bubbly crust when baked. Now, cover the dish with aluminum foil and place it in your preheated oven at 375°F (190°C). Bake for 25 minutes. After that, remove the foil and bake for another 15 minutes. Keep an eye on it until the cheese is bubbly and golden brown. This step is key for that perfect, cheesy finish. When you layer your lasagna, start with a thin layer of sauce. This helps the noodles not stick. Use three noodles for each layer. Spread half of your filling evenly over the noodles. Sprinkle some cheese on top. Repeat until you have used all ingredients. Finish with noodles, sauce, and lots of cheese on top. Bake your lasagna at 375°F (190°C). Cover it with foil for the first 25 minutes. This keeps it moist. After that, take off the foil and bake for another 15 minutes. This makes the cheese bubbly and golden. Let it cool for 10 minutes before slicing. This helps the layers hold together. Cut the lasagna into squares for serving. Garnish with fresh basil leaves and extra Parmesan cheese. This makes it look great! Pair it with a green salad or garlic bread for a complete meal. Enjoy your cheesy chicken Alfredo lasagna with family or friends for a comforting dinner. For the full recipe, check the earlier section. {{image_4}} You can easily make a vegetarian version of this dish. Just swap the chicken for a mix of veggies. Try using mushrooms, zucchini, or bell peppers instead. For added flavor, sauté the veggies before mixing them with the ricotta. This change keeps the dish creamy and satisfying. Feel free to add more vegetables or proteins. Spinach is great for color and taste. You can also toss in some chopped broccoli or roasted red peppers. If you want more protein, consider adding cooked lentils or chickpeas. These ingredients boost nutrition and make the dish heartier. You can switch up the sauce or cheese for a twist. Use a white sauce or pesto instead of Alfredo for a different flavor. For cheese, try blending mozzarella with gouda or fontina for a richer taste. Mixing cheeses adds depth and makes each bite unique. For the full recipe, check out [Full Recipe]. After enjoying your cheesy chicken Alfredo lasagna, you may have some leftovers. To store them, let the lasagna cool completely. Then, cover it tightly with plastic wrap or aluminum foil. You can also place it in an airtight container. This helps keep it fresh for up to three days in the fridge. Make sure to keep it away from strong-smelling foods to avoid any unwanted flavors. When it's time to enjoy your leftovers, reheating is simple. Preheat your oven to 350°F (175°C). Place the lasagna in a baking dish. If you want, add a splash of Alfredo sauce on top to keep it moist. Cover it with foil to prevent drying out. Bake for about 20-25 minutes, or until heated through. You can also reheat individual slices in the microwave for about 1-2 minutes on high. Just check and stir halfway through for even heating. If you want to save some for later, freezing is a great option. Cut the lasagna into portions for easy serving. Wrap each piece tightly in plastic wrap, then foil. This double wrapping helps prevent freezer burn. You can freeze it for up to three months. When ready to eat, let it thaw in the fridge overnight. Reheat in the oven or microwave as mentioned above. Enjoy your homemade meal anytime! For the full recipe, refer to the earlier section. Yes, you can use different pasta shapes. You might try wide egg noodles or even gluten-free options. Just make sure they fit well in your dish. Cook them according to the package directions. This way, they will blend smoothly with the other layers. To make Alfredo sauce, start with butter and cream. Melt 1/2 cup of butter in a pan. Then stir in 1 cup of heavy cream. Cook for about 5 minutes on low heat. Add 1 cup of grated Parmesan cheese. Mix well until it melts. Season with salt, pepper, and garlic powder for flavor. Homemade sauce tastes fresh and creamy. You can tell your lasagna is done when the cheese on top is golden brown and bubbly. Insert a knife in the center; it should slide in easily. If the layers are hot and firm, your lasagna is ready to enjoy. Let it cool a bit before serving for the best slices. For the full recipe, check out the details above. This blog post covered key ingredients for an amazing lasagna. You learned about substitutions, step-by-step cooking, and tips for a perfect dish. I shared tasty variations and smart storage ideas. When you try this recipe, you’ll enjoy a delicious meal that fits your taste. Remember, cooking is fun. Experiment with different flavors and enjoy the process!](https://goldendishy.com/wp-content/uploads/2025/07/68bc65d6-2565-4554-ba8a-7f3921e48887-768x768.webp)
. First, preheat your oven to 400°F (200°C). This step is key for even roasting. Gather your ingredients. You should have baby carrots, honey, olive oil, garlic, thyme, and lemon juice ready. In a large bowl, combine the honey, olive oil, minced garlic, and thyme. Add a good pinch of salt and pepper. Next, squeeze in the lemon juice. Whisk the mixture well until it is smooth. This glaze will give your carrots a sweet and savory flavor. Now, it's time to coat the carrots. Add them to your bowl with the glaze. Toss them gently until they are well coated. Line a baking sheet with parchment paper for easy cleanup. Spread the carrots out in a single layer, avoiding crowding. Place the baking sheet in the preheated oven. Roast the carrots for 25-30 minutes. Halfway through, toss the carrots again for even cooking. They should become tender and caramelized. Once done, let them cool for a few minutes. If you like, drizzle some extra glaze over the top for added flavor. Finally, garnish with fresh parsley before serving. This adds a pop of color and freshness. If you want the full recipe, check it out [Full Recipe]. To ensure your carrots roast perfectly, choose fresh carrots. Baby carrots work well, but regular ones are great too. If using regular carrots, slice them into sticks for even cooking. Spread the carrots out in a single layer on the baking sheet. This step keeps them from steaming and helps them caramelize nicely. Toss them halfway through cooking for even browning. For a great glaze, mix the honey, olive oil, garlic, and thyme well. The oil helps the honey coat the carrots. If your glaze feels too thick, add a splash of water or lemon juice. This can help thin it out and ensure it coats the carrots evenly. Remember, a smooth glaze means more flavor in every bite! To make your dish pop, use a nice platter. Once the carrots are roasted, transfer them carefully. Drizzle with extra honey for shine. Sprinkle fresh parsley or thyme over the top for color. This simple touch makes your dish look gourmet. Enjoy serving them at your next meal! For the full recipe, check out the details above. {{image_4}} You can easily change this dish by adding other vegetables. Try sweet potatoes or parsnips. They roast well and add new flavors. Just cut them to a similar size as the carrots. This helps them cook evenly. If you want to switch up the sweet taste, use maple syrup or agave. Both give a nice flavor and work well with the garlic. You can use the same amount as honey. Just mix it well with the other ingredients. Adding spices can boost the taste of your honey garlic roasted carrots. You might try a pinch of cumin or chili powder for warmth. Fresh herbs like rosemary or dill can also add a bright note. Experiment with what you love! Each change can make this dish new and exciting. You can find the full recipe to guide you through these variations. To store leftover honey garlic roasted carrots, first let them cool down. Use an airtight container to keep them fresh. If you have a lot, divide them into smaller portions. Place the container in the fridge. They will stay good for about 3 to 5 days. Keeping them sealed helps avoid drying out. When you're ready to enjoy the leftovers, preheat your oven to 350°F (175°C). Spread the carrots on a baking sheet. You can drizzle a little olive oil for extra moisture. Heat them for about 10 to 15 minutes, or until they feel warm. You can also use a microwave if you're in a hurry. Just cover them with a damp paper towel and heat in 30-second bursts. If you want to keep the carrots longer, freezing is a great option. First, let the carrots cool completely. Spread them in a single layer on a baking sheet. Freeze them for about 1 hour. This step prevents them from sticking together. After that, transfer the carrots to freezer bags. Remove as much air as possible before sealing. They can last for up to 3 months in the freezer. To eat, thaw them in the fridge overnight before reheating. For more details, check the Full Recipe. Yes, you can use frozen carrots. However, fresh carrots will taste better. Frozen carrots may lose some crunch. If you use them, roast them longer to ensure they cook fully. Just remember to thaw them before roasting for the best results. Honey garlic roasted carrots pair well with many dishes. You can serve them with grilled chicken, beef, or fish. They also taste great with rice or quinoa. Try them with a fresh salad for a balanced meal. Their sweet and savory flavor adds depth to any plate. You can make this dish ahead of time. Prepare the honey garlic glaze and coat the carrots. Store them in the fridge for up to 24 hours. When ready to serve, just roast them in the oven. This saves time and still gives you that amazing flavor. For the full recipe, check out the complete instructions above. We explored the key ingredients and steps to make honey garlic roasted carrots. You learned how to mix the glaze, roast the carrots, and personalize the dish. We also discussed useful tips for perfect roasting and presentation. Lastly, we covered variations and storage tips to keep your dish fresh. Use this guide to make a tasty meal. Enjoy these carrots with your loved ones for a delightful experience.](https://goldendishy.com/wp-content/uploads/2025/06/04a56f10-aefe-4807-b100-2b1e29675843-768x768.webp)