Spicy Sesame Cucumber Salad Refreshing and Flavorful Dish
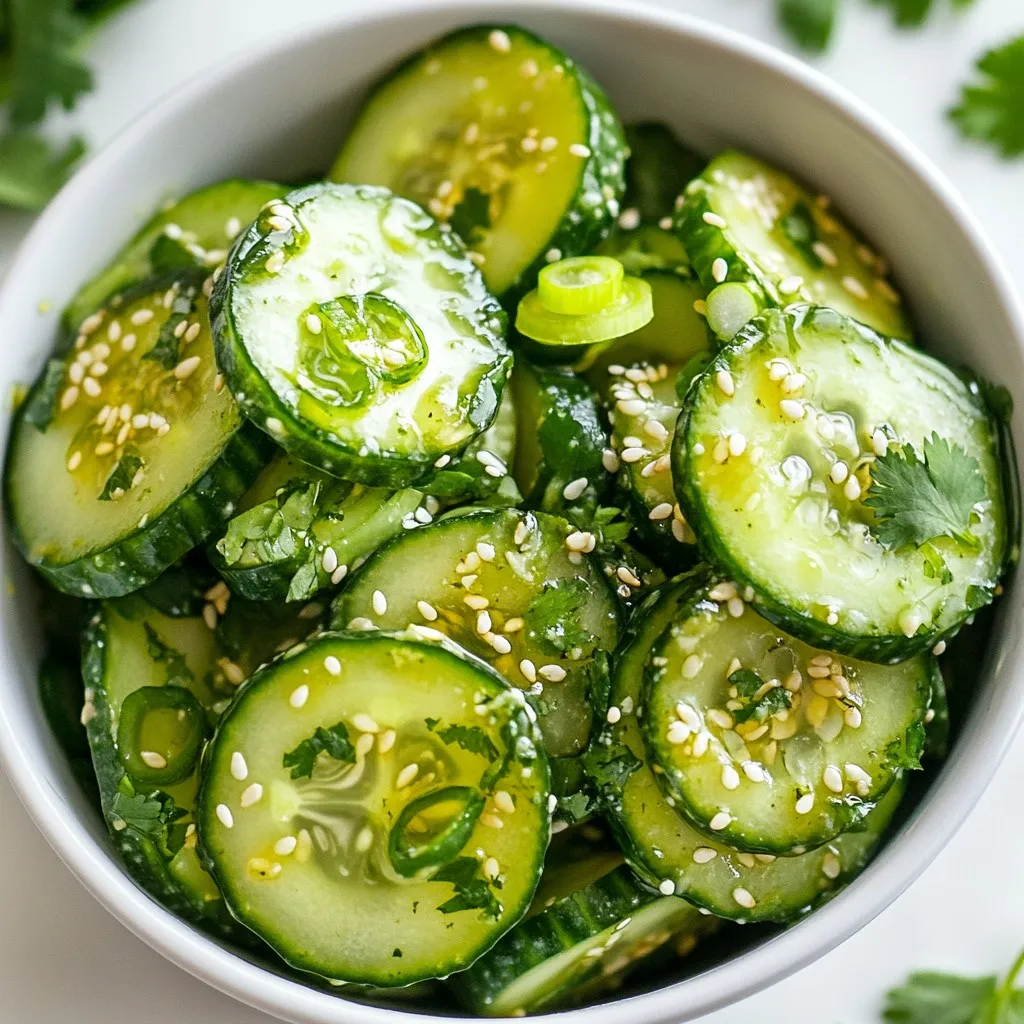

Looking for a dish that bursts with flavor and keeps you cool? My Spicy Sesame Cucumber Salad is exactly what you need! This zesty, refreshing salad combines crunchy cucumbers and a spicy sesame dressing, making it perfect for any meal. Whether you enjoy it as a side, a light snack, or a base for your favorite protein, you’ll love how easy and delightful it is to prepare. Let’s dive into the ingredients and get started!
Why I Love This Recipe
- Fresh and Crunchy: This salad highlights the refreshing crunch of cucumbers, making it a perfect side dish for any meal.
- Quick and Easy: With only a few ingredients and minimal prep time, this recipe is ideal for busy days when you want something healthy.
- Customizable Heat: The amount of Sriracha can be adjusted to suit your spice preference, allowing everyone to enjoy it just the way they like it.
- Vibrant Presentation: The colors from the green onions and cilantro not only taste great but also make the dish visually appealing on the table.
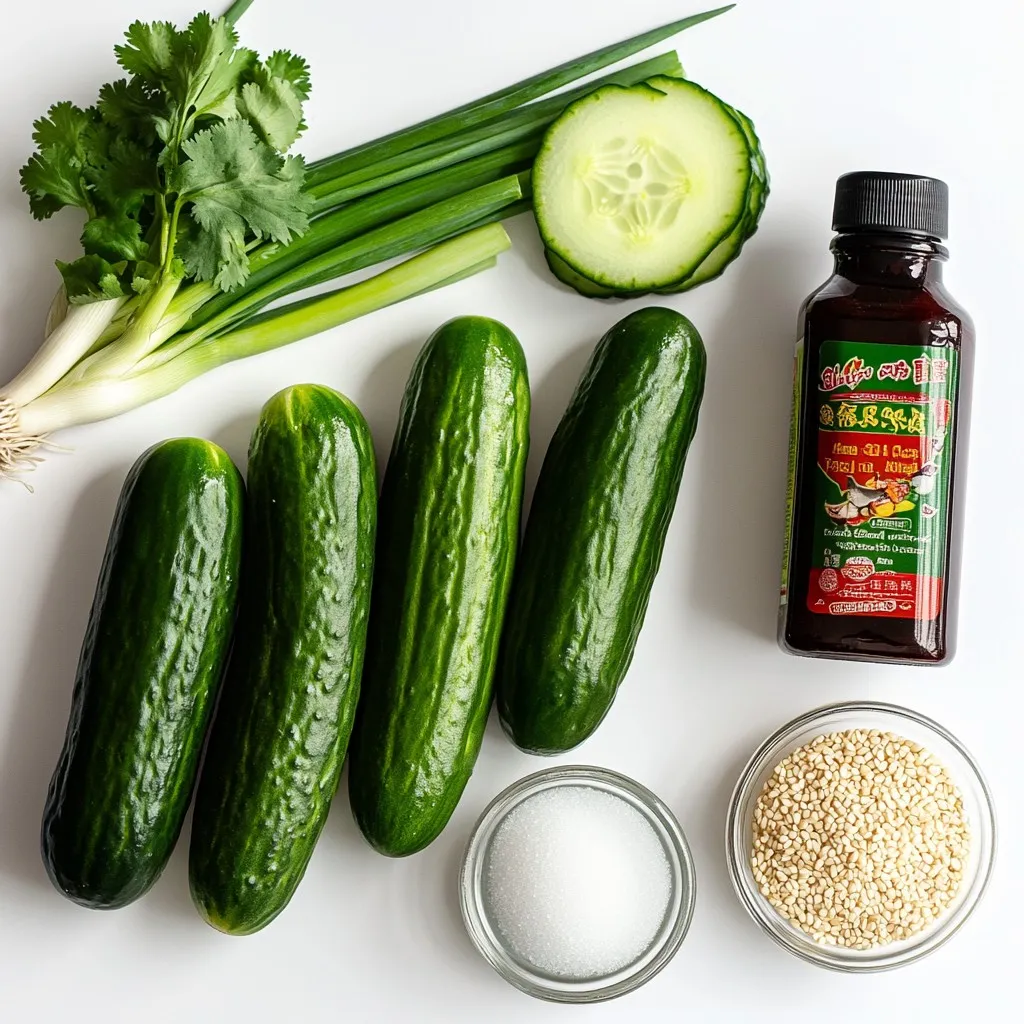
Ingredients
To make the Spicy Sesame Cucumber Salad, you will need the following ingredients:
– 3 large cucumbers
– 2 tablespoons sesame oil
– 1 tablespoon rice vinegar
– 1 tablespoon soy sauce
– 1 teaspoon sugar
– 1 tablespoon Sriracha
– 2 teaspoons toasted sesame seeds
– 3 green onions
– Fresh cilantro leaves
– Sea salt
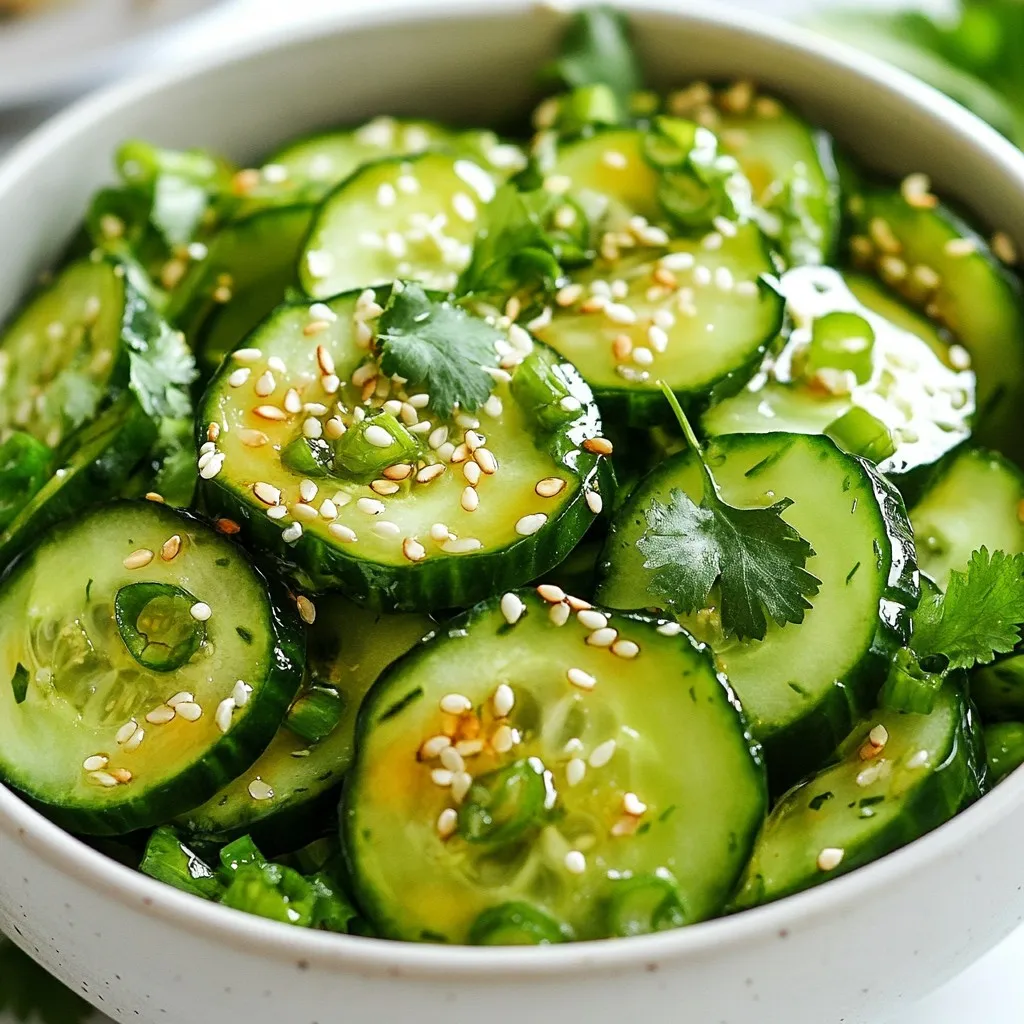
These ingredients come together to create a crisp and refreshing salad. The cucumbers are the star, adding crunch and hydration. The sesame oil gives a warm, nutty flavor, while rice vinegar adds a tangy punch. You can adjust the Sriracha to control the heat level, making it as spicy or mild as you like.
To add extra texture, the toasted sesame seeds and green onions provide a nice crunch. Finishing with fresh cilantro gives a burst of color and flavor. This salad is not just simple; it’s also a great way to enjoy fresh produce in a tasty way. The balance of flavors makes it a perfect side dish or a light meal.
Step-by-Step Instructions
Preparing the Cucumbers
Start by washing the cucumbers under cold water. This step ensures they are clean and fresh. Next, use a sharp knife or a mandoline to slice the cucumbers thinly. Aim for uniform thickness. This is key because even slices absorb flavor better. After slicing, place them in a large mixing bowl.
Making the Dressing
In a separate bowl, mix the sesame oil, rice vinegar, soy sauce, sugar, and Sriracha. Whisk these ingredients until they blend smoothly. Taste the mixture and adjust the Sriracha to fit your spice level. If you want it spicier, add more. If you prefer mild, reduce it.
Combining Ingredients
Now, drizzle the dressing over the cucumber slices in the bowl. Use your hands or salad tongs to toss the cucumbers gently. Make sure each slice gets coated evenly with the dressing. This step is crucial for full flavor in every bite.
Adding Toppings
Next, sprinkle toasted sesame seeds and finely chopped green onions on top. Toss the salad gently one more time. Be careful not to bruise the cucumbers. This keeps them crisp and pleasant to eat.
Marinating for Flavor
Let the salad sit at room temperature for about 10-15 minutes. This resting time allows the flavors to blend. The longer it sits, the more the cucumbers soak in the tasty dressing.
Final Touches
Before serving, taste the salad. Add sea salt if needed. This enhances all the flavors. Finally, garnish with fresh cilantro leaves. This adds a burst of color and fresh aroma that makes the dish even more inviting.
Tips & Tricks
Best Practices for Cucumbers
– Choosing the right cucumber varieties: I recommend using English or Persian cucumbers. They are crisp and have fewer seeds. These varieties also have thin skin, so peeling is optional.
– How to achieve crispiness: To keep cucumbers crunchy, slice them thinly and let them drain for a few minutes. This removes excess water and enhances their texture.
Dressing Adjustments
– Variations for different spice levels: If you want a milder salad, use less Sriracha. You can start with half a tablespoon and taste as you go. For more heat, add more Sriracha slowly until you reach your desired spice level.
– Substitutions for allergies: If you have a soy allergy, try using coconut aminos instead of soy sauce. This keeps the umami flavor while avoiding soy.
Presentation Ideas
– Serving suggestions for visual appeal: Serve your salad in a chilled bowl. The cold bowl keeps the salad fresh and crunchy. For a stylish look, use a white platter to highlight the vibrant colors of the salad.
– Creative garnishing tips: Garnish with extra sesame seeds and fresh cilantro. You can also add red pepper flakes for a pop of color and extra spice. A slice of lime or lemon on the side adds flair and freshness.
Pro Tips
- Choose Crunchy Cucumbers: For the best texture, select firm, fresh cucumbers with minimal blemishes.
- Adjust Spice to Your Liking: Start with a smaller amount of Sriracha and increase gradually to suit your taste preferences.
- Enhance with Additional Vegetables: Consider adding shredded carrots or bell peppers for extra color and crunch.
- Serve Chilled: For an extra refreshing experience, chill the salad in the refrigerator for 30 minutes before serving.
Variations
Different Dressings
For a twist on the classic flavor, try different dressings. You can use peanut sauce or tahini for a creamy option. These sauces add nutty notes that pair well with cucumber. If you want a lighter option, mix lime juice with olive oil. This brightens the dish while keeping it fresh.
If you follow a vegan diet, simply swap out any non-vegan ingredients. Use maple syrup instead of sugar for sweetness. Choose a vegan soy sauce or tamari for your base. These changes keep the salad plant-based without losing flavor.
Additional Ingredients
You can enhance your spicy sesame cucumber salad by adding other veggies. Consider bell peppers or shredded carrots for color and crunch. Radishes also add a nice peppery bite. You could even include thinly sliced cabbage for extra texture.
If you want to boost the protein, add cooked chickpeas or edamame. These options make the salad heartier and more filling. Grilled chicken or shrimp can also work if you prefer meat.
Flavor Enhancements
Don’t be afraid to experiment with flavors! Fresh herbs like mint or basil can elevate the dish. They add freshness that balances the spice. Try adding sesame seeds for crunch. You can also use crushed peanuts for a nutty texture.
For a touch of sweetness, drizzle honey or agave syrup. This helps to tone down the heat from Sriracha. Adding these little twists can make your salad unique and exciting.
Storage Info
Best Storage Practices
To keep your spicy sesame cucumber salad fresh, store any leftovers in an airtight container. This step is vital. It prevents moisture loss and keeps the salad crisp. If you use a bowl, cover it tightly with plastic wrap or a lid. Make sure to eat the salad within a few days for the best taste.
Shelf Life
In the fridge, this salad lasts about three days. After that, it may lose its crunch and flavor. Signs of spoilage include a mushy texture or off smell. If you notice these signs, it’s best to toss it out. Freshness is key to enjoying this dish.
Serving After Storage
When you’re ready to eat the salad, refresh it by tossing it gently. This helps mix the flavors again. If it seems dry, add a splash of sesame oil or rice vinegar to enhance the taste. Serve the salad chilled for the best experience. A cold dish is always more refreshing!
FAQs
What is Spicy Sesame Cucumber Salad?
Spicy Sesame Cucumber Salad is a fresh and zesty dish. It features crunchy cucumbers tossed in a spicy sesame dressing. This salad has roots in Asian cuisine, often served as a side dish. The mix of sesame oil, soy sauce, and Sriracha adds bold flavors. Enjoying this salad is a great way to cool off on hot days.
How do I make the salad less spicy?
To tone down the heat, reduce the Sriracha amount. Start with a half tablespoon instead of a full tablespoon. You can also add more cucumber and dressing. Mixing in a bit of honey or sugar can help balance the spice. Another option is to use plain sesame oil instead of the spicy Sriracha.
Can I prepare this salad in advance?
Yes, you can make this salad ahead of time. Prepare it up to a day in advance. Store it in an airtight container in the fridge. The flavors will meld, making it even tastier. Just wait to add the sesame seeds and cilantro until you serve it.
What are some common substitutions?
If you have dietary restrictions, there are easy swaps. Use tamari instead of soy sauce for a gluten-free option. Swap rice vinegar for apple cider vinegar if needed. You can also try different oils like avocado oil. For a milder flavor, use plain cucumbers and skip the Sriracha.
How can I make this salad a meal?
To turn this salad into a full meal, add protein. Grilled chicken or shrimp works well. You can also toss in chickpeas or tofu for a vegetarian option. Adding cooked quinoa or brown rice gives it more bulk. This makes the dish filling and satisfying while keeping it refreshing.
This blog post shared a simple recipe for Spicy Sesame Cucumber Salad. We explored the ingredients, step-by-step instructions, and storage tips. Each part helps you make this dish flavorful and fresh. Remember, you can adjust spice levels and try new ingredients for variety. Experiment with different dressings and toppings to make it your own. Enjoy your delicious salad, whether as a side or a main dish. Happy cookin

Spicy Sesame Cucumber Salad
Ingredients
- 3 large cucumbers, thinly sliced
- 2 tablespoons sesame oil
- 1 tablespoon rice vinegar
- 1 tablespoon soy sauce
- 1 teaspoon sugar
- 1 tablespoon Sriracha (or to taste)
- 2 teaspoons toasted sesame seeds
- 3 green onions finely chopped
- Fresh cilantro leaves, for garnish
- Sea salt, to taste
Instructions
- Prepare the Cucumbers: Start by thoroughly washing the cucumbers under cold water. Using a sharp knife or a mandoline, slice them thinly, aiming for uniform thickness to ensure even flavor absorption. Place the sliced cucumbers in a large mixing bowl.
- Make the Dressing: In a separate small mixing bowl, combine the sesame oil, rice vinegar, soy sauce, sugar, and Sriracha. Whisk the mixture together until well blended. Taste and adjust the amount of Sriracha depending on your desired spice level.
- Combine: Drizzle the prepared dressing all over the cucumber slices in the large bowl. Use your hands or salad tongs to gently toss the cucumbers, ensuring that each slice is coated evenly with the flavorful dressing.
- Add Toppings: Sprinkle the toasted sesame seeds and finely chopped green onions over the top of the cucumber salad. Toss gently once more to incorporate these ingredients without bruising the cucumbers.
- Marinate for Flavor: Allow the salad to sit at room temperature for about 10-15 minutes. This resting time helps the flavors to meld beautifully, enhancing the overall taste of the dish.
- Final Touches: Just before serving, taste the salad and sprinkle in sea salt as needed to enhance the flavors. Garnish with a generous handful of fresh cilantro leaves for added color and aroma.

. To start, you need to preheat your grill or oven. If you choose to grill, set it to medium-high heat. This will help create a nice char on the corn. If baking sounds better, preheat your oven to 400°F (200°C). Both methods work well, giving you tasty corn. Next, prepare the garlic butter mixture. In a mixing bowl, combine melted unsalted butter, minced garlic, smoked paprika, sea salt, and black pepper. Whisk this mix together until all the ingredients blend well. The aroma will fill your kitchen, making it hard to wait for the corn! Now, it’s time to coat the corn. Take each ear of corn and brush it with your garlic butter mix. Make sure to cover every kernel. This ensures each bite bursts with flavor. For grilling, place the corn on the grill grates. Rotate it every 2-3 minutes until charred and tender, about 10-12 minutes total. If baking, wrap the corn in aluminum foil and bake for 20-25 minutes, turning halfway. After cooking, sprinkle grated Parmesan cheese on top while it’s still hot. Optionally, drizzle with fresh lemon juice for added flavor. Finally, garnish your corn with chopped parsley for a bright finish. Enjoy your Garlic Parmesan Corn on the Cob! For a complete guide, check out the Full Recipe. Grilling corn on the cob can be fun and easy. First, soak the husked corn in water for 15 minutes before grilling. This helps keep the corn moist. When you're ready, heat your grill to medium-high. Place the corn directly on the grates. Rotate the corn every 2-3 minutes. This gives it even cooking and a nice char. In about 10-12 minutes, the corn will be bright and tender. For the best garlic flavor, use fresh garlic. Mince the cloves finely to release the oils. Mix it well with the melted butter before brushing it on the corn. If you want a stronger taste, let the garlic sit in the butter for a bit. This helps the flavors blend. You can also add a touch of garlic powder if you like more depth. If you prefer a bit of heat, add a pinch of cayenne pepper to your garlic butter. For those who enjoy a milder taste, skip the pepper entirely. You can also adjust the smoked paprika amount. Start with less, then taste as you go. Everyone has different spice levels, so make it your own. Remember, you can always add more spice, but you can’t take it out! For the full recipe, check out the Garlic Parmesan Corn on the Cob section. {{image_4}} To change up the flavor, you can add more spices. Try adding chili powder for heat. You can also mix in some Italian herbs, like oregano or basil. They give a fresh lift. If you love herbs, fresh cilantro is a great choice. Just chop it fine and add it to your garlic butter mix. This will make your corn taste even better! Parmesan is great, but other cheeses can work too. For a creamier taste, use feta cheese. It adds a nice tang. If you want something sharper, try aged cheddar. It gives a bold kick. You can even use vegan cheese if you prefer. Just make sure it melts well. Each cheese choice will give your corn a unique twist. Serving corn on the cob can be fun and playful. Try cutting the corn into smaller pieces for easy sharing. You can also serve it on skewers for a fun touch. Drizzle it with a spicy sauce for extra flavor. If you want a fancy look, sprinkle some microgreens on top. They add color and freshness. For the full recipe, check out the detailed steps to make this dish shine! After enjoying your Garlic Parmesan Corn on the Cob, you may have some left. It’s best to store it in an airtight container. Let the corn cool to room temperature first. Wrap each ear in plastic wrap or foil for extra protection. This keeps it fresh and tasty for later. Store the container in the fridge. It can last about 3 to 4 days. When you’re ready to enjoy the leftover corn, reheating it is simple. You can use the microwave, grill, or oven. For the microwave, place the corn on a plate and cover it with a damp paper towel. Heat in short bursts of 30 seconds. Check to see if it’s warm. If using the grill, wrap the corn in foil to avoid drying out. Heat for about 5 to 7 minutes. For the oven, preheat to 350°F (175°C) and bake wrapped corn for 10 to 15 minutes. Freezing is a great option if you want to save the corn for a long time. Husk the corn and cut the kernels off the cob if you prefer. Place the kernels in a freezer bag, removing as much air as possible. Label the bag with the date. You can also freeze whole cobs. Wrap each cob in plastic wrap and place it in a freezer bag. The corn can last up to 6 months in the freezer. When you’re ready to use it, thaw in the fridge overnight before reheating. You can pair Garlic Parmesan Corn on the Cob with many easy side dishes. Some great options include: - Grilled chicken or fish - Fresh salad with vinaigrette - Coleslaw for crunch - Roasted potatoes for heartiness - Tomato and mozzarella salad for freshness These sides complement the sweet, buttery flavor of the corn. They also create a colorful plate. Yes, you can make Garlic Parmesan Corn on the Cob in the oven. Preheat your oven to 400°F (200°C). Wrap the corn tightly in aluminum foil to keep it moist. Bake for 20-25 minutes. Turn the foil halfway through cooking. This method gives you tender corn, full of flavor. To prevent the corn from sticking to the grill, follow these tips: - Preheat the grill to medium-high heat. - Brush the grill grates with oil before placing the corn. - Make sure to coat the corn with the garlic butter mixture. This keeps it moist and adds flavor. - Rotate the corn every few minutes to avoid sticking. These steps help you achieve perfectly grilled corn every time. Enjoy your cooking! Making Garlic Parmesan Corn on the Cob is simple and fun. We covered the best ingredients, tools, and methods. Preheating is key, and the garlic butter really adds flavor. You learned grilling tips and how to customize with herbs or spices. Don't forget about storage and reheating for later. Enjoy your delicious corn, and share it with friends. Each bite can bring smiles, making it worth the effort. Now, get cooking!](https://goldendishy.com/wp-content/uploads/2025/07/bd43f489-c25e-441e-8123-0082a4d55c21-768x768.webp)
![- 1 pound fresh asparagus, trimmed - 3 tablespoons unsalted butter - 2 tablespoons freshly squeezed lemon juice - Zest of 1 lemon - 2 cloves garlic, finely minced Fresh asparagus is key to this dish. When you choose asparagus, look for bright green stalks that feel firm. The butter adds richness, while the lemon juice and zest bring a bright, zesty punch. Garlic gives a nice aroma and flavor, making the dish exciting. - Salt and freshly ground black pepper, to taste Salt and pepper enhance all the flavors. Use good-quality salt for the best taste. Freshly ground black pepper adds warmth and a bit of spice. - 1 tablespoon fresh parsley, finely chopped (for garnish) Fresh parsley adds color and freshness. You can also use lemon wedges for extra zing. They allow you to customize how much lemon flavor you want. These small touches make the dish look and taste even better. For the full recipe, check out the details above! Start by washing the fresh asparagus. Rinse it well under cool water to remove dirt. Next, trim the tough ends. You can snap them off or cut 1-2 inches from the bottom. This makes the asparagus more tender and easy to eat. In a large skillet, melt the unsalted butter over medium heat. Watch for the butter to bubble and foam; this means it is hot enough. Once it is ready, add the minced garlic. Cook the garlic for about 30 seconds and stir often. It should smell great but not turn brown. Brown garlic can taste bitter. Now, add the trimmed asparagus to the skillet. Toss it gently in the garlic butter. Make sure each piece gets coated well. Sauté the asparagus for 4-6 minutes. Turn it with tongs so it cooks evenly. You want it bright green and still a bit crisp. Once cooked, drizzle the lemon juice over the asparagus and sprinkle the zest on top. Season with salt and black pepper. Toss everything together to mix the flavors. Finally, transfer the asparagus to a serving dish. Garnish with chopped parsley for a lovely look. For the complete recipe, check the [Full Recipe]. To cook asparagus just right, start with fresh, vibrant stalks. Look for asparagus that is firm and bright green. Trim the ends, as they can be tough. When cooking, aim for a tender yet crisp texture. Sauté for 4 to 6 minutes. The color should become a vivid green. If you want to test doneness, simply pierce a stalk with a fork. It should be easy to pierce but still hold its shape. If you're out of any ingredients, don't worry! You can swap unsalted butter for olive oil. This will give a different flavor but still taste great. For lemon juice, you can use lime juice instead. If you lack fresh garlic, try garlic powder. Use half the amount, as it's stronger. Fresh parsley can be replaced with basil or cilantro for a fun twist. These substitutions keep the dish flavorful while using what you have. How you present your dish matters! Arrange the asparagus neatly on a white platter. This will highlight the bright green color. For a pop of color, add lemon wedges around the sides. This not only looks nice but also invites guests to add more lemon. You can sprinkle extra parsley on top for a fresh look. A simple, clean presentation makes your lemon butter asparagus look gourmet. {{image_4}} You can make Lemon Butter Asparagus a full meal by adding protein. Chicken or shrimp works well. For chicken, use thin strips and sauté them in the butter first. Cook until they turn golden brown. Then, add the asparagus and follow the recipe as usual. For shrimp, add them after the garlic. Cook until they turn pink, then toss in the asparagus. This adds flavor and makes it more filling. To spice things up, add red pepper flakes. Just a pinch can bring a nice kick. You can mix them in with the garlic for a burst of heat. If you love bold flavors, try adding lemon zest or herbs like thyme or basil. These add depth and make the dish more exciting. Feel free to mix in other seasonal vegetables. Cherry tomatoes, bell peppers, or snap peas all pair nicely with asparagus. Add them in the skillet after the garlic to keep them fresh. This not only enhances the taste but also boosts the nutrition of your dish. For the full recipe, check out the details above. After enjoying your Lemon Butter Asparagus, you might have some left. Store it in an airtight container. Keep it in the fridge for up to three days. The asparagus will stay fresh, but it may lose its crispness over time. To reheat, use a skillet over medium heat. Add a splash of water or a bit of butter. This helps keep the asparagus moist. Cook for about 3-4 minutes. Stir occasionally until warm. You can also use a microwave. Heat in 30-second bursts until hot. Freezing is a great option if you want to save this dish for later. Start by blanching the asparagus for 2-3 minutes in boiling water. Then, cool it quickly in ice water. Once cool, drain and pat dry. Place it in a freezer-safe bag, removing as much air as possible. It can stay frozen for up to three months. When you're ready to eat, thaw it in the fridge overnight before reheating. Yes, you can use frozen asparagus. It is a great option if fresh asparagus is not available. Just remember to thaw it first. Drain any excess water before cooking. You may need to adjust cooking time. Frozen asparagus cooks faster, so keep an eye on it. Aim for a tender yet crisp texture. Lemon Butter Asparagus pairs well with many dishes. Here are some ideas: - Grilled chicken - Pan-seared fish - Quinoa or rice - Pasta with olive oil - A fresh salad These options balance the flavors and add variety to your meal. Making lemon butter sauce is simple. Here’s how: 1. Melt butter in a pan over medium heat. 2. Add minced garlic and sauté until fragrant. 3. Stir in freshly squeezed lemon juice and zest. 4. Season with salt and pepper. This easy lemon butter sauce elevates many dishes, not just asparagus. For the full recipe, refer to the earlier sections. In this post, we covered everything you need for Lemon Butter Asparagus. I shared the fresh ingredients, pantry staples, and optional garnishes. We went through step-by-step instructions to prepare and cook each part. Tips and tricks helped you perfect your dish and suggested tasty variations. Finally, I gave you storage info and answered common questions. Embrace this dish, and enjoy your cooking adventure!](https://goldendishy.com/wp-content/uploads/2025/07/9c4cbd12-069a-483d-8240-a9afe0533cf0-768x768.webp)